Ultimate Guide to Fallen Tree or Debris Damage
Last updated: Feb 28, 2026
Introduction to Fallen Tree or Debris Damage
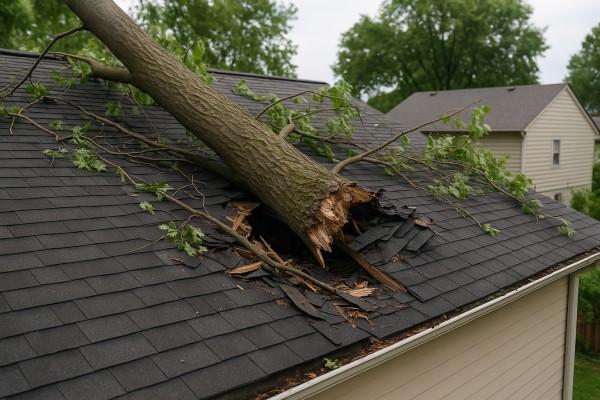
Fallen trees, large limbs, and storm debris can strike roofs with little warning and cause a range of problems—from chipped shingles to visible leaks. Even if you don't see water inside right away, hidden damage can worsen quickly with rain, wind, or freezing temperatures. The good news: with calm assessment and practical steps, you can protect your home, minimize cost, and plan safe, effective repairs.
Is it urgent or common?
- Urgent signs: active leaks, sagging roof sections, exposed decking, or a tree limb bearing on the roof. If there's any risk of collapse or the limb is on electrical lines, call emergency services and your utility company first.
- Common scenarios: storm debris sitting on shingles, gutters, or flashing; minor shingle lift or granule loss; wind-blown branches denting the roof surface. These situations are frequent after storms and usually manageable with prompt inspection and repairs.
What counts as debris damage?
- Visible impact on shingles or roofing material (missing, cracked, or curled shingles).
- Exposed underlayment, flashing, or roof deck from lifted or punctured roofing.
- Damaged or displaced flashing around vents, chimneys, or skylights.
- Clogged, bent, or damaged gutters that can cause water back-up and roof edge rot.
- Debris wedging against the roof surface or pressing on edges that could abrade or gouge the material.
Quick safety checks
- From the ground, look for obvious hazards: hanging limbs, loosened shingles, or pooling water near penetrations.
- If you must be near the roof edge, wear sturdy boots and avoid stepping on fragile areas. Never climb onto a roof after a storm without proper safety equipment.
- Photograph damage from ground level and, if safe, use a zoomed lens to capture problem areas for your records.
- Do not attempt major debris removal or roof repairs yourself—this can cause further damage or injury.
- If you notice a leak, place a temporary container under it and protect interior belongings, but avoid delaying professional assessment.
High-level next steps
1. Document the damage with clear photos and notes (where, what, when).
2. Temporarily protect vulnerable areas if safe to do so (tarps or plywood over exposed sections, avoiding live electrical sources).
3. Schedule a professional roof inspection with a licensed roofer or contractor who handles storm damage.
4. Contact your insurer to understand coverage, required photos, and claim steps.
5. Create a repair plan with your roofer: assess decking integrity, flashing condition, and gutter systems.
6. Plan for permanent repairs, including potential replacements if structural components show damage.
What to expect during the inspection
- The roofer will review the roof surface, flashing around penetrations, and the soffit/gutter area for water entry paths.
- They'll check the deck and insulation beneath the shingles for moisture damage or rot.
- Expect professional recommendations: temporary protection needs, repair versus replacement decisions, and an estimated timeline and cost.
- If damage extends beyond the roof (attic, fascia, or interior ceilings), a broader assessment may be advised to prevent further problems.
Determining Whether a Fallen Tree or Debris Damage Constitutes an Emergency
- Downed power lines, gas smell, or the presence of electrical hazards near debris.
- Roof or structural elements visibly sagging, bending, or cracking.
- Active water intrusion: dripping from ceiling, wet insulation, or visible leaks in the attic or living spaces.
- A large tree, limb, or heavy debris resting on the roof, chimney, or vents, with a risk of shifting during wind.
- Cracking, popping, or shifting sounds from the roof or attic, especially after a storm.
- Rapid weather changes that could cause debris to shift or cause further damage.
- Call a roofer immediately if there is immediate danger to life or property, such as a tree or branch bearing on the roof or skylight and risk of collapse.
- Call a roofer immediately if water is actively leaking into the home or attic after the damage occurs.
- Call a roofer immediately if the damage involves structural components, exposed framing, or a large area of missing shingles.
- Call a roofer immediately if debris is contacting electrical lines or a gas line, or you smell gas.
Monitor if
- Monitor if the storm has passed and debris is not actively shifting, but still resting on the roof.
- Monitor if there are only minor signs of leakage or no leaks yet inside the home.
- Monitor if conditions are calm enough to observe from ground level without climbing on the roof.
- Monitor if the area around the house feels stable and there is no immediate risk of debris moving.
Can wait if
- Can wait if the damage is cosmetic only and there is no leakage or visible movement of debris.
- Can wait if the roof remains dry and the interior shows no signs of water intrusion.
- Can wait if you can schedule a professional assessment within 24–48 hours without risking further harm.
Quick steps to secure and document (do these as soon as it's safe)
1. Stop and reassess from a safe distance. Do not go onto a damaged roof or into a hazardous area.
2. Keep people and pets away from the affected area; mark the zone if needed to prevent entry.
3. If safe, place a temporary tarp or plastic sheeting on small, accessible exposed areas from the ground. Secure with heavy-duty rope or weights—do not climb on wet or unstable surfaces.
4. Photograph the damage from multiple angles from ground level: roofline, debris on the roof, attic signs of leaks, and interior water intrusion. Note date, time, and weather.
5. Contact your insurer to report the incident and start a claim; inform the roofer of any urgent needs or access limitations.
6. Schedule a professional roof inspection as soon as conditions permit, even if you've placed protective measures, to prevent secondary damage and to plan temporary or permanent repairs.
Common Causes of Fallen Trees and Debris Damage
Weather and Seasonal Stress
- High winds during storms, squalls, or hurricanes can snap limbs or uproot trees that are already weakened.
- Heavy snow and ice loads add significant weight to branches and crowns; wet snow is especially harsh.
- Rapid temperature swings and freeze-thaw cycles create cracks in wood and bark, reducing structural integrity.
- Saturated or drought-stricken soils loosen or shrink root zones, making trees more susceptible to failure in wind events.
Tree Health and Structural Weakness
- Disease and decay, including fungal infections and internal rot, hollow out the core and weaken the trunk.
- Dead, dying, or hollow limbs are more likely to fail when stressed by wind or weight.
- Pest infestations (borers, beetles, termites) compromise wood strength and wood-to-wood connections.
- Weak branch unions, included bark, or poor crotch angles create leverage points that can snap under load.
Root and Soil Conditions
- Saturated soils from heavy rainfall or storms reduce rooting strength and increase the chance of uprooting.
- Shallow or compromised root systems, often from prior construction, soil compaction, or improper planting depth, lower stability.
- Soil heave from frost or drought-related shrink-swell cycles can disturb the root plate.
- Nearby digging, trenching, or foundation work damages roots and changes how a tree sits in the ground.
Maintenance and Pruning Errors
- Over-pruning, severe reductions in canopy, or improper cuts remove natural ballast and wind resistance.
- Failing to remove deadwood leaves the tree top-heavy and more vulnerable to wind load.
- Incorrect pruning techniques can create weak points where limbs break or separate.
- DIY cabling or bracing done poorly can introduce stress risers that fail under wind or load.
External Factors and Debris Loading
- Storm-generated debris—limbs, shingles, tiles, or metal—adds impact and weight pressure on the roof and eaves.
- Wind-driven debris from neighboring trees or properties can repeatedly strike and compromise roofing materials.
- Utility work, vehicle impacts, or nearby tree removals can destabilize trees and shift load paths.
- Accumulated debris on the roof, gutters, and valleys traps moisture and snow, increasing ice dam risk and weight.
Seasonal Debris and Roof Load
- Leaves, needles, seeds, cones, and other organic debris collect on roofs and in gutters; wet debris becomes heavier during rain or thaw.
- Debris retention traps moisture against roofing materials, fascia, and underlayment, accelerating deterioration in vulnerable spots.
- Clogged drainage paths force water to back up and pool at eaves, promoting ice formation in winter and rot in milder seasons.
Warning signs to monitor (quick checks)
- Leaning or tilting trunks, visible cracks in the trunk or major limbs, or sudden changes in the tree's posture after storms.
- Loose or cracked branches, especially on the windward side or near the roofline.
- Mushy, crumbly, or hollow areas in the trunk, or a noticeable odor of decay.
- Soils that are unusually soft around the base, exposed roots, or exposed root plates.
Quick steps homeowners can take to reduce risk
1. Inspect trees for obvious signs of damage after storms and before severe weather, focusing on trunks, forks, and major limbs.
2. Schedule a professional arborist evaluation for trees with visible defects, proximity to the house, or prior storm damage.
3. Keep roof lines clear of loose branches and remove roof debris regularly to reduce load and contact risks.
4. Improve drainage around the tree base and avoid soil compaction in the root zone.
How Roof Materials Affect Damage from Fallen Trees and Debris

- Punctures and tears where a branch or heavy debris strikes, exposing the underlayment to moisture.
- Granule loss around impact zones accelerates aging and can mask underlying damage.
- Missing or loosened shingles near impact points increase the risk of leaks, especially on slopes with heavy rain.
Wood shingles and shakes
- Cracks and splits are common after a blunt impact, and nails can loosen, allowing shingles to lift.
- Wood is porous; moisture from a hit can soak in, promoting rot or mold if water entry occurs.
- Shakes may fracture in larger sections, creating larger surface gaps that leak more easily.

- Dents and scratches from branches or debris; shallow dents may not leak but can corrode if paint is gouged.
- Heavy blows can deform panels or compromise seams, potentially loosening fasteners and causing leaks.
- Debris buildup along damaged seams or edges can trap moisture and accelerate corrosion over time.

- Extremely brittle; even modest impacts can cause hairline cracks or full tile fractures.
- Cracked or broken slate often leads to leaks along roof line or at the affected slope.
- Damage tends to concentrate at ridges and valleys where debris tends to land.

- Highly susceptible to cracking or breaking on impact; a single strike can take out multiple tiles.
- Broken tiles expose the underlayment and deck to weather, potentially causing leaks quickly.
- Heavy debris can cause tiles to shift or rock, creating uneven seams and additional breakage.
Composite or synthetic shingles/tiles
- Generally more impact resistant than some natural materials, but heavy debris can still crack or dent depending on the composition.
- Some products may have a protective top layer that shields against scrapes; once compromised, underlayment exposure follows.
- Replacement and color matching are often straightforward with composites, but compatibility varies by brand.
How to compare vulnerability at a glance
- Consider debris weight and thickness (branches vs. smaller twigs).
- Note roof slope (steeper roofs shed debris faster but can expose edges to more wind-driven impacts).
- Assess fastener exposure (shingles with exposed nails vs. concealed-fastener systems).
- Think about underlying layers (underlayment and decking) that become exposed after impact.
Quick checks after a debris strike (safe, practical steps)
1. Stay off the roof and keep a safe distance from damaged areas.
2. From the ground, look for missing, cracked, or displaced roofing materials.
3. Inspect visible flashing, gutters, and ridges for signs of damage or deformation.
4. Check for exposed underlayment or dark streaks, which can indicate moisture intrusion.
5. If you're unsure about the extent of damage, have a professional roof inspector evaluate the structure and flashing system.
A few practical notes
- The material's mass and how it's fastened to the roof play big roles in damage severity.
- Proactive maintenance (replacing worn shingles, securing loose flashing, cleaning debris) minimizes risk when a storm or tree falls.
- Some materials are easier to repair patch-by-patch; others may require full-panel or tile replacement to restore integrity.
The Risks of Ignoring Fallen Trees and Debris Damage
Hidden structural damage
- A heavy limb or pile of debris can stress roof decking, rafters, or trusses even if the surface looks intact.
- Cracks, warped framing, or loose fasteners may not be obvious from the ground but weaken the roof's ability to support loads.
- Over time, moisture seeping through cracks promotes rot, which further reduces structural integrity.
- A partially compromised frame can fail suddenly under wind, snow, or additional debris load.
Water infiltration and rot
- Torn underlayment, punctured decking, or gaps around penetrations create channels for rainwater.
- Leaks may travel into the attic, insulation, or ceilings, leading to hidden mold and musty odors.
- Mold and rot degrade insulation performance and raise heating or cooling costs.
- Wet wood dries slowly and can shrink, warp, or loosen fasteners, worsening leaks and gaps.
Pest and mold risks
- Damp, sheltered debris attracts insects, rodents, and other pests seeking cover.
- Mold spores can spread through attic spaces and into living areas, posing health risks.
- Prolonged moisture exposure weakens wood and invites further deterioration.
Safety hazards to you and your family
- Damaged sections can fail during a storm, creating collapse risk.
- Loose debris can shift or fall with wind, posing injury to anyone nearby.
- Temporary coverings (tarps, boards) can slip or blow away if not secured properly.
- Climbing on damaged roofs or stepping on unstable decking raises the risk of slips, punctures, or falls.
Fire and electrical hazards
- Dry leaves and branches near electrical equipment or heat sources can ignite under certain conditions.
- Water intrusion into electrical boxes or outlets raises shock and short-circuit risk.
- Debris that blocks vents or chimney outlets can cause heat buildup and fire hazards.
Insurance, permits, and long-term costs
- Delaying repairs can complicate insurance claims if the insurer questions neglect or improper maintenance.
- Hidden damage often becomes more expensive to fix later due to additional decking work or structural reinforcement.
- Local codes or HOA rules may require removal or remediation of hazardous debris; neglect can lead to fines or mandated work.
- Relying on quick, cosmetic fixes rarely resolves the root problem and may mask safety risks.
Safe inspection and action steps
1. Do not walk on a visibly damaged roof or decking; back away to avoid triggering a collapse.
2. From the ground, look for daylight in the attic, sagging sections, missing shingles, or warped boards.
3. Photograph the damage from multiple angles and note when the impact occurred.
4. Clear only loose debris from the perimeter if it's safe to do so; avoid lifting heavy logs or limbs yourself.
5. Schedule a licensed roofing contractor or structural professional to assess safety and scope of repair.
6. If leaks are present, place containers to catch water and protect valuables; do not attempt full temporary repairs without professional guidance.
How Fallen Trees and Debris Damage Are Diagnosed
Safety first and foremost. Debris can hide damage below the surface, so take a measured, cautious approach. If you're unsure about safety, stop and call a professional. For homeowners who want a clear sense of how the diagnosis unfolds, here's how it's typically done.
Exterior visual assessment
- Look from the ground with binoculars for obvious issues: missing or severely damaged shingles, torn tabs, curled shingles, or edges that look lifted.
- Check the roof line and gutters for granule buildup, which can indicate shingle wear or impact damage.
- Inspect visible flashing around chimneys, vents, and skylights. Damaged or displaced flashing can point to leaks started by a tree strike or heavy debris.
- Examine fascia boards and soffits for cracks, breakage, or rot. Warped wood in these areas often signals water intrusion from a puncture or wind damage.
- Note signs around the tree base and branches: bark removal, bark marks on shingles, or fresh impact marks on metal components like drip edges or vent caps.
On-roof indicators (only if you can do so safely)
- Look for soft spots or sagging decks when stepping carefully. Soft spots suggest structural or plywood damage beneath the shingles.
- Identify cracked, missing, or torn shingles and exposed underlayment.
- Check vent boots, flashing corners, and seam joints for punctures or deformation.
- Pay attention to mismatched tilting or raised edges that indicate wind uplift or impact damage.
- Take photos from multiple angles to document damaged areas for claims and repair planning.
Interior signs (attic and ceilings)
- Water stains, darkening, or damp insulation in the attic typically point to roof penetrations or compromised decking.
- Bright daylight visible through attic boards or rafters indicates holes that allow moisture and heat to penetrate.
- Soft, sagging areas of the ceiling or attic floor can reveal structural damage or prolonged leaks.
- Musty odor or visible mold growth is a red flag that moisture has penetrated and persisted.
- Visuals from ground level plus a careful, non-rushed roof inspection can reveal most obvious damage.
- Infrared or thermal imaging (often done by pros) highlights hidden moisture that a standard visual check might miss.
- A moisture meter can confirm elevated moisture in decking, insulation, or sheathing behind the interior ceiling or attic.
- Photographs and note-taking help track the extent and location of damage for insurance and repair planning.
Step-by-step diagnostic process (homeowner-friendly)
1) Prioritize safety: secure pets and kids, avoid wet or icy areas, and do not stand under loose shingles or near unstable edges.
2) Do a ground-level exterior check with binoculars; mark suspect spots on the roof and around damaged tree zones.
3) If safe, perform a cautious on-roof check of accessible areas, focusing on missing shingles, torn flashing, and suspect deck conditions.
4) Inspect the attic: look for leaks, staining, and insulation moisture; identify the most significant intrusion points.
5) Correlate exterior findings with interior signs to map the leak's source to a specific roof section or penetration.
6) Photograph evidence and note the timing (when wind storms or tree impacts occurred) to support repairs or claims.
7) Decide if a repair, partial replacement, or full roof replacement is warranted based on the damage pattern, age of the roof, and your local climate.
What a professional diagnosis adds
- A roofer will use safe fall protection and, when appropriate, fall-arrest gear to inspect difficult areas.
- They'll perform targeted moisture testing and, if needed, temporary containment to prevent further water intrusion during the diagnosis.
- A contractor typically provides a formal assessment with a repair scope, cost estimate, and an evidence-backed determination of whether water intrusion came from debris impact, wind uplift, or a combination of factors.
- If ongoing tree movement or proximity poses risk, professionals may recommend temporary stabilization or removal plans before any repair work begins.
- A tree-related diagnosis often leads to a combined plan: repair the roof and address surrounding tree clearance to minimize future damage.
Repair Options for Fallen Trees and Debris Damage
Temporary fixes
- Prioritize safety: if there are loose branches or active leaks, keep people and pets away from the damaged area. Do not attempt to climb onto a wet or unstable roof.
- Stop the leaks short-term: apply a cling-style roofing tape or roofing cement to seal small gaps until you can schedule a proper repair. Use materials rated for outdoor use and follow product directions.
- Cover the opening: place a heavy-duty tarp or roofing membrane over the damaged section. Secure edges with roofing nails or screws through a piece of wooden battens, then weigh down the corners with bricks or sandbags to deter wind uplift.
- Clear the area below: remove debris from gutters and the ground around the roof edge to prevent clogging and water backup.
- Document damage: take clear photos from multiple angles for insurance and contractor reference. Note date, weather, and any new leaks you observe.
- Schedule a professional assessment: temporary fixes are not a substitute for a professional evaluation. If you're unsure about load on the roof or if structural elements look compromised, call in a licensed roofer promptly.
Minor repairs
- Scope: small areas of damaged shingles, light flashing issues, or minor leaks that don't affect decking or structure.
- What to do:
1) Inspect and mark: locate all damaged shingles, nail pops, or lifted edges. Check underlying underlayment for tears.
2) Replace loose or damaged shingles: carefully lift surrounding shingles, remove the damaged one, install a new shingle with matching nails, and reseal with a dab of roofing cement under the tab.
3) Re-nail loose shingles: drive nails just above the tab row to secure any lifted shingles, keeping nails flush and avoiding overdriving.
4) Tuck and seal flashing: inspect vents, chimney, and valley flashing. Re-secure with appropriate flashing nails and seal joints with roofing cement or flashing tape where needed.
5) Seal small gaps: apply a thin bead of roofing cement along seams and nail heads to prevent water intrusion.
- Materials: matching shingles, corrosion-resistant nails, roofing cement, flashing tape, and an appropriate sealant for penetrations.
- Safety and limits: if you see widespread deck exposure, long flashing runs, or moisture behind the shingles, skip to partial replacement or full replacement. For any doubt, involve a pro.
Partial replacement
- When to choose this: damage spans a larger area than a few shingles but you're not dealing with a full roof collapse. This is common after a severe storm with localized impact zones.
- Steps:
1) Assess the scope: map out the damaged zone, including sheathing/deck exposure and underlayment condition.
2) Remove damaged materials: carefully lift and remove damaged shingles, underlayment, and any compromised flashing in the affected area.
3) Deck and underlayment: replace any compromised plywood or OSB sections; install new underlayment across the patch.
4) Install new materials: lay down new underlayment, align and install matching shingles in the correct pattern, and re-flash edges with matching metal or vinyl flashing.
5) Seal and test: apply sealant at joints and inspect for wind uplift at the patch edges. Check for leaks after a rain.
- Considerations: color and shingle profile should match the existing roof for a cohesive look. Budget and warranty implications are important; partial replacements may still leave visible seams.
- Safety note: partial replacement can involve working at heights and near damaged decking. If you're not comfortable, hire a pro to ensure proper ventilation, nailing patterns, and flashing integrity.
Full roof replacement
- When to choose this option: extensive damage across multiple zones, compromised decking, or recurring leaks that can't be traced to a localized fix. Also necessary if the roof is near end-of-life or the underlayment has deteriorated.
- Process overview:
1) Pre-inspection and planning: assess structural integrity, ventilation, attic insulation, and insulation gaps. Obtain any required permits and coordinate with the insurance carrier.
2) Deck evaluation: remove all roofing material down to the deck in worst-affected sections. Replace any rotten or warped decking.
3) Underlayment and ventilation: install new underlayment, repair or upgrade ventilation and insulation as needed to meet current codes.
4) Installation: install new shingles or roofing system per manufacturer guidelines, including starter strips, alignment, and flashing at all penetrations.
5) Finishing touches: install new ridges, vents, and drip edge. Clean site thoroughly; perform a final inspection to confirm waterproofing and aesthetics.
- Materials and options: consider impact-resistant or higher-performance shingles if you live in severe weather areas; discuss warranty coverage, life expectancy, and color-matching with your roofer.
- Budget and timelines: full replacements are the most robust fix but take longer and cost more. Ensure you receive a written estimate with scope, material specs, and warranty details.
- Safety and oversight: a full replacement is best handled by a licensed professional. Proper scaffold or ladder setup, fall protection, and safe disposal of old materials are essential. If any deck or framing shows signs of moisture damage or mold, address those issues first.
Typical Costs to Repair Damage from Fallen Trees or Debris
Minor repair description and cost
- What it covers: A small patch of damaged shingles, minor flashing issues, light leaks, and surface cosmetic checks.
- Typical tasks: Inspect from ground or ladder; replace 3–8 damaged shingles; reseal or adjust flashing around penetrations; patch underlayment; apply temporary tarps if rain is forecast.
- Estimated cost: $200–$1,000.
- When it escalates: If moisture has already penetrated into attic orsheathing, or if there's hidden rot, the price can rise.
Moderate repair description and cost
- What it covers: Larger affected area, several shingles, some underlayment, minor decking exposure, or edge damage near vents or skylights.
- Typical tasks: Remove and replace 10–40 shingles; repair or replace underlayment; reseal or reflash penetrations; address small rotted deck sections if found; restore ventilation paths.
- Estimated cost: $1,000–$5,000.
- Note: If deck or sheathing rot is found during repair, expect higher costs and potential framing work.
Major repair description and cost
- What it covers: Significant structural intrusion or widespread damage affecting substantial roof areas, deck, or framing; may involve gutters, fascia, chimney flashing, and multiple penetrations.
- Typical tasks: Remove and replace major sections or the full roof; replace damaged deck boards and rafters as needed; install new flashing, gutters, and fascia; repair chimney or vent flashing; ensure proper ventilation and insulation; disposal and permit coordination.
- Estimated cost: $5,000–$20,000+, with full roof replacement often in the $8,000–$40,000 range depending on roof size, slope, and material.
- Note: Insurance adjustments and material choice (asphalt, metal, tile) can substantially shift final pricing.
What factors affect cost
- Roof size
- Access (safe staging, ladder placement, and ease of reaching the damaged area)
- Material type (asphalt shingles vs. metal vs. tile)
- Extent of damage (shingle-only vs. deck/rafters involvement)
- Local labor rates
Steps to plan and estimate repairs
1. Document damage from ground level with photos and notes.
2. Prioritize temporary protection (tarps or boards) to minimize weather intrusion.
3. Obtain written estimates from 3–4 licensed roofers; ask for scope and warranty details.
4. Confirm whether decking, flashing, gutters, and ventilation are included in the bid.
5. Check with your insurer about coverage and required documentation.
How Long Should You Wait Before Addressing Fallen Trees or Debris Damage?
- If you see downed power lines, sparking, or a large branch hanging from the roof, keep everyone away and call emergency services or the utility company first.
- Do not climb on a damaged roof or try to remove tree limbs yourself while conditions are unstable.
- If a living space is actively leaking, place containers to catch water and move furniture and valuables to higher ground.
Short-term window (6-24 hours)
- If the area around the damage is safe, plan temporary protection to limit water intrusion and wind uplift.
- Use sturdy plywood or a roof tarp, anchored securely, to cover exposed sections of the roof or gutter lines. Avoid overexertion or risky ladder work; enlist a pro if needed.
- Take photos from ground level for your records. Document any visible sagging, cracks, or displaced shingles.
24-72 hours
- Weather permitting, arrange a professional assessment as soon as possible. A roofer or building contractor can confirm structural integrity and the extent of debris damage.
- Temporary repairs or tarping should be completed promptly to slow water intrusion and prevent further damage to attic spaces, insulation, and interior finishes.
- If interior leaks persist, place plastic sheeting or drop cloths on ceilings to catch drips and protect belongings.
Longer delays (3-7 days)
- The longer you wait, the higher the risk of hidden damage: wood rot, mold growth, insulation saturation, and weakened roof deck.
- Debris left on or around the roof can complicate future repairs and may lead to additional structural concerns if moisture accumulates.
- Weather windows may constrain access; plan with your roofer to secure a clear inspection and a repair plan as soon as conditions improve.
What happens if you wait: a timeframe-focused view
- 0-6 hours: Waiting increases risk of exposed electrical hazards, unstable branches, and sudden shifts that could worsen the damage.
- 6-24 hours: Delaying protection raises chances of interior water intrusion, ceiling staining, and early mold formation in the attic or upper floor.
- 24-72 hours: Each additional day can expand the scope of needed repairs and stress the roof deck, potentially necessitating more substantial replacement work.
- 3-7 days: Procrastination often leads to moisture-related damage to insulation, framing, and even finished interiors, pushing costs higher and scheduling harder.
- 1+ weeks: Prolonged exposure may trigger secondary issues like pests, mildew in HVAC systems, and more complex insurance adjustments.
Practical, homeowner-friendly steps
1. Safety first: keep people and pets away from damaged areas; avoid roof access unless you're a trained professional.
2. Protect where you can: cover open areas to minimize water entry and interior damage, if it's safe to do so.
3. Document everything: take clear photos of all damage from multiple angles; note dates and weather conditions.
4. Prioritize professional evaluation: contact a licensed roofer and, if trees are involved, an arborist for debris removal and structural assessment.
5. Plan for temporary vs. permanent work: distinguish between immediate stabilization (tarps/boards) and full repairs (shingle replacement, decking, or framing work).
Quick safety checklist before calling in help
- Check for live utilities in the vicinity and avoid those zones.
- Confirm roof access is safe or request a ground-level inspection if possible.
- Have your insurance information handy and prepare a brief damage summary for the contractor.
How This Problem Varies by Location & Climate
How This Problem Varies by Region & Climate within the United States
Fallen trees and wind-blown debris don't impact every roof the same way. Local weather patterns, storm types, and even the common tree species around your home shape both how often damage happens and how severe it tends to be. Here's what that looks like across the country.
- Regional patterns you'll see
- Northeast: Severe winter storms, freezing rain, and ice dams create heavy, frequent debris loads. Fallen branches and icing can bring sharp, wet debris that clogs gutters and soaks roofing edges.
- Midwest and Great Lakes: Rapid snow accumulation, crusted ice, and spring thaw produce heavy debris and elevated ice dam risk. Strong thunderstorms and derecho events can hurl branches and shingles alike.
- South (Gulf & Atlantic coasts): Hurricane season and tropical storms drive high-wind debris, salt spray, and coastal trees that snap in storms. Debris tends to be more wet and heavy, and salt-related corrosion can affect fasteners and metal edges.
- West (California to Rockies): Coastal winds, wildfires, and dune/wind-blown dust add unique debris loads. After wildfires, ash and burnt wood fragments can accumulate on roofs and valleys, while Santa Ana winds drive fast-moving branches.
- Pacific Northwest: Persistent rain and wind shear produce saturated branches and moss/lichen on debris, which can hold moisture against shingles and increase rot risk over time.
- Hail-prone regions (often the Great Plains): Hail damage creates pitted or cracked roofing surfaces and debris-heavy runoff that clouds gutters and valleys quickly.
- How climate affects debris type and damage
- Wet, heavy debris from storms increases load on eaves and gutters and can strain fascia boards.
- Dry, brittle debris from droughts or desert winds can crack shingles or tile and create sharp, hazardous shards.
- Ice, snow, and freezing rain add weight and can drive debris under flashing, leading to leaks.
- Salt and coastal exposure accelerate corrosion of metal components and fasteners, changing repair needs.
- Roof materials and regional fit
- Wind-heavy regions favor roofs with strong edge fasteners and wind-rated shingles or metal panels.
- Snow-prone areas benefit from steep slopes and roof assemblies that shed snow to reduce load, plus attic ventilation to minimize ice dam risk.
- Hail-prone zones perform best with impact-resistant shingles or tile and reinforced underlayment.
- Fire-prone regions should pair debris protection with ember-resistant vents and noncombustible accents.
Practical considerations by region
- Key priorities by climate
- Storm-savvy regions: Trim trees regularly, clear yard debris before storms, and inspect gutters for blockages after every big wind event.
- Snow-heavy regions: Ensure proper attic insulation, ventilation, and ice-guard along eaves; plan for snow shedding paths to minimize debris clogging.
- Coastal/wildfire zones: Maintain defensible space around the home, inspect roof intersections for embers, and check sealants for salt or ash exposure.
- Fire-season and drought areas: Watch for dry branches and pine needles accumulating on the roof; remove annually.
- Quick regional checks (step-by-step)
1) After a major storm, inspect for bent, cracked, or torn shingles and displaced flashing.
2) Look for leaf litter, branches, and pine needles clogging gutters and valleys.
3) Check attic insulation and identify any signs of moisture intrusion near debris tracks.
4) Assess trees for hazardous branches within a safe distance from the roof and plan timely trimming.
5) Review local wind, snow load, and hail risk to determine if fastereners or underlayment upgrades are warranted.
Quick regional guidance you can apply now
- If you're in a windy, storm-prone area: focus on securing loose debris, reinforcing edge fasteners, and ensuring a tight seal around penetrations.
- If you're in snow country: prioritize ice-guard installation, good attic ventilation, and debris-free roof drainage paths.
- If you're in a wildfire-adjacent zone: keep vents ember-resistant and clear of combustible debris near the roofline.
- If you're near the coast: rinse salt from metal components periodically and inspect for corrosion after storms.
Common, region-agnostic steps
- Maintain trees and remove high-risk branches.
- Keep gutters clear to prevent standing water and added weight.
- Inspect after any wind event, hail, or heavy rain for hidden damage under debris clusters.