Last updated: Apr 19, 2026
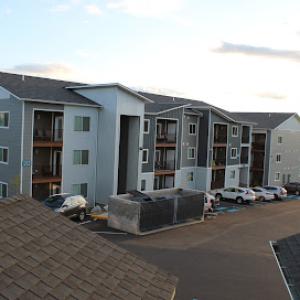
In this Palouse-hilled landscape, rolling neighborhoods are constantly shaped by drifting snow. Exposed rooftops catch wind-driven ice and accumulate uneven loads, especially on south and west exposures where sun exposure alternates with overnight freezes. That uneven loading strains shingles, edges, and chimney flashing, creating stress cracks and premature wear long before spring. If a roof looks uneven after a heavy storm or feels soft in spots along the eave, you're not imagining it-drift patterns are real here and they show up as bubble shapes, lifted shingles, or slipped flashings. You need to respect this local behavior: any unusual variation from year to year is a signal to inspect now, not later.
Winters in this area are cold, dry, and stubborn. What starts as a small ice dam at the gutter line can push water under shingles during the thaw, then refreeze, prying shingles and underlayment apart. The Palouse's spring moisture compounds the risk; wet conditions during tear-off or decking work can stall projects and invite further damage if drying times slip. The roof experiences expansion and contraction with every freeze-thaw swing, which widens existing gaps and accelerates deterioration around penetrations, vent flashings, and skylights. Your roof's life hinges on how well those vulnerable joints hold up through repeated cycles-ignore them and you'll pay in shorter intervals between replacements.
Replacement timing in Moscow is strongly affected by winter snow cover and spring wet conditions, which can delay tear-off, dry-in, and decking repairs. When the snow sits late into spring, crews face awkward access, higher risk of weather-related damage, and compressed schedules. If a roof over your home shows pronounced wear, plan with a contractor for a window that avoids the worst of the winter load while also not risking spring moisture setting in. Early coordination is essential; the window between the end of harsh weather and the first sustained wet spell is your best chance to complete a full tear-off, dry-in, and decking work without back-to-back interruptions.
When moisture finds its way beneath aging roof coverings, the Palouse's winter rhythm can be punishing. Freeze-thaw cycles push and pull at the underside of shingles and underlayment, and that constant expansion-contraction loosens fasteners and can expose weak decking. In homes with aging plywood or OSB, those cycles are less forgiving, and you may notice a gradual turn from minor loose areas to more pronounced movement underfoot as frost heave subtly lifts edges. After a heavy snowfall, the thaw begins to retreat and that lingering moisture can creep into rafter bays and attic spaces, amplifying hidden vulnerabilities. The result is a roof that looks reasonable from the street but carries a creeping risk of interior moisture and structural strain once spring arrives.
Heavy snowfall followed by thaw periods can reveal flashing weaknesses around penetrations and roof-to-wall transitions common on sloped homes. In practice, that means vent pipes, skylights, chimneys, and the intersection where the roof meets siding or brick face tend to be the first places where trouble shows up after winter. In the Palouse setting, accumulated snow sits along low-slope corners and dormers longer than you might expect, slowly pressing against flashing joints. When the sun returns and temperatures rise, that pressure turns into slow leaks if flashing has aged or was poorly sealed to begin with. The result is damp attic corners, spotted ceiling patches, and stubborn moisture that seems to reappear after every thaw. Regular inspection of these transition points, especially after major snow events, can be the difference between a quick repair and a more invasive fix.
Spring rains in the region can turn small winter roof breaches into visible interior leaks, making post-winter inspections especially important. As snowmelt saturates the roof deck and migrates toward vulnerable seams, small gaps become channels for water to track down underlayment and into eaves, soffits, or ceiling planes. If a roof has experienced freeze-thaw cycling, those tiny openings can expand where fasteners have loosened or where shingles have delaminated. That means you might notice the first signs of a leak with the first heavy rain of spring, even if winter appeared uneventful. A thorough post-winter check that targets suspect valleys, joints, and vents will help identify issues before the rain intensifies and interior damage compounds.
Asphalt shingles remain a practical fit for many Moscow homes, but cold-weather brittleness and freeze-thaw wear can shorten service life if ventilation and underlayment are weak. When you're evaluating an asphalt roof in this climate, check that the attic is properly vented to move humidity and heat up from the living space. A solid underlayment that sheds water and guards against ice damming is essential, especially on eaves and valleys where snow tends to linger. Look for shingles rated for cold temperatures and consider oversizing drip edges to direct meltwater away from fascia. In areas with heavy snow, you'll want a roof with a conservative pitch and good ridge ventilation to minimize ice buildup. If you're replacing an older roof, pair the shingles with continuous insulation and a moisture barrier to slow freeze-thaw cycles from breaking the surface.
Metal roofing is well suited to snow conditions because it sheds snow efficiently, but snow movement management matters on entries, walkways, and lower roofs. When you install metal, plan for snow guards or parapet barriers at lower sections to prevent sudden piles that can damage gutters or windows. Panels should be properly anchored to resist wind-driven snow loads, and consider higher-seaming profiles that reduce denting from ice and hail. A reflective finish helps with summer heat load, but in winter the smooth surface can allow fast sliding of packed snow, so design a safe snow-stopping strategy at entry points. Ensure flashing around chimneys, vents, and skylights is robust, since the combination of cold air and moisture can loosen seals over time.
Clay tile, concrete tile, synthetic/composite shingles, and slate are available in the market, but their weight and installation complexity make structural suitability more important in a snow-load city like Moscow. Clay and concrete tiles demand a reinforced roof deck and precise framing to handle the sustained winter load. Slate and high-end synthetic options bring longevity but require trained installers to ensure proper underlayment, nail patterns, and alignment for snow-bearing performance. If considering these materials, have a structural assessment done to confirm your attic height, rafter spacing, and deck strength meet the added weight. For homes with existing heavy mass or limited attic space, weight should drive the decision as much as aesthetic preference.
In all cases, prioritize continuous underlayment and a well-sealed ventilation plan to combat moisture intrusion during melt periods. Inspect after every heavy snow season for ice dam indicators, such as uneven shingle warping, exposed nails, or little ice ridges along eaves. Rely on a professional who understands how Moscow's hills, wind patterns, and university-town housing stock influence roof performance, so the system you choose aligns with local winter realities. Consider staged replacements to align with the upcoming freeze-thaw cycles and ensure a secure, weather-resistant roof season after season.

Apex Roofing
(208) 310-7588 www.apex-roofing.com
317 W 6th St #107, Moscow, Idaho
4.9 from 94 reviews
Apex Roofing is a roofing contractor in Moscow serving Avon, Cora, Nora and nearby areas. Our roofing company offers residential roofing, commercial roofing, roof repair, asphalt shingle roofing, and more. We also specialize in gutter services. Customers love us because of our comprehensive roof warranties and our affordable roof financing options. We also have industry affiliations and certifications such as Owens Corning - Preferred Contractor. If you want to experience how your most trusted Moscow roofing company embraces our motto “Reviving our community one roof at a time", call us now for a free estimate!
Osprey Exteriors
(208) 310-7316 www.ospreyexteriors.com
Moscow, Idaho
4.1 from 18 reviews
A local, trusted roofing, siding and deck focused exterior general contractor. We provide commercial and residential roofing services, siding services and full building envelope services.

Rolling Hills Roofing
(208) 301-6173 www.rollinghillsroof.com
Serving
4.9 from 31 reviews
If your roof isn’t cared for, it can damage your home and disrupt your life. We're here to protect you and your family with a professionally installed, high quality new roof. We provide high quality asphalt shingle roofs to home and business owners in Moscow and Pullman. "We Make Roofing Easy" with friendly service, honest guidance on what's best for your situation, and professional roof installation using top of the line materials. If you're unsure about the health of your roof, give us a call today for a quick chat about your situation. We look forward to helping you and your home stay safe!
Typical Moscow pricing by material is about $350-$650 per square for asphalt shingles, $700-$1200 for metal, $900-$2400 for clay tile, $800-$1600 for concrete tile, $500-$1100 for synthetic/composite shingles, and $1500-$3200 for slate. These ranges reflect the Palouse hill setting, where steeper pitches and occasional wind-driven debris complicate labor and material handling. When estimating, consider not just the roof covering but underlayment, flashing, and equivalent fasteners, all of which influence total price in snow-prone winters.
Costs in Moscow can rise when winter damage is not discovered until tear-off and contractors find moisture-affected decking or fastener problems caused by freeze-thaw exposure. Freeze-thaw cycles push nails loose, lift shingles, and create pinhole leaks that only reveal themselves after a thaw. If decking is compromised, expect additional decking repairs or replacement, which adds to the bill and can extend project timelines. This is particularly true for older homes with continual snow loading and seasonal thaw cycles.
Scheduling can affect price in Moscow because winter storms, spring rains and mud, and fall wind and debris can slow crews, staging, and material handling. Storm windows may push work into tight blocks, increasing crew idle time and potentially shortening available workdays. If scheduling slips into peak demand periods, suppliers may charge more for materials or expedited delivery. Conversely, a well-timed project in late spring or early fall can keep crews moving efficiently and reduce weather-related delays.
Asphalt shingles remain the most economical option for many homeowners facing Moscow winters, with a straightforward installation that tolerates freezing conditions with proper ventilation. Metal roofing offers durability against snow shedding and can be cost-effective over the long term, though upfront costs are higher. For clay or concrete tile, expect higher installation complexity on sloped, snowy roofs and corresponding price premiums. Synthetic/composite shingles provide a balance between cost and durability, while slate carries the highest price and requires specialized workmanship to withstand freeze-thaw effects.
A full roof replacement in this area typically requires a permit through the City of Moscow Building Department. The permit ensures that the work meets local building codes, fire safety standards, and wind load requirements intensified by winter conditions and freeze-thaw cycles. Your best bet is to have the contractor initiate the permit process as part of the replacement project. They usually submit the plans, schedule inspections, and coordinate with the city, which helps keep the project on track and minimizes delays caused by missing paperwork.
In practice, the contractor commonly handles permit filing with the city. This includes pulling the permit, posting the required notices on site if needed, and arranging the inspections at key milestones through the project. It's still wise to confirm in writing at contract signing that permit responsibilities are covered and to obtain the permit number for your own records. If the contractor encounters any hiccups, you'll want to know promptly and have a backup plan for addressing unexpected city requirements.
Moscow typically conducts an inspection after completion to verify code compliance. The inspector will check structural elements, underlayment, ventilation, drainage, and proper flashing around chimneys, vents, and walls, all of which matter for withstanding heavy snows and freeze-thaw cycles. Because inspection timing can affect the project's closeout, you should plan for the possibility of small touch-ups after the city signs off. Confirm with the contractor that the permit is closed out properly in the city system and that the final inspection report or certificate of occupancy (if applicable) is delivered to you.
Coordinate a pre-inspection walkthrough with the contractor to identify likely code items that will be reviewed, such as roof pitch, attic ventilation, and ice-damming precautions near eaves and valleys. Keep a file of all permit documents, inspection reports, and the final city clearance. If a disagreement arises about an inspection item, request a written note outlining what needs to be corrected and the expected timeline for re-inspection. In climates with heavy snowfall and repeated freeze-thaw cycles, ensuring a clean permit closure is a small but critical part of long-term peace of mind for your roof system.
When insurers underwrite or evaluate roof-related claims, you should be prepared with solid documentation of the roof's condition and materials. In this town, adjusters expect a clear picture of what sits atop the house and how it's holding up after brutal winters, freeze-thaw cycles, and spring moisture. Gather recent notes on the roof's age, the composition of shingles or panels, and any notable wear from snow weight or ice dams. Having organized records helps the claim process move smoothly.
Homeowners may need to provide roof age, prior claim history, and an adjuster assessment. In practice, that means keeping a simple file: dates and types of repairs, photos from different seasons, and copies of any previous settlement. Pre-loss photo records are especially useful after Moscow winter weather, serving as a baseline for evaluating new damage. If you keep a dated album or cloud folder, you'll be better positioned to verify what existed before any incident.
Coverage varies by carrier and policy in Idaho, with limited statewide pullbacks rather than a uniquely severe local insurance retreat in Moscow. This means that while the broad pattern is predictable, the exact terms-including what constitutes covered damage from snow load, ice damming, or sustained moisture-will hinge on the specific plan. It pays to review your policy language carefully and compare how different carriers handle wind, hail, and freeze-thaw related wear on sloped roofs.
Maintain year-round photo documentation of the roof and any visible wear, especially after heavy snow events or rapid thaws. Note materials used-shingle type, metal profiling, or tile composition-and keep receipts for any recent maintenance. If a claim is anticipated, prepare a quick chronology: weather events, observed changes, dates of any inspected assessments, and the contact details of any local adjusters you've worked with. This approach keeps you aligned with Idaho insurers' expectations and helps streamline the resolution process.
In Moscow, winter storms and heavy snowfall can halt roof work or make tear-off unsafe. Plan for several weather-limited weeks and keep a hard hold on any long-term scheduling during mid-winter snow events. If you're aiming for a completed project, target a shoulder season when the snowpack is lower, storms are less frequent, and crews can work safely on a dry, stable surface. Build a contingency buffer of two to three weeks around the expected cold snaps, and confirm snow-melt periods before allowing access to the roof.
Spring rains and muddy site conditions can delay installation schedules and complicate access around homes. Start coordinating with your roofer as soon as the ground thaws and stay flexible for a few rainy weeks. Sealers and underlayment benefit from dry days, so push for a schedule that prioritizes dry windows, with clear access paths and tarp-ready entry points to keep mud from tracking into the home. If a late-season thaw brings warm days, you may catch critical dry spells that shorten the wait.
Fall winds and debris can slow work pace in Moscow, so homeowners trying to finish before winter should book earlier than they expect. Debris from nearby trees can clog gutters and slow tear-off progress, so plan tasks like debris removal and roof-edge protection in advance. Early fall starts help crews optimize daylight hours and weather-sparing work sequences. If a late autumn storm sweeps through, have a backup plan to cover exposed areas and protect interior spaces from early-season leaks.
Coordinate with your contractor to align material delivery with favorable weather slots, not just ideal calendar dates. Establish a clear sequence: inspection, tear-off if needed, dry-in, and then finish layers, with built-in buffers for rain, wind, and snow delays. For homes with steep pitches or complex layouts, confirm access routes for equipment during muddy or icy periods. In climate such as this, proactive communication and adaptable timing are the keys to avoiding long holds and ensuring a durable, weather-ready roof.