Ultimate Guide to Poor Roof Installation
Last updated: Feb 28, 2026
Introduction to Poor Roof Installation
What qualifies as a poor roof installation?
- Missing or improper underlayment, flashing, or ventilation that should protect the roof system.
- Inadequate fastener patterns, wrong nail size, or nails placed too high/low, leading to loose shingles.
- Shingles that are lapped, curled, or misaligned due to rushed or careless application.
- Inadequate attic ventilation, leading to heat buildup, preservation issues, and premature shingle wear.
- Incompatible or incorrect materials used together (e.g., wrong underlayment with certain shingles).
- Entries of debris, improper sealing around valleys, vents, chimneys, or skylights.
Why it happens
- Tight timelines or low bids that pressure crews to rush.
- Inexperienced contractors or DIY attempts without proper training.
- Miscommunication about roof type, warranty requirements, or local building codes.
- Weather constraints that force speed over precision, especially near project deadlines.
- Substandard materials or lack of coordination between crews and suppliers.
Is it urgent or common?
- It's not unusual, but it's not something to ignore. A poor installation can fail gradually or suddenly, depending on what was done incorrectly.
- Hidden problems (like a compromised underlayment or incorrect flashing) may not show until heavy rain or wind hits.
- Small issues can become big headaches over time, especially in regions with significant weather or temperature swings.
How to spot early warning signs
- Water stains or damp spots on ceilings after rain.
- Shingles that lift, curl, or buckle along roof edges or in valleys.
- Granules accumulating in gutters or downspouts after a storm.
- Attic condensation, musty odors, or visible daylight through the roof deck from the attic.
- Gaps around vents, chimneys, or skylights where flashing looks compromised.
High-level next steps
1. Document concerns with photos and notes of dates, weather conditions, and any leaks.
2. Check any warranties or roofing contractor guarantees that may apply.
3. Schedule a professional roof inspection to assess installation quality and hidden defects.
4. Obtain independent opinions if multiple issues are found, to compare findings and costs.
5. Prioritize safety: avoid walking on a suspect roof, and arrange for a pro to perform inspections and any necessary repairs.
What a professional inspection covers (high level)
- Verification of correct shingle type, underlayment, and nailing pattern for the roof system.
- Evaluation of flashing, valleys, around chimneys, vents, and skylights for leaks-prone gaps.
- Assessment of attic ventilation and insulation, which affect roof longevity.
- A check for proper roof deck condition and evidence of moisture intrusion.
- Clear recommendations and a sense of urgency for repairs or replacement, based on observed deficiencies.
Practical considerations for homeowners
- Keep a simple repair log: dates of issues, what was observed, and any reactions from rain or wind.
- Request written estimates that specify materials, scope, and timelines, so you can compare apples to apples.
- Consider the trade-off between quick fixes and long-term solutions, especially when warranties and local codes are involved.
- Safety first: if you're unsure about structural integrity or wind exposure, opt for a professional assessment rather than DIY troubleshooting.
Is Poor Roof Installation an Emergency?
Quick triage: Is it an emergency?
Poor roof installation can create immediate danger in some cases, but many situations unfold more gradually. The key is whether interior signs of water intrusion or visible structural movement are present. If rain is actively pouring into living spaces, or you see a sagging ceiling or roof deck, treat it as urgent. If the attic only shows minor dampness after a storm or you notice cosmetic issues, you can assess more carefully and plan a repair window.
- Active leaks or dripping from a ceiling or wall are present during rain.
- The ceiling, attic, or roof deck shows bulging, sagging, or any sense of movement.
- Large sections of shingles are blown off, or decking and underlayment are exposed.
- Daylight is visible in the attic or roof cavity.
- You hear cracking, creaking, or feel movement in the roof structure.
- There is obvious storm damage near the roof with a risk of further collapse or rapid deterioration.
- Mold growth or a strong, persistent mold odor accompanies moisture intrusion.
Monitor if
- Small damp spots appear in the attic after rain, but no active leaks are occurring.
- A few shingles are missing or curled, yet the interior remains dry.
- Localized staining appears on ceilings after rain, but it's not spreading or getting worse.
- Shingle granules wash away in a few spots but there's no ongoing water penetration.
Can wait if
- The issue is mostly cosmetic: minor granule loss or slight color fading without moisture ingress.
- There is no interior moisture, no attic condensation, and no draft or odor associated with leaks.
- The roof is older but currently shows no signs of structural compromise or active leakage.
- Small, isolated issues could be addressed with a planned, non-urgent repair after you've secured a professional assessment.
1. Move people and valuables away from affected areas to prevent damage.
2. If water is entering, place clean, contained receptacles under leaks and use towels to reduce spreading moisture on floors.
3. Do not climb onto the roof or perform DIY repairs on a suspected poorly installed roof.
4. If you can safely do so from the ground, cover the affected area with a tarp, securing it at the edge and away from electrical lines. Avoid putting weight on damaged sections.
5. Photograph all damage from ground level and inside the attic to document the condition for your roofer and insurer.
6. Schedule an inspection with a licensed roofer as soon as possible and ask about emergency service if the situation seems urgent.
Common Causes of Poor Roof Installations
Inadequate deck preparation and fastening
The roof deck is the platform that supports everything above it. If it isn't solid, clean, and properly secured, shingles and underlayment won't perform as they should.
- Rotten, warped, or damaged sheathing left in place. This weakens the base and can cause roof ridges to fail over time.
- Missing or loose fasteners that don't hold the deck flat or secure enough to carry wind loads.
- Improper nail length or gauge. Nails that are too short or the wrong type fail to penetrate adequately, leading to loose shingles and high wind uplift.
- Nailing in the wrong spots (such as through shingles instead of through the deck) or missed fasteners along edges and around hips and valleys.
Underlayment and moisture barrier issues
Underlayment protects the deck and provides a secondary moisture barrier. Skipping steps here invites leaks and mold.
- Gaps, bunching, or improper overlaps that leave gaps at eaves, rakes, and intersections.
- Using the wrong type of underlayment for the climate or roof pitch (felt in some cases, synthetic in others) without following manufacturer guidelines.
- Failing to seal or properly terminate around roof-to-wall transitions, vents, and skylights.
- Not installing a proper ice and water shield where required, especially in cold climates or where water damming is likely.
Flashing around penetrations and transitions
Flashing is a critical line of defense against leaks at chimney aprons, skylights, vent pipes, and roof-to-wall junctions.
- Inadequate or poorly sealed flashing around chimneys, valleys, and vent pipes.
- Step-flashing not paired with counter-flashing where walls meet the roof, creating vulnerable gaps.
- Flashing that is nailed or sealed incorrectly, causing seams to lift or fail under wind and temperature changes.
- Sealing compounds that cure too hard or shrink away over time, allowing leaks to start.
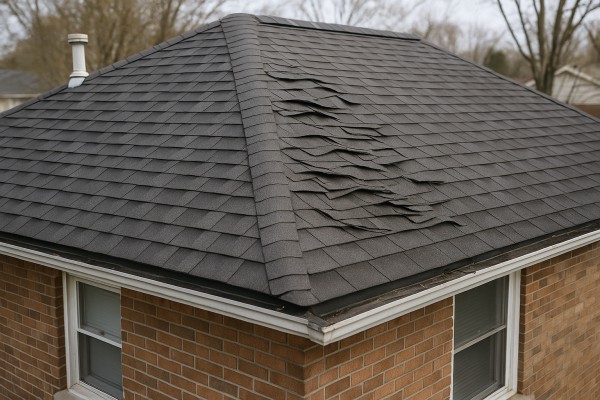
Shingle installation quality and alignment
Even with good materials, poor installation shows up quickly in the field.
- Staggered or misaligned courses that create visible stepping lines and uneven edges.
- Improper starter course, overhang, or edge alignment that affects wind resistance and water shedding.
- Nailing patterns that don't follow the manufacturer's recommendations, leaving rows loose or uneven.
- Overdriven or underdriven nails that damage shingles or fail to seal properly, plus exposed nail heads in visible areas.
Attic ventilation and moisture management
Ventilation is often neglected, but it affects shingle life, ice damming, and energy efficiency.
- Inadequate intake or exhaust leads to high attic moisture, which can cause deck warping and premature shingle deterioration.
- Poorly balanced soffit vents, ridge vents, or turbine vents that don't move air effectively.
- Sealed attic spaces without proper moisture controls, increasing condensation on the underside of the roof.
Material compatibility and climate considerations
Using the wrong product for the climate or roof design invites early failure.
- Shingles rated for a different climate or wind region than your house experiences.
- Underlayment or flashing not rated for the roof pitch, slope, or temperature range.
- Incompatible fasteners with certain shingles or underlayment types.
On-site workmanship and process issues
Sometimes the issue isn't the parts, but how they're installed.
- Rushing through steps, skipping the manufacturer's required sequences, or trying to “save time.”
- Leaving debris, ice, or moisture on the deck during installation, which can compromise adhesion and sealants.
- Inadequate cleanup that allows nails or sharp objects to damage future roof areas or attic spaces.
During installation, watch for these telltale signs of quality work:
1) Straight, evenly spaced courses with the starter row properly aligned.
2) Nails driven flush to the deck, per manufacturer specs, not through shingle surfaces.
3) Consistent overhang at eaves and proper flashing integrated into valleys and transitions.
4) Clean, dry surface free of debris with seals and terminations completed per spec.
How Roof Materials Affect Poor Roof Installations
How installation errors manifest with different materials
- Improper underlayment or deck prep lets water reach the nail line or fasteners, causing leaks regardless of material.
- Flashing missteps around chimneys, vents, and valleys are a top failure point for many materials.
- Inadequate ventilation or attic insulation accelerates moisture-related damage and reduces long-term performance for all roof types.
- Incorrect fastener patterns, sealants, or adhesive choices undermine wind resistance and seam integrity.
Common roofing materials
- Asphalt shingles

- Poor nailing: Nails driven too high, too low, or not sealed can cause shingles to lift in wind and allow leaks at nail heads.
- Inadequate underlayment: Missing or insufficient underlayment increases rapid water intrusion at seams and around vents.
- Shingle alignment: Irregular spacing or overlapping errors create weak points where water can penetrate and curl shingles prematurely.
- Ventilation gaps: Blocked or undersized soffit/roof venting leads to attic moisture buildup, promoting blistering and curling.
- Metal roofing

- Fastener layout: Incorrect spacing or missing through-fasteners lets panels flex and leaks form at panel seams.
- Sealing and flashing: Poorly sealed laps and flashings around roof edges, skylights, and chimneys invite corrosion and leaks.
- Panel alignment: Misaligned panels create stress concentrations, increasing wind uplift risk and potential panel deformation.
- Coating integrity: Inadequate surface preparation or improper sealant use can compromise coating durability and color fade.
- Wood shakes/shingles

- Nailing technique: Nails too short or placed wrong cause shingles to loosen in wind or split when nailed through wrong spots.
- Underlayment gaps: Absence of a proper underlayment layer allows moisture to wick into the wood, accelerating rot.
- Spacing and cutting: Insufficient spacing or jagged cuts create pockets where water stagnates and wood expands/contracts irregularly.
- Moisture management: Poor attic ventilation leads to trapped humidity that accelerates rot and mold growth behind the wood layer.
- Clay and concrete tiles

- Pitch and substrate: Installing on the wrong roof pitch or without a proper batt and underlayment increases crack risk and leaks.
- Tile setting: Walking or stepping on tiles during installation without proper support causes cracks and broken tiles that shed water.
- Fastener and mortar work: Inadequate fastener depth or improper mortar details at hips/valleys undermine tile stability and seal.
- Flashing details: Inadequate flashing around dormers, chimneys, and skylights invites water intrusion at tile edges.
- Slate

- Nailing and clipping: Improper nail sizing or inadequate clipping allows slate to crack or slip in wind.
- Underlayment compatibility: Using wrong underlayment or missing a continuous cover reduces protection beneath slate.
- Flashing integration: Poorly integrated flashings at ridges, valleys, and transitions create leak paths through delicate slate joints.
- Synthetic shingles (composites)

- Fit and trim: Poor cutting accuracy leaves gaps, compromising seal at edges and around penetrations.
- Wind performance: Inadequate attachment or improper seam sealing weakens uplift resistance.
- Heat and expansion: Not accounting for material expansion in heat leads to buckling or cupping over time.
- Flat roof membranes (EPDM, TPO, modified bitumen)

- Seam bonding: Inadequate adhesive or improper Heat-Weld/Seam technique creates seam leaks.
- Edge detailing: Poor termination at eaves, parapets, and terminations invites wind-driven water ingress.
- Substrate prep: Irregular or dirty decks prevent proper bonding and can trap moisture under the membrane.
- Drainage: Insufficient slope or clogged drains cause ponding, accelerating membrane blisters and deteriorations.
Practical homeowner checks
1. Inspect nail lines and fasteners on visible edges for uniform spacing and proper depth.
2. Look at flashings around chimneys, vents, and skylights for gaps, cracking, or missing sealant.
3. Check for lifted shingles or shingles with curling edges, especially after wind storms.
4. Observe attic ventilation and insulation; signs of moisture, mold, or condensation point to installation or venting issues.
5. Note any unusual sounds or visible water staining near penetrations after rain.
Steps to assess material-specific risk (1–4)
1) Identify the primary material of your roof and map common failure points (nails, flashing, seams, edge details).
2) Examine those points up close for misalignment, gaps, or improper sealants.
3) Review installation notes from the original contractor: underlayment type, fastener pattern, and flashing details.
4) Document issues with photos and dates; plan a professional inspection if you notice recurring leaks, wind uplift signs, or rapid material deterioration.
The Risks of Ignoring a Poor Roof Installation
Hidden Damage and Water Intrusion
- Water intrusion through seams and penetrations often starts as hidden leaks, showing up as ceiling stains, damp insulation, or musty attic odors.
- Mold can grow behind walls or in the attic, posing health risks and creating costly cleanup.
- Wood rot and framing damage may not be visible from the ground but weaken roof support over time.
- Ice dams and condensation stress shingles, flashing, and gutters, accelerating wear and increasing the chance of leaks during cold seasons.
Structural Safety Risks
- Misaligned decking or improper fasteners can lead to sagging or movement under wind, rain, or snow.
- Poorly installed flashing or vent details create failure points that let water bypass protective layers.
- Critical joints (valleys, ridges, and eaves) that aren't properly secured can compromise the roof's integrity during storms.
Higher Maintenance and Shortened Lifespan
- Frequent, ongoing repairs become the norm rather than a rare fix.
- The roof may not reach its theoretical lifespan, forcing earlier replacement than planned.
- Ventilation and insulation problems foster accelerated deck deterioration and higher energy use.
Financial and Insurance Consequences
- Repair costs accumulate and can quickly exceed expectations, with full replacement looming sooner than anticipated.
- Warranties may be voided or limited if installation workmanship doesn't meet terms.
- Insurance claims for leaks or storm damage can be questioned or denied if improper installation contributed to the damage.
Health, Comfort, and Climate Impact
- Inadequate ventilation traps humidity, leading to warm, stuffy attic conditions and higher indoor humidity.
- Temperature swings near poorly ventilated attics affect overall home comfort and HVAC efficiency.
- Water intrusion can contribute to indoor air quality issues, especially if mold develops.
Practical Signs to Watch For
- Repeated leaks after rain or thaw cycles.
- Visible dips, sagging, or uneven roof line.
- Unusual attic moisture, damp insulation, or persistent musty smells.
- Granules in gutters or downspouts well before the expected wear of shingles.
What to Do If You Suspect Poor Installation
1. Document signs with date-stamped photos and notes of when you noticed them.
2. Schedule a third-party roofing inspection by a licensed professional for an objective assessment.
3. Obtain a written report that cites specific installation issues, materials, and workmanship concerns.
4. Compare findings to original specifications, warranty terms, and recommended repair options, then request detailed repair or replacement estimates.
How Poor Roof Installations Are Diagnosed
Visual clues on the roof
- Irregular shingle lines, cupping, curling, or cracked shingles that look more like installation mistakes than typical weather wear.
- Flashing installed with gaps, misaligned corners, or sealant that looks sunny or dry-rotted rather than flexible. This is a common giveaway of rushed or improper flashing work.
- Nails that have been over-driven, under-driven, or driven in at odd angles, with raised nails forming small bumps (nail pops) near the fastened areas.
- Underlayment or felt that's wrinkled, torn, or exposed in places where it should be covered by shingles.
- Edge details that don't line up with the gutter, drip edge, or fascia, creating potential entry points for water.
Attic and interior indicators
- Water stains, dark soot-like marks, or damp spots on ceilings and upper walls below the roof lines.
- Soft, spongy roof deck in the attic, which suggests moisture infiltration or structural weakness from improper installation.
- Missing, compressed, or damp insulation around penetrations, vent openings, or areas with poor ventilation.
- Condensation, moldy smells, or visible mold growth in the attic, especially near chimneys, vents, or in poorly ventilated spaces.
Flashing, vents, and drainage indicators
- Improperly installed flashing around chimneys, roof penetrations, and skylights—gaps, poor bends, or sealed with sealant that's cracked or peeling.
- Ridge caps and vent flashings that are loose, poorly sealed, or missing entirely, which can admit rain and wind-driven moisture.
- Drainage issues such as water pooling near the eave, misaligned gutters or downspouts, or insufficient slope that causes water to back up toward the house.
- Visual inspection using proper safety gear, a stable ladder, and adequate lighting to catch subtle errors.
- Moisture detection with a meter or infrared camera to locate hidden damp areas in the attic or decking.
- Controlled water testing performed by a professional to reproduce leakage patterns, confirming whether leaks stem from installation flaws.
- Ventilation and insulation check to see if improper installation is contributing to condensation, ice damming, or attic moisture.
The step-by-step diagnosis process
1. Gather the story: note when leaks occur, recent work, and weather conditions that accompany problems.
2. On-site inspection: inspect the roof components, take comprehensive photos, and measure key areas for later comparisons.
3. Systematic component review: shingles, underlayment, flashing, vents, chimneys, skylights, gutters, and downspouts are examined in detail.
4. Diagnostic testing: moisture readings, infrared scans, and, if needed, non-destructive core sampling in select spots.
5. Root-cause analysis: determine whether the issue came from installation errors, material defects, or related ventilation/insulation problems.
6. Documentation: produce a clear report with photos, findings, and a proposed repair plan.
What the diagnosis report covers
- a concise summary of observed installation defects and where they're located
- an assessment of affected components and estimated time for failure if unaddressed
- recommended repair or replacement steps, prioritized by urgency
- a rough budget outline and notes about warranties, permits, and timeline expectations
Repair Options for Poor Roof Installations
Temporary fixes
- Protect the interior: set up a tarp or heavy-duty polyethylene sheet over the area with a few ballast rocks or boards to hold it in place. This buys time during a weather event or while you schedule a permanent fix.
- Quick seal for minor leaks: apply roofing cement or sealant around the leaking penetrations and flashing edges. Use a thick bead and smooth it with a putty knife.
- Tape and patch: use self-adhesive flashing tape to cover small gaps or seam issues on flat or low-slope sections as a stopgap.
- Safe measures: avoid stepping on fragile sections. If you must inspect, use a stable ladder and fall protection. Temporary fixes are not substitutes for proper repairs.
Minor repairs
- Replace damaged or missing shingles: carefully lift the shingle above the damaged one, remove the nails, and slide in a new piece. Nail according to the shingle's manufacturer specs.
- Re-nail loose shingles: drive new nails into flagged areas (not through the back of the shingle) and seal with a dab of roofing cement under the tab.
- Re-secure or reseal flashing: re-seat loose flashing around vents, chimneys, and transitions. Seal joints with compatible sealant and ensure proper stepping with the roof planes.
- Address curled or lift-up shingles: if curling is limited, re-nail and seal the edges to prevent further uplift.
- Clean and re-seal penetrations: replace worn boot seals on vent pipes and reseal around pipe penetrations with appropriate sealant.
- Inspect deck for any obvious issues: if you notice soft spots under repaired areas, pause and consider a larger repair plan. Minor fixes assume decking is sound.
Steps for a careful minor repair (example: replacing a damaged shingle)
1. Identify the damaged shingle and the surrounding area that may be affected.
2. Remove the old shingle and loosen the nails from the shingle(s) above it.
3. Slide in a new shingle, aligning it with the row.
4. Drive nails through the manufacturer-specified nail line and countersink if required.
5. Seal along the edges and re-check surrounding shingles for secure seating.
Partial replacement
- When a larger area is compromised (but not the entire roof), partial replacement can restore performance while keeping costs lower than a full replacement.
- Scope and planning:
- Have a professional assess the extent of damage and verify the deck condition.
- Plan replacement on one plane, bay, or a defined section where poor installation affected performance.
- What it involves:
- Removal of the affected shingles, underlayment, and any damaged flashing in the targeted area.
- Deck inspection and repair or replacement of any soft or rotten wood.
- Installation of new underlayment, proper flashing complexity, and a matched starter course.
- Replacing shingles to blend with the existing roof and ensuring transitions into adjoining sections are seamless.
- Why it helps:
- Limits disruption to the rest of the roof and targets the proven problem zone.
- Improves warranty coverage for the repaired area and reduces leak risk.
Steps for a targeted partial replacement
1. Define the exact area to replace and document any deck damage.
2. Remove shingles, underlayment, and flashing in the targeted zone.
3. Inspect and repair or replace decking as needed.
4. Install new underlayment and flashing, ensuring proper overlap and drainage.
5. Install new shingles, aligning with the surrounding rows and securing with correct nails.
6. Finish with proper sealing at edges and valleys; check transitions to adjacent sections.
Full roof replacement
- When the poor installation spans most or all of the roof, or the structure is aged and compromised, a full replacement may be the most reliable long-term solution.
- What to expect:
- Comprehensive assessment of the deck, underlayment, ventilation, and flashing.
- Removal of all existing roofing components to expose a clean deck.
- Deck repairs or replacement as needed, with attention to rot or moisture damage.
- Installation of proper underlayment, ice-and-water shield where required, and a correct ventilation strategy.
- New starter course, drip edge, flashing at perimeters, valleys, and chimneys.
- Full shingle or material installation with attention to wind rating and seam integrity.
- Final inspection, warranty discussion, and cleanup to leave the home weather-tight.
- Benefits:
- Restores performance with up-to-date installation practices.
- Provides a coherent, consistent warranty and improved energy efficiency.
Steps for a full replacement
1. Engage a qualified roofer to perform a full roof evaluation and plan.
2. Protect interiors and plan for material delivery and site access.
3. Strip the old roofing system and inspect the deck thoroughly.
4. Replace damaged decking and install a high-quality underlayment.
5. Install ventilation, drip edges, and all flashing components.
6. Lay the new shingles in the correct pattern and secure per manufacturer specs.
7. Conduct a thorough final inspection and review warranty details.
Typical Cost to Fix a Poor Roof Installation
Minor repair: Description and cost
Small issues from poor installation—loose shingles, minor flashing gaps, wind damage near edges—can usually be corrected without a full teardown. These fixes are quick, involve basic materials, and minimize disruption. Typical tasks include resealing, re-nailing, or patching a small area.
- Estimated cost: typically $150–$600, depending on materials and labor.
1) Inspect from attic and roof edge to locate the exact source of the leak or loosened components.
2) Re-nail loose shingles with proper roofing nails; replace any that are cracked or torn.
3) Seal minor flashing gaps with roofing cement and re-secure flashing where needed.
4) Recheck the area to ensure no additional leaks and tidy up the surrounding shingles.
Moderate repair: Description and cost
Moderate repairs address more extensive poor installation issues—several loose or damaged shingles, compromised flashing along valleys or around chimneys, or limited underlayment wear. These fixes require more time and parts but still avoid a full roof teardown.
- Estimated cost: typically $600–$2,000.
1) Remove and replace damaged shingles and flashing; verify the adjacent decking is sound.
2) Repair or reinstall step flashing and valley flashing to ensure proper water shedding.
3) Replace damaged underlayment in the affected zone and reseal penetrations (vents, pipes).
4) Re-shingle the area and perform a basic leak test to confirm the repair.
Major repair: Description and cost
Major repairs indicate significant installation problems or widespread damage—extensive flashing misinstallation, damaged roof deck, or leaks that have compromised decking. These often require more involved work and can lead toward partial deck replacement or a more comprehensive rework.
- Estimated cost: typically $2,000–$8,000+.
1) Stop further damage with temporary measures and a thorough assessment of decking and structural elements.
2) Remove compromised materials in the affected sections, replace damaged decking, and reinstall a proper underlayment.
3) Install corrected flashing details and re-secure wall/vent penetrations; ensure proper drainage and ventilation.
4) Install or reinstall the roof covering with correct installation methods, followed by a comprehensive final inspection and documentation of warranty leads.
What factors affect cost
- Roof size
- Larger roof size increases material needs and labor time, raising the overall price.
- Access
- Easy access lowers setup time and safety costs; difficult pitches, multi-story work, or tight spaces add complexity and expense.
- Material type
- Asphalt shingles are typically the most economical; metal, tile, or slate materials are pricier and often require specialized labor.
- Extent of damage
- Localized issues (e.g., a few shingles or small flashing gaps) stay on the lower end; widespread decking, flashing, or underlayment problems push costs higher.
- Local labor rates
- Regional wage differences, licensing, and demand influence quotes and allowable labor hours.
How Long Can You Wait to Address a Poor Roof Installation?
If you see active dripping, a sagging ceiling, or water stains that keep spreading, treat it as urgent. Even if the forecast looks dry, don't delay. Take safe, practical steps to limit damage and get a pro on the phone.
- If it's safe, check the attic to locate the source of the leak—whether it's flashing, shingles, or underlayment.
- Protect interiors: move valuables out of the way, place a bucket or container under the drip, and throw a tarp over the area if you can do so without climbing on the roof.
- Avoid standing on a damaged roof. If you suspect an electrical hazard or the leak involves wiring, shut off power at the main panel and call a licensed roofer immediately.
24–72 hours: contain damage and document
Short-term mitigation buys time while you arrange professional help.
- Temporarily improve protection: a weatherproof tarp or durable plastic sheeting secured tightly can reduce further water intrusion. Have a pro install it if possible.
- Document everything: dates, times, photos of interior staining, ceiling patches, attic moisture, and any affected insulation.
- Check safety basics: if water is near outlets or fixtures, shut off power to the affected area.
1 week: schedule a professional assessment
A licensed roofer should inspect the installation for root causes and safety.
- Obtain at least 2–3 written assessments. Ask them to examine shingles, flashing, underlayment, ventilation, and attic moisture readings.
- Request a clear repair plan: scope, materials, labor, and expected timeline. Have them explain how the imperfect installation may affect warranty coverage.
- Verify warranties and permits: confirm which parts are under workmanship warranties and whether a permit is required for any work in your area.
2–4 weeks: decide between repair and replacement
With a professional assessment in hand, decide how to proceed.
- Compare costs and outcomes: a localized repair might fix the symptom, but if the underlayment or structural components were compromised, replacement could be more durable.
- Consider long-term performance: flashing integrity, nail placement, and shingle alignment all affect longevity and weather resistance.
- Insurance interplay: if the poor installation contributed to damage, understand how your policy views repairs, replacements, and depreciation. Documentation from the roofer helps.
1–3 months: long-term plan and maintenance
Plan the larger project and any associated upgrades.
- Schedule the work window: coordinate materials, labor, and any needed roof deck or attic improvements.
- Address ventilation and insulation: resolving underlying ventilation or insulation issues improves roof performance and energy efficiency.
- Budget and financing: set expectations for cost, payment timing, and potential adjustments if complications arise.
What happens if you wait to address the problem in several timeframes
- 0–24 hours
- Damage can widen quickly as more rain or humidity penetrates. Drywall, insulation, and framing near the leak are at higher risk, and mold growth can begin in damp spaces.
- 24–72 hours
- Interior damage becomes more extensive; stain area grows, and higher moisture levels raise the chance of wood rot and secondary issues like mildew or pests.
- 1–2 weeks
- Underlayment and roof decking may suffer more substantial moisture infiltration. Improper installation stresses other components (valleys, seams, vents), increasing the likelihood of costly, extensive repairs.
- 1–3 months
- Delayed repair can lead to a full replacement being more likely than a targeted fix. Costs rise, warranties may be affected, and the roof's overall reliability and energy performance can degrade, potentially requiring a broader scope of work than initially planned.
How Poor Roof Installation Varies by Location and Climate
How This Problem Varies by Region & Climate within the United States
The same installation mistake can cause very different headaches depending on where you live and what the weather does year-round. Climate shapes which issues show up, how quickly they worsen, and what fixes actually last.
- Cold climates with freeze-thaw cycles (Northeast, Upper Midwest, high elevations)
- Common problems: ice dams, hidden moisture intrusion, deck rot.
- What to expect from a proper install: ice and water shield along eaves and around penetrations, ample attic insulation, and vents that move air without letting snow block intake.
- Snow loads and high winds (mountain regions, Great Plains during winter)
- Common problems: heavy snow buildup, wind uplift on shingles, sagging edges.
- What to expect from a proper install: steeper roof pitch where required, reinforced fasteners, snow guards, and wind-rated underlayment.
- Hail-prone areas (Central Plains, portions of the Midwest)
- Common problems: dented or torn shingles, exposed roof deck seams.
- What to expect from a proper install: impact-resistant shingles (Class 3–4), secure fastening per wind codes, robust flashing.
- Coastal and hurricane-prone zones (Atlantic and Gulf coasts)
- Common problems: wind-driven rain, corrosion of metal components, fastener failure at edges.
- What to expect from a proper install: corrosion-resistant nails and flashing, continuous edge protection, hurricane clips, and choices in roofing material that resist wind uplift.
- Hot, sunny, dry regions (Southwest)
- Common problems: accelerated aging of coatings, heat distortion, poor attic venting.
- What to expect from a proper install: reflective or cool roofing materials, radiant barriers, and ventilation that reduces attic heat buildup.
- Humid, wet climates (Southeast, parts of the Pacific Northwest)
- Common problems: moisture intrusion, mold/mildew, rot in sheathing, moss or algae on the surface.
- What to expect from a proper install: vapor control, robust underlayment, proper drainage and flashing, and treatments that deter moss growth.
- Fire-prone areas (parts of the West and Southwest)
- Common problems: ember intrusion, debris accumulation, faster ignition of roof materials.
- What to expect from a proper install: ignition-resistant roofing materials, sealed penetrations, and ember-proof vents.
Note: Local building codes and insurance requirements often reflect climate risk. A roof that ignores these rules may look fine but fail under a storm or flood, and it can affect warranties and coverage.
Materials & Techniques that Matter Most by Climate
- Underlayment and deck protection
- Cold/climate: thicker or heat-fused underlayment plus robust flashing around chimneys and skylights.
- Humid/moss-prone: moisture-impermeable layers and proper drainage planes.
- Fasteners and edge protection
- Windy or hurricane-prone: corrosion-resistant nails, longer fasteners, and hurricane clips.
- Coastal/salt air: stainless or hot-dip galvanized options to resist corrosion.
- Shingle choice and surface treatment
- Cold regions: granule retention and flexibility in low temperatures.
- Hot regions: UV resistance and color choices that reflect heat.
- Ventilation and insulation
- All climates benefit, but the priority shifts:
- Cold: stop ice dams with proper ventilation and insulation.
- Hot/humid: reduce attic heat and moisture buildup with vents, fans, and radiant barriers.
Quick Inspection Steps by Climate (simple, practical)
1. Look for obvious damage: curling, missing granules, or lifted shingles (common in wind-prone areas).
2. Check attic ventilation: is there adequate intake and exhaust? Any signs of moisture or ice dam damage near eaves in cold areas?
3. Inspect flashing around penetrations: chimney, vent pipes, skylights—are they sealed and flashing properly integrated?
4. Review underlayment and deck condition: any wrinkles, wear, or exposed plywood, especially in humid or winter-damaged roofs?
5. Assess fasteners and edge details: are nails driven correctly, not overdriven, and are edge restraints solid in high-wind zones?
6. Look for moss, algae, or rot in humid or coastal zones and address drainage or cleaning needs accordingly.
Regional Snapshot: What to tell your roofer
- If you live in a cold or snowy area, emphasize ice-dam protection, attic insulation, and wind-rated installation practices.
- In hurricane or high-wind zones, insist on rated fasteners, clips, and impact-resistant options.
- In coastal salt-air areas, require corrosion-resistant components and robust flashing details.
- In hot, sunny regions, prioritize reflective materials and excellent attic ventilation to extend roof life.