Ultimate Guide to Wind-Lifted or Missing Shingles
Last updated: Feb 28, 2026
Introduction: Wind-Lifted or Missing Shingles
What this page covers
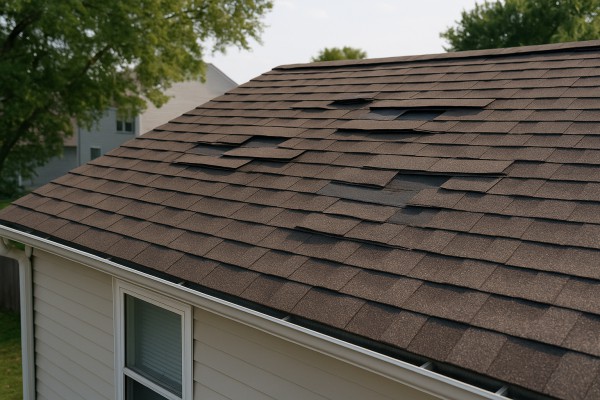
Wind-lifted or missing shingles are common after storms and strong gusts. This page explains what to look for, why damage happens, how urgent it is, and the practical steps you can take to protect your home—without causing extra risk to you or your roof.
What counts as wind-lifted or missing shingles
- Lifted tabs along the edges or corners of shingles
- Shingles that are peeling back at the nailing line
- Cracked, curled, or buckled shingles
- Missing shingles revealing the underlayment or roof deck
- Exposed felt or flashing showing visible daylight from the attic
Is it urgent or common?
- It's very common after a wind event, and small areas can be addressed later.
- Urgency depends on scope and weather. If rainfall is imminent or you notice active leaks in the attic or ceiling, treat it as higher priority.
- Quick attention now prevents bigger problems, like interior water damage, mold, or wood rot.
Signs to look for around the property
- Visible damage on the roof from the ground or with binoculars
- Granules in gutters or downspouts, especially after a storm
- Shingle edges that flap in the wind when you stand on the ground
- Water stains or damp spots on the ceiling or walls inside your home
- Daylight visible through the attic during daylight hours
High-level steps to assess and respond
1) From the ground, do a careful inspection
- Look for lifted tabs, missing pieces, or large patches of worn shingles.
- Note areas around hips, valleys, vents, and chimneys where damage is more likely.
2) Check the attic for evidence
- Look for daylight showing through roofing underlayment.
- Note any wet spots, dark stains, or a musty odor.
3) Photograph and map the damage
- Take clear photos of damaged sections and approximate their location on the roof.
- Create a simple diagram or list to share with a contractor.
4) Decide on immediate protection
- If rain is coming, consider a temporary tarp or protective covering only if you can do so safely.
- Do not climb a damaged roof if you're unsure of footing or stability.
5) Plan repairs or replacement
- Small, localized damage can often be repaired; extensive damage may require replacement of shingles or sections.
- Get at least two professional assessments and written estimates for comparison.
6) Schedule professional help if needed
- If you're unsure about safety, access, or scope, hire a licensed roofer to evaluate and repair.
- Binoculars for a ground view
- Camera or smartphone for photos
- Notebook or notes app to track locations
- Ladder, safety gear, and gloves (only if you are confident and safe)
- Protective tarp and basic repair supplies (for temporary protection only)
When to call a professional
- Damage covers a large area or is concentrated near edges, valleys, vents, or chimneys
- You're unsure about safety or roof integrity
- There are signs of water intrusion or attic moisture that you can't stop
- You need a formal assessment for insurance or a contractor
Preventive tips to reduce wind-lift risk
- Ensure shingles are properly nailed per manufacturer specs
- Install high-wriction underlayment and correct flashing around penetrations
- Keep gutters and roof valleys clear of debris
- Inspect after major wind events and address any lift promptly
- Schedule periodic roof health checks, especially in high-wind regions
Wind-Lifted or Missing Shingles: Is It an Emergency?
- Exposed decking or underlayment is visible from ground level or from attic access; this means the roof is no longer protecting the structure.
- A large area of shingles is missing, or shingles are severely cupped, curled, or lifted and moving with the wind.
- You have active water intrusion inside the home: dripping from ceilings, persistent wet spots, or water pooling near electrical outlets or fixtures.
- The roof shows signs of structural distress, such as sagging rafters, creaking sounds, or visibly damaged framing near edges or along ridges.
- There has been a recent severe storm and you notice new damage or the damage is worsening quickly (wind-driven, hail impact, or trees contacting the roof).
- There are dangerous conditions outside that make it unsafe to wait for repairs (downed power lines, gas odors, or structural collapse risk).
Notes for quick action:
- If you suspect electrical hazards due to water, keep people and pets away from the affected area and contact emergency services if needed.
- Do not climb onto the roof yourself to inspect or repair—leave it to a licensed roofer to assess and repair.
Monitor if
- Shingles are lifting only at the edges or in small patches, with no visible interior leaks yet.
- There's curling or slight lifting in non-critical locations (not directly over valleys, vents, or the chimney) and weather is improving.
- The roof repair would be non-urgent but you want a professional inspection soon to prevent further damage.
- There are days with dry weather forecast and you can arrange a repair appointment without risking further exposure to rain or wind.
What to watch for while you monitor:
- New signs of leaks after each rain or wind event.
- Changes in the amount of exposed decking or underlayment.
- Shingle movement during wind gusts—if you notice continued shifting, that's a sign to call a roofer sooner.
Can wait if
- The damage is limited to a few shingles with no lifting near valleys, chimneys, vents, or the roof edges, and there is no interior leakage.
- Weather is calm and the roof is not actively shedding shingles; a repair can be scheduled within the next few weeks.
- You're able to plan a proper inspection and repair window without risking further water intrusion or wind damage.
- The surrounding area shows only cosmetic issues (minor curling) and there's no risk to the structural integrity of the roof or home.
Temporary considerations:
- If rain is forecast and you have a small, non-leaking area, it's reasonable to wait for a dry window to arrange an inspection. Do not attempt to seal or tar your roof yourself unless you have proper training and equipment.
- Keep an eye on the attic for any rising humidity, musty smells, or newly formed damp spots—these are clues to monitor while you plan a professional visit.
Numbered steps for immediate, safe action (when damage is seen but you're not in a full emergency scenario):
1) Preserve safety: stay off the roof; avoid walking on loose shingles or near edges.
2) Protect interiors: place buckets under any active leaks, and move valuables away from water paths.
3) Document damage: take clear photos from ground level and attic views to share with the roofer.
4) Schedule a pro visit: contact a licensed roofer to assess damage, provide a repair plan, and secure temporary protections if needed.
Common Causes of Wind-Lifted or Missing Shingles
Inadequate or Improper Fastening
- Nails that are too short, the wrong type, or driven in at the wrong angle can fail to hold shingles down during gusty winds.
- Missing nails along the edges or the starter strip create weak spots that let wind get underneath.
- The standard number of nails per shingle matters. In typical residential wind zones, 4 nails per shingle is common; in higher-wind zones, 5–6 nails per shingle may be recommended by the manufacturer. When fasteners aren't placed in the correct locations, tabs lift and shingles loosen over time.
- Fasteners should be driven flush with the shingle surface, not through the sealant strip or too high, which can reduce pull-back strength.
Poor Starter Course and Edge Handling
- The starter row should be properly aligned and sealed; a misaligned or undersized starter course leaves the first row vulnerable to lift.
- If the starter shingles aren't fully adhered or are overlapped incorrectly, wind can pry up the first row and propagate damage to subsequent courses.
- Overhang and edge exposure matter too. Too little overhang or gaps at the eave and rake edges invite wind-driven infiltration.
Damaged, Dated, or Curling Shingles
- Shingles that have aged, curled, cupped, or suffered granule loss lose their smooth, wind-cutting profile. Lift starts at the edges and progresses inward as the shingle's bond to the adhesive strip weakens.
- Sun and heat can soften asphalt and make tabs more pliable, increasing vulnerability to uplift in storms.
- Cracking or hail damage creates breaches that allow wind to pry upward more easily.
Underlayment and Roof Deck Conditions
- Torn, missing, or improperly installed underlayment can allow wind to get under shingles, especially if the deck is soft, warped, or rotten.
- A damaged deck can flex or buckle under wind loads, changing the roof's surface tension and promoting lift.
- Inadequate or degraded roof-to-deck bonding reduces the effectiveness of the shingle's seal and grip.
Ventilation and Ridge Cap Issues
- Poor attic ventilation can cause excessive heat and moisture buildup, accelerating shingle aging and edge curling.
- Missing, damaged, or poorly sealed ridge caps and vents create pathways for wind to catch under adjacent shingles.
- Valley flashing problems (where two roof planes meet) can funnel wind-driven debris under the shingles and loosen surrounding tabs.
Wind Path and Roof Geometry
- Roofs with wide overhangs, sharp ridges, dormers, or complex transitions create more surface area for wind to catch and lift tabs.
- Sharp changes in pitch or poorly sealed transitions between different roof planes increase uplift risk at those seams.
Debris, Impact, and Mechanical Damage
- Branches, leaves, or other debris can trap moisture and erode exposed adhesive strips, weakening bonding over time.
- Foot traffic or improper maintenance work can loosen fasteners or damage the shingle surface, creating lift points that wind can exploit.
Shingle Type, Quality, and Installation Standards
- Lower-cost or mis-sized shingles can have weaker adhesion and thinner tabs, making them more wind-susceptible.
- Not following the manufacturer's installation guidelines (nail pattern, adhesive strip usage, start course requirements) increases the chance of wind-lift failures.
- Warranty-covered products still need proper installation; deviations from spec often negate coverage when wind damage occurs.
Quick Reference: Common Symptoms to Look For
- Lifting tabs or curling along the edges
- Missing shingle tabs along eaves or rake lines
- Visible fasteners or nail pop near the roof edge
- Unsealed adhesive strip gaps or gaps at the starter row
- Areas that feel unusually soft or show warning signs of deck or underlayment damage
Quick Inspection Steps (for homeowners)
1. From ground level, scan eaves, rake lines, and along the ridge for lifted edges or missing tabs.
2. If safe, use binoculars to inspect the roof surface for irregular gaps and misaligned rows.
3. Check the starter course and edge fastenings; look for gaps in sealant strips.
4. Inspect attic ventilation paths and ridge caps for proper sealing and signs of heat or moisture buildup.
How Roof Materials Affect Wind-Lifted or Missing Shingles

- How wind acts: Shingles rely on nails and sealant; strong gusts can lift tabs, especially if nails have pulled or the adhesive seal is worn.
- Common failure patterns: lifted edges, cupping, missing granules, exposed nail heads.
- What to check: look for bubbles or visible gap along the ridge, check for loose tabs from the ground with binoculars.
- Quick fixes (where safe): press down gently on small lifts, apply roofing cement under the lift, reseal with compatible sealant; ensure nails are properly driven.
- Longer-term: upgrading to architectural/high-wind-rated shingles can improve performance; verify correct nailing pattern and sufficient nail length for your roof pitch.

- How wind acts: panels are strong, but seams, laps, and fasteners can fail or loosen under high wind.
- Common failure patterns: exposed fasteners, lifted edge laps, missing clips, damaged flashing.
- What to check: inspect visible screws and clips along eaves, ridges, and seams; look for missing or degraded sealant.
- Quick fixes (where safe): replace missing or loose screws with appropriate neoprene washers; reseal penetrations; resecure edge trims with proper clips.
- Longer-term: consider wind-rated fasteners and optional wind clips; ensure proper panel spacing and flashing integrity in high-wind zones.
Tile Roofing (Clay, Concrete)
- How wind acts: heavy tiles can be pried upward; a single broken tile can allow others to lift and shift.
- Common failure patterns: missing or cracked tiles, exposed underlayment, displaced interlocking tiles.
- What to check: inspect for cracked or displaced tiles after storms; verify underlayment integrity behind missing tiles.
- Quick fixes (where safe): replace cracked or missing tiles; reseat and secure loose tiles; reseal flashing at ridges and valleys.
- Longer-term: ensure proper interlocking patterns and edge fastenings; in windy areas, ensure underlayment is sound and consider professional assessment for tile fastening upgrades.
Wood Shingles & Shakes
- How wind acts: nails can back out as wood swells and weather ages; edges and thin sections lift easily.
- Common failure patterns: curling, cupping, missing shakes, loose fasteners; quicker deterioration with moisture.
- What to check: look for loose or missing shakes, signs of rot, or gaps near flashing.
- Quick fixes (where safe): re-nail with appropriate fasteners (often ring-shank); replace severely damaged boards; treat or seal exposed wood.
- Longer-term: consider upgrading to more wind-resistant wood options or to synthetic shake alternatives in high-wind zones.

- How wind acts: slate is durable but brittle; uplift often comes from failing nails or poorly sealed edges.
- Common failure patterns: loose or cracked slates, gaps at ridges, corroded nails.
- What to check: check for loose slates and tightness of nails; inspect around flashing and valleys.
- Quick fixes (where safe): replace loose/cracked slates with matching material using corrosion-resistant nails; reseal flashing and ridges.
- Longer-term: use proper slate nails (often copper or stainless) and recommended spacing; ensure continuous support beneath slate to resist uplift.
Synthetic & Other Materials (Composite shingles, Rubber/EPDM, etc.)
- How wind acts: performance varies; some rely on adhesives that can fail in temperature swings, while others use nailed installations.
- Common failure patterns: lifted edges at seams, separated joints, or edge deterioration.
- What to check: inspect seam seals, flashing joints, and edge caulking; check for delamination in composite products.
- Quick fixes (where safe): re-seal seams with compatible sealant; resecure loose edges with approved fastening methods.
- Longer-term: follow manufacturer guidelines for wind-zone ratings; consider upgrading to materials with higher wind resistance if you live in a windy area.
- List of common roofing materials and how they are specifically affected by Wind-Lifted or Missing Shingles:
- Asphalt shingles: lift-prone at edges; rely on nails and sealant; watch for granule loss.
- Metal: resilient but vulnerable at seams and fasteners; needs secure clips and seals.
- Tile (clay/concrete): high wind uplift risk; cracked or missing tiles trigger water intrusion.
- Wood shingles/shakes: wind lifts and rot accelerate; nails can back out.
- Slate: durable but brittle; uplift from failed nails and flashing gaps.
- Synthetic/composite: variable performance; check seams and weatherproofing.
- Rubber/EPDM: common on flat or low-slope sections; wind can lift seams if not properly sealed.
What Are the Risks of Ignoring Wind-Lifted or Missing Shingles?
Water intrusion and interior damage
- Lifted edges create channels for rain to seep under the shingles.
- Water can reach the roof deck, attic, insulation, and ceiling layers.
- Even small leaks can lead to staining, warped drywall, and wood rot over time.
- Moisture in the attic can travel to living spaces, increasing humidity and condensation.
Deck, underlayment, and structural risk
- Exposed roof deck can dry out, warp, or rot if left unattended.
- Damaged underlayment reduces the roof system's ability to shed water.
- Repeated moisture exposure weakens framing and can compromise roof stability over years.
Mold, mildew, and health concerns
- Damp roof spaces invite mold and mildew growth.
- Mold can affect indoor air quality, triggering allergies and asthma.
- Mold growth can spread to insulation and walls if leaks persist.
Ice damming and winter damage
- In cold weather, gaps let melted water flow under shingles and refreeze at the edges.
- Ice dams push water under shingles, causing leaks at the eave and along the soffit line.
- Recurrent freezing cycles can loosen shingles and damage flashing.
- A lifted shingle can act like a lever, lifting neighboring shingles.
- Wind-driven damage can expand quickly from a small area to a larger roof section.
Energy inefficiency and comfort issues
- Gaps allow heated or cooled air to escape, increasing energy usage.
- Poor insulation and ventilation near damaged areas worsen comfort and costs.
Pests and vermin entry
- Gaps near the eave or rake create access for birds, mice, and insects.
- Nests and droppings can foul attic spaces and degrade insulation.
Long-term repair costs and insurance implications
- Minor leaks left unchecked often become major repairs (decking, fascia, flashing).
- Chronic leaks can lead to higher insurance scrutiny or premium changes if claims rise.
- Delays can necessitate full or partial roof replacement sooner than expected.
Practical indicators you should notice
- Missing tabs, cupped or curled shingles, or obvious gaps.
- Dark staining or water marks on ceilings and in the attic.
- Granule loss on shingles and increased granular debris in gutters.
Why waiting is expensive
- Moisture spreads, causing more widespread rot and mold.
- Small fixes become larger, costlier repairs as the roof's protection declines.
Quick steps if you suspect wind-lifted shingles
1. Do a safe visual check from the ground for obvious lifted edges and damaged areas.
2. Document with notes and photos, noting location and size of gaps.
3. Arrange a professional roof inspection to assess decking, underlayment, and flashing.
4. Prioritize replacing missing or damaged shingles and resealing edges; address attic moisture and ventilation concurrently.
How Wind-Lifted or Missing Shingles Are Diagnosed
Visual signs from the ground
- Look for shingles that appear raised, bubbled, or curled along the edges, especially on the low-slope eaves and along ridges.
- Notice missing or torn shingles, where tabs are no longer lying flat against the roof deck.
- See granule buildup in gutters, downspouts, or scattered across the yard—this can indicate shingles have suffered wind abrasion.
- Watch for dark lines or uneven shine on the roof surface, which can signal exposed nail heads or gaps under lifted shingles.
- Use binoculars to scan the upper roof from safe distances; don't climb up if you're unsure about footing or weather conditions.
Up on the roof: close-up checks
- Safety first: use a sturdy ladder, fall-arrest gear if available, and work with a helper when possible. If you're not comfortable, skip this step and call a pro.
- Inspect the windward slopes (the sides facing the prevailing wind), including edges, valleys, around vents, and around flashing details.
- Identify shingles that are lifted, cupped, or rocking when you press gently on them; the more movement you see, the more likely wind has loosened it.
- Check for exposed nail heads or nails that are working up through the shingle surface; this is a sign of wind-driven edge damage.
- Look for loose flashing around chimneys, skylights, dormers, and vent pipes; damaged flashing often accompanies lifted shingles.
- Test with care: if a corner of a suspect shingle can be raised by hand with modest effort, you're likely seeing wind-lift damage rather than a simple lift from sun or aging.
Attic and interior checks
- Inspect the attic for daylight seeping through gaps between roofing boards or along the penetrations; daylight is a strong indicator of compromised shingles or underlayment.
- Check for moisture stains, mold, or musty odors on rafters and insulation near the affected roof areas—these suggest leaks that may follow wind damage.
- Look for compressed or damp insulation near the eave line, which can occur where wind-lifted shingles allow water intrusion.
- Note any attic ventilation issues that could exacerbate moisture buildup and disguise slow leaks behind lifted shingles.
Diagnostic steps used by pros
- Step 1: Establish the footprint. Count and map the affected shingles (rough estimate of area helps decide patch vs. replace).
- Step 2: Inspect underlayment and flashing. Lifted shingles often reveal damaged underlayment or compromised flashing around vents, chimneys, and transitions.
- Step 3: Evaluate the roof's age and remaining life. Wind damage on an old roof may indicate it's nearing the end of its service life, changing the repair plan.
- Step 4: Assess repair options. Small, isolated lifts may be patched, but widespread lift, curling, or missing shingles usually requires replacement of the damaged section or entire roof.
- Step 5: Consider potential water intrusion. If any interior signs exist, prioritize securing the roof to prevent escalating damage.
When to call a professional
- If more than a few shingles are lifted or missing, particularly on steep or tall sections.
- If you notice exposed nails, damaged flashing, or daylight in the attic.
- If you're unsure about safety or the extent of damage, or if you'd need significant repair beyond a simple patch.
Repair Options for Wind-Lifted or Missing Shingles
Temporary fixes
- Cover the area with a heavy-duty tarp as a short-term shield against rain. Secure the tarp with nails or weights along the edges, and make sure it extends several feet beyond the damaged zone.
- If you can access the area safely, apply roofing cement or silicone sealant to any small gaps or exposed nail heads to slow leaks until you can repair properly.
- Keep people and pets away from the affected section and avoid walking on slick, wind-dangled shingles. If the roof is steep or wet, postpone work and call a pro.
- For wind-lifted but still-attached shingles, gently press the tab back into place and temporarily secure with a few galvanized nails through the tab's nail line, then seal around the heads. This is a very short-term fix and should be followed by a proper repair.
Minor repairs
- Re-secure loose shingles with corrosion-resistant roofing nails placed in the manufacturer's recommended nailing zone. Use 4 nails per standard asphalt shingle on the upper edge or as specified by the shingle maker.
- Replace a single damaged tab: lift the adjacent tabs carefully, remove the broken shingle, and insert a new one. Nail in the same pattern as the surrounding shingles and seal along the edges with roofing cement.
- Seal seams and edges: run a thin bead of roofing cement under the bottom edge of any lifted shingle and along the side joints wherewind has peeled the adhesive strip. Press firmly to bond.
- Match and blend: use a shingle that matches in color, profile, and granule color. Keep a small stash for touch-ups in case more tabs fail later.
- Inspect flashing near vents, chimneys, and valleys. If flashing is loose or damaged, temporarily reattach with sealant and plan a more durable fix soon.
Partial replacement
- When several shingles in a localized area are damaged but the rest of the roof is sound, partial replacement is often the most economical option.
- Steps:
1) Identify the damaged zone and remove the affected shingles one course at a time, starting from the bottom row.
2) Check the underlayment and deck for damage. Patch or replace decking if you find soft spots or rot.
3) Cut and fit new shingles that match your existing roof. Slide the new shingles into place, aligning with neighboring pieces.
4) Nail through the same zones used by neighboring shingles (usually in the nailing strip). Use 4 nails per shingles (or per the manufacturer's guidance) and avoid overdriving the nails.
5) Seal all new edges with roofing cement and ensure the tab-to-tab joints are fully bonded.
6) Clean up debris and inspect the surrounding area for loose granules or stray nails.
- Consider the roof's age and overall condition. If the surrounding shingles show wear or curling, plan a more extensive replacement rather than a piecemeal fix.
Full roof replacement
- When wind damage is widespread, shingles are curled or delaminating, or the roof is near the end of its life, a full replacement may be the best long-term investment.
- Planning steps:
1) Have a professional inspection to assess decking condition, underlayment, and ventilation. Replace any rotten sheathing as needed.
2) Remove all old shingles, flashings, and caps. Dispose according to local regulations.
3) Install new underlayment and breathable ventilation as recommended for your climate.
4) Install starter courses, then lay shingles in proper courses with correct nailing patterns. Use the manufacturer's guidelines for nails per shingle and spacing.
5) Install all flashings, ridge caps, and vent boot flashings. Seal edges and transitions to prevent leaks.
6) Thorough clean-up and final inspection. Check for gaps, loose nails, and proper alignment.
- A full replacement often comes with warranty coverage on shingles and installation. If your roof is older than 20–25 years or shows widespread damage, this option may offer the best value and reliability in the long run.
Typical Cost to Repair Wind-Lifted or Missing Shingles
Minor repair: description and cost
- What it covers: A quick fix for a few wind-lifted tabs, a couple of loose or damaged shingles, and minor edge sealing with roofing cement. Often includes resecuring loose nails and reattaching asphalt tabs.
- Typical cost: $150–$350, depending on accessibility, material type, and whether flashing around vents needs a touch-up.
- Quick steps you'd expect:
1) Safety check and surface assessment from ground level or a safe ladder position.
2) Remove loose fragments and nail back the lifted tabs.
3) Seal small gaps with asphalt cement or roof sealant.
4) Reinstall or reseal any loose flashing in the immediate area.
5) Clean up and perform a final inspection.
Moderate repair: description and cost
- What it covers: Replacing several missing or severely lifted shingles, checking underlayment, and touching up nearby flashing or seals. May involve resealing around vents and ensuring proper laminate alignment.
- Typical cost: $350–$900, influenced by the number of shingles affected and the roof pitch.
- What's included in the work:
- Removing and replacing multiple shingles in a defined patch.
- Inspecting underlayment for minor damage and replacing small sections if needed.
- Resealing around penetrations and adjusting flashing where necessary.
- Matching shingle color and profile to maintain a cohesive look.
Major repair: description and cost
- What it covers: A large patch or substantial portion of the roof requiring extensive shingle replacement, and possibly underlayment and flashing work. Can involve re-sealing and re-flashing around multiple penetrations, and addressing any hidden damage.
- Typical cost: $1,000–$3,000. If the damage extends to underlayment, roof deck, or spans a wide area, costs can rise to $3,000–$6,000 or more.
- What you're paying for:
- A substantial amount of labor to remove and install a large number of shingles.
- Any necessary underlayment replacement and flashing upgrades.
- Additional safety measures for steeper pitches or multi-story homes.
- Potential disposal fees for damaged materials.
- Step 1: Safety and assessment — assess wind-damage extent from a safe position; determine if a full inspection of underlayment and deck is needed.
- Step 2: Material planning — select replacement shingles that match type, color, and profile; gather nails, sealant, and flashing components.
- Step 3: Remove damaged sections — carefully lift and remove damaged shingles and any compromised underlayment in the affected area.
- Step 4: Install new components — install replacement shingles, nail with proper spacing, seal tab edges, and reflash if required.
- Step 5: Seal and protect — reseal edges and penetrations; ensure proper waterproofing around vents and chimneys.
- Step 6: Final inspection — check for wind uplift, edge alignment, and any remaining gaps; clean the area and verify ground-level drainage and attic ventilation.
What factors affect cost
- Roof size
- Larger roof areas mean more shingles, more labor, and longer project duration.
- Access
- Steep pitches, difficult terrain, or multi-story homes raise labor time and safety requirements.
- Material type
- Asphalt shingles are generally cheaper; architectural or specialty shingles cost more per square and may require additional accessories.
- Extent of damage
- Isolated shingles are cheaper to fix than widespread wind-lift or missing shingles across a large section.
- Local labor rates
- Prices vary by region, demand, and proximity to storm repair activity; permits and disposal fees can also affect total cost.
How Long Can You Wait for Wind-Lifted or Missing Shingles?
Wind-lifted or missing shingles can expose the roof deck and underlayment, inviting water intrusion and further damage. If you notice any of these signs after a wind event, treat it as urgent:
- Shingles flapping, cupping, or curling on the roof edge
- Entire shingles missing or gaps along the eaves
- Exposed roof deck or flashing gaps visible from the attic
- Water leaks, wet spots, or ceiling stains after rain
- Granule buildup in gutters or downspouts
Short-term actions you can take today
These steps help limit damage while you arrange a professional inspection.
1) Prioritize safety: don't climb onto a damaged roof. Use a sturdy ladder and have a helper if you must inspect from the ground.
2) Protect the interior: place buckets under any drips, lay towels, and consider a quick tarping if you can do so safely and securely.
3) Document the problem: take clear photos of missing/lifted shingles, flashing gaps, and any interior leaks for insurance or contractor use.
4) Schedule a roof inspection ASAP: contact a licensed roofing contractor for an on-site assessment. If weather worsens, a temporary tarp is often recommended, but do not attempt risky tarp work on a steep or wet roof.
5) Check for attic signs: look for daylight or moisture in the attic, and note any musty or moldy smells—these imply elevated moisture that should be addressed.
Medium-term window: what to expect in the next days
In the days following wind damage, the risk of worsening water intrusion rises, especially with rain. Expect:
- Increasing interior moisture, especially after storms
- More shingles loosening as wind shifts continue
- Potential ice dam or condensation issues in colder weather
- Rapidly elevated risk if underlayment or decking has been compromised
- The need for a temporary repair plan to prevent further damage until a full fix is possible
Longer-term window: weeks out
If the damaged area is left unrepaired for weeks, consequences compound:
- Deck and underlayment rot, leading to structural concerns
- Insulation contamination and higher energy bills due to air leaks
- Mould growth and related health concerns in the attic or ceiling spaces
- Higher repair cost and longer downtime if wood damage becomes extensive
- Potential insurance implications if the claim is delayed too long or documentation is lacking
What happens if you wait to address the problem in several timeframes
- 0–24 hours: Small leaks can become larger with the next rain; interior damage and mold risk begin to rise.
- 24–72 hours: Additional shingles lift may occur; exposed decking is vulnerable to water damage and wind-driven debris.
- 3–7 days: Ongoing leaks can saturate insulation, lead to attic mold risk, and accelerate deck deterioration.
- 1–4 weeks: Substantial deck rot, insulation degradation, higher repair scope, and possible secondary issues like pest intrusion or compromised attic ventilation.
- 1–2 months: Major repairs become likely, with potential homeowners' insurance friction if the damage is not reported promptly or properly documented.
Quick-reference checklist for timing
- If rain is imminent or ongoing: treat as urgent—get a pro on-site sooner rather than later.
- If dry conditions persist: still schedule an inspection within a few days to prevent escalation.
- Always document and photograph: keep records for insurance and contractor use.
- Prioritize a permanent repair plan: temporary measures can help, but a solid, code-compliant fix is essential for long-term performance.
How Wind-Lifted or Missing Shingles Vary by Location and Climate
How This Problem Varies by Region & Climate within the United States
Wind-lift and missing shingles don't show up the same way everywhere. Local weather patterns, temperature swings, moisture, and even building practices shape how often shingles lift, crack, or blow off. Here's how it looks in different parts of the country, plus practical tips you can use.
- Coastal, hurricane-prone regions (Gulf Coast, Atlantic seaboard)
- Why it matters: Strong, gusty winds from tropical storms and hurricanes lift shingles more often along edges and in gullies of the roof. Salt air can corrode nails and fasteners, weakening attachments over time.
- What to check: Look for lifted corners, exposed underlayment, loose rake edges, and any shingles that have started to curl or cup.
- What to do: Prioritize wind-rated shingles, use additional fasteners per shingle, and consider corrosion-resistant nails. Install proper edge sealing and hurricane clips if your local code calls for them. Ensure attic ventilation is balanced so roof sheathing doesn't bow under pressure.
- Northeast and Great Lakes (Nor'easters, ice storms)
- Why it matters: Freezing and thawing cycles push and pull shingles, increasing the chance of lifting and cracking. Ice dams can force water under shingles and underlayment, widening damage.
- What to check: Look for cracked or lifted shingles near the eaves after cold snaps, plus signs of moisture intrusion around vents and chimneys.
- What to do: Use underlayment designed for cold climates (peel-and-stick or fully taped), maintain adequate attic insulation, and clear roof valleys of debris so meltwater doesn't back up. Consider upgraded sealants at seams and fasteners.
- Pacific Northwest (high rainfall, humidity)
- Why it matters: Persistent moisture and moss growth can loosen shingles and underlayment. Humidity accelerates aging of asphalt and adhesive tabs.
- What to check: Inspect for moss, black algae staining, and any soft or curling shingles in shaded areas.
- What to do: Keep gutters clean and consider zinc or copper strips to slow moss. Ensure proper roof ventilation and consider shingles with better moisture resistance and longer adhesive life.
- Southwest and desert regions (extreme sun, heat)
- Why it matters: Intense UV exposure and high heat accelerate aging and brittleness of shingles, making edges more prone to lift in wind gusts.
- What to check: Look for drying, cracking, or cupping in shaded versus sun-exposed sections.
- What to do: Choose reflective or lighter-colored shingles with higher UV resistance. Maintain good attic ventilation to reduce heat buildup under the roof deck.
- Mountain West (windy, snowy elevations)
- Why it matters: High winds combine with heavy snowfall and ice, creating stress on ridges and eaves. Rapid temperature shifts can cause expansion and contraction.
- What to check: Inspect ridge and hip lines for loose caps, and monitor eave areas for revealed roof deck.
- What to do: Use wind-resistant fasteners and ensure proper sealant at transitions. Prepare for snow by installing drip edge and snow guards as needed; reinforce vulnerable edge courses.
- Midwest plains (rapid temperature swings, thunderstorms)
- Why it matters: Severe storms and hail can physically damage shingles, while rapid temp changes promote cracking and pop-off failures.
- What to check: Watch for hail impact marks, lifted corners, and any missing tabs after storms.
- What to do: Choose impact-resistant options where hail risk is high, and verify proper nail length and spacing per local building code. Ensure gutters and downspouts aren't causing water pooling near the eave.
- Northeast interior and inland regions
- Why it matters: Seasonal storms bring wind and rain that stress ridge lines and flashing, with occasional winter ice impacting edges.
- What to check: Edge lift, flashing integrity around chimneys and vents, and any moisture intrusion near eaves.
- What to do: Reinforce flashing where winter moisture can seep in, and maintain a solid seal along shingle edges to resist wind uplift.
Steps homeowners can take regardless of region
1) Inspect after major weather events, especially after high winds, hail, or heavy snowfall.
2) Favor wind-rated shingles and ensure proper nailing patterns per manufacturer guidelines and local codes.
3) Maintain attic ventilation and insulation to minimize thermal stress on the roof deck.
4) Keep edges and flashing sealed and check for moss or algae growth that can lift shingles over time.
5) Schedule periodic roof checks with a reputable roofer to catch early lift or moisture issues before they escalate.