Last updated: Apr 19, 2026
Spring hailstorms in this area are the primary trigger for sudden roof replacements and insurance claim activity. When the sky darkens and hail begins, act fast: inspect the roof from safe ground but document with photos from the ground if you cannot safely climb. A timely start matters because adjusters often schedule visits soon after storms, and delays can complicate coverage decisions. The window from storm onset to claim review is tight, and early action helps lock in the condition state the insurer will rely on.
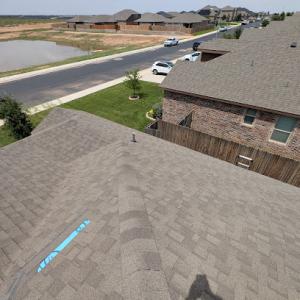
Wind events in spring and fall commonly damage flashing and ridge components on roofs in the region. Hail can bruise shingles and dent metal flashing, but wind-driven debris often concentrates damage at transitions, valleys, and along roof edges. Pay special attention to corners, skylights, HVAC curbs, and vent pipes where flashing meets the deck. If flashing shows loose or lifted sections, surface granules are washing away, or there are micro-cracks in ridge materials, those are red flags for a claim and for replacement planning.
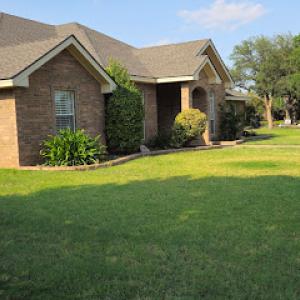
Local insurers commonly expect thorough photo documentation of pre- and post-damage conditions before and during adjuster review in Midland claims. Gather clear images of the roof in good light from multiple angles, plus close-ups of damaged areas. Include exterior photos of the home's eaves, gutters, and any visible interior signs of water intrusion, such as stains on ceilings or walls near the affected roof line. Keep a dated sequence: pre-storm shots if available, immediate post-storm captures, and ongoing images showing progression or any temporary fixes. This documentation anchors the adjuster's assessment and can streamline the replacement decision.
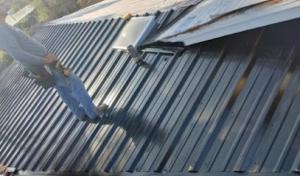
Before calling the insurer, note your home's storm history for the past few years, including when hail or wind events occurred and how those events affected exterior features. If you can access the attic, look for signs of roof interior leakage, such as staining or damp insulation, and photograph those indicators. Do not climb onto damaged or slick rooftops without proper safety gear and, ideally, a professional inspection. A decisive early assessment helps avoid back-and-forth over what constitutes permanent damage versus cosmetic wear.
Adjusters often operate on a tight adjustment window, particularly after spring hailstorms. Promptly report the storm date, location, and a list of suspected problem areas; share your photo set and a concise narrative of symptoms like roof ridge lifting or flashing corrosion. Keep communications organized in writing and save every photo and email thread. In Midland, the claim can hinge on how clearly the pre- and post-damage states are documented, so be precise about dates, storm intensity, and observed effects.
Replacement decisions are driven by the combination of documented damage, observed performance of the current roof system, and insurance policy language. If a leak is present or if flashing and ridge components show clear failure, expect the insurer to favor replacement rather than extensive patchwork. Weather patterns and forecasted heat extremes mean delaying a decision can escalate the risk of secondary damage. When the evidence supports it, pushing for a timely replacement often yields more reliable protection and faster restoration.
Start compiling your damage file now: dated photos of every roof face, close-ups of shingles, flashing, and ridges, plus interior signs of water intrusion. Establish a safe inspection plan, preferably with a local roofing professional who understands how Midland storms interact with common roof types. Maintain a steady line of communication with the insurer, supplying updates as new photos or information become available. Quick, thorough documentation and decisive action reduce risk and speed the path from assessment to a secure, weather-resilient roof.
Happy Home Roofing & Construction
(432) 300-4656 happyhomeroofers.com
3301 Storey Ave, Midland, Texas
5.0 from 170 reviews
With over 100 years of combined experience, we’ve been the go-to expert for quality roofing in Midland, Odessa, Big Spring, TX and surrounding areas. Catering to both residential and commercial properties. We guarantee top-notch quality and competitive pricing for all your roofing needs. We help protect one of your largest investment, your home & family.
Chappell Roofing
(432) 312-8705 chappellroofing.com
4804 E Loop 250 N, Midland, Texas
4.9 from 365 reviews
For more than 10 years, we’ve been the go-to roofing contractors in the Permian Basin, regularly ranked as #1 in the area. We’re local, using local materials and want every customer we help to become part of the Chappell Roofing family.
Ryan Roofing
3201 N Pecos St #208, Midland, Texas
4.9 from 176 reviews
Ryan Roofing is the premier roofing contractor in Midland, TX, and the surrounding area. We proudly offer roof replacement, metal roof replacement, TPO roofing, flat roof coating, roof repair, and more in Midland, TX! We deliver high-quality, code-compliant, and long-lasting roofing solutions for residential and commercial properties. With a foundation built on trust, transparency, and excellence, we go beyond just installing roofs—we provide comprehensive inspections, expert craftsmanship, and dedicated insurance support to make the process seamless for our customers. Whether storm damage restoration or a complete roof replacement, Ryan Roofing is your trusted partner for superior roofing services designed to stand the test of time.
Roofs By Nicholas of Midland
(432) 278-3831 www.roofsbynicholas.com
10204 Farm to Market 307, Midland, Texas
4.9 from 372 reviews
Roofs By Nicholas of Midland provides expert roof replacements in Midland, TX, helping homeowners protect their properties from harsh West Texas heat, high winds, and sudden hailstorms. Our team specializes in assessing roof damage, removing old materials, and installing durable new roofing systems built to withstand Midland’s challenging climate. We understand the unique needs of local homes, where energy efficiency and storm resistance are top priorities. With a focus on quality workmanship and dependable service, Roofs By Nicholas of Midland is the choice for homeowners seeking trusted roofing contractors who bring experience, professionalism, and care to every project.
Hartman Roofing
(432) 522-1117 www.hartmanroofing.com
2419 E Hwy 80, Midland, Texas
4.8 from 157 reviews
Residential and commercial Roofing
Certified Roofing & Inspections
(432) 250-2741 www.certifiedroofingteam.net
Midland, TX
4.9 from 117 reviews
Certified Roofing and Inspections provides residential and commercial roofing services, including seamless gutter installation, skylight repairs, and storm restoration services throughout Midland, TX and surrounding areas.
T.O.T.L. Roofing
(844) 367-8685 www.totlconstruction.com
3102 Boardwalk, Midland, Texas
5.0 from 55 reviews
T.O.T.L. Roofing & Solar was created with the vision of integrating real passion into the design and interworking’s of all types of roofing and solar projects. The skills possessed by our motivated staff is all based on experience gained from real on-the-job training. Whatever the project, T.O.T.L. Roofing & Solar will identify your vision and by the skills of our professional staff, we will turn them into a reality.
Permian Roofing
(432) 300-7694 permianroofing.net
Midland, Texas
5.0 from 28 reviews
Permian Roofing is a trusted roofing contractor proudly serving Midland, TX, and the surrounding Permian Basin area. Our team provides reliable roof installations, repairs, and replacements designed to handle the region’s intense sun, high winds, and occasional hailstorms. We work with both residential and commercial clients to ensure each roof is built to protect and perform in West Texas conditions. Known for our attention to detail and professional service, Permian Roofing is the go-to choice for homeowners and businesses seeking experienced roofers who deliver lasting quality and craftsmanship.
Maverick Roofing
(432) 617-0607 maverickroofing.com
4400 N Big Spring St Suite 104, Midland, Texas
5.0 from 23 reviews
Maverick Roofing is the leading residential and commercial roofing company serving Midland and Odessa, Texas. Our expert team understands local building codes, weather patterns, and architectural styles, ensuring your roof is both durable and aesthetically pleasing. From repairs and replacements to new installations, Maverick provide high-quality craftsmanship and dependable service. Protect your property with confidence, Choose Maverick Roofing to safeguard you homes and businesses in Midland-Odessa, TX
Carreras Roofing & Construction
(432) 901-8572 www.carrerasroofingandconstruction.com
3110 W Wall St, Midland, Texas
5.0 from 20 reviews
Locally and family owned! We have served the Permian Basin Since 2006. We specialize in Shingle Roof Replacements, Metal Roofs, Flat roofs , TPO Roofs, Stone coated Steel Metal Roofs. We are Licensed and Insured! We stand behind our work long after we've put our hammers down after a job well done. You will be satisfied with the workmanship ,quality and cleanliness of our Company. Give us a call Today for a FREE estimate or a damage assessment!!
Lopez Roofing
(432) 238-3364 roofingspecialistlopezroofing.us
802 N Weatherford St, Midland, Texas
4.8 from 17 reviews
Lopez Roofing is a trusted and reputable roofing company dedicated to providing top-notch roofing solutions for residential and commercial clients. With years of experience and a focus on quality craftsmanship, we have become a go-to name in the roofing industry. At Lopez Roofing, we understand the importance of a sturdy and reliable roof in protecting your property from the elements and ensuring its longevity. Our team of highly skilled and experienced roofing professionals is committed to delivering exceptional results, using the latest techniques and industry-leading materials. Whether you require a new roof installation, roof replacement, or roof repairs, we have the expertise to handle projects of any size and complexity. Our comp
Charles Terry Construction
(432) 520-6943 www.charlesterryconstruction.com
2707 S County Rd 1206, Midland, Texas
4.2 from 40 reviews
Welcome to Charles Terry Construction, serving the greater Midland, TX and Odessa, TX areas! We've been in the "Woof'n Business" since 1976, providing quality workmanship, excellent materials, and friendly customer service that's just what you'd expect from a family-owned West Texas roofing, gutter and metal building company. We pride ourselves on being the Platinum Roofing Company of the Midland-Odessa area.
Midland's hot, dry climate accelerates roof aging, and that reality can shorten replacement timing compared with milder Texas markets. Intense sun exposure dries out underlayment faster, and blowing dust accelerates granular loss on asphalt shingles. Wind-driven hail events also contribute to hidden damage that undermines a roof's remaining life. When a panel shows obvious hail impact or stressed shingles, the owner should treat it as a potential replacement signal rather than a minor patch, especially if multiple seasons have passed since installation. In practical terms, the aging clock starts earlier here, so a proactive assessment after major storms helps prevent weather-driven failures later in the summer furnace.
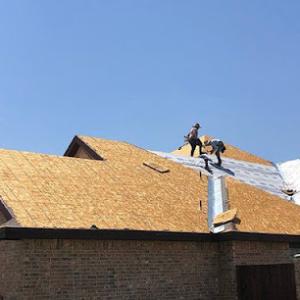
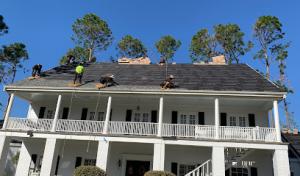
Cooler spring and fall months are the preferred replacement windows in Midland to reduce heat exposure during installation. Scheduling tear-off and installation for those seasons allows crews to work more steadily, keeps materials from degrading in the sun, and minimizes heat-related strain on workers. If a storm creates urgent repair needs in the peak heat, aim for early-morning work start times and plan for fluctuations in daily high temperatures. A well-timed project can use shade from late afternoon hours and avoids the most brutal midday heat, which helps adhesive and sealant performance in some systems and reduces the risk of heat distortion on sensitive components.
Hail and wind storms in this market are often clustered, so the real decision point hinges on the extent of underlying damage and the restoration plan. After a major hail event, a cautious homeowner schedules a professional roof inspection within a few days to confirm whether wind-driven damage or hail bruising has compromised deck integrity or flashing. If replacement is indicated, the sequence typically follows a careful tear-off during cooler hours, inspection of the sheathing for water intrusion, and timely installation of underlayment and new roofing to minimize wind uplift risk. In practice, this means communication with the contractor about preferred start times, especially when storms forecastes push work into late spring or early fall.
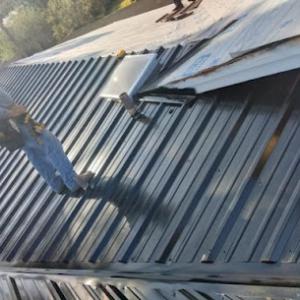
Certain materials respond differently here due to heat. Shingle granules may shed faster, metal panels can expand and contract with temperature swings, and tile products respond to heat-induced expansion stresses. A local crew will tailor the installation sequence to these realities, ensuring fasteners are sized for high wind zones and coatings are chosen for sun exposure. The result is a roof that not only resists hail and wind but also maintains its integrity through Midland summers.
Documentation after a hail event matters, as insurance timelines and weather windows can intersect. A homeowner benefits from coordinating early assessments, clear photos of impact patterns, and a staged plan that aligns tear-off with a fall shoulder season where heat is less intense. This approach keeps replacements efficient and protects the roof's long-term performance in the region's signature climate.
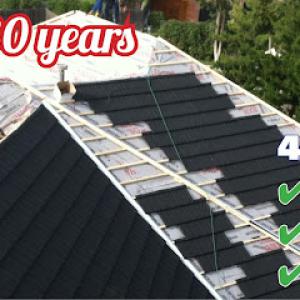
The dominant residential roofing materials in Midland are asphalt shingles, metal roofing, clay tile, concrete tile, wood shingles or shakes, and synthetic or composite shingles. In this climate, a roof is more than shade and insulation; it's a frontline against West Texas hail, abrasive wind, and extreme summer heat. The landscape of storm response, insurance documentation, and rapid replacement after hail events makes understanding how each material behaves under Midland conditions essential. When choosing a type, think not only about initial appearance, but also how the system handles impact, heat load, and the ability to secure key details like ridges and flashing.
Hail events in this area tend to be aggressive, with wind-driven projectiles that stress the surface and any micro-movement along the roof plane. Asphalt shingles offer a familiar, cost-conscious option with a wide range of impact resistance ratings, but their performance varies with shingle design and warranty language. Metal roofing shines in hail-friendly performance and wind resistance, yet the reflective heat of a bright metal surface can increase thermal expansion stresses if fasteners and seams aren't engineered for Midland's heat cycle. Clay and concrete tiles provide robust mass and hail resilience when properly installed, but their weight and brittle fracture risk under severe hail require careful substrate and underlayment planning. Wood shingles or shakes deliver a distinct aesthetic and can perform well in waves of dry heat; however, their susceptibility to cracking and weathering under hail makes proper coating, maintenance, and protective detailing crucial. Synthetic or composite shingles aim to combine impact tolerance with lighter weight and improved uniformity, but the long-term performance hinges on the specific composition and installation quality.
Midland's dry heat and high sun exposure demand materials that either reflect or tolerate extreme temperatures without excessive expansion, contraction, or coating degradation. Reflective or cool roof options can reduce attic temperatures and extend the life of underlayment and flashing, but roof color and finish must be chosen with both aesthetics and regional glare in mind. Metal roofs, in particular, respond to heat with rapid thermal cycling across panels; secure attachment and ridge venting considerations help prevent wind-driven lift during monsoon winds and summertime gusts. Clay and concrete tiles carry substantial thermal mass, which can moderate attic heat but may transfer heat to the deck during peak season if installation gaps are excessive. For all material families, compatibility with underlayment and flashing around valleys, hips, and ridges is essential to prevent heat-induced failures at those transition points.
Strong Midland winds stress ridge lines, hips, and flashing details more than some climates. A secure ridge cap and continuous along-ridge seal-paired with wind-rated underlayment-minimizes uplift risk. Materials differ in how they accommodate fasteners and edge detailing: asphalt shingles rely on adhesive bonding and nailing patterns; metal systems depend on seam integrity and proper caulking around penetrations; tiles require precise spacing, battens, and careful alignment to resist wind-driven uplift. Regardless of material, high-quality installation that prioritizes ridge and flashing accuracy matters as much as the chosen roof type. When evaluating bids, insist on a detailing plan that addresses wind loads, hail impact zones, and edge protection for drip edges and fascia.
After a hail event, replacement decisions hinge on more than visible dents. inspected areas such as attic insulation, decking, and interior water pathways influence whether a full replacement is warranted or a targeted patch is sufficient. In practice, Midland homeowners often benefit from considering material performance under repeated hail seasons, how well a roof ages under heat exposure, and the availability of local contractors who can execute timely, weather-resilient repairs. Tile and metal options frequently appear in active market discussions because of their damage-to-repair dynamics and potential for longer service life in this environment. The best fit balances impact resistance, heat tolerance, and reliable ridge/flashing detailing to withstand Midland's storm cycles.
In Midland, typical pricing ranges per square (one roofing square equals 100 square feet) reflect the local climate and the stock of homes. Asphalt shingles run roughly from 350 to 700 USD per square. Metal roofing sits higher, about 800 to 1500 USD per square, and clay tile generally lands between 1100 and 2100 USD per square. Concrete tile stretches from 1000 to 1700 USD per square, while wood shingles or shakes usually fall between 450 and 900 USD per square. Synthetic or composite shingles offer a middle ground at roughly 550 to 1100 USD per square. When estimating, keep in mind that a full replacement includes not just the roof itself but attachment, flashing, underlayment, and disposal costs, which can add bits to the total depending on the existing structure and attic access.
Midland's storm seasons bring hail and abrasive winds that compress scheduling and pricing windows. After a hail event, contractors often run near-capacity, and that pressure can push day-to-day scheduling back by a few days to a couple of weeks. Material availability can shift quickly as local suppliers respond to demand, especially for popular profiles like architectural asphalt or metal panels with color options. If a claim is involved, timing may hinge on survey and documentation speed, followed by supply chain realities. In practical terms, expect a tighter window for starting work and a higher likelihood of expedited timelines once a project is cleared to move forward.
Extreme summer heat impacts both safety and material handling. Roofs in the higher temperature band can slow installation, affect adhesive curing, and change work-rest cycles for crews. Scheduling early- to mid-morning starts can help maintain pace while protecting crews and underlayment integrity. Access to the attic, interior reach, and nearby storage for materials influence job duration and, by extension, daily labor costs. If the house uses an upgraded underlayment or reflective heat barrier designed for West Texas conditions, those choices can alter both upfront price and long-term energy performance.
When choosing a material, weigh the local wind and hail resilience against price per square and expected lifespan. Asphalt remains the most cost-efficient upfront option but may require more frequent replacement in hail-prone periods. Metal offers longevity and impact resistance that can justify the higher per-square cost for a shop-built Midland home. Clay or concrete tile delivers superb durability in high heat and wind but adds weight and installation complexity. Wood shingles bring aesthetic value but can suffer in hail-heavy climates unless properly treated and installed. Synthetic or composite shingles blend resilience with moderate pricing, fitting a mid-range budget while delivering decent hail resistance.
Get a clear picture of your project costs upfront - no commitment required.
Carreras Roofing & Construction
(432) 901-8572 www.carrerasroofingandconstruction.com
3110 W Wall St, Midland, Texas
5.0 from 20 reviews

For a full roof replacement, a building permit is typically required. The process protects both you and your home from the brutal West Texas sun, hail, and wind by ensuring the structure is sound and up to code before the work begins. You should not assume that a permit will be issued automatically or that an inspection can be skipped to speed things up after a storm. The permit serves as a formal record that the project meets local standards for safety, ventilation, and drainage, which matter a lot when Midland weather throws sudden hail events and high heat into the mix.
In practice, the City generally issues the permit after project details are submitted and the fee is paid. That means you should have your planned scope, material selections, and a clear start timeline ready to accompany the permit application. The process may involve a short plan review, especially if there are any deviations from the standard roof design or if accessory work is included (such as attic upgrades or venting changes). Be prepared for questions about underlayment type, drainage, and roof-to-wall connections. Delays can happen when submittals are incomplete or when the chosen components require additional verification for durability against Midland's wind gusts and hail exposure. Clear communication with the contractor and the permitting office helps avoid last-minute surprises that stall the project.
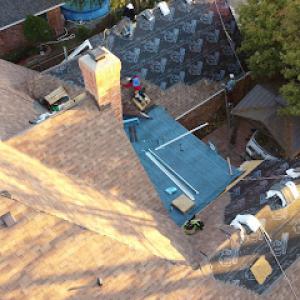
Midland inspections typically verify roof removal, underlayment, nailing, flashing, and ventilation, followed by final clearance after completion and final inspection. The sequence matters: inspectors look for complete removal of old material in the target area, proper installation of underlayment that resists hail impact and wind uplift, correctly spaced and fastened shingles or panels, and flashing around chimneys, vents, and skylights that seals out water in a storm. Ventilation is checked to prevent heat buildup in attic spaces, which can accelerate wear on finishes and reduce energy efficiency. If anything fails, a reinspection will be required, which can push back your project timeline and may complicate storm response plans after a hail event. Understanding this cycle helps homeowners coordinate weather windows and keep the project moving.
On inspection days, have access ready for the inspector to review both the completed layers and the work in progress. Expect questions about the sequence of installation, the type of underlayment used, and any deviations from the initial plan. The inspector will issue final clearance only after all components pass, signaling that the roof is weather-tight and code-compliant. If a storm or heat wave hits during the process, schedule adjustments may be necessary to protect exposed materials and avoid weather-related damage. The permit, inspections, and final clearance serve as critical safeguards to ensure a durable roof that resists the region's harsh storms.
This hail- and wind-driven roof claim market reflects local weather risk. In Midland, documentation isn't just paperwork-it's leverage when insurers review the storm story. Take photos that show roof age, penetrations, and visible wear long before a storm, because adjusters will compare current condition to pre-storm baselines. So build a strong baseline.
Adjusters in Midland-area claims commonly review photo sets and supporting documentation during settlement. A precise chronicle helps prevent disputes over what happened when. Keep a dated library of images: attic and exterior eaves, gutters, and any interior signs of roof leaks that could be linked to wind-driven damage.
Because claim activity rises after local storm events, Midland homeowners benefit from documenting roof condition before storms as well as immediately after damage. Pre-storm footage reduces ambiguity about pre-existing issues, while post-storm shots capture new indentations, missing shingles, or granule loss that otherwise could be contested.
When gathering evidence, aim for clarity and consistency. Use a common reference point on each photo, such as a ruler or a known feature, and include the date and location. Note weather conditions, time of day, and any nearby hail markers that might indicate the storm's severity.
Store everything securely in a single project folder, online or offline, with backups. If you rely on a contractor or adjuster, request a written acknowledgment that your documentation was received and linked to the claim. This simple step helps avoid gaps in the file that could stall settlement.
In the weeks following a hail or wind event, stay vigilant. Small damages often become costly leaks if ignored, and insurers will look for timely reporting and consistent documentation. A well-preserved baseline and thorough post-storm records can influence both settlement speed and the final outcome. Guard your file carefully today.
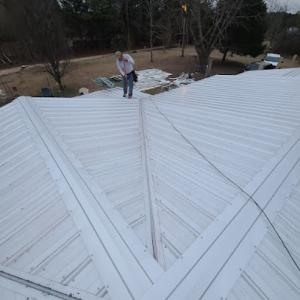
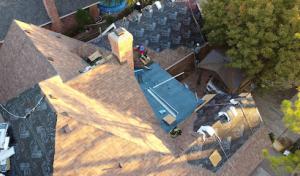
The Midland market shows meaningful demand beyond steep-slope residential work, with flat-roof specialization that reflects local structures and weather patterns. When a hail event hits, flat and low-slope iterations face different stress-the edge and parapet zones, drainage scuppers, and mechanical units sit closer to the wind-driven impact path. This means a practical focus on seam integrity and the practicality of maintenance access becomes central to long-term performance. In this environment, a roof system that ignores its low-slope realities tends to show wear sooner, especially after a hot Texas summer with blowing dust and rapid temperature swings.
Wind events push along the perimeter of flat and low-slope roofs, testing edge details and flashing where roof deck penetration occurs. In Midland, flashing must resist uplift without relying on cosmetic fixes. Edge drains and counterflashing should be inspected for sealant movement or loose connections after a storm, and any hail-induced denting near the perimeters deserves careful evaluation for concealed damage. The underlayment layer needs to be continuous and well-supported, with attention to tapers and termination at parapets to prevent wind-driven water intrusion.
The inspection emphasis hinges on underlayment quality, flashing continuity, and ventilation pathways. Midday heat combined with wind can accelerate fabric wear and degrade sealants, so detailed note-taking on every seam, flashing corner, and penetration is essential. When planning a re-roof, ensure that flashing transitions are mechanically secured and that joints are reinforced where possible. Proper ventilation remains a cornerstone to reduce deck moisture buildup and extend the life of the new cover.
After a storm, document hail patterns and wind damage with dated photos, focusing on roof edges, vents, and parapets. Keep a detailed record of who inspected the roof and what was found, plus any weather-related delays in access. For a replacement, prioritize systems designed to perform under high wind loads and with robust edge detailing, and verify that the chosen approach aligns with Midland's unique exposure to wind-driven conditions.
Find specialists in TPO, EPDM, and built-up flat roofing systems for residential and commercial properties.

Happy Home Roofing & Construction
(432) 300-4656 happyhomeroofers.com
3301 Storey Ave, Midland, Texas
5.0 from 170 reviews
Roofs By Nicholas of Midland
(432) 278-3831 www.roofsbynicholas.com
10204 Farm to Market 307, Midland, Texas
4.9 from 372 reviews
Skylight repair appears as a recurring specialty in Midland's contractor market, though it is not a dominant segment. The combination of hail, abrasive wind, and extreme heat stresses flashing and seals around openings. When a storm hits, these weaknesses tend to show up first on skylights, vent stacks, and attic penetrations. A practical approach is to anticipate that any roof replacement will include a thorough inspection of every roof opening, not just the visible vent skirts or skylight domes.
Midland inspections routinely include flashing review because it directly affects skylights and other roof openings during replacement work. After hail or a windy event, look for loose seals, dented or cracked skylight frames, and lifted or corroded flashing pans. A seasoned contractor will test the integrity of the flashing by inspecting for gaps where water could backflow under shingles. If there is any sign of moisture intrusion or daylight visible from the attic, plan a targeted penetration repair rather than a generic roof patch.
Document every damaged penetration with clear photos showing the skylight, flashing, and surrounding shingles. Note weather conditions at the time of damage and any staining inside the attic or ceiling. When arranging replacement, insist on a line-by-line flashing plan: base sheet transitions, step flashings at chimneys or vent stacks, and proper end dams for skylight curb flashing. Midland-specific reality means expect multiple openings to require synchronous flashing work to minimize heat-driven expansion and contraction stress.
Coordinate skylight repairs with roof replacement so flashing is addressed during the same project window. A dedicated inspection around each opening helps prevent recurring leaks after the crew leaves. If a skylight is being reused, ensure its curb is square, the flange is flush, and the gasket is replaced to maintain a weather-tight seal in the next storm season. For new openings, specify integrated flashing that accounts for high wind uplift common to severe Midland storms.
Find contractors experienced in skylight installation, flashing, and leak repairs to bring natural light into your home.
Happy Home Roofing & Construction
(432) 300-4656 happyhomeroofers.com
3301 Storey Ave, Midland, Texas
5.0 from 170 reviews
Hartman Roofing
(432) 522-1117 www.hartmanroofing.com
2419 E Hwy 80, Midland, Texas
4.8 from 157 reviews

Certified Roofing & Inspections
(432) 250-2741 www.certifiedroofingteam.net
Midland, TX
4.9 from 117 reviews
Solar roofing is an active but smaller specialty in Midland's contractor market. The climate invites sturdy solar options, but the work happens alongside a demanding roofing job rather than as a standalone retrofit. When you think about adding solar, plan it as part of the roof replacement or major repair window, not as a later add-on after the dust has settled. The sun is relentless, and the roof must tolerate high heat, rapid temperature swings, and the same wind-driven debris that damage shingles and panels alike. A smart approach pairs a durable roof system with a solar interface that respects ventilation, insulation, and drainage.
Midland's intense sun makes roof heat exposure a central planning issue when coordinating roofing and solar work. Heat impacts material longevity, shingle color selection, and the efficiency of mounted or integrated PV options. Choose reflective or cool-roof finishes where appropriate, and coordinate with the solar installer to keep attic space well vented and dry. In practice, this means aligning shingle exposure, underlayment choice, and panel mounting to minimize heat buildup beneath the array. It also means recognizing that some solar attachment methods perform better on certain roof types and pitches, especially when the roof must endure prolonged heat during summer afternoons.
Because Midland full replacements typically require permits and inspections, homeowners should coordinate roof scope before adding solar-related penetrations. Start with a unified assessment: confirm the roof's remaining service life, the condition of flashing and joints, and a plan for weatherproofing around any penetrations. Choose a solar solution that aligns with the roof's expected life and the local wind regime; low-profile mounts and durable sealants can pay off during hail season. Schedule installation during a shoulder period of the heating season when temperatures are workable and storm activity is lower, so both roofing and solar crews can align on sealing, insulation, and drainage without rushing. This coordinated approach helps ensure that the system endures Midland's climate while delivering the intended solar performance.
Find contractors who integrate solar panels or solar shingles into your roof for long-term energy savings.
Roofs By Nicholas of Midland
(432) 278-3831 www.roofsbynicholas.com
10204 Farm to Market 307, Midland, Texas
4.9 from 372 reviews
T.O.T.L. Roofing
(844) 367-8685 www.totlconstruction.com
3102 Boardwalk, Midland, Texas
5.0 from 55 reviews
