Last updated: Apr 19, 2026
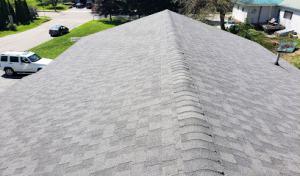
Essex Junction winters bring snow accumulation followed by freeze-thaw swings that can back water up at eaves and shorten roof life if attic ventilation is weak. When snow sits on a roof and temperatures swing above and below freezing, melt water refreezes at the eave lines, forming ice dams that push moisture back under shingles and into the attic. In plain terms: a roof that looks fine in the fall can become a moisture highway in February if the attic isn't breathing properly. This is not a cosmetic risk-water infiltration behind the fascia, underlayment, and into ceiling interiors can compromise structural sheathing and promote mold growth in tight winter air.
The local climate makes ventilation a practical design issue, not just a maintenance checkbox. A well-ventilated attic creates a uniform roof temperature, reducing the ice dam danger and slowing moisture migration. In practice, that means a balanced system of soffit vents paired with permeable, properly spaced ridge or soffit vents, plus an air gap that stays clear of insulation. Materials and roof shapes should be chosen with Vermont winter realities in mind: roofs with generous overhangs, appropriate snow guards in high-snow zones, and fasteners rated for cold impact. When a full replacement is planned, structural and insulation details should be reviewed to ensure air sealing and vapor control align with the roof assembly. Without this alignment, even a top-tier shingle can fail early under repeated freeze-thaw cycles, and the attic remains a moisture reservoir rather than a protective space.
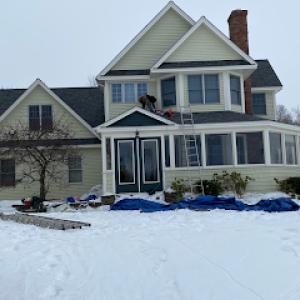
Replacement timing is usually pushed into late spring through early fall because winter access, snow cover, and cold-weather installation conditions complicate full tear-offs. That schedule matters for ice dam risk: delaying a necessary upgrade means another winter of potential moisture intrusion and accelerated roof wear. If a full tear-off is considered, ensure the new system includes continuous ventilation design, properly vented rafter spaces, and an upper air intake that stays free of insulation obstructions. Planning ahead with these elements reduces the chance of calling for emergency repairs after a thaw cycle.
You should inspect for signs of attic ventilation trouble before the next big freeze: look for resting insulation that covers soffit vents, signs of warm-spot staining on the ceiling, or condensation on attic surfaces. If upgrading, prioritize a ventilation strategy that fits the roof's geometry and snow load patterns, and confirm the chosen materials can handle repeated freeze-thaw exposure without delaminating or becoming brittle. For those nearing replacement, coordinate with a contractor who can model winter performance and verify that the new assembly minimizes warm attic losses and blocks meltwater from reaching the eaves. In short, a design-forward approach during replacement protects the home from the ice dam risk that Essex Junction winters so aggressively impose.
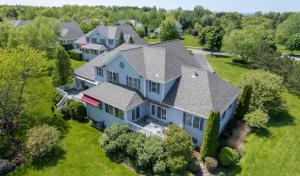
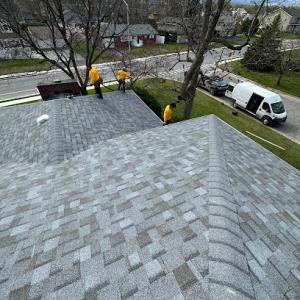
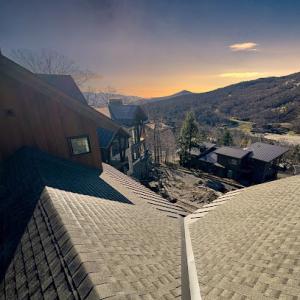
In this area, asphalt shingles and metal roofing are the dominant practical choices, reflecting what local contractors most often install for snow-shedding and re-roofing work. Asphalt shingles are familiar, straightforward to install, and handle the typical Vermont freeze-thaw cycles when paired with proper ventilation and underlayment. Metal roofing, on the other hand, shines when the goal is rapid snow shedding and reduced ice dam risk, especially on steeper pitches or taller homes. For a home with a long history of winter storms, a metal panel or standing-seam system can be a solid bet for maintaining a clearer roof surface through heavy snows. When choosing between these two, consider how your roof shape, attic ventilation, and existing structure will interact with the material's weight, installation method, and maintenance needs.
Slate, cedar shakes, clay tile, and synthetic/composite products exist in the market, but heavier systems need to be evaluated against local snow-load expectations and existing structure conditions. Slate and clay tile deliver a long-lasting aesthetic but carry substantial weight. They can strain older roof framing if not reinforced and require careful assessment of the deck, rafter spans, and the home's overall structural capacity. Cedar shakes offer a classic Vermont look with good adhesion properties in cold weather, yet they also add weight and can be susceptible to moisture-related issues if ventilation and drainage aren't optimal. Synthetic/composite options aim to mimic natural materials with reduced weight and dimensional stability, but they still demand a compatible underlayment and adequate attic ventilation to handle freeze-thaw cycles. Before selecting a heavy system, have a structural assessment and consider whether the existing framing meets the snow-load demands without overburdening the house.
Warm summers and summer thunderstorms can affect asphalt shingle handling and adhesive sealing, while long winters make metal appealing for snow shedding in this part of Vermont. Asphalt shingles installed with the right underlayment and proper attic ventilation perform better if the attic space is sealed and ventilated to minimize heat buildup in summer and capillary action in winter. In hot months, confirm that the adhesive strips are rated for your local temperatures and that shingles are installed with a respected ventilation strategy so they don't blister or lift. Metal roofs respond well to cold weather and snow because they shed snow more readily, but they need precise flashing and a robust seal at penetrations to prevent ice dams along eaves and valleys. Discuss panel profiles, fastener choices, and sealant compatibility with local installers to ensure the system holds up against repeated freeze-thaw cycles and the weight of accumulated snow.
When evaluating options, start with your roof's slope, deck condition, and attic ventilation. If the goal is reliable snow shedding with a straightforward reroof, asphalt shingles or metal are sensible starting points, given common housing stock and climate expectations here. If the desire is a distinct look or a longer lifespan with heavier materials, slate, cedar shakes, or clay tile can work, provided the structure has been evaluated for load and compatibility with winter conditions. Synthetic/composite options offer a middle path but still require attention to ventilation and underlayment to perform through multiple seasons.
Late spring to early fall is the normal replacement window in Essex Junction because winter snow and ice limit safe access and can stretch project timelines. Work plans should build in a realistic cadence for thaw cycles, and crews should set expectations with homeowners about potential weather delays. When the job transitions from the shoulder of spring into summer, ensure staging areas stay clear of lingering snowmelt runoff and that ladders and roof access points are checked for ice near eaves and skylights. A careful schedule can prevent cold snaps from forcing weekend shutdowns and protect materials from moisture exposure during delivery and storage on site.
Spring thaw and heavy rainfall create moisture-management challenges during tear-off and dry-in, so scheduling around thaw periods matters locally. On the removal phase, keep tarps and containment in place to minimize water infiltration into attic spaces and interior rooms. Dry-in emphasizes sealing roof deck and underlayment promptly, but local conditions demand vigilance for lingering moisture in shallow ridges and valleys. If the forecast calls for back-to-back storms, consider adjusting the sequence to secure interior spaces first and then complete exterior sheathing and roof coverings. Ventilation checks should be timed for dry periods when attic air can be accurately assessed, avoiding misreads caused by recent rain or dew.
Autumn storms and leaf debris can interfere with final ventilation checks and cleanup as contractors race to finish before Vermont winter conditions return. Prioritize a clean eave line and gutter clearance so vent paths aren't blocked by fallen leaves. Final inspections should target nailing patterns, attic vent balance, and flashings while trees still have some leaf drop but before heavy snow can obscure workmanship. If a fall rain event interrupts the last phase, use wind and moisture monitoring to determine whether any re-sealing is needed before the season shifts again. Clear communication with the homeowner about anticipated fall weather windows reduces last-minute changes and helps maintain a tight schedule.
In Essex Junction, coordinating with local crews means aligning project milestones to the most reliable windows in late spring through early fall. Build in a buffer week around expected thaw periods and leaf-fall cleanups, and designate a primary contact who can confirm weather-ready days a week ahead. For critical tasks like dry-in underlayment and ventilation setup, schedule when attic spaces can be accessed dry and free from accumulating meltwater. A well-timed sequence keeps moisture risks low and supports a durable, winter-ready roof.
Find local contractors experienced in assessing and restoring roofs after hail, wind, and severe weather events.

Cedar Creek Home Improvements
19 B Corporate Dr, Essex Junction, Vermont
4.8 from 36 reviews

Vermont Construction Company
(802) 200-2684 www.vermontconstructioncompany.com
Serving
4.7 from 226 reviews
Vermont Construction Company Roofing Division
Serving
4.5 from 82 reviews
Cedar Creek Home Improvements
19 B Corporate Dr, Essex Junction, Vermont
4.8 from 36 reviews
Cedar Creek Home Improvements is a Vermont contracting company providing roofing, siding, windows, doors, additions, spray foam insulation, and more. We've built several small homes, but our specialty is home improvement. We complete approximately 100 to 200 projects per year and all work is completed by our own employees. We hold ourselves to the highest standards possible for every job we take on. We never subcontract our labor or hire other companies. We carry full liability and workers' compensation for all of our employees. We kindly ask you to take this important factor into account when considering pricing, materials, and procedures for your next project.
Vermont Construction Company
(802) 200-2684 www.vermontconstructioncompany.com
Serving
4.7 from 226 reviews
Locally owned and operated, Vermont Construction Company has years of experience offering residential and commercial contracting services, including roofing. Our service area extends throughout Vermont, upstate New York, and western New Hampshire. We deliver high-quality roof replacements and repairs, siding, new construction, painting, and drywall services through one contractor. We don’t take a cookie-cutter approach. We are dedicated to understanding every customer's values and circumstances and projects. Contact us today to learn more.

Vermont Construction Company Roofing Division
Serving
4.5 from 82 reviews
Vermont Construction Company - Roofing Division delivers the highest quality in home building, renovations, and maintenance services for your home or business needs. We are expert local roofing contractors providing services throughout Vermont, Upstate New York, and Western New Hampshire. We understand that creating the best possible outcomes requires clear communication, detailed planning, and a thorough understanding of our customer's goals and values. Contact us about your latest roofing project.
Evergreen Roofing
(802) 865-2264 evergreenroofingvt.com
Serving
4.1 from 15 reviews
Evergreen Roofing was founded in 1993 by Stephen C. Smith, commonly known as “Smitty”, until his sudden passing in 2005. After the death of “Smitty” his wife, Sarah Shea-Smith, took over and quickly learned the ins and outs of the roofing business and proudly continued the quality workmanship and professionalism Evergreen Roofing had become known for. Evergreen Roofing strives to ensure that every job completed is above and beyond industry standards and will stand the test of time to provide the highest quality roofing systems while also providing unmatched customer service. Being a family owned business allows Evergreen Roofing to create a welcoming and comfortable environment for all clients.
Prevost Home Improvement
(802) 343-1674 prevosthomeimprovement.com
Serving
4.3 from 12 reviews
PROFESSIONAL ROOF CONSTRUCTION SERVICES: At Prevost Home Improvement, we are dedicated to delivering your new construction or repairs on time, on budget, and as painlessly as possible. Whether it’s roofing, gutters, skylights, or vinyl siding, we will work with you every step of the way, from quoting to cleanup, to ensure your completed project meets your every expectation. "I started this company to give people the best materials and installations, while being fair and doing exactly what we agree upon!” ~ Steve Prevost
CG Family Construction | Roofing Division
(802) 355-4525 cgfamilyroofing.com
Serving
4.9 from 40 reviews
Our team at CG Family Construction will take on all kind of roofs big or small. We work with everything between Roofing & Gutters. Our team won't waste a second on the job site with most of our roofs completed within a day or two. Our work says it all giving you what you envisioned. Our employees at CG Family Construction have shown and given quality work for over 20+ years. If you are in need of the services on our site, give us a call or send us an email.
Rivers Construction
(802) 210-5987 www.riversconstructionllc.us
Serving
4.6 from 25 reviews
Rivers Construction is a premier, full-service construction company based in Chittenden County Vermont, renowned for its exceptional expertise across a wide range of services, including roofing, siding, flooring, drywall, painting, and full on new builds. With a commitment to quality craftsmanship and unparalleled customer service, we tailor our solutions to meet the unique needs of each project.
L&M Construction
Serving
4.6 from 10 reviews
We are a locally owned family operated company with over 24 years of experience, we take pride in all of our work no matter how big or small a job may be. “We will beat any competitors written quote
JSS Roofing Contractors
(802) 578-5107 www.jssroofing.com
Serving
5.0 from 33 reviews
JSS Roofing contractors is a roofing company located in South Burlington, VT, servicing all of South Burlington and the surrounding areas. We specialize in roofing services, residential roofing, commercial roofing, shingle roof replacement, roofer services, Here at JSS roofing contractor, our mission is to always provide quality service at an affordable price. The success of our roofing company is due to the dedication we provide to our customers. No matter the job, customer satisfaction is always our number one priority! Don’t hesitate to give us a call and we'll send an expert roofer to you!
Five Star Roofing Company
(802) 518-7663 fivestarroofingcompany.com
Serving
4.7 from 20 reviews
At Five Star Roofing Company, we pride ourselves on our expertise and professionalism in providing top-notch roofing services to our clients. Based in Shelburne, Vermont state, we specialize in reroofing and roof replacement services for asphalt shingle roofs. Our team is also well-versed in conducting roof inspections, roof repair, and new roof construction. We understand that roofing projects can be expensive and time-consuming, which is why we offer free inspections and estimates to all our clients. Additionally, we provide a unique service using drones to measure and estimate your roofing needs without even having to step on the roof! We also offer lifetime warranties and financing options to make your servicing hassle and stress free!
Blue Sky Roofing & Custom Exteriors
(802) 862-1500 www.blueskyroofingvt.com
Serving
4.6 from 39 reviews
Blue Sky Roofing & Custom Exteriors is a trusted, family-owned company with 22+ years of experience serving Vermont and New England. We go beyond basic roofing — evaluating the entire building envelope for long-term durability and performance. Our expert team specializes in metal, standing seam, slate, steep slope asphalt, skylights, and custom siding. With a crew large enough for commercial jobs and the skill for complex custom builds, we’re equipped to handle projects of any scale. Proudly serving Stowe, Warren, South Burlington, Shelburne, Charlotte, Colchester, Richmond, Montpelier, Essex, and more. For roofing that withstands Vermont winters and integrates seamlessly with your home, choose Blue Sky.
RWS Construction
(518) 570-4321 rwsconstruction.net
Serving
5.0 from 18 reviews
RWS Construction, Inc. is your trusted roofing and carpentry contractor serving Willsboro, NY, and the Adirondacks. We specialize in high-quality roofing solutions—from durable asphalt shingles and sleek standing seam metal to classic cedar shakes and rubber roofing. Our expert team combines precision craftsmanship with premium materials to protect and elevate your home. Beyond roofing, our skilled carpenters deliver exceptional woodwork, from custom cabinetry to detailed trim and structural projects. Whether upgrading your roof or enhancing your interiors, RWS Construction, Inc. ensures lasting beauty, reliability, and value for your property.
When planning a full replacement, start with the provided per-square ranges to ground expectations in local realities. Asphalt shingles run roughly 350 to 700 USD per square, a value that reflects the balance between typical Vermont weather exposure and a manageable install window. Metal roofing sits higher, about 700 to 1100 USD per square, reflecting its durability against ice, wind, and temperature swings common here. For a look with long-term curb appeal, clay tile typically lands 900 to 1800 USD per square, though its weight and installation requirements mean structural considerations matter. Synthetic or composite shingles span roughly 420 to 900 USD per square, offering a versatile mid-range option that handles freeze-thaw cycles well. Slate, prized for longevity, generally trades around 1100 to 1800 USD per square, while cedar shakes land between 600 and 1100 USD per square for those preferring a traditional Vermont aesthetic. In Essex Junction, homeowners weighing these options should consider not only upfront material costs but also long-term performance under heavy snow and rapid thaw cycles.
Costs in this area are strongly influenced by the short practical roofing season. The practical window tightens to late spring through early fall, when weather reliably allows ladder access, material delivery, and consistent crews. That concentration can drive scheduling pressures and, in turn, impacts project timing and potential price volatility. If a replacement is needed after the traditional window closes, wait times may push into the next season, and labor availability often tightens, subtly elevating bids. Planning ahead for mid-spring starts can help secure a steadier crew and reduce the risk of weather-related delays that ripple into material-ordering costs and overall project duration.
Snow-load and ventilation expectations from the Town review can add scope beyond surface replacement. Expect potential upgrades to intake and exhaust vents, decking repairs, and cold-climate detailing as part of a comprehensive project. These elements matter in Essex Junction because ice dam risk increases with poor attic ventilation and marginal decking integrity. A full assessment that includes ventilation balance, insulation quality, and roof-deck condition helps prevent moisture intrusion during thaw cycles. While these upgrades add to the base cost, they substantially reduce the chance of recurring issues in the following winters and improve full-year performance, particularly for full replacements in snow-heavy seasons.
Get a clear picture of your project costs upfront - no commitment required.
A full roof replacement in Essex Junction generally requires a building permit through the Town of Essex Building Department. The process is designed to ensure that the work meets local snow-load requirements and winter performance standards. Starting the permit early helps avoid delays when crews are ready to begin, and it creates a clear record that can protect you if winter weather or snow events push the project timeline.
Inspections are typically scheduled at key milestones, including interim and final review rather than only a closeout visit. Your contractor should coordinate with the Building Department to arrange these visits so that critical steps-such as structure integrity, venting installation, and overall roof assembly-are reviewed as the work progresses. This approach reduces the risk of backtracking or rework after a seal of approval is issued.
The local review commonly focuses on snow-load considerations and attic venting, which are recurring cold-climate issues in Essex Junction projects. The town expects details on how the chosen roof system will manage heavy snow loads and how attic ventilation will function throughout winter. Be prepared to provide documentation on ridge and soffit venting, soffit intake, and any mechanical ventilation solutions that support moisture control. If the design relies on usable attic space, confirm that ventilation meets code requirements while preserving insulation and air sealing integrity.
Expect questions about how vent channels will be maintained during installation and whether existing attic framing can accommodate the new system without compromising insulation. The permit office may request calculations or manufacturer specifications demonstrating that the chosen materials and layout can handle Vermont winters. Having a clear plan for drainage, ice dam prevention, and moisture management can streamline the review and reduce the chance of amended approvals.
Because Essex Junction projects often interact with snow management and street access, the permit process benefits from early coordination with neighbors and town staff. If temporary work areas or reduced eave clearance are required during winter months, document these arrangements with the Building Department. Clear communication about milestones helps ensure the project remains on track and compliant, even when the weather tests sturdiness and performance of the new roof.
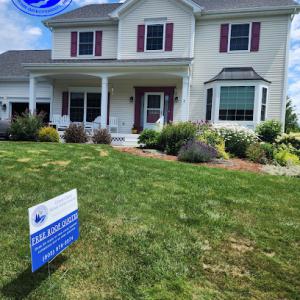
Essex Junction sits in a moderate-claim Vermont insurance environment where carriers usually want photos, contractor reports, and adjuster verification before approving replacement costs. When a claim is on the table after a harsh winter, your file benefits from clear, timestamped evidence: wide-angle exterior photos of damage, close-ups of missing shingles or flashing, and a concise contractor report that explains cause and scope. If you have ongoing moisture concerns, gather interior pictures of stained ceilings and attic condensation, with a simple calendar noting when the issue first appeared and when you first noticed it.
Ice-dam-related damage and wind events are the weather issues most likely to shape coverage decisions and claim timing for local homeowners. Expect insurers to scrutinize how ice dams formed, whether attic ventilation was adequate, and if snow load contributed to structural strain. A well-documented sequence-before-and-after roof views, attic temperature readings if available, and a written summary from a trusted roofer-helps align expectations with adjusters. If a wind event tears metal edging or shingles, include the exact wind exposure, debris impact, and any temporary protections you put in place to minimize further damage.
Because winter conditions can delay inspection access, Essex Junction homeowners benefit from documenting interior leaks, exterior damage, and temporary protection steps as soon as conditions allow. Keep a log of interior leaks with dates and locations, capture exterior ice dam buildup from a safe vantage point, and maintain temporary tarps or boards over vulnerable onsite areas. When weather clears, arrange a rapid assessment by a qualified contractor who can provide a detailed scope and photographs that support the claim narrative, helping the process move toward timely decisions.
Find local contractors experienced in assessing and restoring roofs after hail, wind, and severe weather events.
Cedar Creek Home Improvements
19 B Corporate Dr, Essex Junction, Vermont
4.8 from 36 reviews
Vermont Construction Company
(802) 200-2684 www.vermontconstructioncompany.com
Serving
4.7 from 226 reviews
Vermont Construction Company Roofing Division
Serving
4.5 from 82 reviews
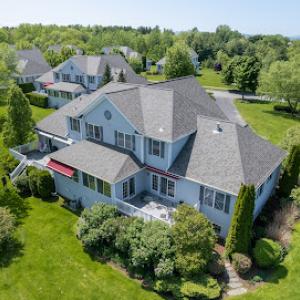
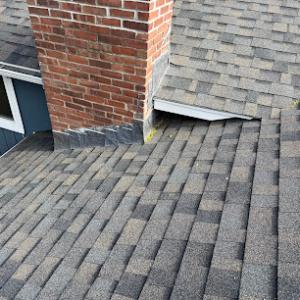
In this snow-heavy climate, skylight work is a meaningful specialty in the Essex Junction market, which matters because freeze-thaw conditions can expose flashing weaknesses around roof penetrations. When storms drive drifted snow against a skylight curb or chimney base, the resulting stress can push flashing toward failure if the surrounding roofing is already marginal. Expect recurring issues after heavy snows or rapid warm spells.
Chimney-related roofing work shows up repeatedly among local contractors, pointing to flashing and masonry transition details as a common homeowner concern. The joint between metal flashing and brick or stone can crack or lift with accompanying ice buildup. Drip edges and kick-out details matter, especially where flashing meets a vertical chimney chase or where mortar has softened over seasons of freeze-thaw cycling.
In Essex Junction's snow season, penetrations such as skylights and chimneys are frequent leak points when backed-up ice or drifting snow stresses flashing details. Look for dark staining, peeling shingles along the base, or granule loss near the flashing. Inside, signs include peeling paint, condensation on ceilings, or a musty odor after a heavy snowfall. A yearly exterior check after the thickest snows helps catch issues before leaks develop.
Keep snow from piling up directly around skylight wells and chimney flashing by careful clearing of adjacent roof areas using non-abrasive tools. Ensure attic ventilation remains robust to reduce interior condensation that can worsen moisture intrusion at penetrations. If flashing appears lifted, cracked, or rusted, address it promptly with a skilled roofer who understands winter performance on full replacements.
Find contractors experienced in skylight installation, flashing, and leak repairs to bring natural light into your home.
Cedar Creek Home Improvements
19 B Corporate Dr, Essex Junction, Vermont
4.8 from 36 reviews
Vermont Construction Company Roofing Division
Serving
4.5 from 82 reviews