Last updated: Apr 19, 2026
Queensbury sits in the southeastern Adirondack region, where cold winters and repeated freeze-thaw cycles drive the aging of roofs. The proximity to Lake George and the town's varied elevations mean snow can linger unevenly, creating pockets of heavy load and inconsistent melt across a single roof surface. That combination-intense cold followed by partial thaws and refreezing-accelerates wear on underlayment, flashing, and ventilation details, especially on full replacements where every component is under scrutiny.
The most locally relevant winter failure pattern is ice damming at eaves, with backup risk tied to drainage blockage and refreezing. When snow sits on a roof, heat loss causes snow to melt near the eaves. If water refreezes at the gutter line, an ice dam forms, backing up water behind it. That water can seep under shingles, saturate underlayment, and find pathways into attic spaces or ceilings. In Queensbury, lake-effect wind patterns and drifted snow can create uneven dam development, making some eaves more vulnerable than others even on similar homes.
Repeated cycles of freezing and thawing are a primary roof-aging factor here. Shingle granules loosen, seams separate, and flashing around chimneys, vents, and skylights can loosen just enough for slow leaks to begin. In a town with a mix of aging roofs and newer installs, the weakest link often becomes visible after a February warm spell followed by another cold snap. Without timely attention, small leaks turn into bigger, costlier problems that complicate attic insulation, ventilation, and interior comfort.
Start by inspecting the eaves and gutters for ice buildup and ensure downspouts drain away from the foundation. Clear loose snow from generous overhangs but avoid aggressive shoveling that nicks roof surfaces. If a professional ladder inspection is possible, have someone check for damaged drip edge, loose or missing flashing, and signs of attic ventilation shortfalls-those are the bottlenecks that let ice dams form and grow. In the attic, look for compressed insulation and visible signs of moisture near the top plates, which signal heat loss that fuels dam formation. Address venting issues promptly: ensure soffit vents, ridge vents, and bathroom exhausts work in concert to move warm, moist air out of the attic rather than into roofing cavities. If ice dams exist, avoid walking on the roof; contact a local pro to remove ice safely and install preventive measures such as improved insulation, enhanced ventilation, and possibly heat cables only where appropriate and approved for your roof assembly.
Unrepaired ice dams, persistent attic condensation, or recurring leaks after melt cycles demand immediate professional assessment. A local roofer will tailor a plan that accounts for Lake George's microclimates and your roof's exposure to prevailing Adirondack winds, ensuring underlayment, flashing, and ventilation are aligned to withstand another harsh season. The goal is to interrupt the cycle-minimize heat loss, reduce melt, and stop dam formation before water finds its way inside.
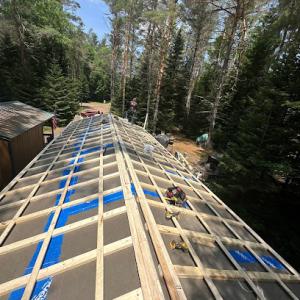
In this climate, the window that makes sense for full roof replacements runs from late spring through early fall. The ground thaws, crews can move efficiently, and material delivery stays more predictable. That means planning your project to start after the frost has cleared and finishing before the late autumn winds pick up. Doing so minimizes delays caused by snow, ice, or sudden cold snaps that can make crews pause to protect exposed decking. For homeowners, aligning timing with weather forecasts and having contingencies ready for a wet spell helps keep the job on track.
Spring brings a careful truth-teller to the roof. As snow recedes, hidden leaks and flashing failures become obvious, especially around chimneys, dormers, and valley joints. The meltwater can find ways through weak seams that never showed under winter cover. If a roof is due for replacement or serious repairs, this season is when you learn the full extent of any preexisting damage. For inspection, focus on flashing around roof penetrations, the eaves, and valley boxes. A thorough assessment now saves time later, because undetected issues can complicate a late-season install or lead to post-project trouble in a sudden thaw.
Autumn in this area is a mix of brisk winds, unpredictable precipitation, and rapid temperature swings. Those conditions pressure sealants and underlayment, and they test roof penetrations and ridge lines as days cool and nights dip below freezing. If a replacement runs into autumn, crews must pace the work to avoid cold-weather curing problems and to ensure all flashing details stay dry during installation. The goal is to complete the heavy lifting while daytime temperatures are comfortable and before the first hard frost sets in. For repairs, autumn weather can mean shorter windows between storms, so preparedness and clear communication with the contractor become essential.
Because the local climate combines snow loads with freeze-thaw cycles, the quality of underlayment, proper ventilation, and flashing details matters more here than in milder markets. Shoulder-season projects require meticulous planning: ensure the attic is well ventilated to handle the heat of late spring and the residual heat of early fall, and verify that eave-to-ridge airflow is uninterrupted. In a Queensbury weather pattern, a late spring or early fall installation benefits from consistent temperatures that allow for proper sealant and fastener behavior. If you suspect ice dam concerns, address insulation and radiant barriers as part of the re-roofing plan so cold air doesn't meet warm roof deck pockets during melt cycles.
Begin with a daylight-window assessment of the roof in late winter or early spring to map high-risk areas such as valleys and penetrations. Schedule follow-up visits during the late spring lull when weather is typically more cooperative. If a delay is unavoidable, use the waiting period to prep the site: clear nearby branches, protect landscaping, and arrange for snow-free access after storms. When autumn arrives, confirm that the crew has a clear plan to manage rapid temperature swings and damp days, with contingencies for rain delays and wind-driven debris. In all cases, maintain open lines of communication with the contractor about weather contingencies and the sequence of work, so that critical flashing and ventilation work can be completed during the most favorable conditions.
In this climate, the roof面对 long winters with lake-effect snow, freeze-thaw cycles, and potential ice dams. The reliability of underlayment, proper ventilation, and flashing details becomes a practical line of defense against moisture intrusion and ice-related damage. If attic ventilation is weak or balanced poorly with insulation, cold air won't circulate to keep roof deck temperatures even, which increases the risk of snow melting at the eave and refreezing as an ice dam. When selecting materials, focus on assemblies that allow for robust, continuous underlayment, well-sealed flashing at penetrations, and a vented soffit-to-ridge path. The goal is a roof that resists sustained cold, wind-driven snow, and mid-winter temperature swings without permitting condensation on the deck.
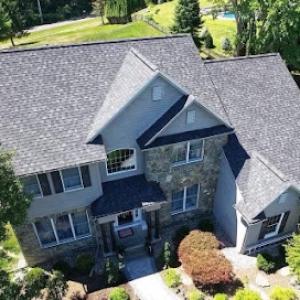
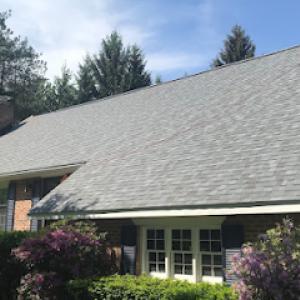
Asphalt shingles are a common locally, and they perform well when paired with a solid underlayment and attention to edge details. In practice, the most critical component for this material is how the shingle system integrates with ventilation gaps at the eaves and around chimneys or vents. Poorly detailed fascia, improper drip edging, or gaps in valley and step flashing can become weak points under heavy snow loads. When choosing asphalt, look for premium 30-year or longer options that have reinforced nailing zones and a waterproof underlayment system beneath. In addition, ensure that the roof line and fascia accommodate proper snow shedding without creating stagnation points where ice can form.
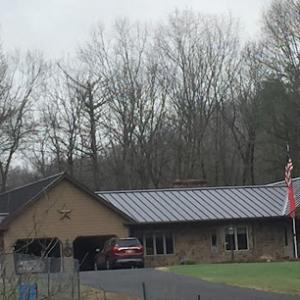
Metal is especially relevant in this snow-prone region because shedding behavior and edge details matter during heavy winter accumulation. Metal panels should be installed with continuous, well-sealed seams and trimmed edges to prevent snow from bridging under flashing or sitting against vulnerable slopes. For Queensbury-style winters, a standing-seam or snow-retention-ready panel design reduces the risk of ice dams along eaves and hips. Pay attention to fastener placement and sealant over penetrations; a tight seal around vent stacks and skylines helps minimize meltwater intrusion. A metal roof can handle cycles of freeze and thaw when edge details are robust and the system resists developing gaps as temperatures swing.
Clay and concrete tile appear in the material mix, but their weight and cold-climate performance need careful evaluation in a town with snow load concerns. These tiles are heavy; ensure the structure can support elevated loads, especially when snow packs up on overhangs. Cold-weather performance hinges on the substrate and underlayment choice, plus how well flashing integrates with tile laps at hips and ridges. Tile edges and fasteners must tolerate freeze-thaw without cracking or loosening, and suitable snow guards may be necessary in high-accumulation zones to prevent tile damage or dangerous sliding.
Wood shingles and shakes bring a traditional look, but their performance under freeze-thaw stress depends on continuous ventilation and moisture management. Wood is vulnerable to staining or rot if underlayment isn't airtight and flashing around chimneys, skylights, and hips isn't continuous. In snow-prone stretches, wood substrates must stay dry long-term; consider treated or decay-resistant species and ensure that curing and sealing products remain intact after winter cycles. Adequate ventilation paired with a solid drip edge helps shed snow and minimize standing moisture at eave lines.
Synthetic or composite options can mimic natural materials while offering consistent performance in cold weather. Look for products with proven resistance to ice damming and superior dimensional stability in low temperatures. The installation should emphasize a robust underlayment, precise flashing, and compatible venting strategies. Given winter exposure, select a system that tolerates temperature swings without warping or losing integrity at edges, valleys, or penetrations, and that supports effective snow shedding without creating hidden pockets of meltwater.
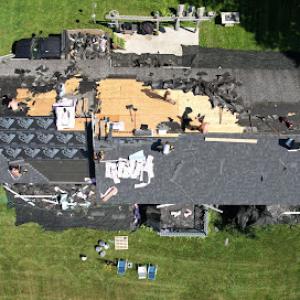
Regional storm, wind, and hail events drive a meaningful share of roofing claims in this area. Winters bring heavy snow, ice buildup, and freeze-thaw cycles that test shingles, flashing, and underlayment. When a storm hits, roofs face not just immediate damage from hail or wind, but the slow creep of ice damming and saturated underlayment that can complicate later leaks. Homeowners should prepare for a process that can extend beyond a single inspection and require clear documentation to support the need for replacement rather than repair.
Insurers in this market commonly expect documentation of roof age, prior damage history, contractor estimates, and photo evidence before approving a replacement scope. When a claim is filed, the adjusting team often asks for a timeline of past issues, including any prior leaks, shingle granule buildup, or flashing failures. Having a well-organized file with dates, visible damage, and a concise narrative of how a storm event affected the roof increases the chances of a straightforward assessment. If you keep receipts and note when shingles were first noticed to fail, those details can help local adjusters connect causes to the current damage.
Homeowners may be asked for updated photos during the claim process, and New York market conditions can affect claim timing and coverage decisions. Take clear, outdoor daytime photos from multiple angles after a storm, focusing on shingles edges, flashings around chimneys and vents, and any signs of lifted or curling material. Include attic shots if you notice interior staining or new condensation. When possible, arrange a short video walk-around to show elevation changes or overhang issues that aren't obvious in stills. If the roof is partially compromised, capture both the damaged and intact sections to illustrate the scope to the adjuster.
Begin with a careful evaluation of whether the damage is isolated or widespread, especially after heavy snow and thaw cycles. Document weather events and any related debris accumulation on the roof or gutters. Request a written estimate from a reputable local contractor who understands common Queensbury roofing issues, such as ice dam resistance, proper ventilation, and flashing details. Keep a steady record of all communications with the insurer, including dates, names, and summary notes of conversations. With careful documentation and timely photos, you can help ensure the claim reflects the true extent of storm-related damage rather than a series of incidental issues that emerge over time.
1st All Weather Roofing
(518) 741-8669 1stallweatherroofingco.com
Serving
4.9 from 141 reviews
1st All Weather Roofing LLC offers expert roofing services for residential and commercial properties. With extensive experience in real estate, home renovations, design, and decorating, our roofing contractors bring a unique perspective to each project. We understand the importance of a well-crafted roof in maximizing a property's potential, and our expertise helps us identify and address any underlying issues that may affect its integrity. Our commitment to detail and design ensures that our roofing solutions complement the property's overall aesthetic, providing superior protection and style. Choose 1st All Weather Roofing
Peak Roofing
(518) 577-6306 www.peakroofingnewyork.com
Serving
4.9 from 40 reviews
Peak Roofing provides professional roofing and siding services in Glens Falls, NY, Queensbury, Lake George, Fort Edward, and throughout the Adirondack region. We specialize in metal roofing, asphalt shingle roofing, EPDM rubber roofing, roof replacement, maintenance, and emergency roof repair for residential and commercial properties. We also install high-quality LP SmartSide, vinyl, and composite siding designed for durability, energy efficiency, and protection against harsh Adirondack weather conditions. Peak Roofing is committed to quality craftsmanship, reliable service, and customer satisfaction.
Greenwood Industries
(518) 747-4191 greenwoodindustries.com
Serving
4.7 from 12 reviews
Commercial roofing contractor also offering services such as waterproofing, and masonry.

RJS Services
(518) 751-0007 rjsservices.net
Serving
4.7 from 13 reviews
RJS Services is a trusted roofing contractor that is committed to serve Hudson Falls, New York and its nearby areas. A company dedicated to help you with your roofing needs and concerns.
Resolute Builders
Serving
5.0 from 6 reviews
Resolute Builders offers Roofing contractor services in Hudson Falls, NY and surrounding areas.
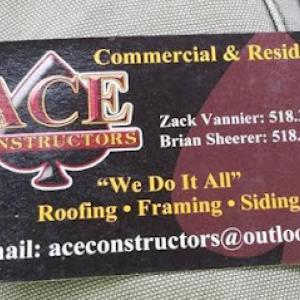
Ace Constructors
Serving
4.6 from 8 reviews
We do it all! Roofing, Framing, and siding.
M&D Roofing
Serving
4.2 from 6 reviews
Roofing and siding company that can perform carpentry including additions and other light framing work as needed

Roof Maxx of Schenectady, NY
Serving
4.9 from 69 reviews
Roof Maxx of Schenectady offers a cost-effective and eco-friendly alternative to traditional roof replacement. Our 100% natural, plant-based treatment extends the life of your roof by up to 15 years, saving you thousands. We serve Albany, Schenectady, Troy, and surrounding areas with free assessments and estimates, backed by a five-year transferable warranty. Protect your home, reduce landfill waste, and avoid the mess and expense of roof replacement. Contact our team today!

Saratoga Roofing
(518) 992-6405 saratogaroofingco.com
Serving
4.9 from 151 reviews
Saratoga Roofing - Premium Workmanship, Premium Materials, Premium Roofing We are Saratoga County's roofer! From minor repairs to full roof replacements, skylights to gutters, we are the roofers you can trust. Not only do we provide honest, quality workmanship, we are committed to serving our community proudly. With premium materials combined with our professionally trained installers and technicians, we are able to provide high quality results that will last. In addition, we guarantee all of our projects with our LeakProof and Professional Workmanship warranty. We proudly stand behind our motto: Premium Workmanship, Premium Materials, Premium Roofing. Call us today for your free estimate or in-home consultation!
Full Coverage Contracting
(518) 800-7663 www.fullcoveragecontracting.com
Serving
4.7 from 51 reviews
Welcome to FULL COVERAGE CONTRACTING, INC.. We are a full service Construction Company specializing in Commercial and Residential Roofing. We offer a wide range of customizable services to fit all of our customers’ needs.
DiCristofaro Construction
Serving
5.0 from 11 reviews
Certified and insured contractor with 25+ years experience. Providing reliable, professional and quality roofing and contracting services to the Capital Region. Free consultation and estimates available by appointment. dicristofaroconstruction@gmail.com Facebook: @dicristofaroconstruction
Roofing Saints
(518) 977-7663 www.roofingsaints.com
Serving
4.6 from 10 reviews
Roofing Saints has been repairing and replacing roofs in the Capital District for over 20 years. We know how hard it can be to find a Roofing Contractor that does quality work at an affordable price. We knew that Saratoga Springs had many Residential Roofing Contractors, so it would be tough getting started. But we also know, from firsthand experience, that there aren't many Roofing Contractors that are fair with their pricing and offer a Lifetime Warranty with all Roof Replacements and we wanted to fill that need in the Roofing Industry. Roofing the way it should be!
In this part of the Adirondacks, you'll see cost fluctuations driven by winter damage discoveries and spring/summer storms. After a heavy snow year or a sudden thaw, crews book up quickly and prices creep up as demand tightens. Plan for at least a small premium if you're scheduling right after a harsh stretch or a late-season melt that catches homeowners off guard. Emergency or expedited replacements nearby can push labor charges higher, so align timing with calmer windows when possible.
Steeper roof designs are common in snow country, and that extra pitch changes more than just the view. It raises safety considerations and slows down work, affecting both time and crew hours. In practice, this translates to higher labor costs per square and tighter scheduling. If your home has a dormer, chimney chase, or complex flashing, expect additional labor charges for detailing and wind-resistant integration. Low-slope replacements are easier to sequence but may require enhanced underlayment and ventilation attention to prevent leaks, which can shift the overall cost balance.
Material choice matters sharply here because snow, ice, and freeze-thaw exposure take a toll year after year. Upgrading from basic shingles to more durable or ice-dam resistant options often pays back in fewer call-backs and better performance in melt-freeze cycles. Asphalt remains a common starter option, but metal, synthetic/composite, or concrete tile can offer improved longevity and ice-shedding benefits, especially on steeper roofs. When planning, consider not just the installed price per square but the long-term resilience against the local freeze-thaw regime and the potential need for more robust underlayment, enhanced flashing, and attic ventilation.
Asphalt Shingles: 350-700 USD per square. Metal Roofing: 700-1200 USD per square. Clay Tile: 1200-2800 USD per square. Concrete Tile: 1100-2600 USD per square. Wood Shingles/Shakes: 900-1900 USD per square. Synthetic/Composite Shingles: 600-1200 USD per square. Use these ranges to set expectations for a given house size, roof pitch, and chosen upgrade level, recognizing that seasonal spikes and steeper slopes will bend the totals higher.
A building permit is generally required for a full roof replacement. In this town, the permit process is designed to ensure that underlayment, ventilation, and flashing details meet code and local practice. The permitting step signals the onset of a careful review of how the new roof will handle the Adirondack winters, heavy snow loads, and potential ice dam scenarios. You'll want to align your project plan with the expectation that every layer from deck to ridge vent is documented and sized for Queensbury's climate.
Applications are submitted to the Town of Queensbury Building & Zoning Department with project details. Have at hand a complete scope of work, roofing material specification, and installation methods for underlayment, flashing, and ventilation. Include a roof plan showing penetrations, valley configurations, eave details, and any skylights or chimneys. The department often asks for drainage calculations or snow-load considerations tied to the chosen system. Providing precise, code-aligned details up front reduces back-and-forth during review and helps prevent delays that can occur when winter weather tightens job sites.
Inspections are commonly scheduled during and after the project, with review focused on code compliance for underlayment, ventilation, and flashing details. Expect at least one inspection while the roof is open to verify installation methods and material compatibility, followed by a final inspection to confirm completion and compliance. In winter months, the inspector may coordinate around weather windows, so plan for seasonal constraints and have all installed components ready for review. Keep a clean access route to the roof and maintain open communication about any deviations from the approved plan.
Before submitting, verify that the chosen roof assembly aligns with local expectations for attic ventilation and eave/soffit interaction to minimize ice dam risk. Document how underlayment is installed across ridges, hips, and valleys, and show flashing continuity at all vents, chimneys, and wall transitions. If there are any unique features-like a low-slope section or a dormer-include additional notes on notes about drainage and ventilation. Organize the project binder with manufacturer specs, installation manuals, and a clear sequence of work to keep the process smooth through permit review and the inevitable winter scheduling.
Eave-edge leakage tied to ice damming is a more locally important concern than purely sun-driven shingle aging. In the Adirondack foothills, meltwater from a sunny midday can refreeze along the edge of the roof as temperatures drop, backing up under shingles and flashing. Over time, that repeated freeze-thaw process wears away underlayment and can wick moisture into attic spaces or ceiling joints. You'll notice small stains first, then softening of wood or drywall at the eave line. Keeping proper slope, snow removal practices, and a solid ice barrier at the eave can buy you time, but the consequences of neglect are interior dampness, mold growth, and higher repair bills once leaks establish a pattern across seasons.
Flashing and ventilation details receive inspection attention in Queensbury, reflecting their importance in local roof performance. Worn or improperly lapped flashing around chimneys, vents, and valleys invites leaks that travel unseen until they show up as damp spots on ceilings. Proper sealing where roof meets walls and around protrusions matters, especially after winter thaw cycles. Ventilation plays a critical role too: insufficient attic airflow compounds condensation, which can rot decking and encourage ice dam formation by warming roof sections unevenly. A well-ventilated loft or attic reduces condensation and keeps roof assemblies closer to the intended design temperatures year-round.
Rapid seasonal temperature changes in this region can stress roofing assemblies at penetrations, valleys, and drainage transitions. Metal flashings expand and contract with cold snaps, and sealants can crack if joints freeze and thaw repeatedly. Valleys collect meltwater and are particularly vulnerable when ice builds up near transitions to vent stacks or skylights. For lasting performance, inspect sealants, fastening patterns, and flashing integrity after each heavy snowfall and after the first thaw, paying special attention to any signs of moisture intrusion around penetrations.