Last updated: Apr 19, 2026
The inland San Fernando Valley cooks in the summer, and the roof surface here absorbs that heat with little shade except for occasional eaves. On tile and low-slope roofs, prolonged sun exposure pushes surface temperatures higher, which accelerates material aging and heat cycling. That means overlaps, underlayment seams, and flashings are tested not just by wind but by repeated heating and cooling. In practice, expect fastest wear along ridge lines, edge details, and any penetrations where heat creates micro-movements in materials. A practical approach is to plan for reinforced edge detailing and high-temperature-rated underlayment in areas most exposed to sun and glare. If a tile roof sits on a structure with a shallow slope, keep roof-cleaning to a minimum on peak sun days to avoid cracking or loosening tiles from thermal stress.
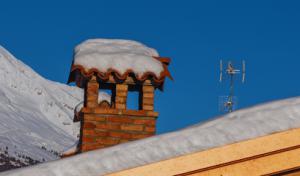
Fall Santa Ana winds are a major local roofing stressor, increasing uplift risk on edges, ridges, flashings, and lighter components. Wind-driven rain can work its way under flashing or tile laps, especially where fasteners have aged or where ventilation components create small edges for wind capture. The practical response is to inspect and seal potential uplift points before Santa Ana season, focusing on ridge caps, valley transitions, and chimney or vent flashings. When reroofing or repairing, choose fasteners with corrosion resistance and adequate length for the substrate. During high-wind forecasts, consider temporary protective measures for loose accessories and ensure that any lightweight details are secured. Regular checks after windy spells help catch loosening or movement early, before water intrusion follows air movement.
The city's mix of tile roofs and low-slope sections means heat cycling and wind-driven rain can affect different roof areas on the same home. Tile roofs respond to heat with expansion and contraction across the surface; joints between tiles, clips, and underlayment need to accommodate that movement. Low-slope sections face water flow differently, with edge details and transitions drawing more attention to potential leakage, especially where underlayment has aged or where debris has backed up along eaves. On a single property, one area might show heat blistering or micro-cracking in tile coatings, while another area reveals worn edge flashings or clogged drainage. The key is a paired inspection strategy: monitor tile condition and the integrity of flat or low-slope transitions in tandem, not in isolation.
A proactive maintenance mindset pays off when heat stress and Santa Ana winds converge. Start with annual or post-wildfire-season checks focusing on tiles: look for cracked or displaced units, loose clips, and broken mortar on clay or concrete tiles. For low-slope sections, inspect for moss or debris accumulation that can trap moisture and obscure flashing integrity. Keep drainage paths clear to prevent ponding on flat areas, which compounds heat exposure and wind impact. Replace compromised underlayment and upgrade to wind-rated components where the roof assembly shows age or prior repairs. When you see early signs of movement or seam distress, treat the area promptly to avoid a larger problem during the next wind event or heat cycle.
Before the hot months crest, walk the roof with a partner and use a ladder-safe method to check ridges and perimeter edges first. On tile roofs, test a few tiles at the edge for movement and confirm clips are firmly seated. For low-slope areas, examine the edge flashing and valley mullions for any signs of lifting or corrosion. After strong winds, recheck for displaced tiles, missing fasteners, or disturbed sealants around penetrations. In practice, this means setting up a quick annual cadence: a thorough pre-season check, a mid-season touch-up if heavy heat or wind hits, and a post-storm review after notable Santa Ana events. This disciplined routine reduces the risk of heat-related deterioration and wind-driven water intrusion across the roof's varied surfaces.
Concrete and clay tile are common on Northridge-area homes, and the true vulnerability often sits beneath the surface. The tile surface itself can be durable, but age and wear on the underlayment matter more than the color or finish of the tile. In a Valley climate with Santa Ana winds and rapid heat cycles, the underlayment dries out, becomes brittle, or develops small leaks that creep under flashing and into the attic. If the roof deck beneath has seen decades of heat exposure, a careful inspection should focus on the waterproof layer rather than just the visible tiles. When underlayment shows signs of saturation or delamination, even a seemingly solid tile edge can be a pathway for moisture during winter rains. Plan on periodic checks of the underlayment's integrity, especially after multiple dry-wet cycles typical of summer-to-wall-to-rain transitions.
Many Valley homes blend pitched tile sections with attached garages, patios, or additions that use low-slope roofing. Those transitions are classic trouble spots because drainage paths change abruptly as water moves from a steep tile plane to a flatter surface. The risk isn't only pooling; it's the subtle seepage that can track along fasteners, flashing lines, and edge details where water finds a way around the learning curve of a hybrid roof. If a transition point isn't flashed with modern details-such as correctly sized counter-flashing and integrated terminations-the risk of water intrusion rises, especially during heavier winter showers or windy downpours that force dirt and debris under the edges. Regular attention to these junctions, including re-flashing or upgrading transition details when a roof is serviced, helps prevent hidden leaks.
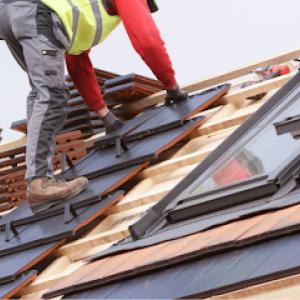
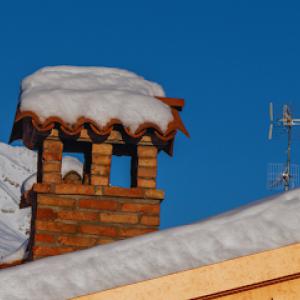
Skylights, chimneys, and roof penetrations are common local service categories, making flashing details a recurring source of leaks during winter rain. In Northridge, where wind can lodge debris against flashing and blow-swept rain favors edge leaks, the seal around penetrations deserves targeted scrutiny. The flashing should be integrated with both the tile layer and the underlayment, with attention to continuity where different roof planes meet. Worn or cracked sealant around skylights or chimney bases is a frequent culprit; it can allow moisture to bypass the tile surface entirely and migrate into the attic, compartments, or behind the interior wall. When inspecting, consider not only the visible condition but also how recent weather patterns may have stressed the flashing and the fasteners. If a roof has experienced past leaks around a vent pipe or chimney, re-check the entire flashing envelope and consider upgrading to a continuous or integrated flashing system that remains resilient under heat and wind.
Find contractors who specialize in clay and concrete tile roofs, known for their durability and curb appeal.
Northridge Roofing Masters
(818) 740-6050 roofersnorthridge.com
18860 Nordhoff St #66, Northridge, California
4.8 from 82 reviews
Northridge Roofing Masters
(818) 740-6050 roofersnorthridge.com
18860 Nordhoff St #66, Northridge, California
4.8 from 82 reviews
Northridge Roofing Masters is a reputable roofing company dedicated to providing top-quality roofing services in the Northridge area. With our skilled team of professionals, we specialize in a wide range of roofing solutions for both residential and commercial properties. From roof repairs to installations and maintenance, we have the knowledge and experience to handle projects of any size or complexity. Our commitment to excellence and customer satisfaction sets us apart. At Northridge Roofing Masters, we pride ourselves on delivering exceptional craftsmanship and reliable service. Trust us for all your roofing needs in Northridge.
Peak Roofing Services
9275 Corbin Ave #9275, Northridge, California
4.8 from 76 reviews
Peak Roofing Services is your trusted partner for comprehensive roofing solutions. With a team of experienced professionals, we offer a wide range of services to meet your roofing needs. From installations to repairs and maintenance, we bring expertise and attention to detail to every project. Our commitment to using quality materials and employing industry-leading techniques ensures reliable and durable results. Whether it's residential or commercial roofing, we provide exceptional craftsmanship that meets the highest standards. Count on Peak Roofing Services for top-notch roofing solutions that elevate the performance and aesthetics of your property.
Preferred Roofing
(818) 787-1811 www.preferredroofinginc.com
19779 Bahama St, Northridge, California
4.9 from 138 reviews
We have 29 years experience providing quality roofing throughout Los Angeles, Ventura, Orange, and Santa Barbara Counties. Our business methodology is simple, we are committed to quality work, customers becoming raving fans, and affordable solutions to your roofing needs. Preferred Roofing has been a trusted provider of roofing services in the San Fernando Valley and surrounding areas. We have successfully completed roofing projects for over 8,000 residential and commercial property owners in the LA Area. Our long-standing presence in the industry is a testament to our reliability and expertise. Cal St. Lic. #1122648
Patton Family Roofs
(747) 318-3700 roofingnorthridge.com
8510 Balboa Blvd #177, Northridge, California
4.8 from 69 reviews
Patton Family Roofs is a trusted name in the roofing industry, known for its commitment to quality and customer satisfaction. With our experienced team of professionals, we specialize in delivering top-notch craftsmanship and exceptional results. Whether you need roof repairs, installations, or maintenance, our skilled technicians are equipped with the knowledge and resources to handle your project efficiently and effectively. At Patton Family Roofs, we prioritize attention to detail and use high-quality materials to ensure the longevity and functionality of your roof. Trust us for reliable roofing solutions that protect and enhance the value of your property.
Northridge Roofing Solutions
(818) 797-7376 northridgeroofingsolutions.com
8945 Quartz Ave #1, Northridge, California
5.0 from 22 reviews
Northridge Roofing Solutions is your trusted local roofing expert in Northridge, CA. We specialize in high-quality roof repairs, replacements, and inspections for residential and commercial properties. Our skilled team is dedicated to delivering durable, weather-resistant solutions using premium materials and expert craftsmanship. Whether you need a minor repair or a full roof replacement, we provide reliable service and customer satisfaction. Protect your home or business with a roof built to last. Contact Northridge Roofing Solutions today for a consultation!
Hunters Roofing
(818) 996-6120 huntersroofing.com
18328 Eddy St, Northridge, California
4.8 from 50 reviews
In 1989, we founded Hunters Roofing with one mission: to build a world-class company that makes a difference in people's lives—those of our customers and our employees. Today, more than 25 years later, Hunters Roofing is proud to be known as one of the most reputable roofing companies in Los Angeles County, California.
Pro Family Roofing & Exteriors
(818) 740-4916 roofingnorthhills.com
Serving
4.9 from 61 reviews
Welcome to Pro Family Roofing & Exteriors, your trusted partner for all your roofing and exterior needs. With our dedicated team of professionals, we deliver exceptional results that exceed expectations. We specialize in roofing installations, repairs, and maintenance, as well as exterior services that enhance the beauty and functionality of your property. With our attention to detail and superior craftsmanship, we prioritize the integrity and durability of your roof and exteriors. Trust Pro Family Roofing & Exteriors for reliable and professional solutions that enhance the value and aesthetics of your home or business.
J&M Roofing
(747) 298-6300 roofersgranadahills.com
Serving
4.8 from 81 reviews
J&M Roofing is a reputable roofing company known for its commitment to excellence and customer satisfaction. With our skilled team of professionals, we specialize in delivering top-quality roofing services for residential and commercial properties. From roof repairs to installations and maintenance, we have the expertise to handle your project efficiently and effectively. We understand the importance of a well-maintained roof and utilize high-quality materials and proven techniques to ensure its durability and functionality. At J&M Roofing, we are dedicated to delivering exceptional craftsmanship and reliable service. Trust us for all your roofing needs.
Butler Brothers Roofing
(818) 600-6139 roofingmasters.site
Serving
4.8 from 87 reviews
Butler Brothers Roofing is a trusted family-owned roofing company committed to providing exceptional roofing services. With our experienced team of professionals, we specialize in delivering top-quality craftsmanship and superior results. From roof repairs to installations and maintenance, we have the expertise and resources to handle projects of any size or complexity. At Butler Brothers Roofing, we prioritize attention to detail and customer satisfaction. Trust us for reliable roofing solutions that exceed your expectations and protect your property for years to come.

California Green Roofing
(747) 298-6407 www.californiagreenroofingremodeling.com
Serving
4.8 from 52 reviews
California Green Roofing is a leader in the Los Angeles roofing sector, recognized for excellence and ingenuity. Serving both residential and commercial clients, we deliver top-tier roofing solutions, tailored to California's unique environment. Our commitment to quality is evident in our choice of superior materials and the unparalleled skill of our team. We're not just about shielding your property; it's about enhancing its appeal and ensuring your satisfaction. Positive client feedback underscores our dedication to not only meet but exceed expectations. With California Green Roofing, expect nothing less than the highest standard of roofing craftsmanship and customer service that genuinely listens and delivers.

Reseda Roofing Installations
Serving
4.8 from 71 reviews
Reseda Roofing Installations is your premier choice for superior roofing installations in the Reseda area. With a team of skilled professionals, we deliver top-quality craftsmanship and attention to detail. Whether you're building a new home or replacing an existing roof, we ensure precision and excellence in our work. Using high-quality materials and advanced techniques, we create roofs that are not only structurally sound but also visually appealing. Trust Reseda Roofing Installations for expertly executed roofing installations that enhance the protection and value of your property.
Van Nuys Dependable Roofing
Serving
4.8 from 67 reviews
Van Nuys Dependable Roofing is your trusted partner for all your roofing needs in the Van Nuys area. With years of experience, we provide professional and reliable roofing services tailored to your specific requirements. Our team of skilled professionals is equipped to handle everything from installations to repairs with precision and attention to detail. We understand the importance of a well-maintained roof, and our goal is to deliver exceptional craftsmanship and customer satisfaction. Using quality materials and proven techniques, we ensure that your roof is restored to its optimal condition. Count on Van Nuys Dependable Roofing for trustworthy and expertly executed roofing solutions.
Dry season strongly shapes the reroof timeline. Winter rains from roughly November through March can interrupt tear-off and expose decking to moisture, so the best window for a full tear-off is the dry stretch between late spring and early fall. Plan to complete weather-sensitive steps-like deck inspection, plywood or sheathing replacement, and underlayment staging-before the first cold storm system arrives. If a late-wall-water leak or wind-driven moisture is present, schedule a quick pre-rain assessment to identify vulnerable fascia, flashing, and drip edge, and address those items before the rain starts. In practice, you'll want to line up delivery of underlayment, leak-stop materials, and fasteners for the dry days in the forecast and stack trades in logical order to minimize exposure.
Extreme summer heat in the Valley slows crew pace and affects handling and installation conditions for some roofing materials. When the heat peaks, plan high-sun days for non-tessellated tasks or exterior work that doesn't require delicate handling of underlayment or tile. Roofers may need to start earlier and pause during the peak heat window, then resume as shade returns. Tile and low-slope surfaces can glare intensely, so arrange for proper hydration, shade breaks, and equipment storage away from direct sun to prevent warping or misalignment. If a material requires careful temperature-sensitive sealing, keep that work for the cooler mornings or late afternoons when the surface temperature is reasonable.
Fall Santa Ana periods can complicate tear-off, underlayment staging, and safe installation on exposed roof planes. High winds can lift loose material, complicate rolling or bagging of underlayment, and create safety hazards during tile placement or membrane work. Build in a buffer by front-loading critical portions of the job when winds are predictably lighter, and have a contingency plan for wind advisories. Secure loose materials at the edge of the roof and use additional temporary fasteners or weights as needed. This is also the time to review anchor points, railing setups, and fall-protection gear so installations can proceed quickly once wind conditions ease.
Coordinate around the dry season and avoid extended exposure of decking to cold rains. Use a staggered sequence: remove old roofing in dry days, perform decking repair immediately, install underlayment on clear mornings, and complete tile or metal installation during periods with calm weather. Maintain daily weather checks and document any daytime rain risks. Keep a ready response for on-site moisture pickup, tarping, and temporary protective measures so a rain front doesn't derail progress or create moisture exposure to newly exposed decking. A careful, weather-aware plan helps preserve roof longevity while aligning with Valley conditions.
When you can't wait, these contractors offer fast response times to stop leaks and prevent further damage.
Northridge Roofing Masters
(818) 740-6050 roofersnorthridge.com
18860 Nordhoff St #66, Northridge, California
4.8 from 82 reviews
Peak Roofing Services
9275 Corbin Ave #9275, Northridge, California
4.8 from 76 reviews

Preferred Roofing
(818) 787-1811 www.preferredroofinginc.com
19779 Bahama St, Northridge, California
4.9 from 138 reviews
For a full reroof project in this area, the permit is issued through the Los Angeles Department of Building and Safety (LADBS) rather than a separate small-city building office. This means your planning, plan review, and final approval all go through the city-wide process that serves the valley's housing stock, including many tile and low-slope roofs. Understanding that this is a city process helps set expectations for the timeline and the level of detail required in your submission. In practice, the contractor typically provides the necessary documentation, but you are the project owner and ultimately responsible for ensuring the plans reflect the work you intend to perform on your property. Keep all correspondence and plan sets organized so you can reference exact details if questions arise during the review.
The local process typically includes submitting contractor information along with roofing plans. Plan check timing can vary, and that variance is common in this climate where many homes combine older framing with modern underlayment requirements. Plan review can take weeks or longer depending on the complexity of the reroof, the roof type (tile or low-slope), and any structural or seismic considerations tied to the home. If the project involves a reroof around existing vents, chimneys, or skylights, include those penetrations in the plan set with clear attachment methods and vent sizing. Because Northridge homes often feature tile or low-slope assemblies, plan reviewers will look closely at weatherproofing details, roof-to-wall transitions, and how the new layers will interact with current mechanical equipment and attic ventilation.
Inspections are commonly scheduled after tear-off or underlayment stages and again at completion, with particular attention to ventilation, underlayment, and roof-deck integrity. The tear-off stage is a critical checkpoint to confirm that old, damaged, or degraded decking is repaired or replaced as needed and that the roof deck is clean and dry for new layers. The underlayment inspection focuses on material choices suitable for high heat and Santa Ana wind exposure, as well as correct nailing patterns and fastener placement. A final inspection verifies that attic ventilation is adequate, that all penetrations are properly flashed, and that the overall roof assembly, including tile or low-slope components, meets current safety and performance standards. Communicating clearly with the inspector about any deviations from the original plan helps avoid delays and ensures the reroof remains compliant with city requirements throughout the hot, windy seasons.
In this market, tile systems are common, and that pushes project totals higher because heavy materials, accessory components, and underlayment work are often more involved than basic shingle reroofs. The heavier weight requires proper framing checks and sometimes reinforced bulkheads or penetrations, which adds a layer of labor and material coordination beyond a simple asphalt swap. Local conditions also mean a need for more robust underlayment and detailing to stand up to Santa Ana winds and scorching valley heat. Expect a higher baseline for tile projects compared with lighter-weight options, even before factoring design-specific features like vents, skylights, or waterproofing transitions.
Asphalt shingles offer the most cost-efficient entry, commonly in the range of 350 to 700 USD per square. metal roofing lies higher but can still fit mid-range budgets if panels are straightforward and fastened with standard systems, roughly 700 to 1,400 USD per square. Clay tile, a staple for long-term heat stability and a classic valley look, typically runs from 1,200 to 2,800 USD per square, reflecting both material weight and the need for precise installation. Concrete tile sits between clay and metal in cost, about 900 to 1,800 USD per square, balancing durability with installation complexity. Wood shingles or shakes fetch roughly 700 to 1,300 USD per square, while slate, the premium option, ranges from 1,800 to 3,600 USD per square. For Northridge projects, those tile and slate prices can be noticeably higher once the labor and accessory work are factored in, compared with the bundled costs shown in broader guides.
Demand spikes after winter leak periods or wind events can affect pricing and availability in this part of Los Angeles. The heat and wind pattern also influence lead time, as crews schedule around heat-sensitive phases of tile installation and the handling of heavy materials. In practice, this means that even when a project starts with a clean quote, the calendar can shift by a few weeks if stock or crew availability tightens, or if inspections and coordination with nearby trades align less smoothly than in cooler, calmer seasons. Planning ahead with a defined sequence for tear-off, substrate prep, underlayment, and tile layout helps minimize these soft-cost wobbles.
For homes with tile or slate, budget toward the upper end of the material range to cover heavier lifts, extra fasteners, and careful detailing around parapets, roof penetrations, and transitions. If asphalt or metal is viable, use that as a baseline to benchmark the incremental cost of heavier systems. Anticipate some scheduling variability tied to local workload patterns and seasonal weather shifts, and build a contingency to absorb small delays without derailing the project.
Wildfire and wind claim environments have quietly tightened across the region, and the effect is felt even in a primarily urban neighborhood. Insurers now look more closely at roof age and fire-resistance features as part of the underwriting mix, which means the condition of your roof can influence how quickly and favorably a claim is handled after a loss. A roof with modern fire-rated materials and proper edge detailing tends to smooth the path when a claim is evaluated, even if the visible damage seems minor.
When a loss occurs, insurers may request proof of roof age, permit history, and contractor records to verify what work has been done and when. In practice, having LADBS permits and inspection sign-offs available can be a crucial part of the documentation file, signaling that the roof has been accurately tracked through its service life. Your file should include material specifications, installation dates, and any prior repairs. This concrete documentation helps prevent delays and questions during the claim process.
Santa Ana winds can loosen tiles, ridge components, and flashings even without creating obvious interior leaks right away. Local adjusters know this pattern, and it can affect how damage is framed in the claim. The absence of visible interior staining does not guarantee claim acceptance; insurers may still assess wind-related loosening or blow-off as damage. Build a narrative around storm events, dates, and any temporary fixes you applied to keep the roof secure.
Keep a dated photo log after a wind event, focusing on ridges, hips, flashings, and any compromised tiles. Collect contractor invoices and records promptly, and if a loss occurs, request a rapid inspection so the timing aligns with your documentation trail. Having a clear, orderly set of records reduces ambiguity when a claim moves through the system.
Connect with contractors who help homeowners navigate the claims process from damage assessment to final approval.
Northridge Roofing Masters
(818) 740-6050 roofersnorthridge.com
18860 Nordhoff St #66, Northridge, California
4.8 from 82 reviews
Peak Roofing Services
9275 Corbin Ave #9275, Northridge, California
4.8 from 76 reviews

Patton Family Roofs
(747) 318-3700 roofingnorthridge.com
8510 Balboa Blvd #177, Northridge, California
4.8 from 69 reviews
In Northridge, the intense Valley sun makes heat-management and long-term thermal performance a more prominent roofing concern than in cooler coastal parts of Los Angeles. Tile and low-slope roofs respond differently to heat: clay and concrete tiles shed heat when they are properly vented and color-selected, while low-slope surfaces require careful moisture management and reflective strategies to avoid heat buildup. The choice should prioritize materials that resist thermal fatigue, retain color longer, and minimize heat transfer to living spaces.
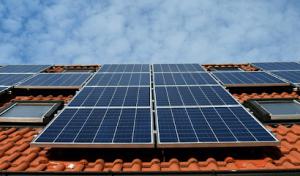
Homes in this area often evaluate reroof timing together with solar work because roof access, penetrations, and remaining roof life are closely linked. If a re-roof is on the horizon, plan for solar panel installation or relocation as part of the same project to limit repetitive disruptions. For low-slope roofs, verify that deck membranes and underlayments can tolerate concurrent solar retrofits without compromising heat-reflective properties. Aligning these two projects can reduce long-term maintenance and ensure consistent thermal performance.
Material choice in Northridge is often influenced by balancing appearance with heat exposure, fire resistance, and compatibility with existing roof geometry. Clay tile offers strong fire resistance and a classic look, but color and texture choices should be guided by reflectivity and neighborhood styles to minimize heat gain. Concrete tiles provide similar fire protection with broader color options and thermal mass, which can help stabilize attic temperatures when paired with a reflective coating or cooling mineral finish. Tile textures that promote airflow between the roof deck and the tile surface improve ventilation, especially on hot, windy days. For low-slope systems, consider reflective membranes and mineral granules that deflect solar radiation while maintaining a seamless surface compatible with the roof geometry.
Santa Ana winds in this area demand attention to fastener design and edge detailing, particularly for metal and tile roofs. Ensure wind-rated fasteners and appropriate edge metal to resist uplift. Ventilation strategies should be tailored to the house shape and prevailing wind patterns, with additional soffit and ridge venting where possible to avoid heat pockets. A well-ventilated, color-appropriate roof system reduces thermal stress on both tiles and underlayment, helping long-term performance under dry, hot conditions.
Find contractors who integrate solar panels or solar shingles into your roof for long-term energy savings.