Last updated: Apr 19, 2026
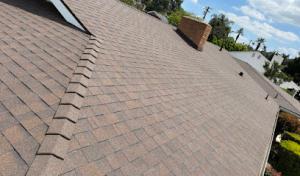
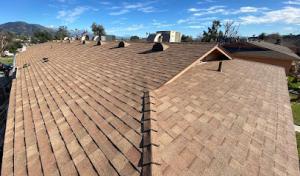
Riverside's hot, dry summers accelerate surface aging from sun exposure, making heat-related brittleness and fading a central roof-life issue. The combination of extreme daytime temperatures and intense UV radiation rots through protective coatings faster than in milder climates. Shingle and tile surfaces can lose flexibility, curl at the edges, or become chalky on the surface, which signals the protective layer is breaking down. In practice, expect accelerated granule loss on asphalt shingles and quicker color fade on clay or concrete tiles. The result is not just cosmetic; the underlying deck and underlayment can see more rapid cycling through heat-related stress and small leaks if the system isn't well-sealed. A practical response is to prioritize materials and maintenance plans that resist UV degradation, especially on rooftops that see full sun for most of the day. When evaluating reroofs, consider products with higher UV stability, more robust granule adhesion, and color choices that reflect heat rather than absorb it. For existing roofs, schedule mid-day inspections with a contractor who can spot heat stress indicators such as softened asphalt, warped edges, or abraded sealant joints before they become obvious leaks.
Santa Ana wind events are a local scheduling and damage factor, with temporary work restrictions and elevated debris risk during active wind periods. When a windy spell approaches, conversations with a contractor should include contingency plans for temporary protection, debris containment, and potential delays. Wind-driven debris can nick flashing, loosen ridge caps, or push granular material deeper into seams, accelerating wear. During evaluation, inspect for loose or damaged components that might become projectiles and address them proactively. If a reroof is underway during Santa Ana season, ensure crews have secure staging and that tarping or temporary closures are in place to minimize risk of wind-driven damage. Weather windows matter: strong winds and extreme heat can shorten productive work periods and affect the performance of sealants and underlayment adhesives. A practical approach is to align major work with calmer, cooler days and factor in potential rescheduling for wind warnings, rather than forcing progress during peak Santa Ana activity. When planning, discuss with the contractor how wind risk will be managed, what protective measures are in place, and how debris control will be maintained to protect the home and neighboring properties.
Replacement timing in Riverside is best planned for spring or fall because summer installation conditions can affect material performance and crew cadence. The heat of summer not only challenges installer comfort and safety but can also influence material behavior: some underlayments cure differently in high heat, fasteners can expand or contract more than expected, and adhesive bonds may require cooler conditions to set properly. Spring and fall generally provide more predictable temperatures, reduced glare-induced glare fatigue for crews, and more reliable warranty protection when contractors can complete a full installation without weather-related interruptions. For tile roofs, heat can stress fasteners and sealants, and a rushed summer schedule may compromise careful flashing and valley work. In practice, map out the reroof sequence to begin with decking inspection, followed by underlayment, then flashing and ridge work, ensuring each stage has an appropriate period for any heat-affected materials to cure or settle. If the decision is to reroof in summer due to urgent moisture concerns, arrange for early morning work hours, frequent hydration and shaded staging, and a plan for pausing during peak heat to protect both crew and material integrity. Consider how color choice interacts with heat: lighter tones can mitigate some heat absorption, reducing temperature-induced expansion stress on joints and fasteners. Finally, coordinate with a trusted local crew that understands Riverside's typical wind and heat patterns and can adjust cadence without sacrificing quality. The goal is a reroof that remains resilient under sun exposure, resists wind-driven damage, and maintains a predictable performance throughout the commonly hot months.
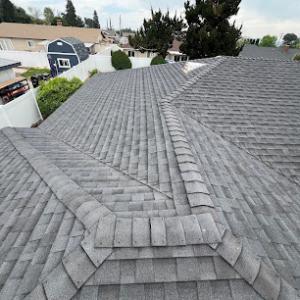
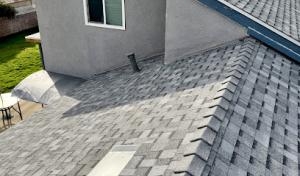
Clay tile and concrete tile are dominant roofing choices in Riverside, matching the city's large stock of Mediterranean and Spanish-influenced residential architecture. The combination of Inland Empire heat and UV exposure, along with Santa Ana wind events, shapes how these roofs age and how homeowners should plan for reroofing. Tile remains a durable look, but the profile and panel sizes you choose matter. In this climate, a tile roof isn't just about curb appeal; it's about long-term performance under relentless sun and sudden gusts. Matching an older tile profile during reroofing is a frequent decision, so understanding the nuances of historic shapes and fabric is worth the extra planning.
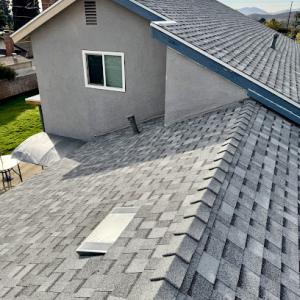
Because tile is so prevalent locally, homeowners often face decisions about replacing broken field tiles, underlayment aging beneath reusable tile, and matching older profiles during reroofing. Field tiles-those large surface tiles scattered across the roof-are prone to cracking if a wind event or a maintenance step disrupts their placement. When a single tile breaks, it can cascade into leaks if the underlayment beneath has deteriorated. The underlayment in older homes may not offer the same air-tight protection as modern versions, and it may need to be partially or fully replaced even if the rest of the roof remains sound. The choice to reuse or replace tiles is not just a cosmetic call; it affects waterproofing, weight load, and future repair work. If the roof has curved or barrel-style tiles, salvage becomes more challenging, and finding exact matches can drive the scope upward in a reroof.
Tile reroof costs sit at the top of the local material range, so structural loading, access, and tile salvageability have an outsized effect on project scope. Clay and concrete tiles are heavy, and the roof deck must be able to carry that load safely. In Riverside, many homes were built with traditional wood-heavy framing, which may require additional structural assessment before a reroof. Access angles and the ability to remove and replace tiles without breaking adjacent units matter, particularly on two-story homes or long, shallow pitches common in the region. If the home has multiple roof planes or complex transitions, the labor time increases, and the chance of tile breakage rises. Salvageability-whether existing tiles can be reused in part or wholly-depends on tile condition, color match, and the ease of cleaning or reseating the hardware underneath. Expect some degree of tile breakage during removal, and plan for careful staging to minimize waste and preserve any reusable pieces.
Because tile is so prevalent locally, homeowners often face decisions about replacing broken field tiles, underlayment aging beneath reusable tile, and matching older profiles during reroofing. The underlayment beneath tile faces heat-driven wear and may degrade more quickly than other components. If underlayment has aged, it can compromise waterproofing even when the surface tiles look intact. When reroofing with a modern underlayment, the installer may need to compensate for a slight mismatch in tile profile or color to maintain the visual rhythm of Mediterranean styling. This is especially true when replacing a smaller section or blending new material with older, established roofing lines.
Tile roofs respond to heat with expansion and contraction cycles that stress fasteners and laps. In the event of a leak, a rapid response matters more than most other climates due to the combination of heat load and wind-driven damage potential. The practical approach is to perform proactive maintenance against cracked field tiles, inspect underlayment wear after seasonal extremes, and plan reroofing with attention to tile salvage options and color-made matches. Timely replacement and careful layout planning help preserve both performance and curb appeal in a climate where sun and wind relentlessly test the roof.
Find contractors who specialize in clay and concrete tile roofs, known for their durability and curb appeal.
Urban Roofing
(888) 808-9193 urbanroofingca.com
3890 11th St Unit 118, Riverside, California
5.0 from 42 reviews
Berry Roofing & Solar
(951) 905-5116 www.berryroofing.com
3226 Kluk Ln, Riverside, California
4.8 from 230 reviews
Hull & Sons Roofing / Commercial & Residential Roofing
(951) 685-9499 hullandsons.com
8960 Jurupa Rd, Riverside, California
4.8 from 141 reviews

Guyou Roofing & Solar
(866) 344-7729 www.guyouconstruction.com
9880 Indiana Ave Suite 2, Riverside, California
4.9 from 1364 reviews
What if you didn’t have to think twice about your bill every time you flipped a switch? We can make it possible through affordable clean technology solutions tailored to your specific needs. From retrofit lighting and energy consumption monitoring to solar energy system installation and battery solutions, our experienced, problem-solving energy experts can help you become energy-independent.
Allstar Roofers Riverside
(951) 498-5637 roofersriversideca.com
3913 Tyler St, Riverside, California
5.0 from 44 reviews
Allstar Roofers Riverside offers a comprehensive range of roofing services tailored to meet your every needs in Riverside, CA. Our team has the expertise to handle any project with precision and excellence. From new roof installations to repairs and maintenance, we ensure that your property is protected from the elements while enhancing its aesthetic appeal. Our technicians are well-versed in the latest roofing techniques and use top-of-the-line materials to deliver exceptional results that stand the test of time. We are always ready to address your questions and concerns promptly, providing you with peace of mind throughout the entire roofing process. Contact us today for a consultation, and let us transform your roof!
Urban Roofing
(888) 808-9193 urbanroofingca.com
3890 11th St Unit 118, Riverside, California
5.0 from 42 reviews
Urban Roofing is a trusted roofing company based in Los Angeles, Riverside and Orange County, specializing in high-quality residential and commercial roofing services. We offer roof repairs, replacements, new installations, and roof inspections using top-grade materials and expert craftsmanship. Whether you need asphalt shingles, tile, flat roofing, or cool roofing solutions, our licensed and insured team delivers reliable results with excellent customer service. Contact us today for a free estimate!

Berry Roofing & Solar
(951) 905-5116 www.berryroofing.com
3226 Kluk Ln, Riverside, California
4.8 from 230 reviews
Since 1994, Berry Roofing & Solar has provided residential and commercial roofing services across Riverside, San Bernardino, and Orange County. We specialize in composition shingles, clay and concrete tile roofs, and low-slope systems, including TPO and Owens Corning Deck Seal. Our licensed and insured crews perform roof replacements, commercial reroofs, and clean, efficient installations using premium materials and proven systems. Family-owned, Owens Corning Preferred, and GAF certified, we offer manufacturer-backed roof system warranties along with workmanship warranty coverage. Proudly serving Riverside, San Bernardino, Rancho Cucamonga, Ontario, Chino, Corona, Murrieta, Irvine, San Clemente, and nearby cities.

Hull & Sons Roofing / Commercial & Residential Roofing
(951) 685-9499 hullandsons.com
8960 Jurupa Rd, Riverside, California
4.8 from 141 reviews
At Hull & Sons Roofing we provideQuality Roofing Services for Commercial, Industrial or Residential in the Inland Empire. We offer other roof sevices like replaceing Skylights, Roof Drains, Gutters, Crickets to divert water, Removal and replacement of AC units, Wood platforms for AC units, Resealing duck work and total removal for abandoned units.
Divine Roofing Services
(951) 533-7959 divineroofingservicesinc.com
5566 Palm Ave, Riverside, California
4.9 from 39 reviews
Divine Roofing Services in Riverside, CA delivers top-quality residential and commercial roofing with integrity and expert craftsmanship. We specialize in installations, repairs, inspections, and maintenance, ensuring long-lasting protection for your property. Our team is committed to quality, transparency, and customer satisfaction, using the best materials and skilled professionals to get the job done right. Whether you need a small repair or a full roof replacement, we provide fast, reliable, and affordable solutions. Contact us today for a free consultation and experience the Divine difference!
Veirs Kluk Roofing
(951) 781-9999 www.veirsklukroofing.com
3371 Chicago Ave, Riverside, California
4.9 from 38 reviews
3rd Generation Commercial and Residential Roofing Contractor Service the state of California! We specialize in New Tile, Lift and Relay, Shingles, Single Ply, APP Torch Down, Reinforced Coating systems, TPO, and Roof Maintenance.
California Roof Experts
(424) 535-6828 www.californiaroofexperts.com
3669 Van Buren Boulevard, Riverside, California
5.0 from 23 reviews
We are a full-service, family owned and operated roofing company with over 30 years of experience. We provide roofing services for residential, commercial and industrial roofs. No job is too big or small.
Frontline Roofing
(951) 399-0072 frontlineroofing.com
3845 Stobbs Way Suite E, Riverside, California
5.0 from 23 reviews
Located at 3845 Stobbs Way Suite E, Frontline Roofing is your premier roofing contractor catering to both residential and commercial clients. Specializing in roof repair, installation, and replacement, we provide top-notch roofing services tailored to your specific needs. Recognized for exceptional customer service and a 4.9-star rating, we are the go-to roofing company near you. From metal and shingle roofing to industrial strength commercial roofing solutions, our expert team delivers quality, reliability, and energy efficiency. Contact us today for detailed roofing estimates and discover why we are a leader among roofing companies in the area.
Storm Guard Construction
(951) 218-5176 stormguardconstruction.net
1601 Chicago Ave, Riverside, California
5.0 from 19 reviews
General Contractor
MHC Roofing
(951) 847-8134 mhcroofingpro.com
Riverside, CA
5.0 from 14 reviews
Protect your largest investment with our reliable roofing services. We are a locally owned and operated roofing company currently serving Corona, CA and surrounding communities. If you want to make your roof last as long as possible, it is vital that you never put off a roof repair. Small issues with roofing become big issues in a hurry. No matter how major or minor the repair you need, we are here to help. We offer roofing contracting, roofing repair, and roof leak repairs.
Ies Roofing
3076 Kathleen St, Riverside, California
5.0 from 11 reviews
At IES ROOFING INC, we bring over experience in craftsmanship to residential and commercial roofing projects across Southern California. Based in Riverside, CA, our team specializes in roof installation, repair, replacement, and inspections. We work with Various types of materials this includes; shingle, tile, metal, flat roof, fascia board, and skylight. Fully insured and committed to quality, we provide free estimates and 24/7 emergency roof repairs. Whether it is a routine project or an urgent leak, count on us for a fast and reliable service.
Local cost expectations span asphalt shingles at 350 to 800 USD per square up to clay tile at 1800 to 3000 USD per square, with concrete tile also running high in Riverside. That spread matters because the Inland Empire climate drives material choices: the hotter summers, stronger UV exposure, and Santa Ana wind events all push up the price of higher-performance systems. On one end, asphalt shingles remain the most budget-friendly entry point, while clay and concrete tile push the budget higher due to weight, installation complexity, and underlayment needs. Metal roofing sits in the middle, often appealing for its durability and wind resistance, but still more expensive than asphalt. Wood shingles or shakes carry a premium for aesthetics and traditional insulation benefits, while synthetic or composite shingles sit between asphalt and premium tile, offering a balanced mix of durability and cost.
Riverside's strong reroofing market and the prevalence of tile systems mean tear-off, disposal, and underlayment replacement can be major cost drivers compared with lighter systems. Tile roofs require careful handling, lifting, and sometimes reinforced decking to support the weight, which adds labor and disposal fees. If an old underlayment needs replacement or added ventilation is required for heat management, those steps compound the total. In many neighborhoods, tiles are the default choice due to durability and the area's wildfire-conscious insurance environment, so expect higher upfront costs when tile is selected, even before the underlayment and potential structural tweaks are counted.
Project timing can affect pricing because winter rains, summer heat, and Santa Ana wind events can disrupt scheduling and compress contractor availability. In peak seasons, crews are scarce and rates can rise, while in rainier months, work may stall, extending the job and increasing mobilization costs. If a tear-off is needed, plan for removal windows that align with dry, mild days to minimize weather-related delays. For tile reroofs, weather windows are especially impactful: heat softens underlayment options and high winds can slow tile placement and increase waste. If timing is flexible, aiming for shoulder seasons can help keep prices closer to the lower end of the range and reduce the risk of crunch-demand pricing.
The most popular roofing material in the US. Find pros who install, repair, and replace asphalt shingles.
Urban Roofing
(888) 808-9193 urbanroofingca.com
3890 11th St Unit 118, Riverside, California
5.0 from 42 reviews
Berry Roofing & Solar
(951) 905-5116 www.berryroofing.com
3226 Kluk Ln, Riverside, California
4.8 from 230 reviews
Ramon Total Roofing
(951) 900-5022 ramontotalroofing.com
425 W La Cadena Dr Unit 16, Riverside, California
5.0 from 6 reviews
A roofing permit is typically required through the City of Riverside Building & Safety Department for reroof work. This isn't just a formality; the permit process ensures that the new roof system is planned and installed to withstand Inland Empire conditions, where heat, UV exposure, and Santa Ana wind events stress both the visible roofing surface and the underlayment beneath. When you start, expect the permit to be tied to specific materials, methods, and a verified tie-in to the structure's ventilation and attic airflow. The goal is not only compliance but long-term performance under Riverside's climate realities.
Plan review and field review in Riverside focus on wind uplift, underlayment, and venting rather than treating reroofing as a paperwork-only swap. The reviewer will look closely at how the chosen roofing assembly handles high temps, rapid sun exposure, and wind-driven uplift. Common questions include whether the underlayment meets the current code requirements for roof decks in hot climates, whether fasteners are appropriate for the sheathing and anticipated wind zones, and whether venting and attic insulation meet performance standards to prevent premature heat and moisture-related deterioration. Your submittal should clearly show ridge and soffit ventilation strategies, starter and drip-edge details, and any enhancements to mitigate uplift. Getting these details right at the plan stage can save time during field checks and help avoid post-permit changes.
Inspections commonly occur at rough-in and final. During rough-in, inspectors verify that deck preparation, underlayment, and anchor points are correctly installed and that ventilation paths remain unobstructed. At final, the focus shifts to confirming that the installed materials match the approved plan and that all penetrations, flashings, and terminations are properly sealed against heat and wind stress. The permit is considered closed after final approval, signaling that the project has met Riverside's safety and performance expectations for reroofing. If a field issue arises, expect targeted corrections that address uplift resistance, venting effectiveness, and any alterations to the original plan that impact performance under Santa Ana wind events.
Winter in this area brings sudden storms that can halt roofing work for days. When rain arrives, crews can't safely climb a slick, wet surface, and lingering clouds mean crews shift priorities to the worst active leaks first. That pause can stretch into a work stoppage, leaving your interior vulnerable if leaks aren't sealed temporarily. In those moments, you need a plan for protection that buys you time until a full replacement can proceed. Dry-in strategies, tarps secured over vulnerable slopes, and careful clearance around skylights become essential to limit interior damage while waiting for a clear window.
The local contractor market shows unusually strong emergency-repair activity during leak events, reflecting homeowner urgency and tight windows for dry conditions. If a leak starts during a storm, seek a contractor with a rapid-response track record and a clearly defined emergency protocol. Document the damage with photos, note the date and time of the rain event, and prioritize arranging a temporary fix that can hold while scheduling a full roof replacement in the drier months. Your goal is to prevent water from traveling along rafters or penetrating attic insulation, which can complicate later repairs.
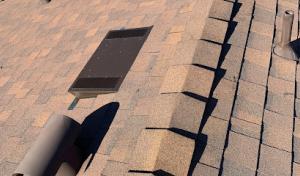
Skylight penetrations are a meaningful local repair category, with many Riverside contractors specifically advertising skylight-related roof work. If water shows up around a skylight during a storm, expect faster turnarounds for resealing or flashing replacements. Inspect around skylights after a rain event for damp decking, cupping shingles, or wrinkles in underlayment. When arranging repairs, insist on reinforced flashing, high-grade sealant, and ice-and-water shield as appropriate to the roof type. A properly addressed skylight leak can prevent broader interior damage and reduce the risk of wind-driven rain forcing an earlier reroof.
Prepare a simple temporary protection plan: lay a sturdy tarp that extends beyond the leak area and secure edges to prevent wind uplift, especially on exposed ridges. Create a clear contact chain with your chosen emergency-responding contractor and keep a log of all storm-related leaks, notes on roof areas affected, and any skylight plumbing or vent penetrations. If a leak is actively dripping into living spaces, prioritize an immediate temporary seal to minimize exposure and skulls-then schedule the full repair as soon as conditions allow.
When you can't wait, these contractors offer fast response times to stop leaks and prevent further damage.
Urban Roofing
(888) 808-9193 urbanroofingca.com
3890 11th St Unit 118, Riverside, California
5.0 from 42 reviews
Divine Roofing Services
(951) 533-7959 divineroofingservicesinc.com
5566 Palm Ave, Riverside, California
4.9 from 39 reviews
California's tightened insurance market has a direct bite in this part of the Inland Empire, where Santa Ana winds and seasonal heat push wildfire risk higher. Some carriers have pared back coverage or raised premiums after wildfire-related losses, and that pressure can ripple into what gets reroofed and how soon. For a home with a tile or lighter composition roof, the underwriting lens may be sharper, especially if the roof shows more age or wear from repeated heat cycles. The practical consequence is that choosing a roof material or deciding on reroof timing isn't just about comfort or curb appeal; it can influence whether a policy remains in force and at what terms.
Insurers increasingly want a clear paper trail. They may request verified roof age, a history of prior claims, and independent roof reports to gauge current condition and remaining life. For a Riverside property near the foothills, where heat exposure and wind abrasiveness are common, this documentation becomes even more important before and after reroofing. If a claim arises, how the roof has held up under stress will be scrutinized, and gaps in records can complicate coverage decisions. Having a thorough, independent assessment on file helps avoid delays and surprises when the policy is up for renewal or when a new policy is underwritten.
Start with a proactive ledger: gather roof age estimates, recent inspection notes, and any repairs tied to heat or wind damage. When planning a reroof, coordinate with your agent to ensure the project timeline aligns with underwriting expectations, and request a post-project independent inspection to document work completed and material quality. Material choice matters here; some options withstand sun and Santa Ana gusts better and can reassure underwriting, even if the upfront cost is higher. In high-risk pockets around the Inland Empire foothill interface, solid documentation paired with deliberate material selection can smooth renewals and help maintain stable coverage during fire season.
Connect with contractors who help homeowners navigate the claims process from damage assessment to final approval.
Veirs Kluk Roofing
(951) 781-9999 www.veirsklukroofing.com
3371 Chicago Ave, Riverside, California
4.9 from 38 reviews
Sawdust Roofing
(951) 667-8948 chasemaria98.wixsite.com
6835 Comstock Ave, Riverside, California
4.4 from 5 reviews
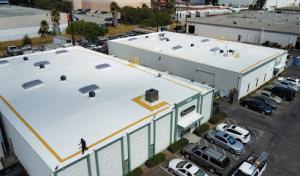
Flat roofs and low-slope assemblies are a meaningful portion of the local market, especially on additions, patio covers, and commercial properties. You'll see membrane and built-up options, but you still need a plan for heat, sun exposure, and Santa Ana wind gusts. In this climate, ensure the roof system is accessible for inspection and maintenance, so small problems don't spiral into leaks during a hot Inland Empire summer. This section walks you through practical steps to extend life and plan for future reroofing with flat or low-slope builds in mind.
Roof coating services are active in the area, reflecting demand for restoration on low-slope assemblies that take the brunt of prolonged sun. Start with a roof assessment to verify existing insulation, drainage, and membrane condition. Choose a coating compatible with the current system-silicone and acrylic options are common-but verify UV resistance, elasticity, and reflectivity. Plan for surface preparation: cleaning, debris removal, and prompt sealant replacement where needed. Regular recoats can buy years of service, especially on hot days when membranes lose flexibility fastest.
Solar roofing appears often enough in the local contractor base that reroof planning should account for panel removal, reinstallation, and roof-condition timing. If panels are present, coordinate with installers to inspect the membrane edges, penetrations, and flashing during removal. Treat solar integration as part of the roof's service life: if the substrate is showing wear or delamination, address it before panel work resumes. When planning future reroofs, budget for panel removal and reinstallation and ensure fast access to electrical connections and flashings.
In Riverside's heat, schedule inspections after the hottest months and after any major Santa Ana events. Check for pooling, membrane cracks, and edge-fastener corrosion, especially where parapets meet the roof. Keep drains clear and verify that sun-exposed areas haven't dried out fasteners or seam tapes. For coatings, monitor adhesion and color fade; a timely touch-up preserves reflectivity and reduces heat gain, buying more life from the existing low-slope system.
Find specialists in TPO, EPDM, and built-up flat roofing systems for residential and commercial properties.
Urban Roofing
(888) 808-9193 urbanroofingca.com
3890 11th St Unit 118, Riverside, California
5.0 from 42 reviews
Berry Roofing & Solar
(951) 905-5116 www.berryroofing.com
3226 Kluk Ln, Riverside, California
4.8 from 230 reviews
Hull & Sons Roofing / Commercial & Residential Roofing
(951) 685-9499 hullandsons.com
8960 Jurupa Rd, Riverside, California
4.8 from 141 reviews
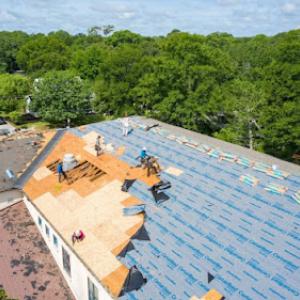
In this valley climate, most local crews are oriented toward reroofing rather than new construction, so you'll see plenty of occupied-home replacements needing quick, reliable service. That emphasis affects scheduling, crew turnover, and the kinds of warranties you can expect. When you interview contractors, ask specifically about their recent replacement work on occupied homes and how they protected landscaping, siding, and fixtures during tear-off and reinstallation. The goal is to find a team that understands the unique demands of heat, sun exposure, and Santa Ana wind events.
Because affordability and cleanup are prominent local hiring signals, bid comparisons should look closely at debris handling, property protection, and what is included after tear-off. Request a line-item breakdown for tarps or fencing to shield your yard, dumpster placement and cleanup hours, and how waste from broken tiles or broken shingles is disposed of. Confirm whether roof-to-ground clean-up includes attic and interior space protection, and whether reusable materials are sorted or discarded. A detailed, explicit scope helps prevent post-work surprises and protects your interior during hot months when dust and debris can travel quickly.
Long-established, family-owned, and locally owned firms are well represented in Riverside, which matters when homeowners want continuity for follow-up service and warranty support. Favor contractors who assign a single project manager or foreman for the duration of the job, and who offer a clear post-installation follow-up plan. Ask for written contact points, expected response times, and how warranty work is handled if a leak or heat-related issue crops up after installation. A locally rooted company tends to stay accessible, and that matters when shingles and tiles age under Inland Empire conditions.
Heat, sun, and Santa Ana winds shorten roof life, so expect crews to propose enhanced underlayment strategies and higher-rated fasteners for your climate. In addition to a robust tear-off protocol, insist on a careful teardown that minimizes track-in of granules and dust. If a crew will work during high-wind conditions, verify safety measures, securing of materials, and timelines. A Riverside-based installer who can narrate adjustments for tile roofs versus asphalt or metal will help you feel confident in a durable, climate-taired result.