Ultimate Guide to Cracked or Broken Shingles
Last updated: Feb 28, 2026
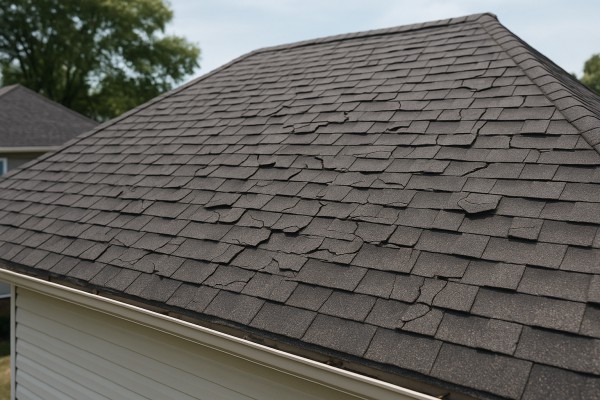
Introduction to Cracked or Broken Shingles
Cracked or broken shingles are a telltale sign that your roof has endured stress—wind, hail, temperature swings, or aging take their toll. When a single shingle splits or a corner lifts, it can create a straight path for water to seep toward the roof deck. The good news: many cracked shingles are manageable with simple, practical steps. The not-so-good news: left unchecked, a few cracks can turn into leaks, rot, or bigger repairs down the line.
Is it urgent? Often, it's not an instant emergency, but it's not something to ignore. A small crack may stay dry for a season, while a larger crack, missing piece, or shingle that's torn loose can lead to water intrusion during a heavy rain. Understanding what you're looking at helps you decide the right next move.
High-level next steps: assess safely, determine repair options, and decide whether you can handle the repair yourself or if you should bring in a pro. Below is a practical, homeowner-friendly guide to get you started.
What cracked or broken shingles indicate
- Exposure to moisture risk: cracks can let rainwater reach the underlayment and decking.
- Possible wind or impact damage: loose shingles, splits near the tabs, or chipped edges often point to recent gusts or hail.
- Aging and wear: older shingles are more prone to cracking as asphalt loses its flexibility.
Is it urgent?
- Minor, isolated cracks on shingles far from chimneys, vents, and gutters are usually low risk in dry weather.
- Cracks near the edges or large splits, or multiple cracked shingles, increase leak potential and warrant faster attention.
- If you notice water staining on ceilings, damp attic insulation, or active dripping after a rain, treat it as urgent and address the source quickly.
High-level next steps
1) Safety first
- Use a sturdy ladder with a helper or spotter.
- Wear PPE: gloves, non-slip footwear, eye protection.
- Do not crawl around the roof in wet, icy, or windy conditions.
2) Quick on-roof assessment from ground or eaves
- Look for obvious cracks, missing pieces, curling edges, or shingles that lift at the corners.
- Note the location of damaged shingles relative to gutters, vents, and the ridge.
3) Decide repair approach
- For a single, hairline crack in a non-sun-exposed area: temporary sealant or patch can be enough until a proper replacement.
- For open, cracked, or multiple damaged shingles: replacement is usually best to restore the roof's integrity.
4) When to call a professional
- If you're unsure about safety, the damage is extensive, or the roof is steep or steeply pitched.
- When you discover signs of water intrusion, soft decking, or mold in the attic.
- If the roof's underlayment or flashing appears compromised.
Quick repair and replacement options
- Minor crack repair (temporary): apply a roof-compatible sealant or asphalt roof cement along the crack, press down the shingle edge, and smooth the sealant.
- Shingle patching: place a pre-cut patch over the cracked area, ensure it's aligned, and seal with roofing cement; avoid relying on patching alone for long-term fixes.
- Replacement path:
- Identify an exact matching shingle and keep a few spare tabs.
- Remove the damaged shingle by lifting the surrounding shingles and removing the nails.
- Slide in the new shingle, align with the row, and nail near the tabs per manufacturer guidelines.
- Seal the edges and re-secure surrounding shingles if needed.
What you'll need (at a glance)
- Replacement shingles (matching color and style)
- Roofing cement or sealant
- Roofing nails and a pry bar
- Ladder, safety gear, and a helper
- Putty knife and utility knife for trimming
Quick safety checklist
- Clear the work area of debris and cords.
- Never step on loose or damaged shingles; distribute weight to the stronger areas.
- Work from a stable surface and avoid working alone if you're uncertain about footing.
When to pursue a full roof evaluation
- If you find more than a few cracked shingles or repeated cracking across a roof plane.
- If you notice recurring leaks after fixes or see sagging decking.
- If you're unsure about whether underlayment or flashing is compromised.
Are Cracked or Broken Shingles an Emergency?
Quick assessment
Cracked or broken shingles aren't always an emergency, but certain signs mean you should act fast. If you're seeing active leaks, a lot of shingles missing after a storm, or daylight in the attic, treat it as urgent. If the shingles are cracked but the roof appears dry and intact, you have more time to plan a repair. In all cases, safety comes first—don't climb onto a damaged roof yourself unless you're trained and equipped.
- Active water intrusion is present: water is dripping into the living space, you notice wet insulation in the attic, or there are damp spots on ceilings below the roof.
- A large area of shingles is missing or severely damaged after a weather event, especially if wind or hail drove impact through the underlayment.
- Shingles around vents, chimneys, or skylights are cracked and moisture is seeping around the flashing.
- The roof deck feels soft, spongy, or you observe sagging or deflection that suggests structural concerns.
- You can see daylight from the attic or through missing shingles—this means the underlayment and decking are exposed.
- There are signs of widespread wind uplift, such as shingles torn loose and loose fasteners visible at edges.
Monitor if
- There are small, hairline cracks or cosmetic damage on asphalt shingles but no leaks, and the attic remains dry after rain.
- The area is not actively leaking, yet you notice an uptick in shingle granules in gutters or on the ground after a storm.
- Weather forecast shows a dry spell or only light rain in the next 24–48 hours, giving you time to plan repairs.
- The damaged area is accessible from the ground with binoculars, and you can document the condition without climbing onto the roof.
- Shingles are cracked but still lie flat, with no curling, tearing, or missing tabs, indicating limited immediate risk.
Can wait if
- The damage is purely cosmetic: small surface cracks that don't expose the underlayment and there are no signs of moisture intrusion.
- There are no leaks, the attic stays dry after storms, and the roof has a long remaining lifespan before a full replacement would be necessary.
- The roof has stable, well-sealed flashing and no recent high-wind events that would increase risk of sudden failure.
- You're able to schedule a repair during normal business hours without threatening interior safety or comfort.
What to do now (quick actions)
1. Protect interior spaces: place a bucket or tray under any active drip, lay down plastic sheeting in the attic to catch drips, and move valuables away from the affected area.
2. Avoid risky roof access: don't climb onto the roof yourself unless you're trained and equipped; a fall is a bigger emergency than the shingles.
3. Document the damage: take clear photos from the ground and inside the attic if possible; this helps with insurance claims and helps a roofer assess the scope.
4. Check the forecast: if storms are approaching, monitor the situation closely and prepare for immediate tarping or temporary containment if advised by a professional.
5. Temporary protection: if advised and you can do it safely, gently place a temporary tarp over the damaged section to minimize water entry, ensuring it extends beyond the affected area to shed water away.
6. Plan a professional evaluation: arrange for a roofer to inspect the damage as soon as practical, especially if you're in a region prone to sudden weather shifts.
When to escalate to emergency services or insurers
- If there is immediate risk of structural failure or collapse, this becomes a life-safety situation requiring urgent attention.
- For significant roof damage after a major storm, contact your insurer promptly to start a claim and obtain guidance on temporary protections and timelines for permanent repair.
What Causes Cracked or Broken Shingles?
Aging and Weathering
Shingles aren't eternal. Over time the protective asphalt binder dries out, becomes brittle, and loses its flexibility. Daily sun, wind, and rain take their toll. As shingles age, they're more prone to small splits that can widen into cracks or break open under stress. You'll often notice curling, cupping, or frayed edges as a sign that the protective layer is thinning.
- Brittle edges that snap under foot or during minor impacts
- Curling or cupping that creates stress risers along the surface
- Increased susceptibility to hairline cracks that grow with time
Thermal Stress and Temperature Fluctuations
Roofs live through big temperature swings, and that cycling causes shingles to expand and contract. Repeated movement can crack the surface or loosen tabs, especially on exposed edges and at transitions around vents and chimneys.
- Day-to-night heating and cooling creates micro-cracks
- Wide seasonal swings amplify stress on the enamel-like surface
- Edges and tabs are common failure points
UV Exposure and Asphalt Degradation
Strong sun accelerates asphalt oxidation, turning the surface chalky and brittle. UV rays break down the protective coating, reducing elasticity and making shingles more prone to cracking, especially on southern exposures.
- Chalky, powdery film on the surface
- Brittle texture that cracks under slight bending or impact
- Faster deterioration on roof faces that get the most sun
Physical Impacts and Loading
Hail, branches, foot traffic, or debris striking the roof can crack or break shingles on contact. Even a light impact can create a tiny fracture that propagates over time, particularly if the shingle surface is already stressed.
- Hail strikes leaving dented or cracked sections
- Fallen limbs or heavy snow loads causing edge damage
- Improper maintenance foot traffic near eaves and valleys
Improper Installation and Fastening
If shingles aren't installed correctly, they're more vulnerable to cracking. Common installation issues include wrong nail placement, insufficient nailing, over-tightening, or improper sealing at starter courses and around penetrations. Bad installation can create stress concentration points that crack during wind or weather events.
- Nails too high or too low, or not penetrating solid sheathing
- Missing or loose fasteners at edges and corners
- Inadequate sealing around vents, chimneys, and valleys
Wind Uplift and Storm Damage
Strong winds can lift and peel shingles, exposing bare underlayment and stressing edges until cracks form. Torn or lifted tabs can crack when the wind shifts or when icy conditions follow a dry spell.
- Lifted edges or tabs create stress fractures
- Repeated gusts worsen already stressed areas
- Damaged seals around flashing worsen cracking risk
Ice Dams, Freeze-Thaw Cycles, and Moisture
Moisture trapped under shingles in cold weather expands as it freezes, widening existing cracks and leading to breakage. Ice damming at eaves can push water up under the shingles, accelerating deterioration and causing crack growth.
- Water penetration under the surface during thaws
- Freeze-thaw cycles that widen micro-cracks
- Warped or lifted shingles from trapped moisture
Poor Ventilation and Moisture Build-Up
Inadequate attic ventilation traps heat and humidity, accelerating aging of both the roof deck and shingles. Excess moisture can soften the underlayment and neighboring materials, making shingles more prone to cracking when stressed by weather or foot traffic.
- Excess heat softens and weakens adhesive bonds
- Moisture promotes deck rot that shifts and cracks shingles
- Condensation-related staining that signals underlying issues
Manufacturing Defects and Quality Variations
On rare occasions, a batch of shingles may have manufacturing flaws that predispose them to cracking or early failure. Visible uniform cracks, inconsistent tab alignment, or premature brittleness can hint at quality issues.
- Manufacturing micro-cracks that propagate under load
- Inconsistent thickness or tab alignment
- Premature brittleness after installation
Debris Accumulation and Surface Damage
Leaves, needles, moss, and standing debris hold moisture and trap heat, accelerating deterioration. Moss or algae growth can lift shingle edges, creating leverage points for cracks when wind or foot traffic adds stress.
- Moss lifting and curling edges
- Wet debris adds weight and stress on mid-section
- Reduced airflow leading to accelerated aging
How Roof Materials Affect Cracked or Broken Shingles

Asphalt shingles are the backbone of many roofs, and cracks or breaks here are usually a big deal. The protective granules on the surface guard against UV and weather; once a crack exposes the asphalt layer, water can seep in, especially during rain or rapid temperature changes. Cracks near the edges can act like wind funnels, catching gusts and pulling the shingle away over time.
- What to watch: exposed underlayment, darkened spots, or moisture stains on the ceiling below.
- Short-term impact: faster granule loss, increased UV exposure, and accelerated wear.
- Long-term risk: leaks, damaged underlayment, and potential mold growth if water gets through multiple layers.
Wood Shingles and Wood Shakes
Wood is naturally porous and expands/contracts with moisture. A crack or broken piece isn't just a cosmetic issue; it creates a direct path for water and invites rot, insect intrusion, and further splitting. Cracked areas can also loosen neighboring shingles, worsening wind uplift during storms.
- What to watch: dark stains, soft spots, or spline cracks that run through several boards.
- Short-term impact: moisture intrusion and swelling around the crack.
- Long-term risk: accelerated decay, insect damage, and higher replacement frequency.

Metal shingles or panels shed water well, but cracks in coating, painted surfaces, or seams can let water reach vulnerable underlayment or fasteners. While metal is durable, a cracked panel or compromised seam can create leaks or corrosion at the exposed edge.
- What to watch: rust spots, white chalky residue near cracks, or water staining along seams.
- Short-term impact: localized leaks and accelerated coating degradation.
- Long-term risk: corrosion, fastener failure, and more extensive panel replacement if cracks propagate.

Slate is naturally brittle. A cracked slate tile can shed shards and immediately allow water to penetrate beneath. Cracks often extend along the tile and nearby pieces if stressed, and moisture exposure can lead to accelerated deterioration of concealed joints.
- What to watch: visible cracks running through a tile, sagging edges, or loose slates.
- Short-term impact: rapid leakage at the cracked tile, possible interior staining.
- Long-term risk: cascading damage to adjacent tiles and potential roof deck exposure.

Clay and concrete tiles are heavy and breakable. A cracked tile creates a direct path for water, and surrounding tiles can crack under added stress. Walking on tiled roofs is risky; a single crack can become a larger fracture if stepped on.
- What to watch: single cracked tile, hairline fractures, or broken corners.
- Short-term impact: localized leaks and moisture infiltration.
- Long-term risk: structural stress on the roof, increased likelihood of adjacent tiles cracking, and more costly repairs.

Composite or synthetic shingles mimic natural materials but rely on layered bonding and polymers. A crack or break can compromise the weather barrier, especially if the crack runs through layers or weakens the adhesive seams. Temperature cycles can cause expansion or further separation at the crack.
- What to watch: visible fissures, lifted edges, or delamination near damaged spots.
- Short-term impact: reduced wind resistance and potential water entry.
- Long-term risk: accelerated wear, higher replacement frequency, and variable performance depending on the product.
Fiberglass cores add strength, but cracked fiberglass shingles still allow moisture to reach the underlying mat. The adhesive sealant around cracked areas may break down faster, increasing the chance of edge lifting and leaks.
- What to watch: cracks that reveal the fibrous mat or soft edges.
- Short-term impact: Quick moisture penetration at the crack.
- Long-term risk: accelerated deterioration of the shingle and faster neighboring shingle wear.
Quick-reference steps for any material
1) Inspect the crack or break and surrounding area for signs of water intrusion, edge lifting, or missing granules.
2) Assess whether the damage is isolated or if multiple shingles in the same area show cracks.
3) Decide on temporary mitigation (sealant or patch) if recommended by a pro, then plan a proper replacement for the affected shingles.
4) Have a qualified roofer evaluate underlayment, decking, and flashing to determine if broader repair is needed.
The Risks of Ignoring Cracked or Broken Shingles
Water Infiltration and Structural Damage
Cracked or broken shingles create open pathways for rain and melting snow. Even small openings can let moisture penetrate the roof's outer layers, especially during storms. Over time, that moisture can reach:
- The roof decking and underlayment, leading to rot and weakening of the structural surface.
- Insulation in the attic, reducing its effectiveness and inviting mold growth.
- The interior ceiling and walls if leaks travel through the attic venting or gaps in flashing.
Hidden Damage That Escalates
Damage you can't see from the ground often hides behind the siding and attic space. Left unchecked, cracks expand or propagate across neighboring shingles, increasing the risk of:
- Deck and fascia deterioration, which can compromise attic ventilation and drip edge function.
- Rusted or loose metal components around chimneys, vents, and valleys.
- Premature failures on neighboring shingles as wind catching cracked pieces accelerates loosening.
Ice Dams, Snow Load, and Freeze-Thaw Cycles
In colder climates, cracked shingles exacerbate freeze-thaw cycles. Water infiltrates and freezes, expanding as it does. This can:
- Raise the risk of ice dams that push water under shingles and into the attic.
- Widen existing cracks, creating larger openings for water intrusion.
- Increase the likelihood of shingle piece loss during winter storms, exposing underlying layers.
Energy Efficiency and Comfort Costs
A compromised roof isn't sealing your home as well as it should. You may notice:
- Higher heating and cooling bills due to heat loss through gaps.
- Uneven indoor temperatures as attic insulation becomes less effective where leaks occur.
- Reduced overall comfort, with more noticeable drafts near ceiling lines and walls.
Safety, Liability, and Insurance Considerations
Cracked shingles can create safety hazards and insurance questions:
- Loose shingles become projectiles in high winds, posing a risk to people and property below.
- Ongoing leaks may lead to extensive interior damage that can complicate insurance claims or coverage limits.
- If repairs are deferred, a claim could be denied or require more extensive remediation than a timely fix would've.
Long-Term Repair Costs Versus Early Action
Ignoring cracks often leads to bigger, more expensive fixes later:
- Small repairs edging toward a full roof replacement as moisture penetrates into structural components.
- Additional costs for mold remediation, improved ventilation, and repair of insulation.
- Possible need for replacing underlayment, flashing, or even sections of the roof deck if rot sets in.
Steps to Take If You Spot Cracked Shingles
1. Inspect carefully from a safe distance and note the location and extent of damage.
2. Photograph the cracks and any pairing damage around nearby shingles or flashing.
3. Schedule a professional roof inspection to assess hidden moisture and deck integrity.
4. Prioritize timely repairs to seal the gap, restore waterproofing, and prevent further escalation.
How Cracked or Broken Shingles Are Diagnosed
Initial Visual Assessment from the Ground
- From the yard, using binoculars if needed, scan the roof for obvious cracks, lifted tabs, or missing shingles.
- Look for chalky granule loss along gutters and footing; a dusty or sandy feel on shingles indicates wear.
- Notice dark lines or splits along the shingle width, especially on edges or near the ridge.
- Watch for shingles that lie flat versus those that curl, buckle, or bow away from the roof deck.
Up-close Roof Inspection
- Only attempt this if the roof is safe to access. Use a sturdy ladder, non-slip shoes, and fall protection.
- Check for visible cracks along the length of individual shingles; isolated small cracks might be superficial, but multiple cracks across the same run are a red flag.
- Inspect for broken tabs or shingles that crack when pressed gently.
- Look for signs of moisture behind the granules such as soft spots, sagging areas, or stains once you pull back the edge of flashing or sealant.
- Examine around roof penetrations (vent pipes, chimneys) where flashing failures can cause cracking to appear.
Attic and Interior Clues
- In the attic, hold a flashlight up to the underside of the roof deck to check for daylight between boards; small light leaks signal compromised shingles.
- Look for water stains, staining, or mold on sheathing or insulation, especially near ventilation runs.
- Listen for a musty odor after rain, which can indicate hidden leaks.
Diagnostic Steps You Can Take (Methodical Approach)
1. Safety first: ensure you have a stable ladder, a spotter, and fall protection before stepping onto the roof.
2. Do a top-down sweep: start at the highest points and work your way down in sections, noting every cracked or broken shingle.
3. Compare shingles: note if you see uniform hairline cracks across many shingles, which can indicate material aging or freeze-thaw damage.
4. Check gutters and downspouts: collect granules and residue; heavier granule loss suggests the shingle's protective layer is compromised.
5. Document with photos: take clear pictures of cracked lines, broken tabs, and any surrounding damage to guide repair decisions.
What They Tell You (How to Read the Findings)
- Isolated cracked shingle: often repairable by patching or replacing a single shingle in its section.
- Several cracked shingles in a small area: consider replacing the entire run or a larger section to prevent future leaks.
- Widespread cracking or broken shingles: typically a sign the roof has reached the end of its life or has extensive freeze-thaw damage; replacement may be more cost-effective in the long run.
- Cracks near penetrations: flashing issues may be more to blame than shingle quality; may require flashing repair in addition to shingle replacement.
When to Call a Pro
- If the pitch is steep, you're unsure about safety, or you find extensive damage, contact a licensed roofer for a thorough assessment and repair plan.
- Diagnostic callouts: hail-damage indicators, curling, or missing sections often require professional evaluation and replacement decisions.
Repair Options for Cracked or Broken Shingles
Temporary fixes
- Use asphalt roofing cement as a quick sealant for small cracks or loose edges.
- Steps: 1) Clean the crack and surrounding area. 2) Apply a thin bead of roofing cement under the crack. 3) Press the shingle back down and smooth the edges with cement. 4) If you have a patch material (repair tape or a small scrap shingle), sandwich it over the crack and seal the edges.
- Apply self-adhesive repair tape or a lightweight patch over the crack to deter water entry while you plan a longer-term fix.
- Steps: 1) Cut tape slightly larger than the damaged area. 2) Remove backing and press firmly from the center outward, smoothing any air bubbles.
- Keep a cautious eye on the area and limit walking on the roof to prevent further damage. Temporary fixes are designed to buy time, not to replace proper repairs.
Minor repairs
- Re-nail loose shingles along the affected row to restore wind resistance and seal edges.
- Steps: 1) Use corrosion-resistant roofing nails (length appropriate for your shingle thickness). 2) Lift each loose corner gently and insert nails about 3/4 inch above the old nails, avoiding overdriving. 3) Seal exposed nail heads with roofing cement.
- Re-seal edges and small cracks with roofing cement or a compatible sealant.
- Steps: 1) Clean the surface and dry completely. 2) Apply cement along the crack and press the edge of the shingle down. 3) Smooth the cement to create a continuous seal.
- If a shingle is cracked but still firmly attached, you can place a small patch over the crack.
- Steps: 1) Cut a patch from an identical shingle or repair patch. 2) Position patch over the crack and seal both edges with roofing cement. 3) Press firmly and allow to cure.
- Use a shingle repair tape for hairline cracks on newer shingles.
- Steps: 1) Clean and dry the area. 2) Place the tape over the crack with at least an inch of overlap on all sides. 3) Press firmly to adhere.
Partial replacement
- When a single shingle is too damaged for temporary or minor repairs but the surrounding rows are sound, replace the damaged piece.
- Steps: 1) Match and source a replacement shingle (same type, color, and batch if possible). 2) Lift the shingles above the damaged one with a flat bar to expose nails. 3) Remove the nails from the damaged shingle and carefully lift it away. 4) Slide the new shingle into place, aligning with surrounding tabs. 5) Nail the new shingle according to manufacturer guidelines (usually 4 nails for asphalt shingles, located in the dotted line area). 6) Seal around edges with roofing cement and press edges to secure. 7) Check adjacent shingles for proper seating and reseal if needed.
- Blend the appearance by staggering replacement shingles to match neighboring tabs and granule distribution.
- If multiple adjacent shingles are cracked in a small area, consider evaluating the section near the roof's slope to ensure there isn't a more widespread issue.
Full roof replacement
- Consider a full roof replacement when cracks are widespread, the shingles are near or past their service life, or water intrusion has affected underlayment and decking.
- Steps: 1) Schedule a professional assessment to confirm deck condition and ventilation. 2) Obtain multiple bids to compare materials, workmanship, and warranties. 3) Plan tear-off of the old roof and disposal; inspect for rot or damage to sheathing. 4) Install underlayment, proper ventilation, and flashing around penetrations (vents, chimneys, skylights). 5) Install new shingles, ensuring proper alignment, wind resistance, and sealant at edges and terminations. 6) Clean up roofline and gutters; inspect for gaps or loose flashing. 7) Review warranty and maintenance tips to extend the life of the new roof.
- Signs a full replacement is warranted: extensive cracking across many shingles, widespread curling or buckling, moisture intrusion into the attic, or historic roof age approaching the end of its expected life.
- Safety note: Full replacement is a major job. If you're unsure about deck condition, ventilation, or flashing, consult a licensed roofer to scope the project and confirm requirements.
Typical Cost to Fix Cracked or Broken Shingles
Minor repair
- Description: A small area with 1–3 cracked or broken shingles is replaced. The surrounding shingles are checked for reseating nails, and a quick sealant is applied to prevent lift and water intrusion.
- Typical cost: $100–$250 for asphalt shingles; up to about $400 in higher-cost markets or if access is tight.
- What's included: replacement shingles matched to existing color, basic sealant, and minimal labor.
- Steps you can expect:
1. Safety and access check; locate the damaged shingles without disturbing neighboring tabs.
2. Lift the shingles adjacent to the damage to expose nails.
3. Remove the damaged shingles and slide in fresh ones.
4. Secure with proper nails and reseal edges with roofing cement.
5. Clean the area and perform a quick inspection for gaps or potential leaks.
Moderate repair
- Description: A larger patch, typically 4–10 shingles, is replaced. May involve addressing slightly damaged underlayment or flashing, and ensuring a clean reseal along the affected ridge line or valley.
- Typical cost: $300–$900, depending on roof pitch, accessibility, and shingle style.
- What's included: several matching shingles, minor underlayment checks, and sealant as needed.
- Steps you can expect:
1. Assess surrounding shingles and any underlayment nearby for damage.
2. Remove the damaged group of shingles and any compromised underlayment.
3. Install new shingles with proper nail placement and alignment.
4. Re-secure edging and reseal along the replacement line; inspect flashing if exposed.
5. Run a quick leak test or inspect after a rain to confirm sealing.
Major repair
- Description: A substantial portion of the roof surface is affected—10+ shingles or a larger consecutive area. This may require deck inspection, replacement or reinforcement, and more extensive flashing work.
- Typical cost: $1,000–$3,000+, with higher figures for steep pitches, poor access, or when deck/underlayment must be replaced; in very large or complex roofs, costs can exceed $5,000.
- What's included: full replacement in the affected section, possible decking repair, re-sealing, and upgraded flashing where needed.
- Steps you can expect:
1. Comprehensive assessment of extent, including decking and flashing condition.
2. Remove a larger area of shingles and inspect or replace damaged underlayment/roof deck.
3. Install new shingles with correct nailing pattern and sealant.
4. Repair or replace flashing around valleys, chimneys, and vents.
5. Final check for leaks and ensure proper ventilation and drainage are intact.
What factors affect cost
- Roof size: More area to replace means more materials and labor.
- Access: Steep pitches, high elevations, or tight attic access raise labor time and safety prep.
- Material type: Asphalt shingles are typically cheaper to replace than architectural or specialty shingles (e.g., slate, tile).
- Extent of damage: Isolated cracks cost less than a large patch with potential deck repairs.
- Local labor rates: Rates vary by region and contractor demand.
Notes:
- Costs assume standard asphalt shingles and typical residential roofing conditions.
- If multiple issues appear during repair (deck rot, faulty flashing, or behind-sheathing leaks), expect additional line-item costs.
How Long Can You Wait to Repair Cracked or Broken Shingles?
Immediate risks (0–24 hours)
- Rain or dew can start seeping under cracks, turning a small issue into a water intrusion problem.
- Exposed roof decking and underlayment are more vulnerable to moisture, which can speed up rot and mold.
- Wind or rapid temperature changes can widen cracks or loosen surrounding shingles, worsening the damage quickly.
- Small pinholes become pathways for pests, insects, or birds seeking shelter.
Short-term risks (1–3 days)
- Visible leaks indoors may appear around ceilings or walls, especially after a wet spell.
- Saturated roof materials beneath the cracked shingle begin to deteriorate, increasing the chance of interior staining and odor from mold.
- Ice dam formation in cold climates becomes more likely, which can back up water under shingles and into the attic.
- Damaged shingles can curl or lift, catching more wind and expanding the damaged area.
Medium-term risks (1–2 weeks)
- Continuous moisture can lead to wood rot in the roof deck, weakening structural support over time.
- Attic insulation loses efficiency as moisture saturates it, driving up heating and cooling costs.
- Mold growth may spread to ceilings, attic spaces, and walls, potentially impacting indoor air quality.
- If left long enough, you may see failure of neighboring shingles as they bear more stress, creating a larger repair job than originally planned.
Long-term risks (2–6 weeks)
- Shingles can delaminate or fracture further, making a full shingle replacement more likely than a simple patch.
- Water intrusion may reach electrical wiring, attic fans, or lighting fixtures, heightening safety concerns.
- Prolonged moisture can cause sheathing and framing damage, potentially triggering costly repairs.
- Insurance and warranties may be affected if the problem is seen as a preventable, prolonged delay in addressing a known issue.
Seasonal considerations
- Winter: freezing and thawing cycles accelerate crack propagation; ice dams push water under shingles, worsening damage.
- Spring and rainier seasons: higher likelihood of leaks and faster interior water intrusion.
- Summer: sun and heat can dry out surrounding shingles, but cracks may expand with temperature swings; wind can whip loose shingle edges.
Quick-reference by timeframe
- 0–24 hours: The window to prevent interior water intrusion and limit deck exposure is narrow. Act fast if rain is expected or if you notice moisture.
- 2–7 days: If leaks are present or you see staining, you're at a higher risk for interior damage and mold; temporary protection is advised while planning a proper repair.
- 2–4 weeks: The risk to roof deck integrity increases; expect potential expansion of the repair scope and higher costs if moisture has penetrated deeper.
- 1–3 months: Structural concerns become more likely; full reroof or major deck repairs may be required, and chances of insurance adjustment or warranty review rise.
What happens if you wait to address the problem in several timeframes
- 0–24 hours: Small cracks can become larger cracks or generate leaks during the next rain event; moisture exposure begins to affect decking and insulation.
- 2–7 days: Persistent moisture elevates the risk of interior water damage, attic mold growth, and accelerated deterioration of surrounding shingles.
- 2–4 weeks: Water can reach the roof sheathing, compromising structural integrity and increasing repair complexity and cost.
- 1–3 months: Prolonged exposure often requires more extensive roof rehabilitation, including possible deck replacement, higher labor charges, and greater disruption to living spaces.
How Cracked or Broken Shingles Vary by Location and Climate
How This Problem Varies by Region & Climate within the United States
In the U.S., the weather you face dramatically shapes how shingles crack or break. Temperature swings, sun exposure, moisture, wind, and hail all play a role, but their impact depends on where you live. Use these regional cues to guide your annual inspections and maintenance.
- Temperature swings and freeze-thaw cycles: In climates with cold winters, water that seeps into tiny gaps freezes and expands, causing hairline cracks or panel breaks. Asphalt shingles are especially susceptible when temperatures bounce between freezing nights and sun-warmed days.
- Sun and UV exposure: The Southwest and other sunny regions age shingles faster. UV rays degrade surface granules and sealants, making edges brittle and more prone to cracking.
- Moisture and humidity: Humid regions (Southeast, Gulf Coast) encourage faster mold, algae, and moisture intrusion. Wet phenotypes can loosen fasteners and contribute to crack progression around vulnerable edges.
- Wind and hail: Tornado-prone plains, the Gulf Coast, and coastal areas see frequent wind-driven impacts. Hail can punch through or crack shingles outright; strong winds can peel off tabs and expose underlying layers.
- Roof pitch and snow load: Steeper roofs shed snow quickly, but sudden heavy snowfall adds stress to shingles during buildup and melt. In regions with heavy snow, ice dams can cause cracks near the edges or at transitions.
Regional Patterns You Might See
- Northeast and Great Lakes: Frequent freeze-thaw cycles create hairline cracks that widen over seasons. Wet springs can lead to moisture-related edge deterioration.
- Southeast and Gulf Coast: High humidity plus strong storms accelerate granule loss and edge curling. Hail and wind damage are common after storms.
- Southwest: Intense sun and heat cause thermal expansion and accelerated UV wear. Shingles may become brittle and crack in heat waves, then heal poorly after cold snaps.
- Northwest: Regular rain and moss growth can hide cracks until leaks appear. Wet conditions can accelerate underlayment deterioration behind cracked shingles.
- Coastal areas (anywhere near salt water): Corrosion and faster algae/lichen growth can accompany cracking, and wind-driven rain adds moisture intrusion risks.
Quick Inspection Focus by Climate
1) After a major storm or temperature spike, check for obvious cracks, missing tabs, or lifted edges.
2) In cold climates, look for hairline cracks near the ends of shingles and signs of granule loss where the sun hits.
3) In hot, sunny regions, look for brittleness, curling, or warping along the shingle tabs.
4) In moist regions, inspect for algae/lichen growth, moss, and moisture wicking at joints.
5) In windy or hail-prone zones, search for dented or fractured shingles along eaves and ridges.
- Cold climates: ensure proper attic ventilation, seal gaps to reduce ice dam risk, and use shingles rated for low-temperature performance.
- Hot/dry climates: choose UV-stable, reflective shingles and maintain good attic insulation to minimize heat transfer.
- Humid/coastal climates: prioritize corrosion-resistant fasteners and consider extra underlayment or water-resistant barriers in vulnerable sections.
- High-wailure zones (storm-prone): increase inspections after severe weather; keep a closer eye on fastener integrity and edge seals.
How to Think About Your Local Climate in 3 Steps
1) Identify your primary climate drivers (freezing winters, heat exposure, humidity, wind/hail).
2) Match those drivers to common crack patterns described above.
3) Schedule targeted checks after weather events that stress your region (cold snaps, heat waves, heavy rain, or hail).