Last updated: Apr 19, 2026
Oroville sits at the transition from the Sacramento Valley's blistering summer sun to the cooler, sometimes wetter Sierra foothill climate. That means roofs endure long, intense sunlight and heat for many months, followed by cooler rains and the possibility of occasional freeze-thaw cycles. This combination pressures roofing materials differently than inland valleys, so choosing a surface that performs well in both extremes is a practical, localized concern. Shingle and metal options should be evaluated not only for their initial weather resistance but also for how they behave as heat accumulates and winter moisture presses through seams and penetrations. The goal is to minimize heat-driven expansion, protect underlayers, and retain color and coating without rapid degradation.
A roof in this foothill setting sits in a landscape where wildfire exposure is part of the decision, not an afterthought. Proximity to Lake Oroville, the Feather River corridor, and surrounding vegetation makes ember resistance and ignition risk a top consideration. Roofing systems with non-combustible or fire-resistive components can reduce exposure to embers and flare-ups. This is not about chasing a single "fire-proof" material, but about a layered approach: selecting a roof assembly with a robust, fire-rated underlayment, properly sealed penetrations, and durable surface coverings that resist燃烧 and charring. In practice, the choice often leans toward materials with higher fire resistance ratings, careful detailing around valleys and chimneys, and attention to venting and eaves to limit ember intrusion.
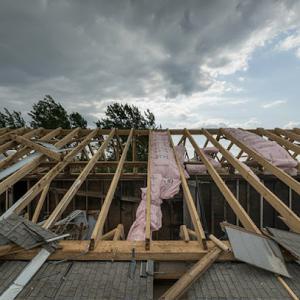
Roof planning in Oroville follows a distinctly seasonal rhythm. Dry, clear stretches are ideal for tear-off and installation, minimizing weather-related delays and ensuring a quality seal with new underlayment. The wet months and occasional freeze-thaw episodes can disrupt exposure times for underlayment and shingle or panel adhesion, especially on steeper pitches. Scheduling around long dry spells not only helps achieve a faster, cleaner install but also reduces the likelihood of wind-driven debris interfering with the job. If a project begins in late fall or early spring, build in buffer time for unexpected rain, as those windows can close quickly in this climate.
Sun exposure amplifies any existing defects, so a roof plan in this area should address seasonal moisture management as well as heat. Underlayment choices play a crucial role here: a robust, water-tight layer beneath the visible surface protects against rainfall infiltration during the wet season and shields joints from thermal cycling during the dry season. Consider overlaps, fastener strategies, and venting at ridges to balance moisture evacuation with wind-driven embers risk. A roof that breathes without leaking is particularly valuable in a climate where sun exposure and rainfall alternate with relatively short windows of ideal installation weather.
Maintenance stays practical when the roof sits near wild vegetation and water bodies. Regular inspection after wildfire season or windy periods matters, with particular attention to ember-prone areas, chimney flashings, and fastener integrity. A proactive approach-checking for lifted shingles, damaged granules, or compromised underlayment-can prevent more extensive damage during the next dry season or the first heavy rain after a fire event. In comparing materials, evaluate how each surface resists UV degradation, how color retention holds up after years of sun, and how well the system stands up to occasional freeze-thaw stress that can cheek the integrity of seals around vents and penetrations.
The foothill-edge setting near Lake Oroville and the Feather River brings a different risk profile than flatter California cities. Insurance underwriting in this area often evaluates roof performance and venting as the primary line of defense, not just whether leaks have appeared. Materials with superior fire performance can matter more in this climate because underwriting may ask for mitigation details and documentation tied to roof assemblies and venting. When a smoke event or nearby fire pushes conditions, the impact isn't limited to direct flame exposure; it can ripple into contractor scheduling, site safety, and how fast a claim moves through processing channels.
Choosing materials with proven fire resistance is not optional in this market-it's a practical necessity. Standing up to ember intrusion and radiant heat matters when roofs are subjected to harsh summer heat and wildfire exposure. Metal roofing and certain concrete or clay products tend to perform better in ember-laced winds and during extended smoke events. Synthetic or composite shingles can offer a middle ground for fire resistance and installation practicality, but the key is to pair the right surface with a compatible, fire-rated underlayment and a venting strategy that minimizes ember entry. In homes with existing venting that shows wear or outdated bird-stop details, upgrading to ember-resistant vent assemblies and coordinated flashing can significantly reduce ignition risk. Remember, a roof is only as strong as its connections to walls, vents, and soffits-these details demand equal attention.
ember-management starts at the eave line and around roof penetrations. Use flashing and seals designed for fire exposure, and upgrade to ember-cap fittings where applicable. The choice of fasteners should align with the chosen roofing material and its heat resilience, ensuring that fastener heads remain secure after heat cycles. A well-installed roof assembly includes a fire-rated underlayment matched to the roof covering, plus sealing around chimneys, skylights, and vents to limit embers from entering the attic or attic vents. In this climate, proper attic ventilation also reduces heat buildup that can stress roofing components in the long run, so balance intake and exhaust to keep temperatures manageable during hot months.
During regional smoke events, even homes untouched by direct flame can face delays in materials delivery, crew availability, and emergency access. Scheduling must account for variable visibility and air quality, which can constrain outdoor work and safety protocols. When a claim is filed, responders may reference the state of the roof assembly, venting upgrades, and documented mitigation steps more than age alone. Prepare by documenting prior inspections, maintenance, and any upgrades-this documentation can streamline processing and support a stronger recovery path.
Act now to review roof coverings and venting for ember resistance, confirm compatibility between chosen materials and underlayment, upgrade vent assemblies where needed, and schedule a careful, safety-focused installation window that accounts for smoke advisories and air-quality swings. Prioritize a coordinated plan that protects both the roof surface and the venting system, because in this environment, resilient details pay off when the next wildfire season looms.
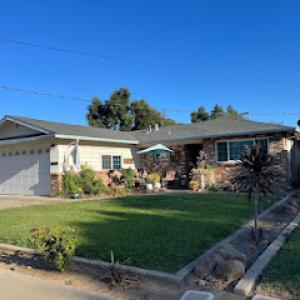
Asphalt shingles remain common in Oroville because they fit many local homes and budgets, but prolonged hot, dry summers can accelerate granule loss and thermal aging. In the foothill heat, you'll notice some shingles cooking under the sun and then cooling at night, which over years can lead to curling and edge delamination. When choosing asphalt, look for heat- and UV-resistant granules and a mineral-saturated asphalt binder. A higher fire rating and reflective or cool-gray granules help reduce radiant heat on roof surfaces during peak afternoon sun. Pay attention to shading on the roof; if nearby trees cast long shadows, the heat cycle will still be intense in the exposed sections. Regular inspections after peak fire season are wise, since heat-driven expansion can reveal early cupping or hairline cracks.
If asphalt is your route, consider a reflective shingle option with a lighter palette to limit heat absorption. Ensuring proper attic venting and a well-sealed attic deck complements the roof's performance, reducing heat transfer into the living space and slowing aging of the shingles themselves. In Oroville's climate, a well-ventilated attic pair with a properly installed underlayment helps resist wind-driven embers and bake-off from high summer sun.
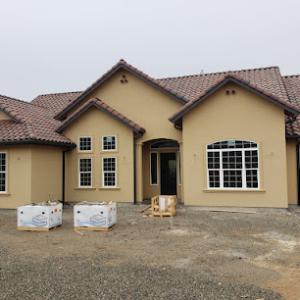
Clay and concrete tile suit hot sun exposure, but their weight and breakage risk matter on older homes and during maintenance access. Clay tile's heat resistance is excellent, and its color stability helps minimize surface fading in strong sun. The heavier weight means a structural evaluation is essential before installation; many older Oroville homes were not built to carry tile loads, and retrofitting may be necessary. Clay tile also tends to be more brittle in freeze-thaw cycles, so routine inspection after winter storms helps catch micro-cracks that can harbor leaks. If you're renovating or repairing, verify the roof framing can carry the tile's weight and that fasteners are corrosion-resistant for the Inland California climate.
Maintenance access is a practical consideration as well. When you need to replace individual tiles, the surrounding area should allow safe access for occasional cleaning and moss control, especially in shaded corners where moisture can linger. In heat-drenched zones, darker clay tiles may absorb more heat than lighter shades; selecting a lighter glaze can improve reflectivity while preserving the tile's aging tolerance.
Concrete tile shares many of the same heat-handling strengths and weight considerations as clay, with the added benefit of sometimes greater impact resistance. In Oroville's dry-warm pattern, concrete tiles offer solid longevity and a broader palette in both texture and color. But their rigidity makes them less forgiving than asphalt on some older roof planes, and you'll want careful workmanship to avoid cracks during installation or seismic events. Concrete's thermal mass helps moderate attic temperatures when paired with proper ventilation, but you still need a roof deck that's prepared for the tile's weight and wind uplift.
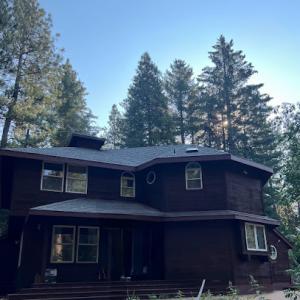
Metal roofing is especially relevant in Oroville because homeowners balancing wildfire concerns, heat reflectivity, and long service life often compare it directly against composition shingles and tile. Metal panels reflect a larger portion of radiant heat, which lowers surface temperatures and can reduce attic heat gain when vents and flashing are correctly integrated. The fast installation time and resilience to embers make metal a practical firefighter-friendly choice in fire-prone periods. However, the system's heat behavior depends on coating and profile; lighter, ceramic-coated or baked-on finishes tend to sustain color and reflectivity longer in intense sun. Ensure that panels have proper sealing at all seams and that ridge vents are compatible with metal roofing to vent hot air efficiently. If you choose metal, you'll likely notice fewer maintenance cycles tied to thermal degradation, but flashing around chimneys and vents should be checked regularly for any signs of expansion-related gaps after hot spells. In this climate, metal roofs pair well with treated underlayment and proactive guttering to handle seasonal rain and debris.
Above & Beyond Roofing Oroville CA
(530) 532-2437 aboveandbeyondroofingorovilleca.com
128 Mono Ave, Oroville, California
5.0 from 37 reviews
Above And Beyond Roofing Oroville CA offers reliable, 7-day roofing services throughout Oroville and surrounding areas. We specialize in roof inspections, repairs, full roof installations, attic venting, gutter cleaning, and storm or wind damage restoration. Our experienced team combines expert craftsmanship with high-quality, durable materials to ensure long-lasting protection for homes and businesses. From minor leaks to complete roof replacements, we provide fast, professional solutions designed to safeguard your property, enhance energy efficiency, and maintain peak roof performance year-round. Trust Above And Beyond Roofing Oroville CA for dependable, expert roofing services you can rely on.
Dan Gardner Roofing
(530) 403-8803 dangardnerroofing.com
Oroville, California
5.0 from 14 reviews
We provide expert roofing solutions with quality materials and skilled craftsmanship. Reach out to us for reliable service and lasting results!

Ridge Side Roofing Company
(530) 282-8901 ridge-side-roofing-company.square.site
1308 Forbestown Rd #95966, Oroville, California
5.0 from 7 reviews
We have 23 years of experience in the Roofing trade, from re roofing residential homes to new construction and commercial buildings. We take pride in giving oure coustomers the highest of quality and integrity in the roofing industry, partnering with one of the world's largest suppliers and offering a quality job for a fair price. We strive to stay up to date with the newest technologies that the roofing industry's has to offer, keeping the weather out and protecting you'r investment for years to come with a roof system you can rely on. We specialize in composition shingels, tile, and flat roofing systems. We also do gutter cleaning, seasonal maintenance, installation of gutter guards, title 24 roof compliance updates and clean up.
Dunlap Roofing Services
Serving
5.0 from 9 reviews
Over 20 years of roofing experience in the Yuba-Sutter area. Now accepting new customers. CSLB#1101674-Dunlap Roofing Services, nestled in the heart of Live Oak, CA, is your trusted partner for all things roofing. With a commitment to quality craftsmanship and unmatched expertise, we provide top-tier roofing solutions that stand the test of time. Whether it's roof repairs, installations, or inspections, our dedicated team ensures your peace of mind with every project. Choose Dunlap Roofing Services for reliable, durable, and aesthetically pleasing roofing solutions that safeguard your home or business. Your roof, our expertise – a perfect combination for a secure and beautiful future.
1 N Done Roofing Service
(530) 933-8272 1ndoneroofing.com
Serving
5.0 from 8 reviews
Roofing Company
Thurman Roofing & Construction
(530) 521-2342 www.thurmanrcinc.com
Serving
5.0 from 17 reviews
Thurman Roofing and Construction is a family-owned company based in Chico, CA, proudly serving Northern California since 2012. We specialize in roof replacements, repairs, new installations, dry rot repair, and complete construction services. Our experienced team works with all roof types, including composition shingles, metal, tile, flat roofs, and TPO systems. As a licensed, bonded, and insured contractor, we’re trusted for delivering quality workmanship, honest service, and top-grade materials like energy-efficient cool roof shingles, synthetic underlayment, seamless gutters, and high-performance gutter guards. Call today for a free estimate you can rely on—ZERO DOWN financing available! Ca License Number 970235
Butte Roofing
(530) 342-6553 butte-roofing.com
Serving
4.7 from 53 reviews
Family owned for 70+ years, we are Northern California's premier roofing contractor for Residential and Commercial roofing services. We take the worry out of roofing!
A M Warrior Roof Repair
Serving
4.7 from 35 reviews
A M Warrior Roofing, Inc. protects homes and businesses throughout Yuba City and beyond. Specializing as a premier roofing contractor, they bring expertise and dedication to every project. Located on McMullen Avenue, A M Warrior Roofing ensures quality craftsmanship and reliable service, giving you peace of mind knowing your property is shielded by a strong, dependable roof.

AAAce Roofing CSLB#845894
Serving
5.0 from 4 reviews
AAAce Roofing is the premier roofing contractor in Paradise, CA. We have been serving the community since 2003. Our team of skilled professionals is committed to providing exceptional roofing services to property owners in the area. We specialize in a broad range of services, including emergency roof repairs, roof leak repairs, reroofing, tear-off services, residential roofing, dry rot repairs, new construction roofing, and much more.
Action Roofing Service
(530) 673-4067 www.actionroofingys.com
Serving
4.4 from 39 reviews
When it comes to roofing in the Yuba-Sutter area, there is no better option than Action Roofing. Our company has over 43 years of roofing experience, and we specialize in residential re-roofing projects. Smart homeowners know that the condition and appearance of their house can be one of the largest factors in its overall value. A quality roof doesn’t just protect you and your family; it protects the investment you’ve made in your home. Make sure that you have the best roofers working for you. You won’t find a staff with more experience and skill in the area. We ensure all roofers have ongoing safety and training seminars to ensure up-to-date styles and techniques.
Sierra Roofing
(530) 342-1863 www.sierraroofinginc.net
Serving
4.5 from 17 reviews
Sierra Roofing has been in continuous business serving the Greater Chico and surrounding areas since 1929. It has been owned by the Gray family since 1981. We proudly stand by the work and service that we provide. Our estimates are always free. We can locate where leaks are entering in and repair, or give an estimate to repair/replace. We can also perform roofing inspections, including real estate roof inspections.
JC Roofing
(916) 633-3135 sites.google.com
Serving
5.0 from 8 reviews
We are a family owned roofing company. We service all types of roofs you can imagine. Shingles, tile, metal, flat, roof decks and many more. We offer services in the residential/multifamily area, commercial space, and industrial sector. Waterproofing is a specialty we take great pride in. Nothing makes us happier than hearing our customers tell us how they can finally enjoy a rainy day indoors. Another compliment that often boosts our ego, is when our customers and their neighbors' tell us how beautiful the new roof looks. Call us and let the pros take care of your roof for a better peace of mind. We offer payment plans tailored to every customers needs. We look forward to working with you!
During the wet season, the failure pattern shifts from the dry-summer concerns you hear about to issues that surface with prolonged rain and colder snaps. Drainage problems, flashing leaks, and underlayment weaknesses often reveal themselves when storms roll in. If water bubbles at a seam or drips from a flashing corner after a heavy downpour, that's a sign you're looking at more than a cosmetic drip in this climate-and it's time to investigate beyond the obvious stain.
Homes on the foothill edge carry unique drainage realities. Slope runoff can push water toward delicate joints, and debris carried by winter winds and storms can clog gutters and downspouts just when you need them most. In valley-floor neighborhoods, exposure to radiant heat during dry spells can age roofing components differently than in the foothills, so winter leaks might appear in places that didn't seem vulnerable after summer heat faded. Inspecting for debris buildup, ensuring channels stay clear, and understanding where runoff concentrates on your roof helps prioritize repairs before moisture wreaks more damage.
Freeze-thaw cycles aren't constant all winter, but when temperatures swing around freezing, vulnerable flashing details and cracked tile or aged sealants can worsen quickly. A single night with temps dipping below 32°F can stress previously sound joints, and those minor gaps become pathways for water once the rain returns. Look for hairline cracks in clay or concrete tiles, loosened sealants around vent stacks, and any edge flashing that looks warped or rusted. These small faults often multiply as storms persist, so addressing them promptly prevents bigger problems down the line.
Practical steps you can take start with a focused winter audit. Clear all gutters and downspouts, then run water from a hose along suspect seams to observe how water flows during a rain test. Pay attention to flashing around chimneys, vent pipes, and wall transitions-these are common leakage points after a season of soaking. Tap on vulnerable tiles or shingles from the ground; a hollow or cracked feel indicates underlayment exposure beneath and deserves closer inspection. If the attic shows condensation or damp spots after a heavy rain, the problem likely lies in underlayment or roof deck integrity, not just surface shingles.
Keep in mind that the combination of debris, slope differences, and exposure levels means leaks can migrate unpredictably from one season to the next. A proactive approach-seasonal checks, targeted cleaning, and timely resealing of flashing-can keep winter moisture from turning a manageable repair into a larger, more disruptive fix.
Pricing per square for common roofing options in this foothill town stays within clear bands, but you'll see bumps when demand spikes after wildfire seasons or storm periods tighten contractor availability across Butte County. Asphalt Shingles run from 350 to 700 per square, a pragmatic choice if you're balancing upfront spend with city-wide insurance considerations. Metal Roofing sits between 700 and 1200 per square, offering durability against heat and embers but carrying a higher install complexity. Clay Tile is typically 1000 to 2100 per square, reflecting its weight, underlayment needs, and careful handling on slopes. Concrete Tile trades at roughly 900 to 1800 per square, combining a heavier mass with long-term resilience. Wood Shingles or Shakes fall in the 650 to 1100 range, prized for a traditional look but requiring more maintenance. Synthetic or Composite Shingles anchor the list at 500 to 1100 per square, delivering a lighter footprint with decent fire resistance if specified. Use these local ranges per square as your starting point when gathering bids or calculating replacement budgets.
Pricing can shift quickly when wildfire-driven demand spikes after regional fire seasons or storm periods tighten contractor availability across Butte County. That squeeze can push both material costs and labor rates higher, especially for reroofing projects that need rapid scheduling before rainy seasons or during limited contractor windows. In practical terms, you may see longer lead times for crews and cranes, which can add to the overall project timeline and cash flow. Fire-season awareness also means potential premium charges for ember-resistant materials or additional protective detailing in the attic and eaves.
Pricing can also shift based on foothill-style access constraints, tear-off complexity on heavier tile systems, and scheduling around the city's dry installation window versus winter weather delays. Narrow driveways, steep grades, and overhanging vegetation can require extra setup, scaffolding, or alternative staging, all of which pressure labor hours and equipment rental. Heavier tiles like clay or concrete demand careful roof-deck assessment and may necessitate structural checks, which later influence bid totals. Plan for a slightly compressed dry season installation, but have a contingency for a late-start or pause if a late-season storm creeps in.
If your goal is a balanced mix of cost and resilience, Asphalt Shingles or Synthetic/Composite Shingles provide the most predictable per-square pricing with reasonable fire performance. For premium durability in exposed foothill conditions, Metal Roofing offers long-term value despite higher upfront costs. Clay and Concrete tiles deliver longevity and a fire-conscious profile, but watch the weight and access needs that can complicate both installation and tear-off.
A full roof replacement requires a building permit through the City of Oroville Building Department. The permit ensures the project complies with local rules and the overall safety framework for the foothill housing stock, especially under wildfire-prone conditions that shape material choices and installation details.
The city handles plan review and permitting, and inspections occur during and after the project to verify compliance with the California Building Code and local amendments. A typical process checks attic ventilation, underlayment, flashing around chimneys and skylights, and ember-resistant details as part of wildfire-aware construction practices.
Homeowners should expect roughly a 1-2 week lead time in normal periods, with longer waits possible during peak demand or after regional weather and fire events increase permit volume. Peaks can stack reviews and require additional coordination with the contractor, especially when inspections must be timed between weather windows and access constraints.
Before applying, gather typical project documentation your contractor will need, including a site plan, proposed roof assembly details, and any fire-hardening features you intend to incorporate. Confirm with the building department whether temporary access or street closures impact inspection scheduling, and plan for potential re-inspections if an initial pass requires corrective work. Communication with the contractor and city staff helps keep the path to permit issuance moving smoothly in the foothill climate.
Homeowners in this foothill setting face a California insurance market that treats wildfire risk and regional loss history as central to every decision. The mix of intense summer heat, winter rain, and wildfire exposure heightens scrutiny of roofing choices, installation details, and expected maintenance. Insurers increasingly expect you to show how a replacement will stand up to local realities, not just generic durability claims. That means the right material choice, fastener patterns, and a clearly documented upgrade path can influence whether a policy remains in force and how it's priced at renewal.
Roof replacement decisions may be shaped by requests for mitigation documentation, photos, product details, and proof of code-compliant upgrades. Your insurer may want before-and-after images that show fire-resistant edges, ember-resistant venting, and spark resistance in the attic or underlayment. Be prepared with product spec sheets, installation manuals, and receipts that connect the chosen material to local risk reduction. In practice, this is about translating a roofing project into defensible risk reduction rather than a simple aesthetic improvement.
When damage touches wind intrusion, rain leakage, smoke exposure, or deferred maintenance, claims and renewals can become entangled. A single event can trigger multiple coverages or endorsements, complicating settlement timelines. The best approach is solid pre-loss documentation: current photos, a clear inventory of prior maintenance, and a detailed narrative that connects damage to a documented mitigation plan. Post-loss records should mirror the pre-loss files to demonstrate continuity and accountability.
Keep an organized digital folder with product brochures, installation dates, and contractor notes. After any incident, photograph the roof from multiple angles, capture attic conditions, and log weather events around the time of loss. When you communicate with an insurer, reference specific features-ember standards, wind-resistance ratings, and drainage details-that directly address anticipated risks in this climate. This careful recordkeeping can smooth conversations and support a faster, fairer resolution.
Prolonged UV exposure and blistering heat components wear down composition roofs faster than you might expect. Shingles can dry out, curl, and crack, creating micro-leaks that hide behind flashing transitions and penetrations. When winter storms arrive, these hidden flaws are revealed as leaks around vent stacks, chimney steps, and roof-to-wall interfaces. The consequence is often a cascade of water intrusion that damages sheathing, insulation, and interior finishes before a homeowner realizes the problem. Regular inspections after the dry season and before the first winter storms help catch aging signs early, especially around roof penetrations where sealants fail or shift.
Tile roofs in this area can develop hidden problems when individual cracked tiles allow water to reach aging underlayment. Cracked or chipped tiles may not be obvious from ground level, yet water can travel along underlayment and framing, leading to rot and mold behind ceilings and walls. In Oroville's wet season, a slow drip can become a loud wake-up call after a heavy rain, long after the roof seemed fine. Pay attention to the condition of sealant lines around hips, valleys, and pipe penetrations, and consider targeted replacement of damaged tiles before they compromise the underlayment.
Autumn gusts bring more than a chill; they push leaves, branches, and pine needles toward edges and drainage paths. Debris accumulation blocks gutters and scuppers, increasing the risk of standing water near eave lines and fascia. Edge damage from wind-driven debris can loosen fasteners and create vulnerable seams just before winter rains. A routine edge and debris check in late fall, with prompt removal and resealing where needed, helps prevent edge deterioration that leads to leaks during the first heavy rains.