Last updated: Apr 19, 2026
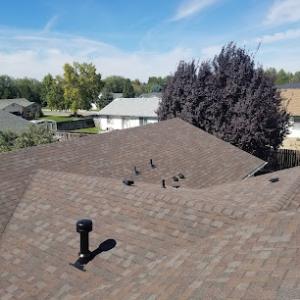
After a hail or high-wind event, the first 24 hours determine whether a roof collapse risk exists or if leaks are silently compromising the attic. In this market, hail and wind activity are significant enough to drive claim volume, making photo documentation and detailed estimates especially important for homeowners. If shingles are blown off, granules accumulate in gutters, or dented metal shows exposed underlayment, treat it as urgent. Your goal is to prevent interior water intrusion while avoiding further damage from wind-driven rain or drifting snow that can expose weak spots under swelling ice. Standby a safe viewing spot from ground level or a sturdy ladder, and photograph from multiple angles-close-ups of damaged edges, hail hits on the valleys, and any dark stains or moisture marks on drywall or ceilings. If there is any sagging, creaking, or unusual roofline movement, mark the location and avoid walking on the roof until a professional evaluates it.
Winter snow and ice can add weight to already-damaged roofs in Caldwell, so post-storm triage often has to account for both leak control and structural loading concerns. Start by sealing obvious leaks with temporary tarp or roofing tape if you can do so safely from the ground, prioritizing the most vulnerable rooms first-ceilings under living spaces, or rooms with heavy attic storage. Do not run generous water through the attic to test for leaks; instead, document where water enters and at what height on the wall. If you can safely access the attic, note any daylight gaps, sagging decking, or frost on the underside of sheathing, as these details will help an adjuster gauge severity. Remember that weight from ice can push a compromised roof beyond its safe loading limit, increasing the risk of a sudden collapse in a heavy snow event. Keep a clear path for emergency crews and avoid stepping on weakened rafters or damaged sheathing.
Local contractor signals show strong demand for emergency repair, storm damage, and insurance-claim help, indicating that fast response after weather events is a core homeowner concern in this market. Gather itemized photos: close-ups of hail marks on shingles or metal, broad shots of the entire roof, gutters clogged with granules, hail-dinged flashings, and any apparent roof deck exposure. Create a simple timeline: date of event, immediate weather impacts, first signs of leaks, and when a contractor first inspected. If you have a prior photo set, compare to reveal preexisting wear versus new damage. Keep a log of every contact with insurers, including names, claim numbers, dates, and promised next steps. If you encounter a resistance to scheduling emergency assessment, document the refusal and escalation to a supervisor-insurers often move faster when presented with clear, dated evidence.
With the surge of storm-related inquiries, a swift, organized response matters. Engage a local contractor who can perform a rapid roof inspection, provide a detailed scope of damage, and distinguish between temporary leak control needs and a full replacement plan. In a market where fast response after weather events is a core concern, choosing a contractor who can triage safely, prioritize structural loading issues, and shepherd the claim through the next stages reduces the risk of long, uncertain repair timelines. Schedule a same-day or next-day assessment if conditions permit, and set expectations about the sequence: immediate tarp or temporary sealing, then a written estimate, then a full mitigation plan once the insurer approves scope and timing.
Find local contractors experienced in assessing and restoring roofs after hail, wind, and severe weather events.
Weathertight Roofing
(208) 455-7663 www.weathertightidaho.com
1429 Andy Ln, Caldwell, Idaho
4.8 from 86 reviews
Since 2008, Weathertight Roofing has been the premium choice for commercial and residential roofing in Caldwell, Treasure Valley, Eagle, Meridian, and Boise. With over 24,000 residential roofing jobs and over 15,000 commercial roofing projects successfully completed, we have the experience and expertise to provide any roof service, big or small.
Flash Rite Roofing
(208) 869-7797 www.flashriteroof.com
1608 Missoula Way, Caldwell, Idaho
4.9 from 29 reviews
Your dependable and trustworthy go-to Roofing Contractor in Idaho. From Boise to McCall. With years of experience and commitment to quality, we provide top-notch Roofing Solutions for Residential and Commercial properties. Whether you need a new Roof Installation, Roof Replacement, or routine maintenance, our skilled team delivers exceptional craftsmanship and uses high-quality materials. Moreover, acquiring our timely and effective Roofing Services in the Treasure Valley, can keep your Roof in perfect condition. From fixing leaks and damaged shingles to addressing issues with flashing, our professionals will restore the integrity of your roof. We have also kept our service charges low for your convenience.
Supreme Roofing
16423 Regence Way, Caldwell, Idaho
5.0 from 13 reviews
-Free estimates -Professional service -Workmanship guarantee -Licensed & insured
Dreamroofs
(208) 454-0323 dreamroofsidaho.com
204 Main St, Caldwell, Idaho
4.5 from 46 reviews
Dreamroofs is your residential roofing expert, serving Caldwell, Nampa, Middleton, Marsing and surrounding areas. New roofs, re-roofs and repairs. We are your tear off specialists. Landscape friendly. Call today for a free estimate.
Precision Single Ply
(208) 939-9979 www.precisionsingleply.net
11070 Bass Ln, Caldwell, Idaho
5.0 from 2 reviews
Low Slope Roofing Specialists Locally owned and family operated for over 20 years. We specialize in commercial and residential membrane installation. Anything TPO, PVC, or EPDM
Mike's Roofing & Repairs
(208) 631-0806 www.mikesroofingandrepairs.com
Serving
5.0 from 42 reviews
Protect your largest investment with our reliable roofing services. We are a locally owned and operated roofing company currently serving Middleton, Boise, Meridian, Eagle, Kuna, Nampa, Caldwell and Emmett, Idaho and surrounding communities. We have earned our GAF certification so not only are you utilizing a trusted local business, but also have the security of a 50 year warranty with one of the nation's largest roofing material manufacturers. If you want to make your roof last as long as possible, it is vital that you never put off a roof repair. No matter how major or minor the repair you need, we are here to help. We offer roofing contracting, roof installation, and roofing repairs.
Idapro Roofing & Exteriors
(208) 201-6408 idaproroofing.com
12704 Harrow Ct, Caldwell, Idaho
3.0 from 4 reviews
Idahos own professional roofing company
M3 Roofing & Exteriors
Serving
4.9 from 150 reviews
M3 Roofing and Exteriors, located in Nampa, Idaho, delivers roofing solutions with quality and durability you can depend on. Our dedicated team expertly protects your home from the elements with high-quality roofing and gutter services. Serving Nampa and surrounding areas since 2020, we are committed to customer satisfaction and efficient service. From new roof installations to repairs, M3 Roofing and Exteriors safeguards your home with excellence.

Three Brothers
(208) 917-1616 threebrothersllc.com
Serving
4.7 from 584 reviews
With Three Brothers, you are guaranteed to have a lasting home renovation project, installed by experts. Our team goes above and beyond to provide expert, friendly service. As a family-owned company, we make customer satisfaction our number one priority. We offer roofing, gutter, windows, siding, and bathroom remodeling services. Give us a call today to learn more about our premier company, or fill out our online form now to request a free estimate!
Knox Construction
Serving
4.9 from 52 reviews
Our mission at Knox Roofing & Construction is to provide quality workmanship along with great customer service. With 3 generations of experience behind us, we know that the integrity of our staff, high-quality materials, and a strong work ethic is key to being a leader in our industry. Serving both residential and commercial clients for new construction, remodel, renovations, and repairs. With continuing to educate ourselves, and our staff we stay on top of some of the newest, and advance technologies which results in superior quality, and service.
Excel Roofing
(208) 284-5879 excelroofing.us
Serving
5.0 from 9 reviews
We take great satisfaction in providing you with a quote that is reasonable, and competitive, and will provide your roof with both value and durability. You’ll never be in the dark regarding the cost of your roofing project because of our dependability and transparency. For your next job in Nampa, ID, Excel Roofing Inspections is the clear choice due to our outstanding track record and affordable prices. Set up an appointment right now to find out more about our extensive services. We’re honored to continue offering top-notch roofing services to Nampa residents and property managers. Turn to Excel Roofing & Inspections when quality and experience matter because we handle every job with pride, reliability, and integrity
Bork Roofing
(208) 869-6674 www.borkroofing.com
Serving
5.0 from 260 reviews
Bork Roofing is your trusted roofing contractor in Star, ID, offering top-quality residential and commercial roofing services. Whether you need a new roof installation, re-roofing, or roof repairs, our expert team is here to help. We specialize in providing durable and reliable roofing solutions that stand the test of time, ensuring your home or business stays protected from the elements. At Bork Roofing, we pride ourselves on delivering exceptional craftsmanship, outstanding customer service, and competitive pricing. Reach out to us today for all your roofing needs, and let us keep your property safe and secure.
In this area, roof work follows a predictable rhythm: late spring through early fall. That window exists because freeze-thaw cycles in winter can disrupt installation and lead to compromised workmanship. When you line up crews for a replacement, aim to complete most of the work before late autumn freezes tighten schedules. Expect the busiest pace to be from late spring into early summer, with crews prioritizing homes that have already passed inspections or weathered storm events. For a typical Caldwell home, coordinate to start once soils stay dry and temperatures are consistently above freezing at night, reducing the chance of shingle or membrane damage during handling and installation.
Spring in this valley brings moisture that can linger after storms. Tear-off work and dry-in steps slow when underlayment and roof deck stay damp, and rushed windows tempt overlooked seam or fastener detail. Plan for shorter workdays during wet stretches and build buffer days into the schedule for inspections between lifted shingles and reseal stages. If a storm rolls through, expect crews to pause and cover exposed areas to protect the attic and interior from moisture intrusion. When spring rain ends, a dry spell helps the new roof cure properly and improves long-term performance, especially on higher-slope sections or roofs with complex penetrations.
Hot, dry summers in this valley can accelerate aging of asphalt shingles and affect sealant performance. During peak heat, crews should adjust work shifts to cooler parts of the day and implement heat-aware handling practices to protect shingles from scorching and premature flashing wear. Metal and tile options respond differently: metal may expand with heat but install tolerances can prevent warping if fasteners are spaced correctly, while clay or concrete tile require careful roof deck prep to avoid this season's thermal stress. Your plan should include shaded staging areas for materials, provision for frequent hydration of crews, and thoughtful sequencing to minimize long exposure of underlayment to sun before it's fully protected by cap and ridge components.
Treasure Valley weather can introduce hail and wind events that mimic the pressures of a re-roof. When a storm hits, diagnosis and documentation become part of the process. Take clear photos of damaged areas from multiple angles, including attic or ceiling signs of leaks and any interior staining. If inspectors determine a replacement is needed, you'll benefit from a well-organized timeline that aligns with the calmer, longer daylight stretch of late spring, early summer, or early fall. Proper sequencing reduces the risk of wind-driven debris causing new damage during a rushed job and helps ensure the new roof performs well through Caldwell's freeze-thaw cycles.
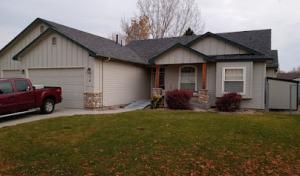
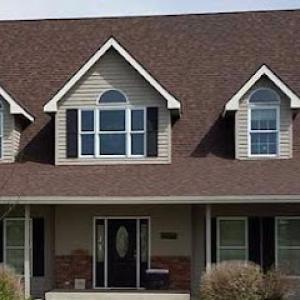
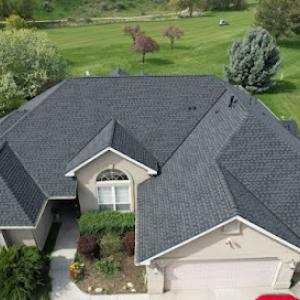
Caldwell homeowners commonly choose among asphalt shingles, metal roofing, clay tile, concrete tile, synthetic/composite shingles, and slate, giving the market a wider material spread than many nearby cities. The local climate-freeze-thaw winters, hot dry summers, and frequent wind and hail-means each option carries distinct performance profiles. Asphalt shingles offer practical balance for entry-to-mid-range replacement timelines and accessible repair, while metal roofing stands out for storm resilience and long-term service life. Clay and concrete tiles bring excellent cool-summer performance and a durable aesthetic, but their weight and installation requirements demand careful planning, especially on older structures. Synthetic or composite shingles aim to blend the best of both worlds, delivering ease of installation with enhanced impact resistance. Slate remains an upscale choice, prized for longevity and timeless look, but its weight and cost demand strong structural assessment. In practice, a Caldwell home often ends up with a mix of what works best for its roof plane, the home's orientation to sun and wind, and how a given material plays into insurance expectations after hail events.
Heavier materials such as clay tile, concrete tile, and slate can trigger insurer attention in Caldwell because carriers may request material-specific documentation for weight and replacement scope. If a home carries a heavy roof, ensure the structural system-decking and rafters-has been evaluated to handle the load, especially after a severe storm or during a re-roof project that spans multiple seasons. When heavy tiles are a current or planned choice, be prepared to supply documentation that confirms roof structure compatibility and, if applicable, recent reinforcement work. For homeowners facing storm-related damage, keep in mind that the insurer may request details about the tile type, underlayment, fasteners, and the roof's ability to meet wind uplift criteria. A clearly documented installation plan, including tile pattern, batten spacing (if used), and the presence of any seismic or wind-retrofit measures, can smooth the claim and replacement process.
Metal roofing has meaningful local contractor presence in Caldwell, which matters in a climate with snow, summer heat, and recurring wind and hail claim concerns. A robust local network helps secure timely inspections, proper snow load management, and reliable warranty support. If considering metal, look for contractors who can demonstrate proficiency with mixed roof geometries common in the area (gable, hip, low-slope transitions) and who understand how metal behaves under freeze-thaw cycles. The best metal systems combo a standing-seam or engineered panel profile with appropriate underlayment and fastener choices to resist wind uplift and thermal movement. Because Caldwell experiences both hot summers and cold snaps, ask about coatings that resist chalking and UV degradation, and about panel warranties that include performance under hail impact. A well-installed metal roof can deliver solid hail resistance and continued performance through the winter melt-and-refreeze cycles.
Clay tile and concrete tile bring strong exterior durability and a distinctive look that remains attractive for years. However, their weight, breakage risk during hail, and the need for precise ventilation and underlayment mean a higher upfront planning bar. Synthetic or composite shingles often strike a balance-delivering enhanced impact resistance without the weight concerns of stone-based products. For homeowners facing storm season, a key decision factor is how the chosen material behaves when struck by hail: some composites absorb impact with less fracture risk than certain asphalt varieties, while tiles must be carefully installed to minimize crack propagation from sudden temperature swings. In every case, partner with a local installer who can translate a product's tested performance into real-world performance in this canyon-country climate.
Ultimately, the best roof type for a given Caldwell home aligns with structural compatibility, performance under freeze-thaw conditions, and the expected insurance documentation needs tied to the replacement scenario. A proactive assessment that includes weight, wind uplift capacity, hail resistance, and seasonal temperature variation will guide a material choice that balances resilience with practical maintenance. Keeping a focus on the local storm history and the contractor ecosystem ensures the selected roof type not only shields the home effectively but also supports smoother insurance interactions and timely replacement timelines when storms strike.
Explore specialists in steel, aluminum, and standing seam metal roofs built to last 50 years or more.
Weathertight Roofing
(208) 455-7663 www.weathertightidaho.com
1429 Andy Ln, Caldwell, Idaho
4.8 from 86 reviews
Flash Rite Roofing
(208) 869-7797 www.flashriteroof.com
1608 Missoula Way, Caldwell, Idaho
4.9 from 29 reviews
Asphalt shingles remain the workhorse for most Caldwell homes, especially when re-roof timing needs to fit into a busy sticking point of tear-offs and deck-condition checks. In practice, pricing is driven more by what the roof reveals beneath the old layer than by the shingles themselves. Expect typical costs in the low-to-mid range of the table, with square-by-square variability tied to how much old felt, roof deck, and stray nails the crew has to remove. When a hail event or strong wind hits, storm-driven demand can tighten crews and push lead times, which can nudge the total project cost upward even before disposal fees are tallied.
Metal options provide long-term durability, but Caldwell's re-roof projects often learn the hard way that metal installs encounter more deck- and flashing-related discoveries than new-construction jobs. Pricing tends to sit toward the higher end of the range, reflecting the need for precise metalwork and potential upgrades to structural components uncovered during tear-off. In periods following hail or wind events, availability can tighten and lead times extend, which translates to both higher immediate costs and longer project durations. The faster installation window is real, but scheduling becomes the real budget variable during busy claim periods.
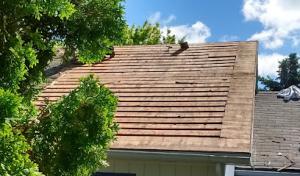
Clay tile brings distinctive durability and curb appeal, but it also exposes more deck-condition questions once the old roof is stripped. Expect costs to sit in the upper portion of the range, given the careful handling required for fragile tiles and the possibility of replacing damaged underlayment or portions of the decking. Caldwell's climate means freeze-thaw cycles stress tiles differently, so crews often verify substrate integrity thoroughly, which can add cost and time. Storm-demand spikes can slow procurement of matching tile profiles and transport, affecting both price and start dates after a hail or wind event.
Concrete tile offers strong wind resistance and long life, yet re-roofing with this material typically involves substantial tear-off and more notable deck evaluation. Prices tend to be higher than asphalt or synthetic options for the same square area, reflecting the weight and handling requirements. In Caldwell, dissection of the deck and potential structural reinforcement discovered during removal can influence final numbers. After hail or wind events, material availability and crew scheduling can tighten, pushing both cost and timing upward.
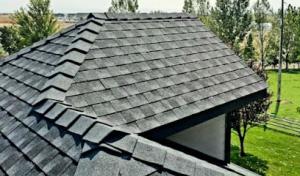
Synthetic or composite shingles strike a balance between durability and cost, but Caldwell re-roofs still revolve around what the roof shows after tear-off. Costs often align with the mid-to-upper range, with less risk of breakage during removal than natural materials, though deck-condition discoveries remain a factor. When storms trigger a surge in demand, the resulting competition for qualified crews can raise both price and lead times, especially for quick turnarounds or rapid replacements.
Slate roofs are less common but must be anticipated in Caldwell's housing mix, particularly where historical homes exist. Re-roof projects with slate carry premium pricing due to material fragility, specialized removal, and careful reinstallation. Deck-condition checks become critical, and any discovered rot or framing concerns add to the bill. After hail or wind, slate projects may experience the most pronounced scheduling pressures as specialists become scarce, potentially extending timelines and tightening pricing windows.
Get a clear picture of your project costs upfront - no commitment required.

A full roof replacement in Caldwell generally requires a permit through the local building department process tied to Canyon County jurisdictional oversight. That permit is not a one-and-done step; the project is tied to a formal review and ongoing oversight as the work progresses. The timing of the permit often influences scheduling, especially in a re-roof-heavy market where contractors juggle permits, weather windows, and inspection availability. When planning, a homeowner should expect a sequence that begins with permit application, then material and scope verification, followed by staged inspections rather than a single final sign-off.
The permit process typically involves submitting project details and completing inspections during and after installation rather than only at final sign-off. In Caldwell, inspectors commonly focus on flashing, ventilation, and overall code compliance. Because these elements are critical for performance in freeze-thaw cycles, wind uplift, and hail exposure, it is essential to verify that the contractor's scope explicitly includes proper flashing details, attic ventilation adjustments or upgrades, and adherence to current code requirements. If any of these items are omitted or deferred, delays or rework can occur after the paneling is up or shingles are laid.
Confirm early with the contractor that flashing materials, attic ventilation, and required drainage details are addressed within the bid and project plan. Ask specifically which inspections will occur and at what stages; common check-ins happen during roof removal, around underlayment application, and after shingles are installed. In Canyon County, inspection timing can be weather-dependent, so plan for potential rescheduling caused by winter freezes, wind events, or storm activity. Keep a dedicated contact with the contractor and the local building department handy to address any deficiencies promptly and avoid delays.
When a hail or wind event rattles the Treasure Valley, insurance decisions hinge on what you can prove happened-and when. Because hail and wind claims are active in the market, insurers often expect date-stamped photos, room-by-room leak notes, and line-item estimates before approving replacement scope. You'll want to photograph the roof from multiple angles, then walk interior ceilings and walls with a notepad, noting any moisture path, staining, or soft spots. A clear timeline from storm to inspection helps avoid a back-and-forth that drags on into insurance season. If a claim looks murky, adjusters may request more evidence or delay decisions, which can push replacement timing later than you expect.
In Caldwell, heavier roof options like tile or slate may draw extra insurer scrutiny compared with lighter systems because carriers may request material-specific considerations. Tile and slate carry different failure modes and installation details, so be prepared for questions about underlayment, fasteners, and roof deck condition. If you're weighing a heavier roof, gather independent assessments on wind uplift resistance and potential impact damage that insurers can reference when evaluating the claim. Clear, professional documentation of observations and tested measurements can help bridge any gaps between what you saw on the ground and what the adjuster needs to approve the scope.
Homeowners should expect insurance decisions to be influenced by whether damage is documented promptly after a storm rather than after winter moisture or summer heat has obscured the original cause. In practice, timely photos, a fresh leak log, and a detailed damage map give the adjuster a clean view of the event. Delays or blurred causes invite disputes, and those disputes often translate into longer rebuild timelines and more back-and-forth before a scope is signed off.
Connect with contractors who help homeowners navigate the claims process from damage assessment to final approval.
Weathertight Roofing
(208) 455-7663 www.weathertightidaho.com
1429 Andy Ln, Caldwell, Idaho
4.8 from 86 reviews
In Caldwell, flashing and ventilation are not just workmanship details but recurring inspection focal points, making them common problem areas when roofs age or are replaced poorly. You'll often see leaks creep in where dormers, chimneys, and valleys meet the roof deck, especially after winter thaw cycles or hammering wind events. A dedicated scan of step, boot, and valley flashing, plus the continuity of roof vents and soffit returns, is time well spent. If flashing is damaged or improperly lapped, water can trickle into attic spaces, freeze into ice dams, and creep along fasteners, letting hidden rot take hold.
Snow and ice exposure in Caldwell can exploit weak eave details and previously repaired sections, especially on older re-roofed homes with layered roofing history. Ice dam formation commonly hides behind overhangs where inadequate drainage or compromised fascia assemblies exist. Pay attention to any history of prior repairs along the eaves, as these spots may conceal inconsistent decking or improper shingle alignment. When temperatures swing, look for new granule loss at eave edges and signs of moisture staining along roof-to-wall intersections-these are hints that the underlayment or flashing under the eaves may be stressed.
Summer heat in Caldwell can shorten the service life of asphalt systems when attic ventilation is poor, making heat-related shingle wear a practical local concern. A hot attic accelerates adhesive creep and expands roofing touches that should move freely, potentially leading to cracked or cupped shingles, especially on our drier, sun-drenched days. If soffit vents are blocked, or if attic insulation is insufficient, you'll notice faster fading, brittle edges, and more rapid granule shedding on sunnier exposures. Regular checks of attic venting balance and insulation thickness can help preserve shingle integrity through Caldwell's long summers.
Older, layered roofing histories create a complex failure pattern in this market, where re-roofs are common and multiple roof systems coexist. You may see mismatched shingle courses, inconsistent nail lines, or hidden fasteners that weren't addressed during a previous replacement. In addition, clay or concrete tile entries can fail at the hips or rake edges when the underlayment below has settled or deteriorated. A cautious approach with probing around surface granule loss, curled edges, and irregular transitions helps catch moisture paths before they penetrate the deck.
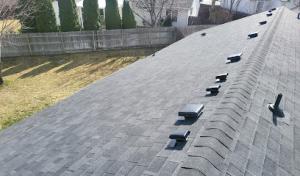
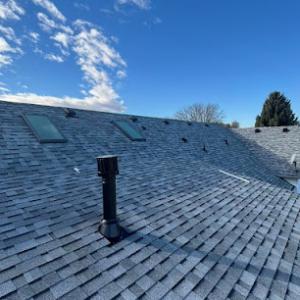
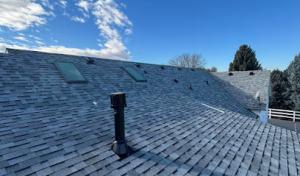
Caldwell's market shows meaningful activity in skylight work, and leak-prone roof penetrations are a real service category. If you're adding or upgrading a skylight, expect the work to involve precise flashing, insulation, and attention to the surrounding deck condition. In a freeze-thaw city, choose a skylight with a strong curb, double seal, and a well-vented interior to reduce condensation. Have the installer confirm how the flashing will integrate with your existing roofing system and venting plan, especially where snow loads might pool around a flashed edge during winter.
Low-slope and flat-roof expertise appears in the Caldwell market but is less dominant than re-roofing and steep-slope replacement. For these assemblies, verify specific experience before signing. Ask for recent projects on similar roofs, and request a written drainage plan that shows how water will shed toward designed outlets. Expect more attention to seam assemblies, edge detailing, and foam or modified bitumen layers. Because this area experiences hot summers and occasional heavy hail, insist on a robust UV- and hail-resistant membrane with a proven track record in the local climate.
Solar-integrated roofing is present among local contractors, which matters for reroof timing around panel or mounting decisions in the area's sunny conditions. If panels are part of your plan, align the roof replacement schedule with the anticipated panel install timeline and ensure the chosen roofing system accommodates a clean, long-lasting interface with mounting racking. Ask for a solar-ready detail set that shows how penetrations for racking, conduits, and vents will be sealed and protected during and after installation.
In a neighborhood with snow load and wind events, request a detailed inspection of all penetrations near the planned solar or skylight work. Confirm that flashing transitions between skylights, vents, and the main roof are tested under freeze-thaw cycles. A coordinated approach-roof replacement, skylight work, and solar installation-helps minimize rework and weather delays, especially in the spring and early summer when heat and sun drive the project pace.
Find contractors experienced in skylight installation, flashing, and leak repairs to bring natural light into your home.