Last updated: Apr 19, 2026
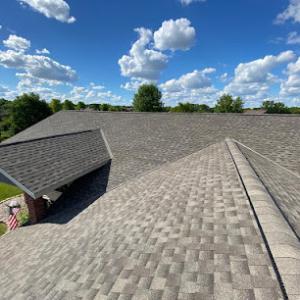
Spring hail and high-wind events can slam a steep-slope roof in a single afternoon, leaving loose shingle tabs, torn edges, and flashing gaps that aren't obvious from ground level. In this climate, those impacts aren't isolated incidents-they often set up lurking leaks that only show up after the next thaw or a rapid warm-up followed by another cold snap. If you notice granule loss, curled shingles, or bright copper sheen along metal flashing after a storm, treat it as an active leak risk. Do not wait for a rain-free window to inspect-get on the roof safely as soon as conditions allow and document every flaw you find.
Winters in this part of Minnesota don't end with the last snowflake. Freeze-thaw cycles push the edges of shingles and sealant joints beyond their comfort zone. This means that once hail or wind has damaged a roof, the already-stressed tabs and sealants may begin to fail where you can't easily see them. Attic heat and air leaks worsen the problem, lifting and warping shingles from beneath. Those fragile spots can worsen quickly when morning frost meets afternoon sun and a wind-borne rain pulls at exposed edges. A rapid, thorough assessment reduces the chance of a small problem turning into a costly interior leak.
Willmar homeowners face a real urgency when a storm window opens and winds howl. After a hail event, the clock starts ticking toward another weather system that could push moisture deeper into compromised layers. The best approach is to stage a focused exterior visit within 24 to 48 hours if safe. Look for cracked sealant around vents and flashing, lifted shingles, and hail dents on metal edging. If you see any wandering gaps near eaves, ridges, or chimney penetrations, your next step should be a professional inspection that confirms whether the underlayment and roof deck remained intact under the surface damage.
Insurers in this area scrutinize hail and wind claims carefully, so your claim package needs to be rock solid. Start with clear, time-stamped photo documentation from multiple angles: the entire roof, the most damaged zones, and close-ups of any lifted or broken pieces. Capture contrasting conditions-wet, dry, sunny-to show the problem's consistency. Collect a trusted contractor estimate that itemizes the affected areas and recommended fixes, plus an independent inspector's written report confirming whether the underlayment, deck, or flashing was compromised. Keep these documents organized and readily accessible to support storm-related roof claims when the weather window shifts again.
When you walk the roof, focus on the most vulnerable spots: elevated flashing around chimneys and vents, step and toe-kailing joints, and the transitions from roof to wall. Look for hairline cracks in sealant at vent penetrations, torn or raised edges at hips and ridges, and any dark staining that suggests trapped moisture behind damaged shingles. On metal flashing, inspect for denting, bending, or loosening that could direct water under the roofing system. If a quick exterior check reveals any of these signs, move from assessment to professional inspection without delay. The goal is to establish a timely, accurate picture of damage before fresh weather arrives and to prevent a minor issue from becoming a major interior leak.
If damage is suspected, prioritize safety and document first. Do not climb onto a steep slope during icy conditions, heavy winds, or when surfaces are slick. When safe, take photos from multiple vantage points and note the time, date, and weather conditions. Then contact a local roofing professional who understands Willmar's particular climate and typical housing stock. Ask them to perform a targeted, rapid assessment focusing on underlayment integrity, flashing strength, and potential deck damage. A focused inspection that aligns with your insurer's expectations will streamline the process and reduce the risk of delayed claims, especially when spring weather is fusing hail remnants with ongoing freeze-thaw stress.
Preferred Roofing
(320) 905-5245 preferredroofingmn.com
116 25th St SE, Willmar, Minnesota
5.0 from 147 reviews
We offer a wide range of services from new construction to roof replacement and installation of seamless gutters. Whether you want metal roofing or architectural shingles, we have you covered! We pride ourselves in delivering excellent workmanship and ensure we leave your property clean and orderly upon completion.
Heritage Exteriors
(320) 592-4636 www.heritage-exteriors.com
3867 US-12, Willmar, Minnesota
4.9 from 227 reviews
Heritage Exteriors delivers expert roofing, siding, gutter, and window services to homeowners and businesses in Central Minnesota and surrounding states. As a licensed and insured general contractor, we're committed to quality workmanship and lasting results. We also provide expert assistance to homeowners navigating insurance claims, ensuring a worry-free experience. Partnering with leading manufacturers like GAF, LP SmartSiding, and Andersen Windows, we ensure superior performance and value. We serve communities in Central Minnesota, South Dakota, and Northwest Iowa. Contact us today for an estimate and long-lasting protection.
West Central Roofing Contractors
(320) 235-8748 www.westcentralroofing.net
4030 US-71, Willmar, Minnesota
5.0 from 4 reviews
Experts in Commercial Low Slope Roofing
A roof in this region faces a unique combination of stresses that chip away at its life in ways you don't see in milder climates. Cold, snowy winters push snow loads and ice formation, while warm summers bring heat cycles that relax and contract materials. That tug-of-war between freeze-thaw cycles and sun exposure accelerates wear on shingles, underlayment, and flashings. In practice, this means more frequent micro-cracks, faster granule loss, and a higher chance of moisture finding its way under the surface. A roof that seems sound after winter can show a different story once spring arrives and that thawing cycle hits again.
Spring hail, wind, and the transition from winter to summer are especially consequential for steep-slope residential roofs. The late spring through early fall window is the most practical replacement period here because snow and lingering freeze conditions create unpredictable schedules and weather-related delays. When hail bruises or penetrates the surface, it can compromise the protective layer quickly, and wind can lift edges and loosen fasteners. In this climate, the roof deck and underlayment need to be prepared to resist rapid temperature swings and moisture exposure as soon as the first warm days arrive.
The interior moisture swings that characterize Minnesota's interior lake region make attic ventilation and underlayment choices critical during reroofing. Willmar experiences moisture highs that creep into attic space during melt-off periods, even when the exterior looks dry. If ventilation is under-addressed, warm, moist air can condense on colder sheathing, promoting rot and mold behind the scenes. The right combination of attic intake and exhaust, plus a continuous, properly sealed underlayment, helps maintain deck dryness and preserves insulation efficiency. This is not just about keeping rain out; it's about managing humidity, vapor diffusion, and the long-term integrity of the roof assembly.
Material choice matters more here than in some milder locales. Asphalt shingles still perform well, but the local climate makes synthetic and metal options attractive for their handling of heat and wind loads. Metal roofs can shed hail more predictably and resist impact better than some asphalt configurations, but require careful fastening and gaps that won't trap condensation. Synthetic or composite shingles offer a lighter weight alternative with good hail resistance and dimensional stability in temperature swings. If clay or concrete tiles are considered, expect significantly higher weight and the need for structural assessment and precise installation to handle Willmar's freeze-thaw stress.
Every Willmar roof benefits from a thoughtful, climate-aware inspection routine. After spring's hail season, a focused check of ridge lines, seam laps, vent pipe flashings, and edge details pays dividends. Look for loose shingles, lifted tabs, or shiny impact hail spots that indicate compromised protection. Early detection supports quieter summers and a longer roof life, because addressing small issues before the next freeze-thaw cycle reduces the risk of hidden damage that compounds over time. In practice, you'll keep the attic space better conditioned and the deck less vulnerable by pairing solid ventilation with well-sealed, continuous underlayment.
Asphalt shingles are a dominant choice because they fit the area's common residential roof types and offer a lower entry cost for storm-prone replacements. In Willmar's mix of gabled and steep-slope homes, asphalt shingles install quickly, shed snow relatively well when paired with a solid underlayment, and tolerate the freeze-thaw cycles typical of west-central Minnesota. When selecting, prioritize shingles with good nail-holding strength and algae resistance alternatives for higher snow load days that can push moisture into shaded eaves. Consider a reinforced underlayment and an ice-and-water shield at eaves and around any roof penetrations to reduce ice dam risk during the shoulder seasons. A well-ventilated attic helps extend shingle life, so pair asphalt with a balanced vent strategy-ridge vents plus soffit vents-to keep moisture from lingering under the decking.
Metal roofing is especially relevant in this snow-prone climate because its shedding behavior helps snow slide off more predictably, reducing prolonged ice buildup on steep slopes. Fastening details matter in Willmar's long winters and the accompanying temperature swings, so look for a system that uses concealed or exposed-fastener options suitable for the climate and a panel profile that aligns with the house's slope. Metal commonly performs well with spring hail, as the material resilience minimizes denting compared to some other options, especially when the panel trim and edge detailing are correctly specified. Pay attention to expansion movement and panel seam design; in a region with repeated freeze-thaw cycles, a properly engineered seam and sealant strategy prevents leaks as temperatures move between extremes. A robust underlayment remains essential under metal to manage any trapped moisture from rapid snowmelt and spring rains.
Heavy materials such as clay tile, concrete tile, and slate are less typical for Minnesota reroof projects and require careful structural consideration in a region with snow loading concerns. If a Willmar home with an existing robust roof structure contemplates tile or slate, a structural engineer should verify attic joist spacing and overall load capacity before fabrication and installation. These materials demand precise installation to prevent edge cracking and to maintain proper drainage on steep pitches. In practice, homes with limited attic ventilation or marginal rafter capacity may not be good candidates without costly reinforcement. For many Willmar residences, lighter options paired with a reinforced underlayment deliver a more predictable performance under hail exposure and freeze-thaw cycles. If considering these heavy choices, schedule an evaluation during a dry season when the structure's loading can be accurately assessed, and plan for potential additional framing or truss upgrades.
Across all materials, proper attic ventilation and a continuous underlayment system are critical in this climate. The combination reduces heat buildup in summer, moderates rapid temperature shifts in spring, and helps manage moisture from snowmelt and rain. For steep slopes common in Willmar, ensure soffit intakes align with ridge exhausts, and consider baffles that maintain airflow above insulation. The underlayment should extend past eaves and around penetrations, with a weather-resistant barrier at transitions between roofing materials. In wind-prone or hail-exposed portions of the roof, a self-adhering membrane at the eave line and along any valleys provides an extra layer of protection against wind-driven rain.
Given Willmar's spring hail exposure and freeze-thaw cycles, plan for weather-timed inspections that align with seasonal transitions. After heavy hail events or brisk winds, inspect for lifted or damaged shingles, dented metal, or disturbed sealants. In the months following winter, check for loose fasteners and signs of edge wear. A well-chosen material paired with diligent maintenance-ventilation, underlayment integrity, and timely resealing-will help a steep-slope residential roof stand up to the area's unique blend of hail, snow, and thaw cycles.
A full roof replacement in Willmar generally requires a building permit issued by the City of Willmar Building Department under Kandiyohi County. Before any shingles come off, you or your contractor should pull the permit and confirm what specifics the city expects for your roof type, slope, and materials. The permit process helps ensure that installation meets local wind, fire, and structural standards that are particular to this lake-country climate.
Reroof inspections commonly include a final inspection, and the department may ask for proof that underlayment and attic venting meet requirements. In practice, that means the permit review will look for an underlayment rated for expected freeze-thaw cycles and adequate attic ventilation to prevent moisture buildup during Willmar's spring thaw and summer heat. Your contractor should be prepared to show documentation that venting openings meet code and that the underlayment meets or exceeds city standards. A common question from the inspector is whether the attic has sufficient intake and exhaust ventilation and whether any venting changes were made to accommodate the new roof.
Gather before filing: a concise roof plan, material spec sheets, and venting details from the chosen system. If spring hail or storm activity is anticipated, plan for the final inspection window to occur after a dry stretch but before the looming late-season push to finish before winter. Weather can shift inspection scheduling in Willmar, so coordinate a realistic inspection date with the contractor and the Building Department to minimize weather-induced delays.
Inspection scheduling in Willmar can be affected by weather, which makes timing more important during spring storm periods and the late-season push before winter. Coordinate the sequence: prior to starting, ensure the permit is issued; mid-project, address any underlayment or venting discrepancies; and finally, schedule the final inspection promptly once the roof is completed and all ventilation and underlayment proof is ready for review. Keep copies of all approval notices and any city-issued marking or labeling handy for the final check.
Provided Willmar-area material ranges are about $350 to $650 per square for asphalt shingles, $700 to $1400 for metal, $900 to $1800 for clay tile, $900 to $1700 for concrete tile, $420 to $800 for synthetic/composite shingles, and $1200 to $2500 for slate. In practice, the exact number depends on roof size, the complexity of the slope, and how aggressively the project includes underlayment, venting, and ice/water shield. Asphalt remains the steady workhorse for most Willmar homes, but if the house has a steep pitch or tall eaves, expect to edge toward the higher end of the range due to material waste and ladder time. Clay and concrete tiles push the budget higher, especially on steeper roofs with longer runs.
Storm-driven demand spikes after hail and wind events can tighten contractor availability and push reroof scheduling and pricing upward during peak claim periods. In practice, that means a typical spring or early summer window can fill quickly after a damaging hail storm, leaving some homeowners waiting longer for crews and potentially paying a premium for expedited work. If a roof needs major repair before winter, consider the risk of scheduling delays and how that might affect waste disposal and material protection during a mid-season thaw.
Costs in Willmar can also be affected by steep residential roof pitches common in snow country, tear-off complexity after winter wear, and the need for robust underlayment and drip edge. Steep slopes require more time and fall protection measures, which can add to labor costs. Tear-off-heavy jobs add disposal fatigue and potential reuse considerations if the existing deck needs reinforcement. On higher-pitch roofs, synthetic or metal options may offer better wind resistance and longer life, but they sit at higher price points.
When planning, factor in the possibility of price fluctuations tied to supply chain quirks and local demand spikes after hail seasons. For a Willmar reroof, it's prudent to build a contingency: 5-15% more than the initial estimate if a complete tear-off is involved or if multiple trades (underlayment, ventilation, flashing) must coordinate. Getting multiple, clearly itemized bids that break out underlayment, ventilation, and disposal helps reveal where pricing is coming from and where you might negotiate.
In a town with frequent Minnesota storms, homeowners often face decisions about roofing on timelines tied to hail and wind rather than a neat replacement plan. This reality shapes every roof claim: the weather window, not a calendar, drives when work gets started. The insurer's bottom line is often driven by when damage is discovered and documented, and by whether the exposure matches the storm event rather than a preexisting plan.
State market dynamics can affect when a claim moves from initial notice to approval. Insurers serving Minnesota commonly require detailed documentation, including date-stamped photos, contractor estimates, and a licensed inspector's findings before confirming roof damage. That means you should be prepared to show, with precision, exactly when and how the damage occurred, what areas were impacted, and how those impacts could progress if left unaddressed. A clear trail helps prevent debates about preexisting conditions or accelerated wear.
Document damage immediately after storms and before temporary repairs obscure evidence. Take wide and close-up shots of all affected areas, focusing on hail impact patterns, missing shingles, granule loss, and any interior signs of leakage that appeared after the weather event. Keep a running log of dates and observations, and gather any independent inspector notes as soon as possible. The sooner the documentation is assembled, the smoother the insurer's review, especially when wind-driven damage travels along ridges and eaves where stealthy breaches often start.
If temporary repairs are unavoidable, photograph those fixes before and after, and ensure they do not mask primary damage. Insurers will want to see the original condition alongside the corrective efforts to determine if the claim reflects storm-related damage or new deterioration. In practice, timely, thorough documentation paired with professional inspections reduces the risk of claim delays and helps align the repair path with how storms commonly stress Willmar roofs.
In this part of the state, Willmar's cold winters make attic ventilation a central reroof issue, and the local department may specifically ask for venting compliance on replacement projects. If the attic is poorly ventilated, warm, moist air can condense inside the roof assembly once temperatures drop, increasing the risk of ice dams and slow-drying interior moisture problems. Ensure soffit, ridge, and gable venting are balanced and that baffles or insulating platforms keep airflow unobstructed above the insulation. A well-ventilated roof is not optional here; it's a reliability factor against repeated freeze-thaw cycles.
West-central Minnesota experiences regular freeze-thaw cycling that stresses eaves, flashing transitions, and roof penetrations, especially when ventilation and underlayment details are weak. Ice buildup near eaves can back up into shingles and flashing, loosening fasteners and allowing leaks to form behind the exterior surface. When planning a reroof, verify that underlayment extends properly to the eaves, that flashing around vents and chimneys is continuous and channeling meltwater away, and that any transitions from roof deck to vertical surfaces are sealed against water intrusion.
Snow-season performance matters more in Willmar than in warmer markets, so the focus should be on moisture escape paths and cold-weather roof assembly durability. Consider how snow will shed and where meltwater will travel during sustained cold snaps and mid-winter thaws. Prioritize a roof assembly that tolerates moisture if a full dry-out window is present during spring. Thoughtful ventilation, robust underlayment, and durable penetrations reduce the risk of hidden moisture seeping into decking, insulation, and interior finishes when spring arrives.