Last updated: Apr 19, 2026
In this Twin Cities insurance environment, hail and wind generate frequent roof claims and adjuster-driven inspections. Fall storms deliver some of the most active seasons for claims, and a quick assessment of roof conditions after a hail event can determine whether you're dealing with minor repairs or a full re-cover. Anoka sits in a market where the adjuster's first walk-through sets the tone for what gets approved and what doesn't, so understanding how these visits typically unfold helps you prepare.
Fall hail and strong wind events are a stated seasonal risk in this market, making between-storm inspections especially relevant for homeowners here. When storms roll through, the clock starts ticking on documenting damage and filing timely claims. The short window for weather-safe installation means you should plan for a rapid but thorough evaluation after every significant event. Delays in assessment can lead to longer project timelines and forced compromises if a roof is exposed to further weather damage.
Older roofs in this region are often evaluated with depreciation schedules, so photo documentation and contractor estimates materially affect claim outcomes. If the roof is nearing the end of its design life, a claim may hinge on whether you can demonstrate storm-driven damage beyond normal wear. Clear, timestamped photos of hail impacts, wind-stripped granules, and any interior signs of moisture can shift the insurance review. Likewise, contractor estimates that itemize exact replacements, materials, and labor help the adjuster translate physical damage into a fair settlement.
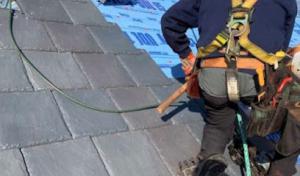
When a hail or wind event strikes, your first action is to photograph damage from multiple angles, including any attic signs of leakage or ceiling staining. Create a simple damage log with dates, storm notes, and any prior repairs. Contact your insurer promptly and request an adjuster inspection, then secure two independent contractor estimates that detail scope and materials. Keep all receipts and correspondence organized; if the insurer requests documentation, you'll be prepared to deliver it quickly. If the roof is older, emphasize any pre-existing conditions only insofar as they are relevant to distinguishing new damage from prior wear. A well-documented file can reduce back-and-forth and help you compare repair options more effectively.
Choose a local roofer who understands how adjusters evaluate claims and how depreciation schedules influence reimbursement. A nearby pro can coordinate a prompt inspection, supply project-ready estimates, and help translate claim terminology into clear, actionable next steps. In a market where weather windows are tight, a trusted local partner who can mobilize quickly after a storm makes a tangible difference in getting a roof repaired or replaced without unnecessary delays.
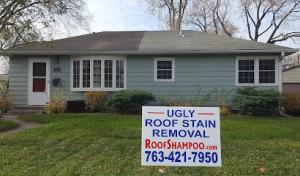
Find local contractors experienced in assessing and restoring roofs after hail, wind, and severe weather events.

Wild Construction
(763) 292-9453 wildconstructionmn.com
222 Monroe St, Anoka, Minnesota
4.8 from 110 reviews
Diamond Roofing, Remodeling & Roof Cleaning
(763) 421-7950 diamondconstructionmn.com
18959 Lithium St NW, Anoka, Minnesota
4.9 from 24 reviews

Wild Construction
(763) 292-9453 wildconstructionmn.com
222 Monroe St, Anoka, Minnesota
4.8 from 110 reviews
Wild Construction is temporarily closed to new projects while we complete existing contracted work. We appreciate your patience and support.
Diamond Roofing, Remodeling & Roof Cleaning
(763) 421-7950 diamondconstructionmn.com
18959 Lithium St NW, Anoka, Minnesota
4.9 from 24 reviews
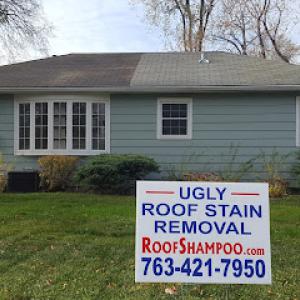
Diamond Roofing, Remodeling & Roof Cleaning has 25 years of experience and is both a family- and locally-owned business. What sets us apart from the competition is that we do roof cleaning with eco-friendly products that no one else uses. We also do remodeling and siding! Need your roof shampooed and your windows taken care of? We are your guys. Diamond Roofing, Remodeling & Roof Cleaning is a Minnesota-licensed contractor. We are also a certified roof contractor and have an A+ rating with the BBB, so don't hesitate to contact us for a free estimate.

Aspen Exteriors
(763) 220-7663 aspenexteriors.com
Serving
4.7 from 252 reviews
Aspen Exteriors is one of the largest and most reputable storm damage restoration companies in the country. We specialize in roofing and storm damage restoration. Aspen is a company devoted to exceeding expectations!
Superior Builders
(612) 615-0065 superiorbuildersinc.com
Serving
4.8 from 80 reviews
Serving the Twin Cities Metro Area. An experienced Master Residential Roofing Contractor. Were Here For All Your Exterior, Siding, Window, And Gutter needs. We service single residential and multi family properties. Superior Builders Is A GAF Certified Master Elite Contractor. Superior Builders offers a full range of exterior services and wants to make sure we give you the time to show us your needs. When we arrive at your property you can expect a polite and knowledgeable exterior expert. We take the time to walk your property with you and let you tell us your needs. Superior Builders is a no-pressure company and we will work around your schedule. Punctuality is very important to us because we know and understand how valu...
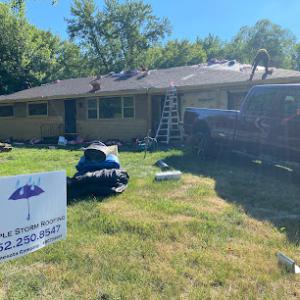
Purple Storm Roofing
(952) 250-8547 www.purplestormroofing.com
Serving
5.0 from 37 reviews
Purple Storm Roofing is a Family owned division of Regal Custom Homes Established in 1998. We specialize in insurance claims / inspections and Roofing when it comes to damage by wind / hail.
Aspire Services
(612) 478-9999 www.aspireservicesmn.com
Serving
4.9 from 44 reviews
At Aspire Services, we’ve been dedicated to providing top-notch roofing and exterior services for both residential and commercial clients in the Twin Cities area, with over 25 years of personal experience.
Cedar Valley Exteriors
(763) 755-2221 www.cedarvalleyexteriors.com
Serving
4.5 from 19 reviews
Providing Exterior Solutions Roofing, Siding, Windows & Gutters Storm Response & Recovery Insurance Restoration Specialists & Reconstruction Experts. Helping Property Owners Restore & Improve their Home & Asset from Storm to Finish Since 1998

Leader Roofing
(763) 298-2727 www.leaderroofing.com
Serving
4.8 from 18 reviews
Since 1994, we have served Twin Cities homeowners, providing emergency roofing services and peace of mind as a disaster restoration company. We bring decades of hands-on experience with roof repairs and replacements to our new business, Leader Roofing. So, customers can expect that same reliability, integrity, and customer-first philosophy. It is a part of our unwavering commitment to providing the value and service you deserve.
Excel Roofing
(763) 712-0757 www.excelroofingmn.com
Serving
4.8 from 96 reviews
Excel Roofing is backed by our outstanding workmanship and manufacturer warranties that all can be transferred with the sale of your home. The Excel Roofing team consists of skilled craftsmen, client-oriented project consultants, visionary management, and our rock-solid local business partnerships. You can make sure that the covering of your residence or place of business is structurally sound by hiring Excel Roofing. We're also adept at performing routine maintenance to make certain our clients and their belongings remain safe and protected. Excel Roofing is a locally-owned roofing contractor that has been an industry leader in the Minneapolis area for 30+ years.
Summit Exteriors
(763) 300-3245 www.summitexteriorsmn.com
Serving
4.9 from 97 reviews
Get reliable roofing, siding, windows, storm damage and gutter services with professional installation and great warranties. Get your free estimate today!

Northern Lights Metal Roofing
(763) 276-1390 www.northernlightsroofs.com
Serving
4.9 from 59 reviews
Northern Lights Metal Roofing was founded in 2021 and works with the most experienced metal crew in the area. We are proud to serve Twin Cities and the surrounding areas, and strive to set the standard for quality roofing, siding, gutter and window products, professional service, and complete customer satisfaction. When you choose to work with us, you can count on a beautiful roof that will protect your home or business for a lifetime.
Perfect Exteriors of Minnesota
(763) 280-6900 www.perfectexteriorsmn.com
Serving
5.0 from 36 reviews
We are a locally owned and operated exterior remodeling company that specializes in roofing, siding, windows, and gutters. We've been proudly serving the twin cities metro area since 2002!
In Anoka, the typical roof replacement season runs from late spring through early fall. Cold winters, pronounced freeze-thaw cycles, and the summer storm pattern all conspire to push crews and materials off schedule. The window can feel brief when storm fronts march through and when ground conditions turn soft after heavy rains. Your planning should align with a clear, predictable start and a cushion for weather-related delays, so you're not scrambling to complete the project as frost returns.
Winter snow and ice are not just inconveniences; they shift the whole project timeline. Tear-offs slow to a crawl when roofs stay icy and decks stay slick, and installation crews have to clear and protect work areas before any shingle or panel goes back on. In neighborhoods near the river and the open plains, wind-driven snow can pile up against eaves and valleys, complicating access and material staging. If a winter storm hits mid-project, expect temporary pause points and a plan to resume as soon as the temperature and conditions allow safe work.
Spring thaw brings its own set of challenges. Exposed decking and underlayment require extra vigilance during wet periods, and rain can push moisture through the roofing system longer than expected. The practical impact is more protection and more time between stages: you'll want to keep tarps handy, verify that roof openings are shielded from heavy downpours, and coordinate with the crew on temporary enclosures or moisture barriers. Wet soils can also limit ladder placement and crane access near foundations, so the logistical plan should incorporate alternate staging zones.
Short installation windows in the peak months mean that a single significant storm can derail progress for several days. Thunderstorms, hail risk, and high winds not only threaten ongoing work but can cause micro-delays if crews have to pause to secure loose materials. When storms are forecast, coordinate a day-by-day plan with the contractor that prioritizes critical tasks first, such as securing underlayment seams and flashing, so minor weather interruptions don't set back the entire schedule. It helps to have a weather-tracked calendar and a single point of contact for weather-driven changes.
Storm damage often becomes a driving factor for urgency. If a damaged roof has exposed decking or compromised underlayment, the objective shifts to safeguarding the interior while you wait for a dry, cooperative stretch. In Anoka's climate, the decision to accelerate a replacement should weigh the risk of further weathering against the typical short window. A practical approach is to establish a phased plan that prioritizes the most essential elements first-secure flashing and underlayment, then address shingles or panels-so protection is continuous as conditions allow. The result is a repair that keeps water intrusion in check while respecting the seasonal rhythm and the neighborhood logistics around river-adjacent yards and wind-prone ridges.
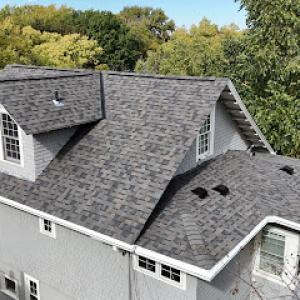
In Anoka, asphalt shingles are the workhorse for most residential roofs. They fit the region's re-roof-heavy market and the insurance replacement patterns that many homeowners navigate after hail, wind, or seasonal moisture swings. If a storm package or wear-and-tear forcing a quick replacement comes up, asphalt shingle systems offer the most straightforward installation timeline and widespread compatibility with existing roof lines. For homes facing long freeze-thaw cycles, a well-chosen asphalt shingle with a robust underlayment and proper attic ventilation can provide reliable protection without exposing you to a lengthy installation window. When evaluating a re-roof, you'll often see asphalt shingle configurations that balance durability, local wind performance, and ease of replacement after hail events.
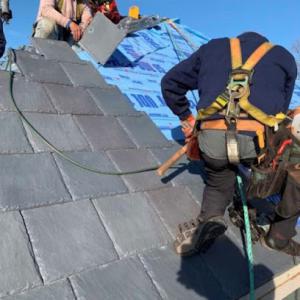
Metal roofing is a meaningful specialty in the local market and is often considered by homeowners looking for better performance against snow shedding and repeated storm exposure. In Anoka's climate, metal can shed snow more predictably and may reduce the risk of ice dam formation when installed with proper ventilation and insulation. If your home's roof deck and framing can support it, metal offers longevity and a fast installation that can align with shorter weather windows. It also stands up well to the region's wind-driven hail episodes, though it can be more conspicuous stylistically and may require attention to flashing details around higher-risk edges and chimney junctures. For homeowners weighing a mid-life roof refresh, metal can be a strategic choice when the goal is stronger seasonal performance and fewer shingle replacements over time.
Clay tile, concrete tile, synthetic/composite shingles, and fiber cement shingles do appear in this market, but their higher weight or cost can make them less common choices for typical Twin Cities-area homes. Clay and concrete tile bring distinctive curb appeal and excellent long-term durability, yet their heavier load can necessitate structural assessment and potential framing adjustments. Synthetic/composite shingles can combine some of the best attributes of traditional shingle performance with enhanced impact resistance, which is appealing after hail events, but they may not always align with every roof geometry or existing venting pattern. Fiber cement shingles offer a solid balance of durability and fire resistance; however, they can be heavier than standard asphalt and require careful fastener planning. Given Anoka's mixed housing stock-from modest ranches to two-story homes-these options are often reserved for projects where the roof structure can accommodate the weight and a favorable long-term performance is prioritized.
For homes that have already endured hail or wind exposure, the selection process should emphasize compatibility with the existing roof lines, attic ventilation, and the anticipated maintenance cycle. A roof that's simple to repair after a storm can minimize downtime during a tight installation window. In neighborhoods where snow load and freeze-thaw cycles are real considerations, the ability to shed snow efficiently and resist moisture intrusion becomes a practical tie-breaker between materials. The best choice aligns with your roof's pitch, existing framing, and how quickly you can proceed from inspection to completion when the weather allows a safe, efficient install.
Anoka's long cold season means repeated freeze-thaw cycling that accelerates wear at shingle edges, flashing transitions, and roof penetrations. When mitten-warm afternoons meet frosty mornings, water that sits on the roof can seep into tiny gaps and then freeze. Each cycle expands and contracts, loosening granules and nudging sealant at critical seams. Over multiple winters, those micro-failures accumulate, often showing up as granule loss on gutters, premature edge curling, or localized leaks around vents and skylights. This isn't dramatic failure in a single storm, but a steady erosion that reduces still-robust roofs to a shorter service life if left unchecked.
Snow accumulation followed by thaw-refreeze conditions is a local driver of leak complaints and mid-winter service calls. When a heavy snowpack sits for days, heat from the attic and roof warmth melt a layer at the bottom, creating a slide and refreeze cycle along the eaves and corners. The result can push water under shingles or flashing where it's least expected. In short windows between storms, a small ice dam or a blistered vent boot can become a medium-sized problem. If you notice uneven icicle formation, concentrated staining on interior ceilings after a thaw, or damp spots near valleys, address it sooner rather than later. Delays compound damage, especially where insulation and ventilation are inadequate.
Ventilation and underlayment matter more in this climate because inspections in the area commonly verify both during full re-roofs. A well-ventilated attic reduces the temperature differential that drives meltwater up to shingles' undersides, while a proper underlayment acts as a third line of defense when shingles are stressed by freeze-thaw cycles. In practical terms, this means that during a re-roof, pay close attention to attic intake and exhaust balance, ensure the underlayment is continuous and properly sealed at all transitions, and double-check around penetrations. A small upgrade in attic insulation and sealing can pay back by reducing hot roof spots and controlling ice dam risk in the long run.
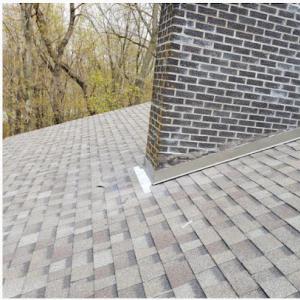
Keep an eye on edge warranties, flashing around chimneys and vents, and any curling along the eaves after a brisk storm. If shingles show micro-cracking or granule loss near corners or valleys, or if interior rooms reveal delayed moisture responses after ice and thaw events, plan a targeted inspection soon. Early detection helps prevent mid-winter emergencies and preserves roof integrity through another cold season.
When you can't wait, these contractors offer fast response times to stop leaks and prevent further damage.
For a full re-roof, most Anoka-area cities require a building permit issued through the local building department. This isn't something to treat as optional or informal; the permit keeps the project aligned with wind, hail, and moisture considerations that are common in the Twin Cities corridor. Before any tear-off happens, verify with the city's building division what forms are needed, who signs off, and what the inspection schedule looks like. A contractor experienced with Anoka codes will typically pull the permit on your behalf, but you may be asked to supply project details, including roof type, underlayment, and venting plans. If the project involves replacing vented soffits or adding attic exhaust, have those details ready so the plan reviewer can confirm compliance with local ventilation requirements. Permit timing tends to hinge on the winter lull and the early-spring window, so coordinate early to avoid delays.
Inspections in this market focus on three core areas before the underlayment is covered and again after installation is complete. First, the inspector will check underlayment installation for proper overlap, weather resistance, and sequencing around eaves and valleys. Second, ventilation accuracy is reviewed-proper intake and exhaust balance helps manage freeze-thaw cycles and humidity swings that are typical here. Third, nailing methods and fastener spacing get a close look, especially with wind exposure from storms and the need for secure shingles on steep pitches or intricate rooflines. Expect inspectors to verify that starter courses are correct and that flashing around chimneys, vents, and skylights is integrated with the chosen roofing system. Having the roof deck prepped cleanly and all penetrations sealed to a high standard reduces re-inspection risk.
A final inspection may be required to confirm the completed roof complies with local requirements, so scheduling and contractor coordination matter. Coordinate with the contractor to ensure the permit holder is prepared for a post-installation walk-through and that all documentation-manufacturer instructions, warranty transfer forms, and any required test results-are accessible. If the final sign-off reveals issues, expect a brief retouch period. In this climate, aligning the install timeline with the city's inspection cadence helps minimize disruptions from weather windows and ensures the reroof remains compliant through the next cycle of storms.
Material costs in this area shift with the same Twin Cities hail and wind events that hit Anoka households. Asphalt shingles sit in a practical middle ground, with local cost ranges running from 350 to 650 USD per square, while metal roofing generally sits between 600 and 1100 USD per square. Tile options-clay or concrete-are materially higher, often well above metal, and synthetic or fiber cement shingles land in between or near asphalt in many projects. If you're evaluating options, expect the lowest price when replacing like-for-like with asphalt, and the highest when choosing heavier or specialty systems that require extra structure or underlayment work.
Storm-driven demand spikes in the Twin Cities region can push Anoka pricing upward when many homeowners are replacing roofs after the same hail or wind event. In peak seasons, timely scheduling becomes tight and material lead times can extend. If you're facing an insurance-driven replacement after a storm, know that prices may rise modestly during the rush, and securing a trusted crew early in the process helps avoid late-season bottlenecks.
Short seasonal production windows influence how quickly a project can start and finish. Spring delays can compress work into summer and early fall, which means crews juggle tighter calendars and may push timelines out if the weather turns wet or freezes come early. To keep a project on track, line up a qualified contractor as soon as you have a target replacement window, and confirm start dates that align with the region's short installation season. Here in Anoka, having a realistic plan around the weather window helps prevent costly delays.
Get a clear picture of your project costs upfront - no commitment required.
Diamond Roofing, Remodeling & Roof Cleaning
(763) 421-7950 diamondconstructionmn.com
18959 Lithium St NW, Anoka, Minnesota
4.9 from 24 reviews
Because hail and wind claims are common in this region, insurers often expect dated photos, contractor scopes, and evidence tying damage to a specific storm window. You will improve your position by showing that damage aligns with a clearly defined event, not with wear or unrelated incidents. Good documentation slows down guesswork and helps avoid back-and-forth disputes that stall a claim during Anoka's short installation window.
Adjuster evaluations are central in the Anoka market, so homeowners benefit from documenting all elevations, soft metal impacts, and interior leak evidence before temporary repairs. Take exterior photos of each side, the attic and ceilings beneath suspected leaks, and close-ups of hail hits on shingles, gutters, and flashing. Note the date of each shot and the weather conditions. Capture visible water stains, staining patterns, and any sagging or curling of roofing materials. Keep a simple intake log that pairs photos with observed symptoms and dates.
As the claim progresses, the adjuster will compare the scope against the storm window. Having a clearly outlined contractor scope helps avoid confusion about what is being replaced versus repaired. If soft metal impacts are present, capture their extent so the adjuster sees why metal components may need replacement beyond shingles. Interior leaks-especially in upper floors or near penetrations-serve as crucial corroborating evidence that supports a full or partial replacement strategy rather than a patch.
Older roofs may face heavier depreciation in claim settlements, which can influence whether homeowners repair, patch, or fully replace. While depreciation is a factor, submitting solid, storm-tied evidence can steer the outcome toward repairs when appropriate and toward full replacement when warranted by condition and coverage.
Connect with contractors who help homeowners navigate the claims process from damage assessment to final approval.
Wild Construction
(763) 292-9453 wildconstructionmn.com
222 Monroe St, Anoka, Minnesota
4.8 from 110 reviews