Last updated: Apr 19, 2026
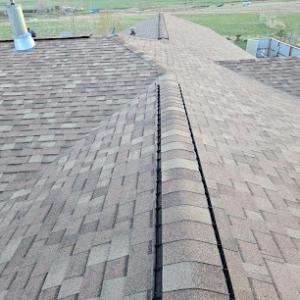
Gillette sits on the High Plains, where exposed terrain leaves residential roofs more vulnerable to wind-driven weather than sheltered mountain towns. In these conditions, roof edges, rakes, and flashing are tested more often by gusts that sweep across open neighborhoods and unblocked horizons. The typical wind stresses a roof not only with outright lifting forces but also with dust and grit that can abrade shingle surfaces and accelerate wear. When a homeowner surveys the street, the most telling signs of exposure are in the corners of older roofs where wind-driven debris tends to accumulate and where edge metal shows more wear. Understanding this exposure helps prioritize fastener security, shingle integrity, and the need for robust edge protection in maintenance notes.
The city's cold winters and warm summers create repeated freeze-thaw cycling that affects asphalt shingles and roof-fastening longevity. Water that works into small gaps or micro-cracks can freeze, expand, and gradually widen those flaws, nudging shingles loose or causing micro-cracks to propagate. In practice, this means that even a well-installed roof will show micro-deterioration after several winters if ventilation and attic insulation aren't balanced to keep a relatively stable roof deck temperature. The freeze-thaw pattern also stresses sealants and flashings, so inspecting around chimneys, vent collars, and skylights becomes a more frequent maintenance task as temperatures swing from subzero nights to springtime thaws. With metal roofs or synthetic options, the same cycles translate into expansion and contraction stresses that manifest as loose fasteners or panel seams if not properly secured.
Seasonal risk in Gillette is not uniform: winter snow and ice damming, spring and fall temperature swings, and late spring to summer hail all influence inspection and replacement timing. In winter, the emphasis is on preventing ice dam damage and ensuring adequate attic ventilation to minimize roof surface meltwater rerouting into eaves. As temperatures climb through spring, freeze-thaw effects persist where any moisture is present, so sealants, edge details, and flashing joints deserve closer scrutiny after heavy snows melt. Summer cooldowns and intense thunderstorms bring hail risk that can leave dings, granule loss, or micro-cracks across a roof plane; and autumn's wind patterns can further loosen fasteners or weaken shingles after the stress of summer heat and storm cycles. A practical approach is to schedule targeted inspections after notable events: a heavy hail or wind storm, a sharp temperature swing, or a mid-season freeze onset. Focus the checks on shingle surface integrity, sealant lines, vent penetrations, and the condition of gutters and downspouts that influence overhang drainage.
Residential roofs in this area typically show a mix of asphalt shingles and metal roofing, with some homes incorporating synthetic products for extended lifespans. The wind-prone exposure makes edge and seam protection a recurring theme in maintenance plans, regardless of material choice. Asphalt and synthetic shingles benefit from careful fastening patterns and proper nailing counts to resist wind uplift, particularly along rakes and the ridge line. Metal roofs require solid panel alignment and carefully installed fasteners to prevent panel movement in gusty events. Knowing the local wind and freeze-thaw dynamics helps a homeowner tailor inspection checklists, prioritize repair timing after storms, and choose materials that balance performance with the seasonal cycle of Gillette's climate.
Wyoming's periodic hail and wind events hit hard in this region, and a stormy late spring or summer can quickly turn pre-existing wear into a claim-ready problem. In Campbell County, the combination of high plains gusts and hail pummels roofs that already show aging or minor defects, so the clock on damage progression starts ticking as soon as a severe bout rolls through. The sharp freeze-thaw cycles that follow storms can push tiny cracks or loosened fasteners from nuisance to obvious leaks. That means the condition of your roof before the next wave of weather is just as critical as the storm itself. If a hail event coincides with a period of rapid temperature swings, the chance that a small vulnerability becomes a full-blown leak rises dramatically. Timely assessment after a storm helps catch issues before they compound.
Homeowners in this area need photo documentation that clearly separates storm-created damage from older weathering. Insurers commonly require detailed evidence and adjuster review, so your evidence should tell a simple story: what existed before the storm, what changed during the storm, and what persisted or worsened through subsequent freeze-thaw cycles. Take wide shots of the entire roof and close-ups of any cracked shingles, lifted tabs, or loose fasteners. Date the photos, note the weather conditions at the time, and keep a running log of observed leaks or moisture intrusion. After a hail event, schedule a roofing inspection promptly while the roof is still fresh in memory and before freeze-thaw cycles blur the lines between new and old damage. If an inspector points to areas that look weathered but aren't clearly storm-induced, you'll need corroborating images from before the event or a second opinion that documents the storm's impact.
Act quickly, because every hour matters when the melt-freeze cycle is poised to aggravate vulnerabilities. Inspect reachable areas for immediate signs of trouble: water stains on ceilings, damp patches in the attic, or darkened streaks along interior walls beneath the roof line. On the exterior, look for missing granules on asphalt shingles, exposed fasteners, or shingles that are cupped or curled at edges. If you identify trouble, avoid delaying a professional roof inspection-moss, lint, and debris can disguise leaks but also trap moisture that accelerates damage. Schedule a reputable local roofer to perform a thorough assessment soon after a storm and again after the first warm stretch that follows, because the freeze-thaw cycle can convert small cracks into leaks in the weeks that follow. Maintain a detailed record of all inspections, findings, and recommended repairs, and keep it organized with the storm date and the sequence of observed deterioration. In this market, proactive documentation paired with timely, expert evaluation is the best defense against escalating damage and insurer disputes.
Built Wright Homes & Roofing inc.,
(307) 213-6011 builtwright.com
1001 S Douglas Hwy #195, Gillette, Wyoming
4.9 from 67 reviews
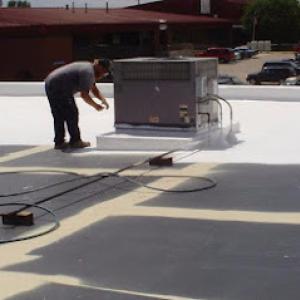
At Built Wright Homes & Roofing, Inc., we proudly serve Gillette and nearby communities like Moorcroft, Rozet, Upton, Sundance, Wright and Recluse. We specialize in full roof replacements, roof repairs, inspections, storm damage repair, and flat roofing systems built for Wyoming weather. Our team installs high-performance asphalt, metal, and fiberglass roofing, plus precision-cut seamless gutters and durable siding for homes and businesses. We’re local, licensed, and family-run—offering fast estimates, honest pricing, and quality that lasts. Call today and see why Gillette trusts Built Wright.

Pro Plus Roofing & Construction
(307) 682-0889 www.proplusroofing.net
808 E 8th St, Gillette, Wyoming
4.5 from 41 reviews
Providing Professional Roofing and Siding services to Wyoming for over 20 years
Black Hills Exteriors
(605) 716-7663 www.bhexteriors.com
301 W Lakeway Rd, Gillette, Wyoming
5.0 from 6 reviews
Black Hills Exteriors is more than just a roofing company servicing Rapid City, Spearfish, Deadwood, Hot Springs, Sturgis, Custer, Hill City, Black Hawk, Box Elder, Piedmont, and all other areas of the Black Hills. We specialize in General Contracting Hail Claims and Maintenance-Free Exterior Remodels. We have in-house construction crews that also specialize in Siding, Seamless Gutters, Windows & Doors, Versetta Stone, Soffit & Fascia and more!

Built Right Roofing & Construction - Gillette
(307) 228-5156 builtrightroofs.com
1901 Energy Ct #319, Gillette, Wyoming
5.0 from 5 reviews
Choose Built Right Roofing & Construction for for prompt service, unparalleled quality, and an exceptional customer experience. As a top rated roofing, siding, gutter, and window company, we possess many manufacturer certifications and credentials so you can be sure of the quality of craftsmanship applied to your project. Our office staff takes customer service to heart and will keep you informed with total transparency every step of the way. We work with all insurance companies to ensure your property is adequately repaired when you have a hail damage claim. Trust our award winning team to serve you!
New Horizons Alternative Energy Solutions
(307) 686-0332 www.newhorizonsbiz.com
300 W 2nd St, Gillette, Wyoming
4.4 from 7 reviews
We have been doing residential and commercial roofing in Gillette and north east Wyoming area since 1983.
Asphalt shingles are common in Gillette, and they hold a lot of homeowners' trust. But local freeze-thaw cycles can accelerate granule loss, cracking, and fastening issues compared with milder climates. In practice, that means more frequent inspection after hail events and quicker attention to loose or missing shingles along eave lines and hips. When you choose asphalt, opt for a premium, impact-resistant product and a strong underlayment, then plan for regular gasketed vent and edge weathering checks every spring after the windy season settles. The ramification is simple: you'll want a good seal and secure fasteners that stand up to gusts that sweep across Campbell County.
Metal roofing is relevant here because it handles snow shedding and weather exposure well, but installation quality matters in a windy High Plains setting. If you go metal, expect a tight fastening plan, ridge venting, and careful panel overlap to resist gusts that can lift edges. In this climate, a well-sealed seam system and heavy gauge panels pay off more than a showroom finish. Panels should be installed with sealing at fasteners and through-wall penetrations, and you should confirm that snow guards are integrated where you have steeper pitches or heavy winter loading. A skilled local installer will verify that the roof deck, fastener pattern, and flashing align with typical Gillette wind paths to prevent wind-driven leaks after storms.
Clay tile, concrete tile, synthetic/composite shingles, and slate are available options, but their weight, brittleness, and cost need to be judged against hail exposure and seasonal temperature swings. Clay and concrete tiles, while durable against impact, are heavy and can crack under hail impact or rapid freeze-thaw movement if the roof structure isn't prepared for their load. Synthetic or composite shingles offer a balanced choice, but you still must assess hail resistance and color stability under long sun exposure and freeze-thaw cycles. Slate provides longevity and distinct aesthetics, yet it is brittle and expensive, demanding exacting installation and a solid deck to resist cracking during freezing temperatures. In practice, the decision hinges on existing roof structure, expected hail exposure, and the willingness to maintain or replace component pieces after severe weather.
In Gillette, fastener quality and flashing detail are as important as the material itself. After a hail event, inspect fastener heads, clips, and sealant joints around chimneys, vents, skylights, and edges. Wind-driven rain and ice can find gaps when fasteners loosen or missing granules expose the underlayment. For any material, insist on a weather-tight underlayment system and a comprehensive flashing plan that accounts for seasonal wind shifts. A roof that leaves vulnerable edges open is more prone to accelerated degradation from freeze-thaw cycles and hail impact. Your best approach is a local contractor who can tailor the fastening pattern and flashing details to the prevailing gusts and storm history typical of Campbell County.
In Gillette, the storm-driven demand spikes after hail and wind events can tighten contractor availability and push scheduling and pricing pressure higher. When you're budgeting a roof replacement, the local weather reality matters as much as the shingles you choose, and timing can affect both cost and completion speed.
Material choices drive the big cost swings you'll see on a bid. Asphalt shingles run about 450 to 900 per square, a solid baseline for most residential homes in areas with frequent hail and gusty days. Metal roofing sits higher, typically 700 to 1200 per square, which pays off later in wind resistance and longevity for some homes. Clay tile can range from 900 to 1800 per square, offering strong hail performance but heavier installation requirements. Concrete tile sits roughly 700 to 1100 per square, providing good durability with manageable weight. If you're after modern balance, synthetic or composite shingles run from 420 to 800 per square, delivering decent hail resistance at a lower price point. Slate is the premium path, often 1200 to 2300 per square, with hefty installation needs and exceptional longevity. These ranges reflect a Gillette-specific premium for weather exposure and the extra effort contractors put into fastenings and wind-rated underlayment.
Weather timing matters for scheduling and final cost. After a big hail event, crews can be booked solid, and you'll see rush charges or limited window options if you're aiming for a quick turn around. Windy stretches can also shift availability and push up material-handling costs, especially for heavier options like clay or slate. If you're weighing upgrades specifically for hail or wind performance, consider the trade-off: higher upfront cost now versus longer service life and improved resilience during our freeze-thaw cycles.
To narrow the numbers, map your home's roof area in squares and multiply by the per-square cost for your preferred material. Don't forget that installation quality and fastening specifics matter more here than in milder climates; improper fastenings or underlayment choices can undermine even a top-tier material in our High Plains conditions. If you're torn between two materials, a good rule of thumb is to balance initial cost against expected performance under hail and wind, then factor in the typical weather-driven scheduling realities that can influence final project timing and availability in the peak storm seasons.
In this market, the Building Department generally requires a permit for a full residential re-roof. That means you don't treat it as informal maintenance, even if the change is to a familiar shingle or metal profile. When you apply, expect to submit project details that cover the roof's scope, plus material specifications for the chosen system. The department wants a clear picture of what's going on above the eaves, not a casual quick fix. Having the exact shingle type, underlayment, fastener type, and any vent or snow guard components spelled out helps the review move smoothly and avoids delays during the warm weeks when storm damage work tends to pile up.
Inspections are scheduled during the work and after completion to verify venting, underlayment, and proper installation. On the day the crew starts, the inspector will verify the plan shows adequate attic ventilation and that ridge and soffit venting aligns with the attic size and climate needs. After underlayment goes down, the inspector checks for gaps, overlaps, and proper nail patterns through the underlayment to resist hail impact and wind. Once shingles or panels are installed, the focus shifts to sealing, edge detailing, and proper flashing around chimneys, valleys, and vents. Documentation matters: keep a tidy log of every inspection appointment, including the timing of each stage and any corrective work required. Sequencing is critical because a missing underlayment inspection or altered vent configuration later can trigger rework.
Coordinate with the Building Department early to confirm required materials and any local amendments. Prepare a concise plan that includes roof deck conditions, ventilation strategy, underlayment type, fastener choices, and flashing details. Schedule the initial permit review, then align your contractor's sequencing with the city's inspection windows. After each major milestone-deck readiness and underlayment, then finished installation-book the corresponding inspections and bring the project binder, including drawings, spec sheets, and any notice of correction from previous reviews. Clear documentation and a logical installation sequence save time and reduce the risk of delays when weather and hail season sweep through.
Wyoming's hail and wind pattern shapes how damage shows up on a roof and how insurers view it. In Campbell County, a storm can pepper a roof one season, and sharp freeze-thaw swings the next can complicate the picture years later. That mix means claims teams often scrutinize whether visible damage is a recent storm loss or older deterioration accelerated by wind, hail impacts, or repeated freeze cycles. If a claim sits too long without documentation, the line between fresh damage and preexisting wear can blur, leaving a homeowner with less coverage than expected.
Adjuster inspections are a normal part of the local claims process, and not a sign of trouble. Before any temporary repairs obscure evidence, you should photograph and note every roof slope, along with any soft metals like flashing or vent collars, and interior leaks that trace back to the attic or ceilings. Keep a dated log of the storms that may have affected your home in recent years, including hail size if you can estimate it from nearby properties or precipitation alerts. When temporary patches are necessary, take additional photos after work begins and again after permanent fixes, so the record reflects the true condition and timing.
Coverage terms, deductibles, and claim history can influence whether a homeowner sticks with basic asphalt shingles or opts for materials marketed for stronger impact resistance. The timing of a claim, plus how the insurer perceives prior wear versus new storm damage, can sway what gets approved and recommended. In practice, that means a careful, well-documented file can preserve options for a higher-performance roof if the storm-related damage proves to be recent and clearly connected to the event, rather than gradual aging.
Winter snow and ice damming in Gillette can both damage roofs and delay tear-off or replacement work. Heavy snows press against eaves, and ice buildup can push water under shingles or flashing, creating hidden leaks that only show after a thaw. When crews are under snow cover, work pauses not just for safety but to prevent storm-related setbacks. If you need urgent repairs after a heavy dump, expect longer timelines as crews clear snow, assess damage, and stage materials.
Spring and fall temperature swings in Gillette can stress underlayment and fasteners, which affects when repairs hold best and when hidden defects show up. Freeze-thaw cycles crack sealants, tighten or loosen fastenings, and can reveal nail pops or peeling underlayment after a warm spell followed by a cold snap. Contracts and timelines should assume that the first mild stretch may uncover additional issues once moisture moves through, especially after a windy, hail-free winter period.
Because hail risk rises later in spring and summer, homeowners often need to balance urgent post-winter repairs against the possibility of another damaging storm season. If a hail event clips the roof after winter, it may be tempting to press for a quick fix, but the window to do a full replacement can close as severe weather returns. In practice, this means prioritizing safety and moisture control now, while planning for a thorough assessment and durable repair once the storm season settles.