Roofing in Alaska
Last updated: Feb 28, 2026
In Alaska, a roof isn't just a home feature—it's a winter shield that bears the brunt of months of snow, ice, and wind, then dives into long days of sun and thaw. From Anchorage's heavy snow loads to coastal rain and seasonal freeze-thaw cycles, your roof has to work hard, stay sturdy, and be paired with materials and maintenance that fit our unique climate. Here on roofs.fyi, this Alaska page is written with neighbors in mind: practical, trustworthy guidance you can count on when planning repairs, upgrades, or a full replacement.
Here's what you'll find as you explore this page, tailored to our conditions and backed by local resources:
- Local climate drivers that shape roof selection, installation, and maintenance
- Recommended roofing materials for Alaska and why they perform here
- Popular roof styles and architectural trends seen across Alaska homes
- Typical roofing costs in Alaska and what influences those numbers
- Permits and local regulations you'll want to know before work starts
- Common roofing problems in Alaska and practical solutions
- Maintenance and repair tips that actually hold up in our winters
- Guidance on when to repair vs. replace and when to hire a professional
All of this is anchored in Alaska-specific conditions and reinforced by regional resources—from local suppliers and warranties to code considerations and trusted contractor networks. The advice here reflects real-world experiences homeowners face across our communities and is designed to be actionable, clear, and easy to apply to your own roof project.
With that local focus in mind, you'll get practical steps you can take this season—whether you're preparing for the first big snow, repairing after a thaw, or planning a roof upgrade that stands up to coastal wind or inland cold. We aim to be your neighborly guide: knowledgeable, straightforward, and ready to help you make informed decisions that keep your home dry, energy-efficient, and lasting.
Let's start with the climate that makes Alaska roofs unique and how it informs every choice on the roof you'll trust for years to come.
Local Climate & Its Impact on Roofs
Key Alaska Conditions
- Extreme cold, long winters, and rapid weather shifts are the norm in many parts of Alaska.
- Snow is a constant factor; regional snow loads vary, with coastal and mountain areas experiencing frequent heavy snowfall.
- Wind plays a major role along coastlines and exposed ridgelines, contributing to uplift on roofing and fasteners.
- Ice and frost cycles create freeze–thaw stresses on shingles, flashing, and underlayment.
- Permafrost-affected areas can influence building envelopes, moisture management, and insulation needs in adjacent roof systems.
- Summer daylight and high sun angles can accelerate UV wear and material expansion, especially on lighter-colored surfaces.
How Alaska Climate Impacts Roofs
- Ice dams and gutter backup: When warm attic temps meet cold eaves, ice dams form, squeezing water under shingles and flashing. This is a leading source of leaks in Alaska homes.
- Snow load and shedding: Heavier snow loads require stronger structural design and steeper pitches to shed snow, plus careful valley and flashing work to prevent leaks.
- Wind uplift: Coastal and exposed sites demand wind-resistant fasteners, roof edge detailing, and durable edge metal to resist uplift.
- Cold-climate material behavior: Many common shingles become brittle at very low temps, and metal roofing expands/contracts with temperature swings. Choose products rated for extreme cold and install per manufacturer guidance.
- Ventilation and insulation: Poor attic ventilation lets warm, moist air accumulate above living space, increasing condensation risk and promoting ice dam formation. Adequate insulation reduces heat loss into the attic and minimizes frost concerns.
- Drainage and snow retention: Blocked gutters and downspouts can cause water to back up under roofing materials. In some areas, snow guards or snow retention systems help manage heavy snow loads and protect eave lines.
Design & Materials for Alaska
- Steeper pitches are common: A higher slope helps snow shed naturally, reducing snow load on the roof deck and minimizing ice dam risk.
- Ice and water shields: Install at eaves, around penetrations, and along valleys to seal against potential water intrusion from ice dams.
- Underlayment: Use high-quality, cold-weather underlayment and consider synthetic options for better performance in freeze–thaw cycles.
- Roofing material choices:
- Asphalt shingles rated for cold climates are widely used, but ensure proper nailing patterns and starter courses to withstand wind and cold.
- Metal roofing is popular in exposed areas for durability and shed speed, yet it requires careful flashing and sound management in snow.
- Snow guards or rails can help control sliding snow in steeper or sheltered slopes.
- Flashings, valleys, and penetrations: Pay extra attention to detailing around dormers, chimneys, vents, and skylights to prevent leaks in freeze–thaw cycles.
- Ventilation and insulation: Target a well-sealed attic with ample insulation (high R-values) and balanced ventilation (soffit and ridge/vapor barriers) to minimize condensation and ice-dam formation.
Maintenance & Seasonal Plan
1) Inspect attic insulation and ventilation before winter; seal air leaks from living spaces.
2) Ensure ice and water shield is properly installed at eaves and around penetrations.
3) Plan for snow management: install snow guards if appropriate and use a roof rake from the ground to remove buildup safely.
4) Keep gutters and downspouts clear; verify drainage paths away from the structure.
5) Schedule a professional roof inspection in late fall or early spring to catch cracked shingles, damaged flashing, or sagging elements before heavy seasons.
Warnings & Local Resources
- Do not climb on a snow- or ice-covered roof. Use a roof rake from the ground and hire professionals for risky work to prevent falls or structural damage during extreme cold.
- Heavy snow and ice can cause roof edge damage, leaks, or collapse risk if not properly designed or maintained.
- Permafrost and cold-weather conditions can affect flashing and insulation performance; address moisture control and venting proactively.
- Official resources:
- National Weather Service – Alaska:
- Alaska Division of Commerce, Community, and Economic Development (DCRA) – Building Codes and Standards:
- USGS Alaska Science Center – Permafrost:
Recommended Roofing Materials for Alaska

- Pros: exceptional durability in extreme cold, wind, and heavy snow; long lifespan (40–70+ years); snow sheds off more easily on steep pitches; lightweight and low maintenance.
- Cons: higher upfront cost; can be noisy in heavy rain or hail without proper insulation; color fading possible over decades.
- Best practices: choose standing-seam or corrugated steel with a corrosion-resistant finish (galvalume or aluminum); pair with robust attic insulation and ventilation to prevent condensation; use sealed fasteners and proper sealants at seams and penetrations; consider snow guards or retention systems in regions with heavy, drifting snow.

- Pros: budget-friendly; wide availability; easy to install and repair; modern shingles come with better cold-weather performance and wind ratings.
- Cons: not as long-lasting as metal in harsh climates; performance depends on proper underlayment and ventilation; may crack in extreme cold if not rated for low temperatures.
- Best practices: select cold-weather or high-wind rated architectural shingles; install over a quality ice-and-water shield along eaves and around penetrations; ensure adequate attic ventilation to reduce ice dam risk.
Composite and Synthetic Shingles
- Pros: mimic more expensive materials (slate, shake) with improved performance in cold; lighter and often more impact- and wind-resistant than traditional asphalt; reduced maintenance.
- Cons: higher upfront cost than basic asphalt; quality varies by manufacturer.
- Best practices: look for products with strong wind resistance (Class 4/Hail rating where available) and proven performance in subzero temps; verify warranty covers freeze-thaw cycles; install with cold-temperature adhesives and proper underlayment.
- Pros: natural insulation and distinctive look; good wind performance when properly installed.
- Cons: high maintenance in Alaska's wet/cold cycles; rot and insect risk without regular treatment; fire risk in wildfire-prone zones; heavier and more expensive.
- Best practices: choose fire-treated or fire-rated cedar; maintain a regular coating schedule to combat moisture; install with solid ventilation and an effective unexpected drainage plan; in high-fire areas, consider alternatives like treated composites.
Flat or Low-Slope Roofs (Sheds, Additions)
- Materials: EPDM rubber, TPO, or modified bitumen.
- Pros: good for flat or low-slope layouts; often cost-effective initially; good for snow loading with proper drainage.
- Cons: higher risk of pooling water and ice dam formation if drainage isn't designed correctly; puncture vulnerability.
- Best practices: ensure a clearly defined drainage plan with tapered insulation; use a durable membrane with UV protection and a robust edge detailing; inspect regularly after heavy snow events.
Underlayment, Ventilation, and Insulation Essentials
- Ice and Water Shield: apply along eaves, valleys, and around penetrations to mitigate ice damming.
- Synthetic Underlayment: durable in cold, moisture-prone conditions; improves overall protection.
- Ventilation: balanced soffit intake and ridge or power-vent exhaust to control moisture and temperature, reducing ice dam risk.
- Insulation: upgrade attic insulation to keep roof deck closer to living- space temperature, lowering condensation and heat loss.
Snow and Ice Mitigation Tips
- Snow guards and retention devices prevent dangerous snow slides onto walkways and entries.
- Electric heat cables at eaves (thermostat-controlled) can reduce ice dam formation in persistent freeze-thaw cycles.
- Maintain proper roof pitch (4:12 or steeper is common in Alaska) when feasible to aid snow shedding.
Local Code and Contractor Tips
- Work with installers who have Alaska-specific experience with wind uplift, snow loads, and cold-weather fastening.
- Verify manufacturer warranties require local installation conditions and cold-weather testing.
- Request a detailed installation plan showing underlayment, venting, and fastener types suitable for subzero temperatures.
Materials Selection Checklist
- Climate suitability for your region (coastal vs. interior, wind exposure, snow loads)
- Wind uplift rating and warranty coverage
- Compatibility with existing drainage and attic insulation
- Local availability and contractor expertise
- Maintenance expectations and long-term costs
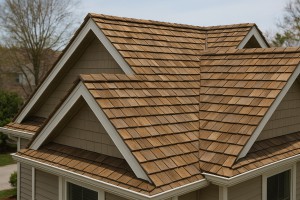
Popular Roof Styles & Architectural Trends in Alaska
Popular Roof Styles for Alaska Homes
- Gable roofs with steep pitches (typically 6/12 to 12/12): great for snow shedding and relatively straightforward to build. They're a common, cost-effective choice in many Alaska neighborhoods and pair well with traditional or modern exteriors.
- Hip roofs: excellent wind resistance, a smart choice for exposed coastal and high-wind areas. The multi-directional slope helps stabilize the structure during storms and can support dormers for light and living space.
- Chalet-inspired and A-frame designs: tall, dramatic pitches help shed heavy snowfall and maximize interior volume. They're popular in remote cabins and mountain retreats but require solid framing and robust insulation.
- Log cabin and rustic wood-shingle profiles: these styles emphasize natural materials (cedar shakes or shingles) and blend with Alaska's timber landscapes. They often use durable, weather-tight assemblies to handle temperature swings.
- Combination roofs: many Alaska homes mix roof styles (gable, hip, dormers) to optimize views, daylight, and snow management. This approach balances aesthetics with performance.
Materials Suited for Alaska's Climate
- Standing-seam metal roofs: long-lasting, excellent snow-shedding, and strong wind performance. Minimal maintenance makes them a top choice for harsh winters and coastal salt air.
- Cold-rated asphalt shingles: engineered for low temperatures and strong wind uplift; look for high-wind and ice-dam resistance ratings.
- Cedar shakes and wood shingles: offer a rustic look that fits many Alaska neighborhoods. Apply rot and fire-retardant treatments, and be prepared for higher maintenance in wet or freezing conditions.
- Composite and synthetic shingles: durable, heavier-duty options that mimic wood or slate while delivering predictable performance in temperature extremes.
- Premium underlayments and ice/water shields: install a high-quality underlayment (often synthetic) and ice-dam protection at eaves to prevent leaks as snow and ice accumulate.
- Snow guards and thermal flashing: essential details to control snow movement and protect edges, especially on longer roof runs or steeper pitches.
Architectural Trends Shaping Alaska Homes
- Modern rustic blends: timber, metal, and glass combine to create bright, energy-efficient interiors that still feel connected to the landscape.
- Timber-frame and log elements: exposed timber framing or log accents remain popular for their warmth and structural perception, particularly in mountain and lodge-style homes.
- A-frame and chalet influences: these designs maximize snow-shedding and daylight, often with large windows to capture long Alaskan days.
- Energy-efficient envelopes: higher insulation levels, continuous air barriers, and triple-pane or high-performance windows reduce heating loads and improve comfort.
- Wide overhangs and sheltered entryways: designed to shield walls from relentless winter sun, blowing snow, and rain.
- Coastal resilience: weather-resistant claddings, rain screens, and robust flashing are common to withstand wind-driven spray and damp conditions near the water.
Practical Design Considerations for Alaska Roofs
1. Plan for snow loads and local wind speeds: consult climate data and local codes to choose a safe roof design and pitch.
2. Select an appropriate pitch: interior regions with heavier snows often benefit from steeper pitches (6/12–12/12) to reduce snow buildup; milder climates may tolerate lower slopes with proper drainage.
3. Material choice and weight: heavier roofing requires a reinforced structure. Balance aesthetics, weight, and maintenance when selecting metal, shingles, or wood.
4. Ventilation and insulation: ensure a well-sealed, insulated attic or roof space with effective ridge and soffit ventilation to minimize ice dams and heat loss.
5. Ice dam prevention: use ice/water shield at eaves, proper attic ventilation, and heated zones if needed to keep water from backing up under shingles.
6. Snow management features: consider snow guards, and design eaves and balconies to tolerate snow loads and prevent dangerous slide paths.
7. Local expertise: work with a contractor experienced in Alaska climates, familiar with material warranties, and local snow/wind considerations.
Maintenance and Longevity Tips
- Schedule post-winter inspections to catch shingle lifting, flashing gaps, or vent blockages before they worsen.
- Keep gutters clear of ice, leaves, and pine needles to maintain melt-off flow and reduce ice dam risk.
- Inspect snow guards and flashing annually, especially after storms or heavy snowfall.
- Refinish or reseal wood shakes as recommended to slow rot and weathering.
Average Roofing Costs in Alaska
Material cost ranges (installed)
- Asphalt shingles: $5.50–$9.00 per sq ft installed.
- Metal roofing: $9.00–$15.00 per sq ft installed.
- Cedar shake shingles: $8.50–$16.00 per sq ft installed.
- EPDM/TPO flat roofs: $6.00–$10.50 per sq ft installed.
- Slate or tile (less common in Alaska): $25.00–$40.00 per sq ft installed.
Alaska-specific cost influencers
- Severe winter conditions: cold-weather crews and extended job timelines can raise labor costs.
- Snow load and ice dam protection: higher materials costs for ice-and-water shield, extra underlayment, and ventilation to prevent damming.
- Accessibility and remote locations: remote villages, limited contractor availability, and material delivery surcharges add to the total.
- Short seasons: winterwork interruptions can lead to seasonal pricing spikes and scheduling challenges.
Style, architecture, and local considerations
- Steep-pitched log cabins or timber-frame homes often require more material and specialized detailing (shake or cedar options) and can push costs higher.
- Modern or low-slope roofs may favor flat or metal systems, which have different install complexities and price bands.
- Coastal Alaska and exposed sites require corrosion-resistant metal or coatings, increasing material costs slightly.
- Traditional asphalt shingle roofs on older homes might need additional structural reinforcement or plume-free ventilation upgrades to meet local energy codes.
Common local options and their rough ranges
- Asphalt shingles on a typical suburban Alaska home: $5.50–$9.00 per sq ft.
- Metal roofing on exposed locations: $9.00–$15.00 per sq ft.
- Cedar shakes for cabins or rustic homes: $8.50–$16.00 per sq ft.
- Flat or low-slope rehab (EPDM/TPO): $6.00–$10.50 per sq ft.
- Specialty materials (slate/tile) rarely chosen in Alaska due to weight and cost: $25.00–$40.00 per sq ft.
Additional Alaska-specific add-ons
- Ice dam prevention package: ice-and-water shield in eaves and problem areas; adds to material cost per square foot.
- Enhanced underlayment and roof ventilation: ridge vents, soffit baffles, and insulation upgrades to improve energy efficiency and reduce heat loss.
- Weatherproofing and sealants: extra sealants and coatings for high-wind exposures and salt spray near coastal regions.
- Permits, disposal, and mobilization: often a fixed or percentage-based add-on, especially for remote jobs.
How to estimate your project (step-by-step)
1) Measure roof area and sections: calculate length × width for rectangular portions, then add irregular sections to get total square footage.
2) Choose your material and features: asphalt, metal, cedar, or flat roof; add ice-dam protection and ventilation as needed.
3) Apply installed cost per sq ft: multiply total area by the chosen material's per-square-foot range.
4) Add contingencies and extras: include 10–25% for weather delays, accessibility challenges, and disposal; factor in permits if required.
5) Factor local fees and delivery: account for remote-location surcharges, crane or equipment needs, and seasonal pricing variations.
Quick project example (illustrative ranges)
- 1,800 sq ft asphalt shingle roof in a typical interior- Alaska setting: roughly $9,900–$16,200 before contingencies and extras.
- 2,500 sq ft metal roof on an exposed coastal home: roughly $22,500–$37,500 before contingencies and extras.
- 1,200 sq ft cedar shake roof on a rustic cabin: roughly $10,200–$19,200 before contingencies and extras.
Permits & Local Regulations
Permits required for roofing work in Alaska
- Most municipalities require a building permit for roof replacements that involve removal and installation or structural changes. In some rural areas, smaller repairs may not need a permit, but it's best to verify.
- A permit helps ensure the work meets the Alaska State Building Code and local amendments, including safety, ventilation, and underlayment standards.
- Even if the project seems minor, if you're upgrading materials, changing roof geometry, or accessing attic spaces, expect that a permit will be needed.
- If you're unsure, treat it as a permit-required project to avoid fines, rework, or failed inspections.
Where to apply
- Contact your local city or borough building department (Anchorage, Fairbanks, Juneau, etc.) or the tribal/municipal government in unincorporated areas.
- Some regions use an online permit portal; others require in-person or mail submissions. Ask for the correct form and submission method.
- In unincorporated parts of Alaska, the county/borough building office or state code enforcement agent may handle permits.
- If you're unsure which department handles roofing projects, call the city hall or visit the municipality's website for the permit office contact.
What you'll typically need
- A clear project description: replacement only, or structural work, installation of new vents, or sheathing panels.
- Property address and parcel info, current homeowner or contractor details.
- If using a contractor: contractor license number, insurance certificates (general liability and workers' compensation).
- A basic plan or sketches may be required if you're adding attic vents, changing roof lines, or replacing structural components.
- Payment for permit and plan-review fees. Fees vary by municipality and project scope.
- Depending on the area, you may need energy code compliance documentation (insulation, radiant barrier, ventilation).
Licensing and contractor options
- Alaska allows homeowners to perform work on their own primary residence in many cases without a contractor license, but if you hire an outside contractor, they should hold a current Alaska contractor license.
- Verify the contractor's license status, insurance, and workers' compensation coverage before pulling permits or starting work.
- Request a written scope of work and a detailed cost proposal. This helps with permit review and inspections.
- If the project value exceeds state or local thresholds, a licensed contractor is typically required to pull the permit.
Inspections and compliance
- Plan for inspections at key milestones (often after roof removal, after new underlayment/venting are installed, and a final inspection).
- Inspections verify adherence to the local code, including structural support, deck sheathing, nailing patterns, and proper installation of underlayment and flashing.
- If issues are found, you'll need to address them and obtain re-inspection before final approval.
Alaska-specific considerations
- Winter work windows: Many areas do roofing work in spring through fall; if winter work is necessary, coordinate with the inspector about cold-weather procedures and safety requirements.
- Snow and ice constraints: Some codes in Alaska address snow load, ice-dam prevention, and attic ventilation—ensure your plan complies with local amendments.
- Energy codes: Alaska jurisdictions often require enhanced insulation and proper attic ventilation. Have insulation and ventilation plans ready for permit review.
- Remote locations: In rural Alaskan areas, permitting can take longer. Start early and verify whether digital submissions are accepted or if in-person visits are required.
Steps to get a permit (quick guide)
1. Define the project scope and confirm whether a permit is needed with your local building department.
2. Gather required information: address, description of work, contractor details (if applicable), license/insurance docs.
3. Complete the permit application and pay the applicable fees.
4. Submit plans or sketches if required and await plan review feedback.
5. Schedule and pass required inspections at milestones (and the final inspection).
6. Receive permit finalization and keep the permit card/approval on-site during work.
Common pitfalls to avoid
- Starting work before obtaining a permit.
- Using an unlicensed contractor or failing to verify insurance.
- Skipping required inspections or not addressing inspector notes.
- Underestimating arbor or snow-load implications in coastal or mountainous areas.
Common Roofing Problems in Alaska & Solutions
Heavy Snow Load & Ice Dams
Alaska winters bring deep snow followed by thaws, which can lead to ice dams along the eaves. When attic heat escapes, snow on the upper roof melts and refreezes at the colder edge, forcing water to back up under shingles.
- Signs to watch: icicles along gutters, water stains in ceilings or attic, and new soft spots on the roof deck.
- Quick actions:
- Snow removal: Use a long-handled roof rake from the ground after a storm. Do not climb onto a wet or icy roof.
- Edge protection: If ice is building up, consider temporary heat line along the eaves installed by a licensed electrician, following all safety guidelines.
- Long-term fixes:
- Improve attic envelope:
1) Seal visible air leaks around penetrations and around the attic hatch.
2) Increase insulation to reduce heat transfer to the roof (aim for higher R-value as recommended for your home and local code).
3) Ensure proper ventilation with soffit and ridge vents or a balanced vent system to keep roof decks cold in winter.
- Plan for maintenance: Periodic inspections after major thaw/freeze cycles help catch problems before leaks start.
Wind Uplift & Storm Damage
High winds in Alaska can lift shingles, loosen flashing, and tear off valley components. Storms can expose underlayment and deck fasteners.
- Signs to watch: loose shingles, damaged flashing around chimneys or vents, or lifted edges after a windy day.
- Quick actions:
- Post-storm check: Inspect flashing, vents, and ridge caps; secure any loose pieces.
- Immediate fixes: If you see exposed underlayment or significant damage, contact a roofer to assess and re-secure or replace affected sections.
- Long-term fixes:
- Use wind-rated materials and proper nailing patterns for your climate.
- Have professionals install hurricane ties or clips where required; trim loose branches near the roof to minimize debris impact.
Freeze-Thaw & Shingle Wear
Repeated freezing and thawing can crack asphalt shingles, lift granules, or loosen fasteners. Metal roofs expand and contract with temperature swings, which can stress seams and fasteners.
- Signs to watch: cracked shingles, missing granules, or flashing that shows through.
- Quick actions:
- Inspect after severe cold snaps for lifted edges or exposed nails.
- Replace damaged shingles promptly to prevent leaks.
- Long-term fixes:
- Choose materials rated for extreme cold and wide temperature swings.
- Ensure proper installation with correct nailing patterns and sealants appropriate for Alaska winters.
Ventilation, Condensation & Roof Lifespan
Inadequate attic ventilation traps moisture, leading to deck rot and reduced roof life. Condensation can form on cold mornings and over time degrade sheathing.
- Quick actions:
- Check that intake vents (soffits) and exhaust vents (ridge or gable) are clear and balanced.
- Ensure attic is properly sealed first, then add insulation to the recommended level.
- Long-term fixes:
- Install vent baffles to maintain airflow above insulation.
- Use a quality vapor barrier on the warm side of the attic to control condensation.
Gutter, Moss & Algae Maintenance
Snow, shade, and moisture promote moss, algae, and clogged gutters, which can trigger ice dams and water backups.
- Quick actions:
- Clear gutters and downspouts after big storms or heavy snowfall.
- Remove visible moss with a soft brush and rinse gently; avoid high-pressure washing on shingles.
- Long-term fixes:
- Consider zinc or copper strips near the roof edge to deter moss and algae growth.
- Trim overhanging branches to reduce shade and moisture retention on the roof surface.
Regular Checks & Maintenance
Alaska roofs benefit from proactive care.
- Schedule: Semi-annual inspections (before winter and after spring thaws) plus after major storms.
- What to look for: damaged flashing, loose nails, lifted shingles, clogged gutters, and attic moisture signs.
- When to call a pro: If you suspect widespread damage, complex ice dam issues, or unsafe access, bring in a licensed roofer for a detailed assessment and safe repairs.
Maintenance & Repair Tips for Alaska
Seasonal Prep: Winter is Coming
- Alaska winters bring extreme cold, heavy snow, and strong winds. Start with a basic inspection of the roof and attic before the deepest snows arrive.
- Check insulation and air sealing in the attic: aim for minimal drafts, no gaps around penetrations, and sufficient insulation (typical targets are high R-values for cold climates). Seal any gaps around vent stacks, pipes, and wiring.
- Inspect the roof edge and flashing for loose fasteners or gaps that could let in moisture. Address issues now to prevent ice dams later.
Snow & Ice Management
- Use a roof rake from the ground to remove snow from eaves after big storms. Keep a safe distance from the edge and avoid sharp tools near shingles.
- Don't chisel or pry ice that's adhered to the roof. For ice dams, focus on prevention (ventilation and insulation) and use heating cables only if necessary and installed by a licensed electrician.
- Create channels for meltwater by gently easing packed snow away from the eave line, but avoid walking on a slick, icy roof. If the pitch is steep, hire a pro for snow removal.
- Clear driveways and walkways of packed snow and ice to minimize dangerous ice runoff near entrances and vents.
Attic Ventilation & Insulation
- Proper attic ventilation keeps the roof cold and reduces ice dam formation. Ensure soffit vents, ridge vents, and baffles are clear and functioning.
- Check for insulation gaps around chimneys, vent pipes, and hatch doors. Add or top up insulation where needed to maintain a cold roof above the attic.
- Look for signs of moisture or condensation in the attic (stains, musty odor). Address the source of moisture to prevent wood rot and mold growth on the roof structure.
Gutter, Downspout & Flashing Care
- Remove debris from gutters and downspouts. Clogged systems trap water, which can freeze and back up under shingles.
- Ensure downspouts direct water away from the foundation. Extend spouts or add splash blocks if needed.
- Inspect and reseal flashing around chimneys, skylights, and wall penetrations. Loose or cracked flashing invites leaks during snowmelt and rain.
- In freeze-thaw cycles, check for flashing corrosion or loose nails. Tighten or replace as needed and seal with a compatible sealant.
Roof Surface Care & Repairs
- Asphalt shingles: look for curling, missing granules, or blistering. Replace damaged shingles promptly to prevent leaks.
- Metal roofs: inspect standing seams for loose fasteners or exposed corrosion. Tighten fasteners to manufacturer specifications and seal any penetrations.
- Cedar shakes: check for rot, split boards, and moss buildup. Replace damaged sections and remove moss to prevent wood decay.
- Small leaks: apply roofing cement or a patch appropriate to your roof type until a professional repair can be done. Do not rely on temporary patches for long-term protection in Alaska conditions.
- For hail or wind damage, document affected areas with photos and contact a pro promptly if you notice exposed wood, tears in underlayment, or compromised flashing.
Materials & System Upgrades for Alaska
- Ice and water shield: install or maintain a high-quality ice dam membrane along eaves and extending up the slope to protect the most vulnerable areas.
- Underlayment: ensure a durable underlayment designed for cold climates, with proper seam sealing to resist moisture intrusion.
- Roof style considerations: standing-seam metal roofs shed snow better and resist ice dams, but require proper sealing and clearance at flashings. Asphalt with reinforced underlayment and good attic ventilation is another solid choice. For cedar, select rot-resistant stock and sealants designed for exterior use.
Safety & Best Practices
- Never climb a wet or icy roof. If you must assess or repair, use a sturdy ladder, non-slip footwear, fall protection, and a partner on the ground.
- Use snow guards or snow stoppers in regions with heavy snowfall to reduce rapid snow slides.
- If you're unsure about insulation, ventilation, or flashing work, hire a local roofer with Alaska-specific experience. Properly rated professionals understand cold-weather installation and local code requirements.
When to Call a Pro
- Persistent leaks after basic maintenance, damaged flashing, or widespread shingle deterioration.
- Large ice dam buildup or signs of attic moisture that DIY steps don't resolve.
- Roof work on steep pitches, near utilities, or when heavy snow loads require specialized equipment.
When to Repair vs. Replace
Quick indicators
- Localized issue: small leaks or a few damaged shingles can often be repaired without a full replacement.
- Widespread signs: widespread leaks, many soft spots, or visible deck rot typically point to replacement being the smarter long-term choice.
- Age factor: if your roof is past the typical lifespan for its material, plan for replacement even if damage seems minor.
Material-specific guidance
- Asphalt shingles
- Repairs work well for isolated leaks around flashing, vents, or a handful of damaged shingles.
- Replace if more than a quarter of the visible surface shows curling, missing tabs, or widespread leakage, or if the roof is nearing the end of its expected life (roughly 20–25 years in cold climates with freeze–thaw cycles).
- Metal roofs
- Small punctures or seams that have opened slightly can often be repaired with sealant or panel replacement.
- Choose replacement if corrosion, widespread denting, or multiple failed seams occur, especially on lower slopes or in areas with heavy snow.
- Cedar shakes
- Minor splits or isolated rot can be repaired, but frequent maintenance is required.
- Replace when rot covers a large area, when shakes are cupped or shedding bark, or if insect damage is evident.
- Flat/low-slope membranes (EPDM, TPO, etc.)
- Localized seam leaks or punctures can often be repaired.
- Replacement is usually best when the membrane is punctured across multiple seams, delaminating, or shows widespread aging.
Climate and Alaska-specific factors
- Ice dams and insulation: Alaska's cold winters make ice dam risk high. If you're seeing ice damming, and insulation or ventilation improvements are needed, a full or partial roof replacement paired with attic upgrades may be the most durable fix.
- Snow load and durability: Heavy snow and freeze–thaw cycles accelerate wear. If the roof deck shows soft spots or lingering moisture after thaw cycles, replacement may prevent repeated repairs.
- Material performance in cold: Some materials perform better in Alaska's climate. For example, metal roofs handle snow shedding well, while cedar shakes require more maintenance to prevent moisture intrusion.
Structural and attic considerations
- Deck condition: If the decking beneath the roofing is soft, warped, or moldy, repairing the surface won't fix the underlying problem.
- Ventilation and insulation: Before deciding, assess attic ventilation and insulation. Poor ventilation can cause recurring ice dam issues and shorten roof life, favoring replacement when upgrades are impractical.
- Fasteners and flashing: Worn flashing around chimneys, vents, and skylights can leak repeatedly. If flashing is corroded across many flashings, replacement may be more cost-effective than repeated patching.
Decision steps (quick, homeowner-friendly)
1. Inspect the roof surface and attic for leaks, moisture, and decking softness.
2. Identify the roof's material and approximate remaining life.
3. Weigh repair costs against partial or full replacement, considering the frequency of needed fixes.
4. Consider insulation and ventilation upgrades to maximize longevity.
5. Discuss weather windows and contractor availability to minimize winter risk.
When to bring in a pro
- Complex leaks, roof decking issues, or multiple areas of damage.
- Uncertain about remaining life or proper ventilation upgrades.
- Need for accurate assessment of ice-dam risk mitigation and warranty implications.
Timing and season considerations
- Best repair or replacement window: late spring to early fall when temperatures are mild and access is safer.
- Winter work: limited availability and higher risk; if you must proceed, prioritize emergency leaks and temporary waterproofing until conditions improve.
When to Hire a Professional
- Active leaks during rain or meltwater on the roof
- Sagging or visibly damaged decking, flashing, or vent areas
- Structural concerns after a storm, falling trees, or high winds
- Electrical or gas hazards near roof penetrations
If you notice any of these, don't delay—call a pro to assess safely.
When to schedule a roof inspection or repair
- Several missing or damaged shingles, curling edges, or granules in gutters
- Ice dam formation along eaves, especially after freeze-thaw cycles
- Noticeable drafts or damp spots on ceilings indicating hidden moisture
- After a severe Alaska storm, heavy snow, or repeated freezing and thawing
For non-urgent issues, start with a professional evaluation to determine whether a repair or full replacement is best.
Alaska-specific concerns to consider
- Ice dams and ventilation: Alaska's cold winters make ice dams common. A pro will assess attic insulation, ventilation, and flashing and may install heat cables, vent baffles, or upgraded flashing to prevent leaks.
- Snow loads and access: Heavy, sustained snow can strain roofs. Roofing teams with proper equipment and safety plans are essential, especially on steep or remote roofs.
- Seasonal constraints: Summer is usually the window for major roofing work, but Alaska projects may be paused by weather. If winter work is necessary, expect longer timelines and specialized cold-weather products.
- Remote locations and travel: Many homes sit far from urban centers. Ask about travel charges, expected arrival windows, and whether the contractor can source materials locally to reduce lead times.
- Permits and codes: Alaska communities often require permits and adherence to the state's building codes. Ensure your contractor will pull the necessary permits and conduct work to code.
- Insurance and warranties: Confirm the contractor carries liability insurance and workers' comp, and ask about workmanship warranties and material warranties. In harsh climates, a robust warranty is especially valuable.
How to evaluate a roofing contractor in Alaska
1. Verify licensing and insurance: Check that the company is properly licensed for roofing in Alaska and that active liability and workers' compensation insurance are in place.
2. Check local references: Ask for recent Alaska projects, especially ones involving ice dam prevention or heavy snow loads.
3. Get written estimates: Detailed, apples-to-apples bids help you compare scope, materials, and timeline. Confirm warranty terms.
4. Confirm permit handling: A good pro will pull the required permits and coordinate inspections.
5. Assess local experience: Prefer contractors with Alaska-specific experience (snow, cold-weather adhesives, and venting considerations).
6. Review safety practices: In Alaska's terrain and weather, crew safety plans and fall protection are essential.
7. Inspect crew qualifications: Ensure subs are properly licensed, insured, and supervised.
Questions to ask a potential Alaska contractor
- Do you have experience with ice dam prevention and attic ventilation improvements?
- How do you evaluate snow load impacts on my roof, and what mitigation measures do you recommend?
- Can you provide examples from Alaska projects, including weather-related challenges?
- Will you handle permits, debris cleanup, and final inspections?
- What is your lead time, and how do you manage weather-related delays?
- What warranties do you offer on labor and materials, and how do you honor them in harsh winters?
Red flags to watch for
- Extremely low bids without a written scope of work
- No local references or a lack of Alaska projects
- Pressure to skip permits or pay upfront in cash
- Unclear or vague contracts, or no written warranty
- No physical business address or an unresponsive company
Steps to take before the project starts
1) Get a written, itemized estimate with scope, materials, and warranties.
2) Confirm permit requirements and who will pull them.
3) Document the current condition with photos and notes, so you can compare post-work results.
4) Align on a clear start date, contingency plans for weather, and payment milestones.
5) Ensure the contract includes waste disposal, safety measures, and cleanup standards.
Putting A Lid On It: Roof Maintenance, Repair, and Replacement in Alaska
Alaska's winters are long, intense, and exacting on every roof. Snow loads, ice glazing, wind-driven spray, and rapid temperature swings aren't just seasonal hazards—they're ongoing realities. Regular maintenance isn't optional here; it's practical protection. A quick seasonal check, timely repairs, and using weather-appropriate materials can prevent leaks, extend roof life, and keep your home warm and dry through the toughest months.
Each Alaska neighborhood faces its own conditions—from coastal storms to interior freeze-thaw cycles. Local pros who understand our snow patterns, insulation needs, and sun exposure know how to tailor a plan for your roof. Building that local know-how into your maintenance routine makes a real difference when the next storm rolls in.
Seasonal Maintenance Snapshot
- Spring: after the snow melts, inspect for winter damage, clean gutters, re-seal flashing as needed, and look for any soft or loose areas on the roof surface.
- Summer: verify attic ventilation and insulation, check for shingle wear or granule loss, trim overhanging branches, and ensure proper drainage away from the house.
- Fall: schedule a pre-winter inspection, install or confirm ice and water shield at eaves, secure snow guards, and seal gaps around chimneys, vents, and skylights.
- Winter: monitor for ice dams and leaks; if safe to do so, remove perched snow from accessible areas, but avoid climbing a slick roof—call a pro for ice dam removal or sagging sections.
What to look for between visits
- Water stains on ceilings or walls
- Missing, cracked, or curling shingles
- Damaged flashing around vents, chimneys, or skylights
- Noticeable sagging or warped roof edges
Common Alaska Challenges
- Ice dams and trapped moisture from attic heat
- Wind uplift and loose flashing on exposed ridges
- Heavy, drifting snow and hidden damage under the snowpack
- Cold-weather impact on membranes, sealants, and fasteners
- Moss or algae in damp, shaded areas
Materials and longevity
- Metal roofs: excellent snow shedding and durability, but require proper installation and snow guards.
- Asphalt shingles: choose cold-weather-rated products with good freeze-thaw performance.
- Membranes (EPDM/PVC) for flat or low-slope sections: require careful flashing and edge detailing.
Replacement considerations
- Ensure insulation and ventilation are matched to climate demands
- Pay attention to underlayment, ice-and-water shield, and proper flashing details
- Factor in local snow load requirements and long-term warranty coverage
Finding a reliable pro
- Verify licenses and local references; ask about Alaska-specific experience
- Seek detailed, written estimates with scope and materials clearly defined
- Prioritize safety plans and proof of proper handling for winter conditions
Together, we can keep your roof resilient—beautiful, well‑vented, and built to last through many Alaska winters. You're part of a community that values practical care and steady upkeep, and with thoughtful maintenance and the right experts, your roof will continue shielding your home for years to come.