Last updated: Apr 19, 2026
Central Wisconsin winters bring repeated freeze-thaw cycling that can open shingle seals, stress flashing, and worsen small penetrations before spring. Your steep-slope roof endures days where nighttime frost turns to sun-warmed shingles that soften, only to refreeze and pop seals again. Over time, these cycles can create micro-moves at vent flashings, chimney joints, and seam areas that look trivial but quietly invite leaks once rain returns. In older homes, where flashing updates may be older than the era of the current roof, expect small penetrations to become bigger problems faster when the weather front flips from cold to warm and back again. The practical consequence is not just a visible drip in a closet ceiling, but a compromised roof-to-wall interface that can degrade framing and sheathing if left unchecked. To head this off, schedule a targeted inspection after the last deep freeze of each winter, focusing on step flashing along dormers, valley intersections, and the joint where roof meets siding. Look for hairline cracks, lifted shingle tabs, or rust-colored staining from calcium, which can indicate early moisture intrusion. If you notice damp insulation in attic falls or muffled drips near penetrations, treat those as urgent warnings rather than seasonal nuisances.
Snow load and ice buildup are recurring roof stressors in Stevens Point, especially after long cold stretches followed by brief warmups. Snow tends to accumulate on sun-exposed slopes, but melt-refreeze cycles push ice into gutters, downspouts, and eave edges where it can trap heat and cause fasteners to fail or shingles to peel back at the edges. When icicles form or gutters pull away, water can back up under shingles and into the attic or ceiling plane. Insulation gaps or poor attic ventilation amplify this risk, so you may see rapid changes in attic temperatures that mislead into thinking the roof is dry when it's not. A practical alert system is to keep a careful eye on snow piles along eaves during thaw cycles and to remove excess snow promptly with a roof rake from the ground, never from a ladder. Do not rely on shingle color or gloss as a moisture indicator; a small but persistent attic cold spot or warm-slate patch near a vent often signals hidden ice dam activity. If you have a metal edge or snow retention devices, inspect them after heavy snows for movement or gaps that could channel meltwater under shingles. In high-snow weeks, treat the attic as a diagnostic space: check for frost on insulation boards, listen for tapping sounds from ice under the roof deck, and address any soft spots in the ceiling promptly.
Spring hail and wind storms are a major local trigger for roof inspections, emergency leak calls, and replacement scheduling delays. After a brutal hail event, even if the surface looks mostly intact, unseen granule loss or micro-damage to shingles can loosen critical seals and set the roof up for repeated leaks during the first spring rain. The storm season also tends to push work into tighter windows, meaning scheduling can collide with continued bad weather. The immediate action is to conduct a focused post-storm inspection that prioritizes damage at valleys, sidewalls, and areas with large hail impact marks. If the underlayment shows exposed fibers or if flashing around chimneys and vent pipes bears dull or crushed sections, treat those as high-priority repairs rather than cosmetic fixes. For steep-slope roofs in this climate, small punctures or cracked seals in the roof deck can expand quickly with another freeze-thaw cycle or a sudden wind gust, so don't delay addressing suspected issues. Maintain a visible check list you can reference after every major thaw or hail event: look for lifted edge tabs, dark staining along seams, loose flashing, and any telltale signs of moisture in the attic. If a soft roof area is detected, consider a temporary protective shingle seal or overlay solution to bridge the gap until a full repair can be scheduled in a clear weather window, minimizing the risk of further water intrusion. This is the time of year when proactive planning and rapid response matter most for preserving home comfort and structural integrity.
Late spring through early fall is the preferred replacement window for steep-slope roofs in this area. Cold-weather installation and snow conditions complicate tear-off, sealing, and shingle seaming. By aiming for a stretch that avoids deep freezes and frequent late-season storms, you reduce the risk of moisture-related leaks during the critical sealing period. In practical terms, plan for a window when daytime highs sit comfortably above freezing and nighttime temps aren't flirting with freezing after the workday ends. That balance helps crews tighten all seams and flashings before the next thaw or winter setback.
Spring in this region can throw a variety of weather at you, even when temperatures look suitable for roofing work. A storm system can roll through with gusty winds, sudden rain, or hail that slows progress or requires adjustments to the tear-off and resealing sequence. If a forecast shows a few warm days followed by unsettled days, discuss with the roofer how they will pace the job to protect exposed sheathing and allow for timely drying times between rain events. If possible, target a stretch with several dry, moderate days in a row, and have crews ready to shift the schedule within that window when a storm column moves through.
Autumn brings leaf litter that can clog drains and gutters, complicating drainage during the final phases of installation. A key tactic is to complete the tear-off and initial sealing before the heaviest leaf drop, then return for finish flashing checks and a final inspection after leaves have fallen enough to clear drainage paths. Coordinate with the crew to bag and remove debris promptly, and plan a mid-to-late-fall inspection where possible to confirm that all valley, ridge, and chimney flashings sit flush and watertight before winter sets in. If a late-season rain event occurs, it can push completion dates or require a quick retest of seals once the yard has a chance to dry.
1) Schedule for late spring to early summer when freeze-thaw cycles are minimal and dry spells are more predictable. 2) Align the work plan with a weather buffer-prefer a few consecutive dry days, not just a handful of favorable forecasts. 3) Build in a mid-project checkpoint to address any moisture intrusion discovered during tear-off, with a plan for rapid resealing if a Spring storm interrupts progress. 4) Plan the final inspection for a day after a dry period in late summer or early fall, ensuring gutters and downspouts have a clear path for drainage and flashing checks can be completed without obstruction.
Keep questioning visibility and access: clear paths for equipment, protect landscaping, and ensure a staging area that minimizes tracked mud back into the house during the wet spring transition. Have a contingency plan for wind gusts that can whip loose materials, and confirm that attic ventilation remains adequate throughout the project to prevent condensation buildup on hot afternoons. By respecting these seasonal rhythms and staying adaptable to spring storms and autumn leaves, the roof replacement can progress smoothly toward a durable, weather-tight result before winter arrives.
Vanguard Roofing & Siding
(715) 722-7663 vanguardroofingcompany.com
3440B Church St, Stevens Point, Wisconsin
5.0 from 223 reviews
Vanguard Roofing & Siding, a Stevens Point-based roofing contractor, serves Plover, Wisconsin Rapids, and neighboring areas with expert roofing, gutter, and siding installations and repairs. Their knowledgeable installers are certified and have the experience needed to provide top-quality workmanship, treating each home as if it were their own. With a focus on honesty and integrity, Vanguard Roofing & Siding strives to ensure customers' peace of mind and is committed to delivering the best service, every time.
Oakwood Exteriors
(715) 432-8202 www.oakwoodexteriors.com
2619 Post Rd Suite C, Stevens Point, Wisconsin
4.9 from 143 reviews
Oakwood Exteriors was founded on quality customer service and reliable, long term exterior solutions. We specialize in a full range of exterior remodeling services including roof repairs and installation, siding installation, seamless gutters, and replacement windows. Our installers are well trained and experienced to make your home beautiful. From concept to completion, we believe every step in the remodeling process and attention to detail is critical to the final outcome. The end result being a long lasting installation with the highest quality products you can be proud of. We are a fully licensed and insured operation, with well-established credentials with the Wisconsin Better Business Bureau.

Feltz Construction
(715) 345-1043 feltzconstruction.com
1870 Northstar Dr, Stevens Point, Wisconsin
5.0 from 92 reviews
#1 voted roofing contractor! Feltz Construction has been in business for over 50 years with a flawless reputation.
Roofing & Exterior Repairs
(715) 630-0408 roofingandexteriorrepair.com
3501 Minnesota Ave, Stevens Point, Wisconsin
5.0 from 7 reviews
Roofing and Exterior Repair is your trusted partner for roofing and exterior repairs. Based in Stevens Point, we're licensed and insured, serving central Wisconsin and surrounding areas. We prioritize communication, quality craftsmanship, and transparent estimates. Our commitment extends to real-time project updates. From roof replacements to gutter cleaning, we ensure meticulous attention to detail. Explore our estimates and experience excellence in roofing, siding, gutters, fascia/soffit, and exterior repairs with Roofing and Exterior Repair.
Superior Roofing & Remodeling
(715) 347-7990 superiorroofing-remodeling.com
4701 Industrial Park Rd Suite B, Stevens Point, Wisconsin
4.4 from 14 reviews
Superior Roofing and Remodeling is a locally owned and operated company and I have over 30 years of experience. We have been serving Central Wisconsin for the past 15+ years. We are a full service residential and commercial contractor that provides roofing, siding, remodeling and other services to our area. Our company is fully licensed and insured.
Albion Roofing
(715) 572-1222 www.albionroofing.com
3273 Michigan Ct, Stevens Point, Wisconsin
3.7 from 3 reviews
Albion Roofing specializes in all types of repairs, replacements, and renovations. We install roof systems for all types of buildings. Our outstanding customer service gives you peace of mind and knowledge about your roof. We handle a wide variety of jobs in both residential and commercial settings. Call us today for more information.

Infinity Exteriors
(715) 710-1293 www.infinityroofing.com
Serving
5.0 from 29 reviews
Established in 1997, Infinity Exteriors is the most trusted home exterior company in Plover, Wisconsin specializing in roofing, siding, windows, and gutter replacement services. As a locally owned and trusted contractor, our licensed technicians provide residential and commercial customers with roof repair and replacement, siding and window installation, and gutter systems. Infinity Exteriors prioritizes honest communication and offers no-pressure inspections for all projects. Since our founding, we have completed thousands of projects and earned an A+ rating with the Better Business Bureau. No roofing contractor in Plover, Wisconsin offers the same high caliber of roofing installation and repair at prices as competitive as ours.
Roofing & Siding Solutions
(715) 935-0777 www.roofsidingsolutions.com
Serving
5.0 from 12 reviews
Our reputation in the community has been built on the quality of our services, and our competitive pricing. We guarantee that your roofing and siding job will exceed your expectations. All of our dedicated Roofing & Siding Solutions professionals work hard for you, your home and your business. Getting the job right is our top priority. “Stress Free Guarantee. Real People. Real Solutions”
Dynamic Alliance Roofing
(715) 421-1845 www.dynamicallianceroofing.com
Serving
5.0 from 38 reviews
Dynamic Alliance Roofing, LLC brings superior craftsmanship and expertise to every roofing project. Located at 3906 Woodridge Trce in Wisconsin Rapids, Wisconsin, their team of skilled professionals delivers exceptional roofing solutions that combine quality materials with unparalleled attention to detail.
Horizon Exteriors
(715) 421-7663 horizonexteriorswi.com
Serving
5.0 from 53 reviews
For homeowners in Wisconsin Rapids, Horizon Exteriors delivers high-quality roofing, siding, and window installation services backed by skilled craftsmanship and premium materials from GAF, CertainTeed, LP SmartSide, and Andersen. Searching for ‘roofing companies near me in Wisconsin Rapids, WI’? Our team handles everything from roof replacement and routine roof repairs to siding upgrades and energy-efficient window solutions. With fast estimates, transparent communication, and attention to detail, Horizon Exteriors provides reliable exterior remodeling that protects and enhances your home’s value.
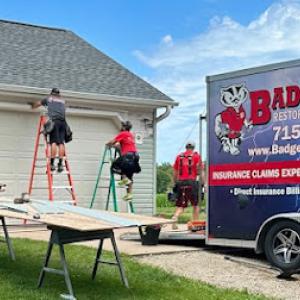
Badgerland Restoration & Remodeling Inc. - Wisconsin Rapids
(715) 942-7160 www.badgerlandrestoration.com
Serving
5.0 from 26 reviews
We have been remodeling and restoring homes and businesses in Central Wisconsin for over 25 years, and in that time, we have earned the respect of customers and competitors alike and established ourselves as one of the most trusted names in the industry. Our mission is to provide exceptional craftsmanship and outstanding customer service, building strong and lasting relationships with our clients. From small-scale home renovations to large commercial projects, we have the experience and expertise to handle it all. When you choose our company, you can expect nothing short of excellence. We are committed to delivering exceptional results that exceed your expectations. Call Badgerland Restoration and Remodeling today for a free quote.
M.H. Roofing & Coatings
Serving
5.0 from 4 reviews
M.H. Roofing & Coatings is a family owned and operated business, we offer new pole sheds / bardominen houses/ garages etc also asphalt shingle roofing elastomeric roof coatings for any & all commercial & residential roofs. We keep it simple/hassle free/ quick turnaround time and fair priced! Continuously building lifetime relationships Thanks for checking with us god bless!
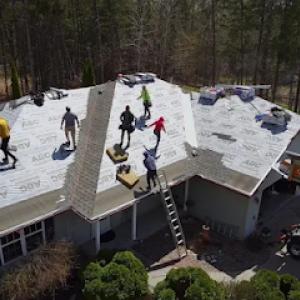
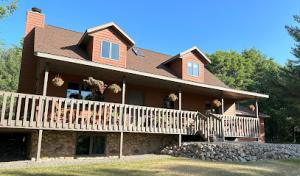
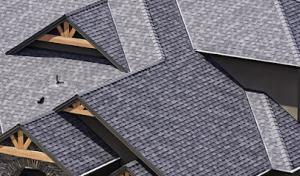
In this region, winters bring repeated freeze-thaw cycles, heavy snowfalls, and spring hail-wind events that test steep-slope roofs. The combination of freeze-thaw on roof surfaces and the risk of ice dam formation makes snow shedding and reliable waterproofing essential. The typical Stevens Point home often features a steep pitch to manage heavy snowfall, and roofs must endure long winters with sustained moisture. Any roof type chosen should perform well under snow load, resist wind-driven debris, and tolerate seasonal temperature swings without shrinking or warping. When planning a replacement, consider how the roof will shed snow, how flashing holds up after winter seals, and how the system integrates with existing attic ventilation to minimize condensation and ice dam risk.
Asphalt shingles are a dominant choice because they fit the area's common residential re-roof market and broad contractor availability. This combination of supply and service makes it practical for Stevens Point homeowners who want reliable performance without a long lead time. Modern asphalt shingles can be engineered for improved wind resistance and algae resistance, which matters in darker shaded roofs that collect more moisture during the shoulder seasons. For freeze-thaw conditions, ensure proper attic ventilation, a solid underlayment, and compatible flashing to limit water intrusion at valleys and transitions. If a roof experiences rapid weather changes or heavy spring wind events, asphalt's ease of repair and replacement can translate into fewer surprises after a hail season.
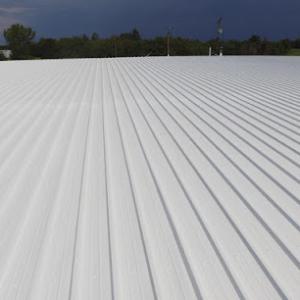
Metal roofing is actively installed in the market and is often considered by homeowners planning for snow shedding and lower maintenance over time. A metal panel or shingle system can shed snow more readily than many other options, reducing the load on eaves and improving safety during heavy storms. Metal also tends to resist wind uplift well and holds color longer in bright, sun-intensive months. In Stevens Point's climate, careful attention to insulation beneath the metal and proper sealing around edges and penetrations is essential to avoid condensation and ice buildup at eave lines. Since metal is more rigid, ensure the underlying structure can handle the weight distribution, and confirm that fasteners and seams are designed for freeze-thaw cycling to prevent loosening over the years.
Tile, wood, and synthetic roofs exist in the market, but their performance in this area must be weighed against freeze-thaw exposure, snow load, and the structural demands of heavier systems. Clay or concrete tiles offer durability and a distinct look, but their weight requires a reinforced structure and careful consideration of wind uplift, especially on exposed ridges. Wood shingles or shakes can provide a traditional, rustic aesthetic, yet they are more vulnerable to moisture, mold, and fire concerns if not properly treated and maintained. In a Wisconsin winter, potential warping and rapid deterioration from freeze-thaw cycles can shorten the service life unless the decking and flashing are detail-driven for drainage and water shedding. If choosing these options, verify the roof deck's capacity and prepare for more meticulous maintenance and inspection after severe weather events.
Synthetic or composite shingles can blend the best attributes of durability with manageability. They often give improved impact resistance and longer lifespans, while still offering more flexibility than heavy tile systems. For a Stevens Point setting, assess the product's behavior under temperature swings and its resistance to moisture absorption. Synthetic options may provide a middle ground: lighter than tile and sometimes easier to install than natural materials, with good wind performance and a lower risk of hail damage than traditional wood. As with all options, ensure the installation accounts for proper attic ventilation, flashing details, and a well-sealed underlayment to handle spring storms that carry wind-driven rain and hail.
When choosing among these options, align the roof's material properties with the home's structure, the expected snow load, and the local contractor network. A well-ventilated attic, strategic flashings in valleys and penetrations, and a plan for periodic inspections after winter and spring storm events will help any roof type deliver reliable performance through many Wisconsin seasons. In the end, the best choice reflects how you balance snow shedding, maintenance needs, and the roof's lasting ability to protect the home through freeze-thaw cycles.
When a hailstorm or strong spring winds tracks through central Wisconsin, you'll notice a spike in contractor availability tightening up quickly. In Stevens Point, seasonal demand drives prices and scheduling, especially for steep-slope jobs that require tear-offs and meticulous weather windows. The short prime installation season means crews book up fast, and delays stack with weather events-from squalls to late-season freezes-that can push a job from a few days to a couple of weeks. Expect pricing to reflect those bursts in demand, with some delay-sensitive components like tear-off labor and disposal fees showing sharper fluctuation than during calmer months.
Steep-slope roofs in older homes often reveal flashing details and vent configurations that need updating during the tear-off or installation. In practice, these updates can add to the square footage and labor time, nudging totals upward compared with a straight-through replacement on a newer roof. Asphalt shingles sit in a practical middle ground, commonly cited around 320 to 650 USD per square for a basic install, with upgrades for 3-tab to architectural styles. Metal roofing carries a higher material range, roughly 520 to 900 USD per square, reflecting longer life and more labor-intensive fastening. If clay or concrete tiles are chosen, expect significantly higher costs-clay from about 1,100 to 2,000 USD per square, concrete from about 900 to 1,700 USD per square-driven by weight, substrate requirements, and cut patterns. Wood shingles or shakes span roughly 700 to 1,100 USD per square, and synthetic or composite shingles, while lower in mid-range options, run about 450 to 800 USD per square. These figures assume a standard steep-slope replacement without major structural work.
Steep-slope tear-offs inherently demand dry, steady days, so weather delays aren't rare in central Wisconsin. When a storm season hits, crews may pause on higher-risk days to protect exposed interior spaces, which can compress the window for installation and push labor costs higher if crews must return to complete a project. Also, on older Stevens Point homes, flashing details-like valley pans, ridge vents, and step-flashing around chimneys-often require precise detailing and sometimes partial re-flashing during the job. That extra workmanship contributes to final pricing, but it also pays off in the long run with better wind resistance and reduced leak risk down the line. Plan on a tighter timeline and lean toward scheduling early-in-season windows to minimize weather-driven bumps.
In Stevens Point, most re-roof projects require a building permit, with plans and fees submitted to the City Building Inspection Department. Before any shingle or metal laydown begins, you should have a clear plan on paper that shows roof dimensions, venting changes, and any flashing updates you intend to do. The department's workload and the occasional late-winter thaw can push timelines, so start the process early and expect a few weather-driven pauses. If you live in an older home, be prepared for the permit reviewer to pay closer attention to flashing details and vent adjustments; this isn't a block, just a thorough check to prevent leaks once spring thaw hits your attic.
Inspections happen while the project is underway to catch problems early, not after the fact. Your roofer should coordinate a pre-covering inspection if required, followed by progressive checks as layers go on-underlayment, flashing, and then the final surface. In this city, the inspector will look closely at how valley flashing and vent flashing are integrated with the new roof line, because improper flashing is a common source of Stevens Point leak complaints after heavy snow and spring wind events. If the weather turns or a rain delay occurs, the inspection window can shift, so stay in close contact with your contractor and the building department, and keep access clear for the inspector.
Once the roof is completed, a final inspection seals the process. The permit remains open until this last check passes. If anything is flagged during the final review, the contractor will need to address it before the permit can be closed. That moment matters: a closed permit means you're officially compliant and the roof is treated as a verified replacement in the town records. On older homes, the final look at flashing and vent reattachments is often the deciding factor for a clean close, especially after a winter that tested non-visible seams. If you encounter a delay, don't assume it's only paperwork-tightening flashing, resealing penetrations, or adjusting vent positions may be the real fix needed to pass.
After a severe storm with hail or high winds, claims activity tends to surge. Adjusters will be more active in the days and weeks following a storm, and Stevens Point homeowners should anticipate more visits and questions than usual. The goal for most carriers is to verify damage quickly and determine scope, so having clear documentation ready speeds the process and reduces back-and-forth.
Carriers generally want standard documentation before approving any roof work. Start with up-to-date photos-from ground level and from the attic if accessible-to show both exterior damage and signs of moisture intrusion or compromised decking. Include a simple timeline of events: when you first noticed damage, when you reported it, and when a roofer first inspected. Have your roofer provide a written scope that explains materials, fastening methods, and any observed deterioration such as flashing or vent leaks. If you have a record of prior damage or repairs, include that history to illustrate changes since the last claim. A well-organized packet helps an adjuster evaluate the claim without unnecessary delays.
Some insurers adjust deductibles or coverage terms after significant hail seasons, making pre-loss roof records especially useful. If storms return in quick succession or if a large hail event occurs, an adjuster may reference prior documentation to distinguish new damage from existing wear. Maintaining a consistent set of photos, dated notes, and roof specifications creates a reliable history that supports your claim when terms shift or the scope broadens.
Capture fresh photos from multiple angles and note any changes you can observe from the ground. Contact a licensed roofer early to schedule an inspection and obtain a written scope of work. Share the roofer's documentation with the insurer, along with your storm timeline. If an adjuster proposes a temporary fix, request a written agreement that outlines how long the fix remains in place and what will happen if further damage is detected later. Keep copies of all communications, and update your file as new information arrives.
When a roof is opened for a reroof, the work often reveals more than shingles. The city notes that some older buildings may require additional flashing or vent adjustments during reroofing. That means the replacement scope in Stevens Point can expand beyond shingles once existing penetrations and edge details are opened up. If your home has a history of harsh winter cycles, the uncovering of old flashings or vent gaps can influence the long-term performance of the new roof, even if the initial shingle job looked straightforward.
Older edges, valleys, and penetrations were installed with materials and methods that may not hold up to modern wind and freeze-thaw patterns. In practice, a reroof can reveal rotten underlayment, compromised hip or ridge lines, or misaligned drip edges. These conditions are not cosmetic; they determine how well the roof sheds moisture during spring melts and how resistant it is to wind-driven rain during storm events. A careful assessment during teardown is essential to prevent follow-up leaks after the final inspection.
That means replacement scope in Stevens Point can expand beyond shingles once existing penetrations and edge details are opened up. A contractor who anticipates this reality can plan for additional square footage of underlayment, upgraded vent boots, or reinforced ridge cap. Without this foresight, small oversights on flashing or ventilation can become persistent problem points in years with repeated freeze-thaw cycles and sudden storm bursts.
Inspection outcomes on older homes may depend on whether these roof detail corrections are addressed before final approval. If flashing, vents, and edge metal are upgraded or properly resealed, the project is more likely to pass without resubmittal. Conversely, gaps left untreated can delay approval and invite moisture infiltration from subsequent thaw-freeze cycles. A proactive approach-documenting hinge points, flashing upgrades, and vent adjustments-helps align the final inspection with durable, weather-ready performance.
Find contractors experienced in skylight installation, flashing, and leak repairs to bring natural light into your home.
Superior Roofing & Remodeling
(715) 347-7990 superiorroofing-remodeling.com
4701 Industrial Park Rd Suite B, Stevens Point, Wisconsin
4.4 from 14 reviews
Low-slope roofing remains a smaller specialty in the Stevens Point contractor market compared to standard steep-slope reroofing. When a job involves a porch, addition, or a mixed-slope section, you'll want a contractor who can seamlessly blend the steep-ridge work with the low-slope detail work. The best teams in town bring experience with transitions from traditional asphalt or metal steep-slope surfaces to the flatter, low-slope areas without creating a patchwork look. Expect some firms to be more comfortable with steep-slope reroofing and others to handle true low-slope applications; the strongest options are those that clearly demonstrate capability on both.
Roof coating and restoration services exist locally, but they tend to be a more niche path rather than the dominant replacement approach for Stevens Point homes. If you're weighing a restoration route, look for contractors who can verify long-term performance under central Wisconsin freeze-thaw cycles and spring hail exposure. A solid restoration plan should include surface preparation, a compatible coating system for your roof's material, and a realistic expectation of how coatings interact with attic ventilation and insulation in older homes. In practice, coatings can be a sensible option for isolated low-slope sections or for extending the life of an otherwise solid steep-slope roof, provided the underlying deck is sound.
Many Stevens Point homes feature additions or porches that introduce mixed-slope configurations. In these cases, you'll want a contractor who can design a unified assembly that manages water flow across all planes. Pay attention to flashing details at transitions, edge terminations, and any existing counterflashing that may need upgrading. If your project includes both steep-slope reroofing and low-slope restoration, schedule a single qualified crew to coordinate the installation sequence, flashing upgrades, and ventilation considerations. A cohesive plan reduces the risk of leakage around transitions after winter freezes or spring storms. Clear communication about scope, materials, and maintenance expectations helps ensure durability through the region's notable freeze-thaw cycles.
Find specialists in TPO, EPDM, and built-up flat roofing systems for residential and commercial properties.