Last updated: Apr 19, 2026
Seaford sits in western Sussex County near the Nanticoke River, where humid air and frequent wind-driven rain can keep roof assemblies damp longer after storms. This isn't about a one-off soaking; it's about persistent moisture that concentrates around vulnerable joints and transitions. After a nor'easter or tropical storm remnant, the roof may look intact, but the underlayment and flashing can stay damp for days, inviting slow leaks that progress from hidden spots to living spaces. The local pattern is to watch for dampness along eaves, soffits, and valley intersections rather than isolated shingle failures.
Delaware nor'easters and tropical storm remnants are the weather events most likely to create claim-worthy roof damage in Seaford rather than classic severe hail outbreaks. The wind-driven rain from those systems drives water into edge details, penetrates around vent stacks, and pushes moisture into the most exposed connections. In practice, that means leaks often begin at flashing corners where the roof meets walls, around chimney and vent penetrations, and along the hips and eaves where wind pressure is highest. A roof can shed shingles without obvious damage, yet water sneaks in at the flashing deck, underlayment laps, or along the drip edge if those components are aging or improperly mated.
In this climate, leak risk is often tied to flashing, underlayment, and edge details because prolonged rain and wind can push water into vulnerable transitions even when shingles are not completely blown off. Pay particular attention to the junctions where the roof meets the wall, around exhaust fans, and where newly installed soffits tuck under the roof edge. If edge metal is dented, bent, or underlayment beneath is exposed, a small week of wind-driven rain can become a chronic drip. The most subtle failures-pinholes in flashing sealant, loose step flashing, or degraded drip edge-become the primary entry points after a storm passes.
After a heavy rain event, you should inspect with a flashlight at midday light, checking along rake and valley lines, around any skylights, and at vent penetrations. Look for dark staining on interior ceilings near exterior walls, which signals a slow leak path rather than a single storm breach. If shingles remain intact but water shows up in the attic or ceiling near seams, the issue is most likely flashing or underlayment rather than roof surface material. Prioritize addressing edge and transition components first, as they drive most of the long-duration moisture problems in this area.
When a storm ends, act quickly: clear clogged gutters so runoff isn't backed up against eaves, reseal or replace any damaged flashing promptly, and re-grade any sagging roof edge that traps water. You're aiming to prevent even small leaks from turning into attic moisture, mold risk, or structural degradation. If dampness lingers after a storm season, consider professional evaluation focused on flashing integrity and underlayment condition before the next wind-driven rain arrives.
Little Tiger Roofing
Seaford, Delaware
5.0 from 11 reviews
Little Tiger Roofing is a professional roofing company serving Bridgeville, DE and surrounding areas. We specialize in all types of roofing services including installation, repair, and maintenance. Our top priority is customer satisfaction and we strive to provide quality service at an affordable price. With over 30+ combined experience, you can trust us to take care of your roofing needs!
Hershey Roofing & Siding
(302) 924-8593 hersheyexteriors.com
101 E 3rd St, Seaford, Delaware
5.0 from 1 review
We're a family owned and operated exterior remodeling company with a strong focus on premium, high-end renovations on the Delmarva Peninsula. Our team is passionate about providing a positive experience and beautiful home exterior for our customers. We are GAF Master Elite Certified as well as recipients of the 2024 GAF President's Club Award. We are also BBB-accredited.
Potomac Custom Remodeling
(302) 248-8881 potomaccustomremodeling.com
Serving
5.0 from 16 reviews
Transform your property with expert remodeling services from Potomac Custom Remodeling Specializing in roofing, windows, siding, and solar solutions, we’re committed to enhancing your home's value and functionality. Whether you need a roof replacement, new windows, or energy-efficient solar installation, our team ensures top-quality craftsmanship and excellent customer service. Trust us to handle your renovation project with care and professionalism.
Jb & Sons
(302) 273-5457 www.jbandsonsllc.com
Serving
4.8 from 16 reviews
JB & Sons offers roofing, siding, decking, skylight, interior, exterior, additions in the Georgetown, DE and surrounding areas.
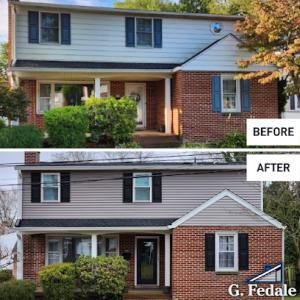
G. Fedale Roofing & Siding
(302) 279-5281 www.gfedale.com
Serving
4.9 from 98 reviews
G. Fedale Roofing & Siding has been a competitive leader in the home improvement and commercial roofing industry since 2002. Gaining a major market share through the specialized talents of our employees, we pride ourselves on the success of our rapidly growing company. We are dedicated to the highest install and repair standards and our extended workmanship warranties guarantee coverage long after work is completed. Our mission at G. Fedale is to provide the best value and craftsmanship for our customers and the communities we serve through service, education and commitment.
Anthony Construction Roofing & Siding
(302) 321-3553 anthonyconstructions.com
Serving
4.8 from 63 reviews
With over 18 years of experience in the construction industry, Anthony Construction Roofing & Siding is your trusted roofing contractor in Sussex County, Delaware. Specializing in roof repair and replacements, we’re proud to be the answer to your search for reliable roofing companies near me. Our team brings unmatched expertise, attention to detail, and a commitment to quality to every project. Fully licensed, bonded, and insured (License #22970125), we prioritize your peace of mind and satisfaction. Whether it’s a small repair or a complete overhaul, we deliver customized solutions and exceptional customer service every time.
Bayview Roofing & Siding
(302) 493-2222 www.bayviewroofingsiding.com
Serving
5.0 from 41 reviews
Bayview Roofing and Siding is owned by Scott Geesey who has over 20 years experience in the home remodeling industry with over $10,000,000 in sales. When it comes to home improvement, Bayview Roofing and Siding provides all of the resources available to insure you are getting the highest quality products installed by experts.
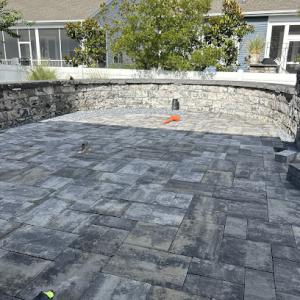
Hardscape & Landscaping Tecos
(302) 493-6800 hardscapelandscapingtecosllc.com
Serving
5.0 from 36 reviews
Hardscape & Landscaping Tecos specializes in landscaping services in Millsboro, DE. We also pavers and deck and roof and siding and stone removal and mulch and walkways etc We always strive to provide services where you will never have to bother about your lot and roadside again, ensuring complete customer satisfaction. Our main goal is to satisfy our clients by providing the most satisfactory customer service possible.
Alpha Roofing & Siding
(302) 772-5742 www.alpharoofingde.com
Serving
4.9 from 47 reviews
The Team to call on your next home improvement project Roofing, Siding, Solar & Much More! DE MD
Hernandez Contractor
(302) 265-7873 hernandezcontractor.net
Serving
4.9 from 195 reviews
Hernandez is your locally established and family operated company. We set out to serve our community with their roofing needs. Providing solutions for those in need of repair, full replacement, and general inspections. Projects big or small, our goal is to inform, educate, and solve your roofing needs. Give us a call & we look forward to helping you. We specialize in all things roofing. Need an estimate? Repair? Or an entire roof installed? We have you covered. Call us today! (302) 265-7873
Delmarva Exteriors
(302) 924-8075 www.delexteriors.com
Serving
5.0 from 16 reviews
Founded in 2014, Delmarva Exteriors has quickly grown as the trusted name in Bridgeville, DE, offering a comprehensive range of services including roofing, decks, paver patios, solar, and fencing. We stand out not just as roofing contractors but as a company known for high-quality care, effective communication, and unmatched dependability. Serving both residential and light commercial clients, our decade-long legacy is a testament to our commitment to excellence.

EP Roofing
(443) 366-6079 eproofingdelmarva.com
Serving
4.9 from 66 reviews
EP Roofing is a family-owned roofing and siding company in Salisbury, Maryland. We proudly serve residential and commercial properties in Maryland, Delaware, and Virginia. Our team of roofing professionals has the experience and knowledge to assist with roofing, siding, and leaks. We believe in quality workmanship. No matter which of our services you choose to use, you can rest assured that you’ll get the best results. We’ll always clean any debris we cause and get to work on your project as soon as possible. For a free project estimate, contact us today!
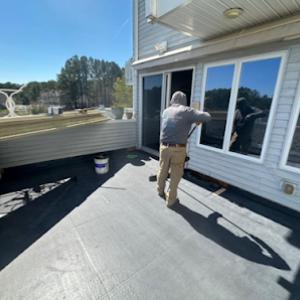
In Seaford's inland-coastal climate, the best window replacements happen when you can avoid the sharp swings of humidity, wind-driven rain, and winter freezes. Mild spring and fall conditions are typically the most forgiving for installers and for sealant curing, which helps prevent moisture intrusion during the open-stud phase. If you time the project for late spring or early fall, you'll generally see fewer interruptions from heat waves or cold snaps, and you can schedule crews during shoulder-season lull periods when crews are less stretched by harsh weather elsewhere in Sussex County.
Wind-driven rain around Nor'easter events and autumn storms demands heightened moisture control. When choosing replacement windows, prioritize products with robust weather resistance and a proven secondary drainage plan to shed any incidental rain that finds its way to rough openings. Before the project starts, confirm that the exterior openings are prepared for rapid drainage during the tear-off and installation phases. Seaford's moisture exposure means any exposed edge needs a fast, clean seal to prevent capillary action from pulling in humidity during the first few days after installation.
Winter ice, snow, and freezing temperatures can slow tear-offs and delay sealing performance for some window systems. If a cold snap hits during installation, crews may suspend work to avoid glazing material freeze-thaw damage or compromised siliconeCure times. In practice, this means you should build in a flexible schedule that accounts for freeze-thaw pauses and interior protection strategies. A practical approach is to stage interiors with temporary weather barriers and to plan for a mid-project interior walkthrough if temperatures dip unexpectedly. In spring, heavy rains and wind events can disrupt outer-sill work and require tighter moisture control while flashing is still curing.
Your window choice should balance Seaford's humid, coastal exposure with long-term performance. Aluminum and vinyl offer low maintenance and good weather resistance, but fiber-reinforced or composite frames can further resist warping in damp conditions. Regardless of material, insist on high-quality flashing, continuous head and sill drainage, and careful sealing at corners and joints. For storm-prone periods, ask installers to complete a two-step sealing process: a primary seal as soon as the sashes are set, followed by a secondary seal after the frame is fastened and housewrap is re-secured. This two-step approach reduces the chance of leakage during sudden spring storms and autumn wind events.
After installation, conduct a quick walkthrough to verify all new units operate smoothly under typical Seaford conditions. Check for uniform operation of sashes, proper drainage around the frame, and any signs of wind-driven moisture entering the rough opening during a test rain. For ongoing reliability, schedule a follow-up inspection after the first substantial autumn wind event and again after the spring thaw to address shifting humidity and any settling that may affect seal performance.
Asphalt shingles remain the dominant practical choice for Seaford homes because they align with the area's affordability-focused re-roofing market and broad contractor availability. In a climate marked by humidity, coastal moisture, and the occasional nor'easter-driven deluge, asphalt shingles offer straightforward installation and reliable sealant performance when properly vented and maintained. For many neighborhoods, standard three-tab or architectural shingles strike the right balance between cost, ease of replacement, and local service access. When choosing asphalt, look for products with good wind uplift ratings and a proven track record in humid, rain-prone environments. Proper attic ventilation, drip edges, and underlayment quality are essential to maximize life expectancy in this inland-coastal setting.
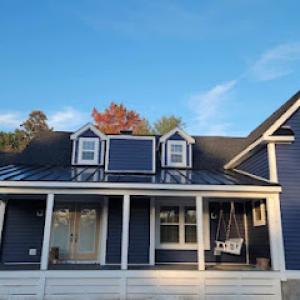
Metal roofing is relevant for homeowners prioritizing wind resistance and reduced maintenance in a climate with humid summers and coastal-influenced storm systems. In Seaford, metal roofs can perform exceptionally well against wind-driven rain and repeated storm exposure, provided the installation is performed by experienced crews who understand coastal detailing. Standing-seam systems are common for their durability and clean lines, while exposed-fastener styles can still work with careful panel selection and correct sealing. Metal also dries quickly after precipitation, which helps minimize moisture intrusion risk during and after storms. If choosing metal, pay attention to the roof's edge detailing, snow-fall considerations (where applicable), and the compatibility of fasteners with coastal air and humidity to prevent corrosion over time.
Clay tile, concrete tile, synthetic/composite shingles, and slate are available options in Seaford, but their higher weights or costs make structure suitability and installation expertise more important than for standard shingle replacements. Clay and concrete tiles require a reinforced roof deck, careful underlayment, and precise flashing around chimneys and dormers to cope with wind-driven rain. Synthetic or composite shingles can mimic traditional looks while offering improved impact resistance, but still demand solid installation practices to hold up in the region's moisture-heavy cycles. Slate delivers a long lifespan and a refined aesthetic, yet its heavy weight and the need for specialized, slate-focused crews can complicate retrofits on older homes. For any of these choices, assess the existing roof structure for load capacity, confirm proper ventilation, and ensure the contractor has demonstrated experience with coastal climates and the local mix of weather patterns.
Ultimately, the best-fit material balances weather resilience with the home's structural reality and local contractor availability. Asphalt remains the accessible, reliable baseline for most Seaford projects, while metal offers compelling advantages if wind resistance and low maintenance are top priorities. Other materials can be appropriate given structural upgrades and skilled installation, but their heavier demands should be matched with professional assessment and longer-term planning. In a climate where wind-driven rain and storm wear shape roof life, tailoring choices to local conditions helps ensure a durable, practical fit for Seaford homes.
When planning a roof replacement, you'll see per-square prices that reflect Seaford's inland humidity, Nanticoke River moisture exposure, and wind-driven rain. Typical pricing follows these ranges per square: asphalt shingles 350 to 700, metal 700 to 1400, clay tile 900 to 1800, concrete tile 700 to 1500, synthetic/composite 500 to 900, and slate 1200 to 2500. A standard 10-by-10 meter (approximately 100 square) roof translates these figures into the commonly quoted "per square" cost, so you can compare bids without guessing about hidden add-ons. In Seaford, you often see cost bumps after nor'easters or tropical storm remnants, when emergency demand spikes and local crews are pulled toward active leak and repair work.
Costs shift not just with material type but with how the project handles underlayment, flashing, ventilation, and fasteners. In this market, a full replacement in Seaford frequently requires careful inspection of deck integrity, plus attention to venting to handle humidity and moisture migration. If the existing roof deck has degraded or if the flashing around chimneys and skylights needs upgrade, you'll see added labor time and material fees. These items add coordination costs because crews may need to sequence work around weather windows and ensure moisture won't trap inside the attic during installation.
Wind-driven rain from nor'easters can accelerate wear on replacing roofs, but they can also disrupt scheduling. If a storm event coincides with your project window, you may face delays or a temporary cost uptick as crews shift priorities to emergency leaks. In practice, this means you should build in a weather buffer of a few days to a week for best-case scheduling, and be prepared for the possibility of modest price fluctuations if a major storm event occurs mid-project or during material deliveries.
As you compare bids, verify that the proposed plan includes a robust underlayment suitable for humid conditions, corrosion-resistant fasteners, and properly flashed joints around penetrations. Ensure the contractor outlines a ventilation strategy to combat attic heat and moisture buildup, which can shorten roof life in this climate. Ask for a clear sequence from tear-off to insulation and final sealant, with a defined clean-up plan for storm-season debris. If you're weighing material choices, remember that the wind-driven rain and humidity in this area favor durable, moisture-resistant options and careful deck preparation to maximize long-term performance.
A full roof replacement in Seaford typically requires a permit submitted through the local building department with project details and a permit fee. The process is not something to treat as optional or incidental; pulling the permit helps ensure that the materials, methods, and workmanship meet local code and weather-related requirements for this inland-coastal climate. In practice, this means your contractor should prepare the application, provide a clear scope of work, and align the project timeline with approval times. Delays or skipping permits can trigger fines, required corrections, or municipal refusals to sign off when storms test the roof's integrity.
Inspections in Seaford are generally scheduled during and after the roofing project rather than only at final completion. This staggered approach reflects the need to verify critical install milestones in real time, given humidity, wind-driven rain, and seasonal shifts that stress roofing assemblies. Plan to have inspectors visit while the underlayment, ventilation, flashing, and fastener patterns are in place, not just after shingles are laid. A contractor who understands this sequence will coordinate these checkpoints so the work pauses for each inspection rather than risking a costly redo.
Underlayment is a common flashpoint for moisture intrusion in this climate. Expect the inspector to confirm that the underlayment is properly installed, sealed at every seam, and protected from wind uplift. Ventilation is another critical area; improper attic ventilation can trap humidity and accelerate roof wear, especially after nor'easters and tropical-storm rain events. Flashing around chimneys, vents, and valleys must be continuous, corrosion-resistant, and properly integrated with the underlayment. Fasteners should penetrate solid decking and be installed at the correct spacing to withstand wind-driven rain; inspectors will verify that nails or screws are set flush and that any exposed fasteners are properly sealed. Contractors who treat these checkpoints as a routine part of reroofing demonstrate awareness of how Seaford's moisture profile interacts with roof systems.
Keep all permit documents, inspection notices, and communication with the building department organized and accessible. Share the project schedule with the inspector in advance when possible, and ensure the contractor provides notice for each inspection event. Treat the permit as a live element of the project, with adjustments documented and approved. If an inspection fails, address the cited items promptly and reschedule the revisit to avoid extended exposure to moisture during the replacement. A well-coordinated permit and inspection plan reduces the risk of leaks and delays when storm-season wind-driven rain tests the new roof.
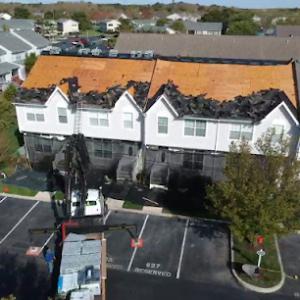
Delaware insurers generally process Seaford roofing claims using standard wind and hail documentation, but the weather events most likely to trigger claims locally are nor'easters and tropical storm remnants. The humidity and river moisture mean shingles and flashing can deteriorate faster when a storm sits over the area, so a claim might hinge on a combination of new storm damage and existing wear masking leaks.
Adjusters serving Seaford commonly want detailed photos and contractor estimates, especially when damage involves flashing, lifted shingles, or water intrusion after prolonged storm exposure. Take wide-angle shots of the entire roof line and close-ups of any suspect flashing, vent collars, and entry points for water intrusion. Include weather reports and dates of the recent storms. Have a licensed contractor provide a written estimate that itemizes flashing repair, shingle replacement, and any fascia or soffit work tied to the damage.
Carriers may scrutinize preexisting wear and ask for mitigation-related documentation, which matters in Seaford because humid conditions can blur the line between sudden storm damage and older moisture-related deterioration. Document prior repairs, attic moisture readings, and signs of mold or rot, especially around soffits and underlayment. If you've performed maintenance like resealing flashing or replacing a compromised drip edge, keep receipts and photos. Honest, timely reporting of changes after a storm helps defenses against claims delays and surprises.
Connect with contractors who help homeowners navigate the claims process from damage assessment to final approval.

Anthony Construction Roofing & Siding
(302) 321-3553 anthonyconstructions.com
Serving
4.8 from 63 reviews
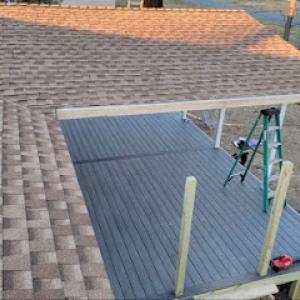
Although Seaford is primarily a re-roofing market, local contractor signals show active specialty demand for low-slope roofs, skylight work, and solar-related roofing coordination. The inland humidity, river moisture, and frequent wind-driven rain heighten the risk that penetrations and transitions will leak during nor'easters and tropical-storm events. Addressing these areas with careful detail during planning helps prevent repeated repairs and keeps the rest of the roof performing as designed.
In this wet, windy climate, skylights and solar attachments are common leak points if not properly integrated. When you review plans, look for flashing that seals against both the low-slope section and any adjoining steep-slope areas. Ensure step and counter-flashings extend adequately, and that curb-mounted skylights have vented drip edges and an interior curb seal that resists moisture creep. For solar, verify that mounting brackets distribute load without creating hidden voids; seal seams where rails meet underlayment and flashing. Consider pre-fabricated transitions from the low-slope deck to the pitched roof to minimize field-cut errors that invite water entry after a storm.
Low-slope sections on additions, porches, and mixed-roof homes need different drainage and membrane detailing than the main steep-slope roof. Specify a continuous, approved membrane with proper edge terminations and a reliable termination at the transition to the higher roof. Ensure slope is adequate to shed water toward designed outlets and that penetrations through the membrane are reinforced with compatible flashing and robust sealants. In Seaford's climate, detailing for wind-driven rain should prioritize redundant seals and visible inspection points at key junctures.
During installation, confirm that fasteners through low-slope membranes are compatible with the substrate and that sealants maintain elasticity after cold-season cycles. Inspect skylight and solar penetrations for uniform compression around flashings and secure attachment points. After completion, schedule a follow-up inspection after a nor'easter or tropical-storm event to verify that defined drainage paths and flashing interfaces remain watertight.
Find specialists in TPO, EPDM, and built-up flat roofing systems for residential and commercial properties.