Last updated: Apr 19, 2026
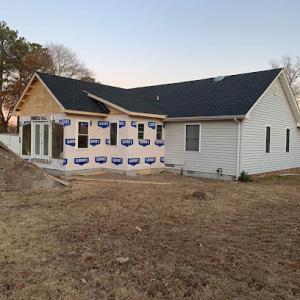
Spring storm rainfall interruptions and tropical-storm or high-wind events can deliver sudden roof damage and debris exposure. In this climate, a quick, disciplined response reduces secondary damage from rain intrusion, structural stress, and hidden leaks. After a storm, safely inspect accessible areas and note any missing shingles, lifted edges, dented flashing, or sags in sections of the roofline. If moisture is entering the attic or living spaces, address the source of water first with temporary tarping or covering to limit further interior damage while arranging a professional assessment. Delaying a rapid check-in with a competent roofer invites costly repairs later and complicates insurance claims.
Maryland insurers generally reimburse roof replacements when damage is well documented, and adjusters commonly ask for photos, prior damage notes, and a contractor scope of work. For Salisbury homeowners, create a dated visual log from multiple angles: roof surface, eaves, vents, gutters, valleys, and exterior walls affected by leaks. Include interior evidence like ceiling staining, attic condensation, or mold-prone spots. Preserve any storm debris and keep a running timeline of when events occurred, when temporary repairs were made, and who inspected the roof. When speaking with the insurer, reference a professional scope of work that outlines shingle replacement, flashing, underlayment, and any structural elements impacted by wind-driven damage. Clear, organized documentation accelerates the claim and reduces back-and-forth delays.
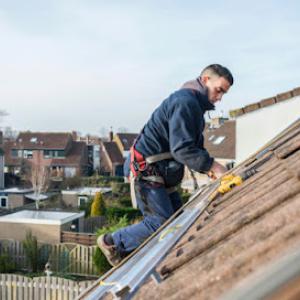
Local contractor signals show storm damage and emergency repair are among the most prevalent specialties in this market, underscoring the need for a swift, credible response after a damaging event. Seek a contractor who can provide a rapid on-site assessment, a written triage plan, and a temporary fix that protects the interior without compromising the long-term replacement. Verify that the contractor carries current licensure, appropriate insurance, and a track record of storm-related work. Ask for references from nearby neighborhoods that faced similar wind and hail impacts, and request a concise, itemized scope of work from the company's estimator. Prioritize those who can coordinate with the insurer, supply a clear sequencing of repair steps, and adhere to a transparent timeline under pressure.
Storm-damaged roofs in this region frequently expose vulnerabilities in underlayment, decking, and ventilation. If the roof is beyond minor repair, plan for a full replacement with a durable, wind-rated system that can withstand the area's typical wind events and freeze-thaw cycles. Discuss with the contractor how attic insulation, ventilation, and proper shingle alignment contribute to long-term performance. A thorough replacement plan should include a robust underlayment, properly sealed flashing around chimneys and skylines, and consistent ridge cap installation to improve storm resilience. Coordinating the replacement timing with insurance adjustments helps ensure the project proceeds smoothly and minimizes the risk of post-installation complications.
Adjusters expect a clear sequence: storm event, damage discovery, documentation package, contractor scope of work, and scheduled repairs. Keep communications concise and documented, with a single point of contact if possible to avoid misaligned information. Expect requests for the contractor's structural assessment, a material takeoff, and a phased repair plan that distinguishes emergency work from permanent replacement. Understanding these expectations helps align the claim process with practical, weather-resilient roofing outcomes.
G & Bros Roofing
(410) 677-4975 www.gandbrosroofing.com
109 Clark St, Salisbury, Maryland
4.9 from 106 reviews
and Bros Roofing specializes in professional roof replacements and roof repairs throughout Salisbury, Ocean City, Ocean Pines, Berlin, and Cambridge, MD. We install shingles, metal, slate, and flat roofing systems with a focus on quality and reliability. As a GAF Certified Plus Contractor, we offer the GAF Silver Pledge Warranty for added peace of mind. We also assist with insurance claims and provide free roof inspections. Whether it’s storm damage or a full roof replacement, we get it Done Right the First Time. Trusted roofing on Maryland’s Eastern Shore.
Spicer Bros. Construction
(410) 546-1190 www.spicerbros.com
32221 Beaver Run Dr, Salisbury, Maryland
4.8 from 389 reviews
Spicer Bros. Construction is a family-owned and operated Delmarva construction company committed to offering customers the best exterior home improvements, bath and shower remodeling. In business since 2002, we have provided residents throughout the area with the services they need to achieve the look and functionality they want for their homes.
All Day Roofing & Siding
(443) 669-5281 alldayroofingandsiding.com
26998 McLeyland Terrace, Salisbury, Maryland
5.0 from 45 reviews
With over a decade in roofing experience All Day Roofing and Siding has been dedicated in serving all of Sussex county and Maryland for its roofing and siding needs. Here at All Day Roofing and Siding we understand that a roof is more than just a roof, it is what protects your priced possessions and loved ones from the elements, it protects them from the harsh cold winters and hellish summer heat. Let the professionals handle it and give us a call.

EP Roofing
(443) 366-6079 eproofingdelmarva.com
405 Marvel Rd, Salisbury, Maryland
4.9 from 66 reviews
EP Roofing is a family-owned roofing and siding company in Salisbury, Maryland. We proudly serve residential and commercial properties in Maryland, Delaware, and Virginia. Our team of roofing professionals has the experience and knowledge to assist with roofing, siding, and leaks. We believe in quality workmanship. No matter which of our services you choose to use, you can rest assured that you’ll get the best results. We’ll always clean any debris we cause and get to work on your project as soon as possible. For a free project estimate, contact us today!

Valor Home Roofing
(410) 936-3774 www.valorhome.com
100 Clemwood St Suite A, Salisbury, Maryland
5.0 from 30 reviews
Valor Home specializes in roofing replacement, siding replacement, window installation and emergency roofing services. Catering to both residential and commercial needs, we ensure top-notch services with a focus on quality and reliability. At Valor Home, our priority is delivering exceptional work and providing a positive customer experience. Equally important is our business culture, centered around our three pillars: Honor, Respect, and Trust. We invite you to meet the team behind Valor Home and experience our values firsthand.
Bayside Exteriors
(410) 831-3938 www.baysideexteriors.net
108 Moss Hill Ln, Salisbury, Maryland
5.0 from 21 reviews
Open by Appointment Only: Whether you have roof damage or even if you need an inspection after a storm, we can help. Bayside Exteriors is focused on providing reliable services.
Peninsula Roofing Company
(410) 742-6163 www.peninsularoofing.com
1209 N Salisbury Blvd, Salisbury, Maryland
4.5 from 54 reviews
Our goal at Peninsula Roofing Company is simple - to safely provide a high quality product and outstanding customer service as we meet our customers' needs in the roofing industry. Our values and beliefs require that we: -Make "Do It Right the First Time" our commitment as a team -Safely deliver a competitive high-quality roof and outstanding service to each customer. -Provide the most effective and efficient corrective action in resolving customer service issues to ensure our customers' satisfaction. (We recognize that the best way to ensure customer satisfaction is to do the job right the first time!)
Precision Exteriors
(443) 675-6485 www.precision-exteriors.com
1525 Edgemore Ave Suite 10, Salisbury, Maryland
4.9 from 11 reviews
Precision Exteriors is your premier roofing contractor in Salisbury, MD, specializing in quality roof repair, roof replacement, and new roof installation. As a trusted residential roofing contractor, we also excel in metal roof installation, gutter cleaning, and comprehensive roof maintenance. Our expert team understands the unique challenges of both residential and commercial roofing services, ensuring long-lasting solutions tailored to the Eastern Shore’s climate. With over 40 years of experience, Precision Exteriors is committed to exceptional craftsmanship and customer satisfaction. Contact us today for a free consultation and experience the difference in premium roofing and exterior services!
Lopez Exteriors
1301 Flamingo Rd, Salisbury, Maryland
5.0 from 8 reviews
General Contractor - Servicing the Maryland, Virginia, Delaware Areas
Power Construction
(443) 735-6609 powerconstructionllc.com
28020 White Pond Dr, Salisbury, Maryland
5.0 from 3 reviews
We are a family company … We do roofing for more of 10 years We Maryland and Delaware license
Blue Line Roofing & Exteriors
(443) 944-4057 www.bluelineremodels.com
207 W Main St #2, Salisbury, Maryland
5.0 from 2 reviews
Blue Line Roofing & Exteriors provides roofing, siding, storm damage restoration, insurance claims and exterior trim projects to the Salisbury, MD and Eastern shores of MD and Delaware
Marroquin Roofing
Salisbury, Maryland
5.0 from 1 review
Marroquin Roofing is a professional roofing contractor located in Salisbury MD. Call us now for more information about the services we offer.
Salisbury's hot summers and cold winters create a steady freeze-thaw cycle that wears on roof systems year after year. This cycle concentrates stress at vulnerable details-valleys, penetrations, flashing, and edge lines-and can accelerate aging even on materials that otherwise wear well. In practice, that means slower signs of wear in the middle of a roof can mask trouble around the edges, where water has more opportunities to intrude during thaw periods. Understanding where those stress points lie on your roof helps you spot trouble early and plan targeted repairs before small issues turn into interior leaks.
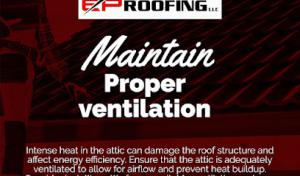
Winter ice dams and heavy, wet snows are a stated seasonal risk in Salisbury and can stress roof edges and lead to interior leaks. Ice dams form when roof temperatures create melted water that refreezes at the eaves, pushing moisture under shingles or tiles. Over time, repeated dam formation widens flashing gaps and loosens fasteners near edges. Snow loads add vertical pressure, especially on older or lighter roof assemblies, and can bend or separate ridge caps and fascia. Practical response is to maintain proper insulation and ventilation in the attic to reduce heat loss that drives dam formation, and to inspect edge detail after snow events for signs of moisture intrusion or loose components.
Summer heat and high humidity affect both material performance and installation pace. In the hottest months, asphalt shingles may become more pliable, while underlayment and sealant products cure differently than in cooler air, impacting adhesive bonds and warranty conditions. For metal, synthetic composites, and tile options, high humidity can slow installation crews and increase the chance of misfires if crews don't account for moisture during sealant and fastener work. Scheduling repairs and replacements in the early shoulder seasons-spring and fall-can make it easier to manage heat during cutting, handling, and setting, while also giving underlayment work a better chance to perform as designed.
A practical approach is to pair seasonal checks with a focused list of vulnerable areas. After winter, inspect for ice dam damage around gutters, soffits, and valleys; look for any signs of moisture intrusion around penetrations or along the eaves. In late summer, pay attention to elevated roof temperatures, warping at edges, and any fastener loosening around flashings. Document and photograph suspected wear, then address small fixes promptly before cycles of heat and cold compound the problem. When in doubt, a targeted professional assessment focused on edge details, flashing integrity, and vented attic spaces can help you extend roof life without waiting for a leak to appear.
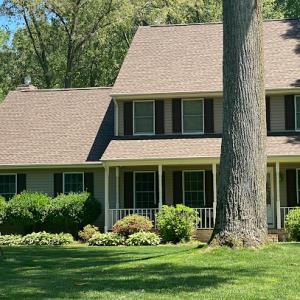
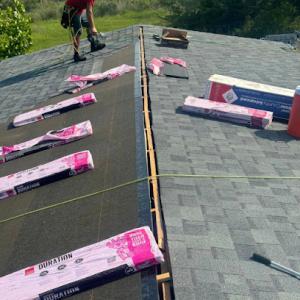
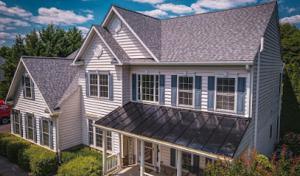
Salisbury faces hot, humid summers, winter freeze-thaw cycles, and the threat of tropical-storm winds that can test any asphalt roof. Asphalt shingles remain the dominant practical choice because they balance performance with a broad contractor base that-from the Eastern Shore perspective-has the most hands-on experience with this material. In neighborhoods where the roof plane has seen years of exposure to salt air and coastal humidity, the familiar asphalt layer can be a reliable, straightforward replacement that keeps maintenance approachable. When evaluating options, consider how the local climate will drive wear patterns: UV exposure in summer, moisture bounce-back in shoulder seasons, and wind-driven debris from storms. A well-sealed, properly vented asphalt system often pairs best with the existing roof deck and drip edge details found on many Salisbury homes.
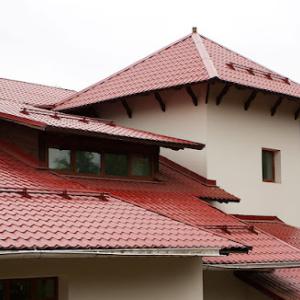
Tile and slate carry a distinct visual appeal, but their weight can be a limiting factor on older housing stock. Before choosing ceramic clay, concrete, or slate, conduct a structural check to ensure the existing trusses and rafters can support the load without reinforcement. In older houses-even those with historically sympathetic elevations-tile or slate can introduce substantial dead load. If structural capacity is uncertain, a structural engineer or qualified contractor can confirm whether accessory upgrades, like reinforced rafters or upgrading the roof-to-wall connections, are feasible. In many Salisbury upgrades, builders lean toward lighter, more forgiving options that still achieve a long service life, while carefully balancing long-term performance against the home's original framing.
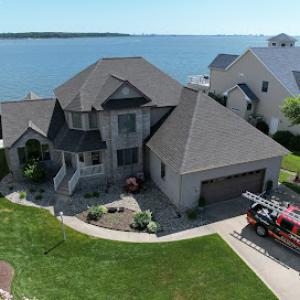
Metal roofing has gained traction in the local market for homeowners thinking about wind exposure and longer replacement cycles. A metal roof can shed wind-blown debris more readily and may offer improved performance during tropical-storm events, especially when installed with proper underlayment and a well-sealed transition to walls and chimneys. For homes already challenged by limited attic ventilation or heat buildup, metal's reflective properties can help reduce interior temperatures in hot months when attic comfort matters. If choosing metal, select a profile that complements the house's architecture and ensure attention is given to flashing, fasteners, and sealants in soffits and vent penetrations to preserve a weather-tight envelope.
Synthetic or composite shingles provide a middle ground between traditional asphalt and higher-end options, with enhanced durability against freeze-thaw cycles and wind. For homes with visual preferences leaning toward classic textures, these can mimic traditional shingles while offering a more uniform performance profile. Tile and slate alternatives, when structurally permissible, should be matched with appropriate underlayment and a framing assessment to guarantee compatibility with the home's existing load path. A thoughtful approach, anchored in the house's stance against coastal winds and seasonal moisture, helps ensure that the material choice yields consistent protection through Salisbury's unique mix of weather, while keeping the roof aligned with the neighborhood character.
In Salisbury, typical pricing ranges per square (100 square feet) reflect local market dynamics and material choices. Asphalt shingles run about 350 to 650 USD per square, a common option for many aging homes on the Eastern Shore. Metal roofing tends to be 700 to 1300 USD per square, appealing for better wind resistance and long life. For established homes that can support heavier systems, clay tile sits between 900 and 1500 USD per square, and concrete tile between 850 and 1400 USD per square. Synthetic or composite shingles are usually 450 to 900 USD per square, offering a middle ground between durability and upfront cost. Slate carries the premium range at roughly 1100 to 1900 USD per square, often paired with stronger framing needs.
Costs in Salisbury can rise after storm events when demand surges for re-roofing and emergency work. Local markets tend to concentrate on rapid storm response and replacement rather than niche specialty installations, so expect shorter lead times and higher temporary labor charges in the weeks following a major event. If your project lands in a post-storm window, plan for potential price bumps and tighter scheduling, especially for higher-end materials or composite upgrades.
Structural review adds cost on homes that may require reinforced framing or additional deck support when choosing clay tile, concrete tile, or slate. The city's housing stock often features older framing that wasn't designed for heavy tile loads, so a engineer assessment or equivalent evaluation is a prudent early step. This can push your per-square cost upward, but it safeguards against under-estimating needed reinforcement and long-term failure.
Begin with a transparent assessment of your roof's current condition and weight-bearing capacity, then obtain multiple bids tailored to your preferred materials. If insurance coverage is involved, document damage with dated photos and get a clear scope of replacement versus repair. Build a contingency for storm-season fluctuations and potential delays, especially if selecting heavier or premium materials. Prioritize installers with solid storm-response reputations and proven performance on older Salisbury homes.
A full roof replacement requires proper permitting through the local Building Department. This isn't just a box to check; it creates a documented trail that ensures the work meets Salisbury's building codes, especially for the climate realities of the Eastern Shore. When a contractor pulls a permit, you're less likely to encounter surprises after the job is underway, such as hidden structural issues or ventilation requirements that could affect long-term performance.
During a replacement, inspections are typically staged to verify progress and code compliance. First comes a rough-in or tear-off inspection to confirm that the roof deck, flashing, underlayment, and ventilation are prepared correctly before new materials go on. This is a critical checkpoint in areas that see hot, humid summers and freeze-thaw cycles, where improper installation can lead to faster wear or leaks. A final inspection then confirms that the installation meets all applicable codes and standards, including how the new roof interacts with attic ventilation and drainage. Planning around these inspections helps prevent delays that could push back your project timeline.
Because inspections are tied to replacement work, scheduling can be affected by spring rain and storm-related backlogs during active weather periods. In practice, that means a window of flexibility is valuable: start the permit process early, align with your contractor on inspection milestones, and build in a bit of buffer for weather-driven delays. If a severe storm pushes debris and access limits, the Building Department may need to revise inspection times, so staying in close contact with your contractor and the inspector can keep the project moving. Expect seasonal ebbs and flows; summer monsoons and late-wall hung storm events are more likely to compress inspection slots than dry stretches.
Choose a contractor who is familiar with local inspection expectations and has a track record of clean tear-offs and well-documented venting and flashing details. Ask for a pre-inspection walkthrough to anticipate any issues the Building Department might flag, such as secondary water barriers or attic intake sizing. If there are any prioritized upgrades tied to the permit, discuss them upfront so their scope aligns with the final inspection, reducing the chance of redos. In this climate, meticulous detailing of underlayment, drip edge, and vent placement is especially impactful for long-term performance.
In Salisbury, insurance decisions are influenced by wind and hail claim handling, including depreciation and settlement timing. Storm events in our humid, freeze-thaw climate can drive complex claim progress, with adjusters sometimes prioritizing rapid damage recognition over long-term performance. You should expect that depreciation may affect the initial replacement scope and final payout, and that settlement timing can lag behind the actual roof work. Plan for a clear, realistic timeline from inspection to completed installation, and keep every party aware of weather windows and material availability that may extend the project.
Carriers may require local code-compliant replacement scope documentation, making permit and inspection records important to the claim file. Gather a comprehensive repair or replacement plan that specifies materials, fasteners, underlayment, and any necessary structural work. Include a sworn statement of materials and scope that aligns with current code requirements and local wind-resistance expectations. Maintain copies of original trip tickets, invoices, and any correspondence with the adjuster, contractor, and insurer. A precise, line-by-line scope helps prevent disputes about what was covered versus what was required for a safe, durable roof in the area's storm-prone conditions.
Photo documentation before temporary repairs is especially important in Salisbury because emergency tarping and quick-response work are common in this market. Take wide and close-up shots from multiple angles, noting any pre-existing issues alongside storm damage. If tarping is unavoidable, photograph the tarp in place and again after it's removed, so the claim file shows the exact conditions your contractor faced and what work was necessary to restore the roof's integrity. Visual records can be decisive when depreciation or scope questions arise during settlement.
Connect with contractors who help homeowners navigate the claims process from damage assessment to final approval.
G & Bros Roofing
(410) 677-4975 www.gandbrosroofing.com
109 Clark St, Salisbury, Maryland
4.9 from 106 reviews
Valor Home Roofing
(410) 936-3774 www.valorhome.com
100 Clemwood St Suite A, Salisbury, Maryland
5.0 from 30 reviews
Precision Exteriors
(443) 675-6485 www.precision-exteriors.com
1525 Edgemore Ave Suite 10, Salisbury, Maryland
4.9 from 11 reviews
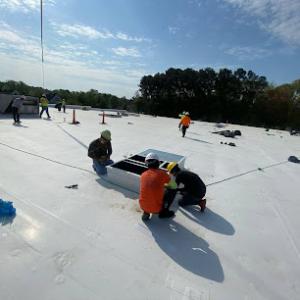
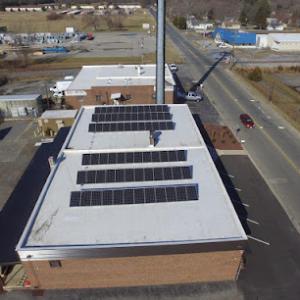
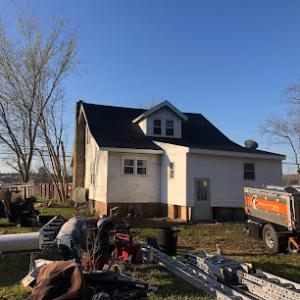
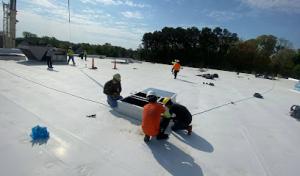
Flat and low-slope roofing appears as a meaningful specialty in Salisbury's contractor market, indicating a notable share of leak-prone roof areas beyond simple steep-slope shingle systems. When wind-driven rain from coastal storms meets a flatter plane, small edge failures or poorly detailed transitions become leaks that aren't easy to spot from ground level. In older or mid-century homes, these sections often sit atop living spaces or garages where even a modest attic temperature swing can push water toward seams and penetrations. The consequence is not always dramatic at first, but seepage compounds with each storm and can quietly compromise insulation, framing, and interior finishes.
Skylight repair is also an active local specialty, suggesting recurring homeowner concerns around flashing and water entry at roof penetrations. Skylight frames can corrode or warp with humidity and freeze-thaw cycles, and flashing joints may fail where shingles abut the curb or curb flashing corrodes. If a skylight shows condensation inside, misty glass after rain, or noticeable leaks near the glazing, treat it as a flashing and seal problem as much as a glass issue. In this market, timely repair by a crew familiar with both low-slope details and curb flashings pays off in fewer follow-up losses.
Heavy spring rainfall and winter freeze-related movement make roof transitions and penetrations especially important inspection points in this city. Valleys, step-flashing at chimney steps, and where roof planes meet vertical walls are common failure zones. Look for pulled or cracked sealant, loose fasteners, and displaced shingles around these edges after storms. Even small gaps around vents or plumbing stacks can invite days of dampness if the wind shifts gradually expose the underlayment.
Treat each inspection as a storm-readiness review. Inspect flat and low-slope areas for blisters, blunted seams, and ponding signs. Check skylight flashing from both exterior and interior vantage points for hidden moisture tracks. After heavy rains, walk the attic to note any damp spots or unusual musty smells. Early detection keeps interior damage contained and prevents small leaks from becoming costly repairs.
Unchecked trouble spots can escalate quickly with Salisbury's humid, freeze-thaw, and storm exposure. A cautious approach-prioritizing flat-slope details, skylight flashings, and transition points-helps protect the roof structure and keeps water from chasing its way into ceilings and walls. Regular, targeted checks after storms are a practical safeguard for homeowners.
Find specialists in TPO, EPDM, and built-up flat roofing systems for residential and commercial properties.
G & Bros Roofing
(410) 677-4975 www.gandbrosroofing.com
109 Clark St, Salisbury, Maryland
4.9 from 106 reviews
All Day Roofing & Siding
(443) 669-5281 alldayroofingandsiding.com
26998 McLeyland Terrace, Salisbury, Maryland
5.0 from 45 reviews
EP Roofing
(443) 366-6079 eproofingdelmarva.com
405 Marvel Rd, Salisbury, Maryland
4.9 from 66 reviews
The Salisbury market is dominated by re-roofing contractors, so homeowners are usually hiring for replacement and repair rather than new construction. Storm-driven damage from humid summers and freeze-thaw cycles is common, and most roofs in older homes face the same wear patterns-shingle granule loss, wind uplift, and occasional cavity leaks that sneak in behind the flashing. When choosing, look for crews with a track record of efficient planning and clear communication, not flashy marketing alone.
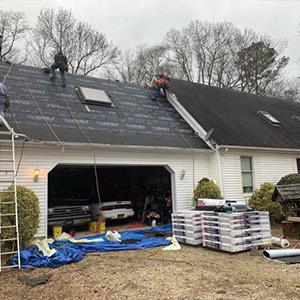
Cleanup included and quick response are two of the strongest market-character signals here, showing that homeowners value fast scheduling and jobsite control. Expect crews to arrive with a dedicated cleanup plan, including tarp usage if replacement work is weather-impacted, and a post-work haul-away that leaves the yard looking presentable within hours. Emergency callouts, prompt tarp-and-tap fixes after a storm, and reliable follow-up visits for minor repairs are all part of the expected service package.
Long-established and family-owned firms have a visible presence in this area, which matters in a market where storm follow-up and warranty service can extend beyond the initial install. Homeowners tend to prioritize contractors who offer clear warranty terms and documented follow-through. Local reputations help, so seek references for after-storm service, not just the initial installation, and verify who will handle warranty work years down the line.
In a storm-impacted season, verify that the contractor can provide temporary protection, a detailed teardown-and-replacement plan, and an explicit schedule with milestones. Ask how the crew handles debris containment, neighbor-access considerations, and on-site communication during weather delays. Ensure they outline who owns the tarp plan, how often crews will sweep the jobsite, and how rain events will affect the sequence of work to minimize further damage.