Last updated: Apr 19, 2026
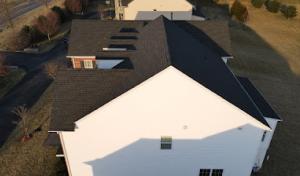
In this area, the DC metro insurance market drives how wind and hail damage is evaluated and paid for, with adjusters trained to spotlight storm-related roof issues. The typical Rockville neighborhood features mature tree canopies and established homes, so hail strikes or wind gusts can create hidden damage that isn't obvious from ground level. Shingle edges may lift, granules grind away, and hail impact can crack underlayment or flashings that only show up after a thaw. This combination means a timely, organized response is not optional-it directly affects how quickly a claim can be opened and how much of the repair burden falls on the insurer versus the homeowner.
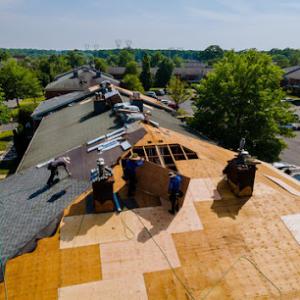
As soon as the weather clears, move to protect the interior and preserve the claim trail. Tarps are not a cosmetic afterthought; they're a practical shield against further water intrusion during the high-risk window that follows wind events and hail dust. If safe to do so, inspect from ground level for obvious signs of roof trouble-streaks on ceilings, new staining along walls, or damp attic insulation visible through attic access openings. Document everything with clear, timestamped photos from multiple angles, including close-ups of any lifted shingles, lifted flashing, or deformed vent boots. Do not rely on memory alone when the claim is filed; a precise record helps an adjuster see the extent of the storm's impact quickly.
When the claim packet is assembled, you'll need a concise narrative that ties observed problems to the wind and hail event. Focus on indicators that are typical in mature neighborhoods with heavy tree cover: torn or misplaced shingles near ridges or valleys, punctures on softer roofing materials, and potential damage where branches frequently brush the roof line during storms. Note any interior signs of leakage that align with roof locations (for example, water stains below a ceiling joist connected to a particular roof plane). This narrative should connect the physical evidence to the event date, wind speeds if known, and the path of water intrusion. The goal is to create a coherent story that helps a trained adjuster quickly attribute damage to the storm rather than to age or wear.
The local contractor signal mix prioritizes storm damage, emergency repair, and insurance-claims work. That means you'll encounter responders who are ready to tarp, stage temporary repairs, and document damage with professional photos and notes for the claim. The best path is to engage a contractor who is experienced with insurance-driven work and understands the adjuster's expectations. Get a rapid, written assessment that enumerates every observed defect and the suggested immediate fixes. Ensure the contractor's documentation includes roof plane diagrams, timestamps for each visit, and a clear set of before-and-after photos. The faster that initial documentation arrives to the insurer, the quicker the claim can move to a repair plan.
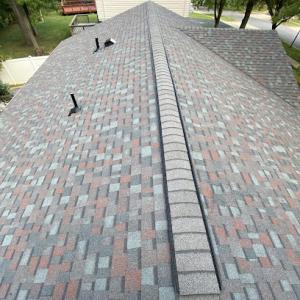
The canopy overhead increases the likelihood of branch impact and hidden leaks, especially after storms. Valleys can clog with leaves and debris, creating slow drip channels that only reveal themselves after several rainy days. Proactively request a thorough inspection of valleys, flashing around chimneys, skylights, and vent boots, as well as the transition between roof and wall. If moisture is found, address the source with temporary sealing and a targeted repair plan that prevents water from migrating into attic spaces or between roof decks and underlayment. Document these inspections in detail; insurers respond more favorably when the scope reflects a deliberate search for latent damage that isn't obvious at first glance.
Time is of the essence when a storm has compromised the roof and several neighbors are pursuing similar claims. Establish a single point of contact for the insurer and your contractor to prevent mixed messages or duplicated inspections. Schedule the first inspection as soon as possible after the storm window ends, and align the contractor's emergency tarping with the adjuster's on-site assessment. A focused, claim-specific approach reduces the risk of mechanical delays and helps ensure the repairs restore the roof's performance quickly while keeping interior damage manageable.
Spring brings a mix of warming days and lingering humidity, which slows tear-off and dry-in timing. In a neighborhood with mature trees and dense shading, spring rain interspersed with sunny moments can keep crews from sealing up profiles quickly, especially after late-season ice and snow melt retreat. For reroofs completed in this season, aim for a window that avoids consecutive rainy spells and targets dry, wind-sheltered days for staging and material storage. Consider scheduling around hail risk spikes in early spring, since utility storms can interrupt crews mid-tear-off. Communication with the crew about flexible timing helps prevent delays that push into peak humidity, when materials expand and adhesive cures behave less predictably. Ground access for debris haul-off can be trickier with spring storms, so plan a path with minimal obstruction from overhanging limbs and fallen leaves.
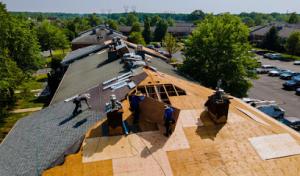
Fall is the most common reroofing window due to cooler temperatures and lower humidity, but it carries its own rhythm. Dry, moderate days are ideal for full tear-offs and new material lay-down, while short daylight hours mandate efficient staging and sequencing. In this season, expect some lingering leaf debris and need for more meticulous cleanup on gutters and valleys. Scheduling should prioritize days with a stable forecast to avoid abrupt cold snaps that stress sealants and underlayment, particularly on younger roofs or renewed underlayment sections. A well-timed fall replacement reduces the chance of late-fall storms interrupting an already tight timeline. Coordination with property owners about spring-like weather pockets in late autumn helps keep installation steady and predictable.
Summer heat and afternoon thunderstorms create staging and crew-safety delays. Asphalt shingles and some composite products can heat up quickly, affecting handling and curling potential if left exposed. Plan for early-morning starts to maximize cooler hours and shorter on-site exposure times. Ensure shaded staging zones and reflective tarps to minimize heat buildup on materials stacked near the eaves. Thunderstorm forecasts demand flexible scheduling, with contingency days reserved for rainouts. Consider sequencing that prioritizes critical roof areas first (valleys, penetrations) during the cooler morning hours, while leaving less weather-sensitive tasks for warmer afternoon periods if necessary.
Winter freezing temperatures and ice affect sealants and scheduling, which is especially relevant for homeowners trying to replace a roof after late-fall storm damage. Ice dams in nearby eaves can complicate tear-off and reveal potential hidden damage. When temperatures hover around freezing, interior underlayment and sealants may cure slowly or not at all, delaying a dry-in. If a late-fall or early-winter replacement is unavoidable, build in a frost-guard plan: heat tracing or temporary roofing blankets for critical joints, and a pause if nighttime temps dip below freezing. Snow load on the roof must be cleared safely before work begins, and access to the roof should be monitored to prevent ice-related slips. Scheduling should lean toward windows with consistently above-freezing days and minimal freeze-thaw cycles to keep the project on track and protect newly installed materials.
Get a clear picture of your project costs upfront - no commitment required.
Skycon Roofing & Restoration
(240) 708-0034 www.skycontractingdmv.com
932 Hungerford Dr #8B, Rockville, Maryland
5.0 from 81 reviews

American Choice Exteriors
(301) 687-2345 americanchoiceexteriors.com
11711 Parklawn Dr, Rockville, Maryland
4.9 from 79 reviews
DNB Construction
(301) 362-7663 www.dnbroofing.com
5710 Wicomico Ave, Rockville, Maryland
4.9 from 112 reviews

Pink Roofing
(301) 416-9581 www.pinkroofingusa.com
12911 Turkey Branch Pkwy, Rockville, Maryland
5.0 from 89 reviews
Pink Roofing is a veteran-owned roofing company serving Maryland, specializing in insurance claim roof replacements, storm damage repairs, and emergency roofing services. We work directly with homeowners and insurance carriers to ensure claims are properly documented and repairs are completed correctly. Our crews bring over 30 years of combined roofing experience, using fully documented and insured workers to deliver high-quality craftsmanship on every project. We respond quickly to storm damage, leaks, and urgent repairs to protect your home and prevent further damage. From minor roof repairs to full roof replacements, Pink Roofing is committed to fast response times, honest guidance, and reliable results across Maryland!
American Custom Contractors
(301) 962-2919 americancustomcontractors.com
15728 Crabbs Branch Way, Rockville, Maryland
4.9 from 607 reviews
American Custom Contractors is a trusted roofing and exterior remodeling company based in Maryland, proudly serving the DMV area since 1972. We specialize in residential roof installation, repair, and replacement, delivering reliable, long-lasting results. Our team also provides expert siding, window, door, and gutter services to enhance your home’s appearance and protection.

Skycon Roofing & Restoration
(240) 708-0034 www.skycontractingdmv.com
932 Hungerford Dr #8B, Rockville, Maryland
5.0 from 81 reviews
Roofing Contractors

American Choice Exteriors
(301) 687-2345 americanchoiceexteriors.com
11711 Parklawn Dr, Rockville, Maryland
4.9 from 79 reviews
American Choice Exteriors is a family-owned and operated roofing company and we are located in Montgomery County, MD.Our extensive knowledge of state-of-the-art roofing techniques and technologies paired with our personalized customer service has continued to make us a top choice in roofing replacement and repair for residential and commercial properties. Your peace of mind is important to us. American Choice Exteriors will make certain you’re well informed about the entire process and are 100% satisfied with your roofing package — and after over 30 years of our combined experience in the trade, we’re completely confident that you will be.
DNB Construction
(301) 362-7663 www.dnbroofing.com
5710 Wicomico Ave, Rockville, Maryland
4.9 from 112 reviews
DNB Construction is a family-owned certified roofing company with experience in all roof types. We are based in Rockville, MD and serving MD, DC & VA areas. DNB Construction was formed with a focus to bring quality to every job we work on. Our roofing experts are highly skilled and have all undergone rigorous training. From the smallest roof repairs to the largest custom home builds, our experts will bring attention and care to your project. We are master installers of asphalt shingles, natural/synthetic slate, cedar shake and shingle, custom metal roofing, and TPO. You can count on us for fast reliable service when you need it most. We offer affordable solutions for everyone. We provide free estimates. Don't wait, call us today!

Presidential Exteriors
(301) 664-2403 presidentialexteriors.com
2301 Research Blvd Suite 300, Rockville, Maryland
4.7 from 1431 reviews
Presidential Exteriors is the top rated exterior home remodeling company in Rockville, Maryland and your one-stop solution for any remodeling needs. Nothing quite sets the tone for your home like professional renovation. Our award-winning exterior home remodeling company has taken countless outdated and dull home exteriors and transformed them into stunning works of architecture. Presidential Exteriors is expert in all fields of exterior replacement as your premier roofing contractor, siding contractor, window contractor, and more. Licensed in both VA and MD, Presidential Exteriors is a homeowner’s one stop solution for any exterior remodeling needs. Our award winning products ensure the very best for you and your home.

Four Seasons Home Improvement
(301) 948-2678 www.4seasonshome.com
15730 Crabbs Branch Way, Rockville, Maryland
4.9 from 51 reviews
Looking for a trusted partner for your next home improvement project? Four Seasons Home Improvement is a family-owned residential contractor serving Maryland, Virginia, and Washington, D.C. since 1976. They specialize in exterior renovations and replacements: roofing, attic insulation, siding, gutters, windows and doors. Need a new deck, patio or porch? Their skilled carpentry team delivers quality results. As manufacturer-certified installers for CertainTeed®, GAF®, ProVia®, and Trex®, Four Seasons ensures every project is completed with premium materials and backed by industry-leading product and labor warranties. Call (301) 948-2678 to schedule your estimate today. Licenses: MD MHIC #129630 | VA Class A #2705082387A | D.C. #420224000125

Home Tech Exterior
(301) 637-9019 hometechrestoration.com
15825-B Crabbs Branch Way, Rockville, Maryland
4.7 from 218 reviews
Serving Maryland, Northern Virginia, Pennsylvania, and Delaware, Home Tech Exterior has over 20 years of experience in roofing, siding, windows, doors, and home improvement. As a GAF Master Elite Commercial Roofing Contractor with multiple certifications, we offer financing options and 24/7 emergency roof services. We specialize in helping homeowners add value to their homes with high-rated roofs backed by extended warranties. Backed by top manufacturers and community trust, we guarantee quality workmanship and customer satisfaction. When you choose us, you’re choosing peace of mind, expert service, and results you’ll love.
The Flat Roof Specialists
(301) 686-4376 sites.google.com
5712 Wicomico Ave, Rockville, Maryland
5.0 from 24 reviews
THE FLAT ROOF SPECIALISTS is a trusted roofing company serving Rockville, MD and nearby areas, dedicated to delivering reliable and long-lasting roofing solutions. We specialize in a wide range of roofing services, including roof repair, roof replacement, new roof installation, flat roof repair, and maintenance for both residential and commercial properties. Our team is committed to quality craftsmanship, using durable materials and proven techniques to ensure every roof we work on stands the test of time. At THE FLAT ROOF SPECIALISTS, we put customer satisfaction first, offering honest advice, transparent service, and professional results that protect your home or business year-round.
Nna Crews
12276 Wilkins Ave, Rockville, Maryland
5.0 from 23 reviews
NNA CREWS is a Maryland roofing contractor serving residential and commercial clients. We specialize in providing professional installation for a variety of exterior elements, including roofs, siding, gutters, windows, and doors.
Westend Exteriors
(443) 854-1774 westendroofing.org
10129 Vanderbilt Cir, Rockville, Maryland
5.0 from 17 reviews
Established in 2018, Westend Exteriors is a reputable roofing, siding, and gutter specialist serving Virginia, Maryland, and Washington, D.C. Their team of experts assists residential and commercial clients with roof repair or replacement, siding installation, gutter services, and storm restoration, and also guides clients through the insurance claims process for a hassle-free restoration. Westend Exteriors is well-known for providing exceptional customer service, competitive pricing, and free estimates for homeowners looking to invest in a new roof.
Roof Masters
(301) 230-7663 www.roofmasters.com
9710 Traville Gateway Dr, Rockville, Maryland
4.5 from 157 reviews
Since our founding in 1994, Roof Masters has provided thousands of homeowners in Maryland, northern Virginia and the greater Washington, DC, area with the security and peace of mind that comes with knowing their homes and families are protected from the elements by a rugged, dependable and long-lasting roofing system. We’ve succeeded by providing top-quality materials and workmanship, all delivered with a level of customer service that is unmatched. From your first phone call to the final inspection of your new roof, we’ll communicate with you openly, honestly and frequently. We’ll never leave you wondering what happens next!
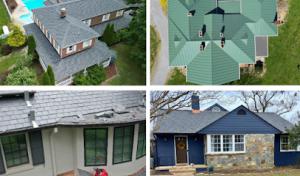
In this climate, asphalt shingles are the dominant practical choice, but repeated freeze-thaw cycling and summer humidity can shorten service life if ventilation and flashing details are weak. For a typical Rockville home, a well-ventilated attic and properly sealed penetrations are essential to minimize ice dam risk and wind-driven moisture intrusion. When you inspect or plan a replacement, prioritize shingle brands with a proven track record for local temperature swings and ensure the underlayment and drip edge are compatible with the existing roof geometry. A responsible approach blends conventional materials with attention to detail in ventilation versus coverage, so that breathable air can escape during humid summers while staying watertight through winter thaws.
Metal roofing is relevant locally for homeowners seeking longer-term performance against temperature swings and storm exposure, but upfront cost is materially higher in this market. If you lean toward metal, focus on panels with robust fastening systems and a thoughtfully designed valley and seam strategy to handle debris from mature trees along many streets. In neighborhoods with older structures, a reinforced attic venting plan becomes even more critical, because metal's thermal expansion can stress flashing if attic conditions aren't balanced. A practical path is to pair metal with a standing-seam approach that minimizes vulnerable edge details and aligns with existing roof lines and neighborhood aesthetics, so your roof can resist wind-driven hail and rapid temperature changes without excessive maintenance.
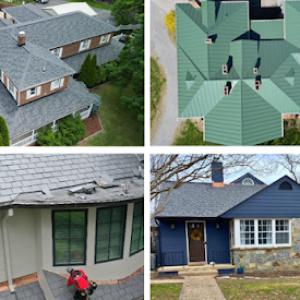
Clay tile, concrete tile, wood shakes, and synthetic shingles appear in the Rockville market but require careful matching to structural capacity, neighborhood architecture, and maintenance expectations on tree-lined lots. Clay and concrete tiles offer excellent longevity and impact resistance, yet they demand a strong structural support system and precise flashing at walls and chimneys. Wood shakes bring a characterful look but can be more sensitive to moisture and rot without a proactive maintenance plan, including regular clearing of shade-dense areas where moss may thrive. Synthetic shingles can mimic many looks while delivering easier installation and weight profiles, but installation quality remains a decisive factor for long-term performance, especially in freeze-thaw cycles. Across all these options, consider how adjacent trees shed leaves and debris that can sit on the roof during wet springs, underscoring the need for targeted gutter and valley maintenance as part of any material choice.
In all cases, the local environment underscores the importance of detailed flashing, precise ventilation, and a roof geometry that supports thorough drainage. Given the mix of mature tree cover and variable winter conditions, adopting a clear plan for inspecting seams, fasteners, and roof penetrations after major wind or hail events will help you document and respond effectively, especially if an insurance review follows a storm. The right material choice here balances a practical budget with an accurate assessment of load-bearing needs, maintenance expectations, and the neighborhood's architectural rhythm.
In this city, a full reroof typically requires a permit issued by the City of Rockville building department. While it may seem convenient to skip paperwork, the permit creates a formal record of the work and helps ensure the roof is installed to current code standards, which matters for safety and future resale. The permitting process holds both you and the contractor accountable for proper underlayment, venting, and flashing details, which are especially important given mature tree cover and freeze-thaw cycles that stress roofs over time. Failing to obtain a permit can trigger penalties, complicate insurance claims after wind or hail events, and slow down any future projects around deadlines or claims windows.
Inspections are scheduled during and after the project to verify installation and code compliance rather than relying only on contractor self-certification. Expect a rough-in inspection once decking and underlayment are in place, followed by a final inspection once the new roof is completed. In this climate, inspectors pay attention to correct ice and water shield placement, proper nail patterns, and adequate attic ventilation. The process is not just bureaucratic formality: it provides third-party verification that the roof can withstand seasonal freeze-thaw stress and local wind loads. If the project encounters unanticipated issues, inspections can reveal gaps that would otherwise become leaks or ice dam problems later.
Projects involving structural changes or additions such as skylights may trigger plan review rather than a simple like-for-like reroof approval. Plan review looks at framing alterations, skylight integration, or changes to ridge and hip configurations, ensuring the roof structure remains sound under Montgomery County and DC-metro code requirements. Even seemingly minor alterations can cascade into required documentation, engineered calculations, or revised wind uplift considerations. Expect longer timelines and clearer communication with the building department if a plan review is triggered; preparing accurate drawings and species details for any new penetrations can help keep things moving.
Start early by confirming permit and inspection requirements before ordering materials. Have your contractor provide a clear scope of work that notes any structural changes or added penetrations. Keep copies of all permits, inspections, and correspondence in a central folder-these documents are invaluable for warranty, insurance, and potential future inspections after storms. In peak wind or hail seasons, coordination with the department can prevent delays and reduce the chance of noncompliance surprises that might stall a project.
Find contractors experienced in skylight installation, flashing, and leak repairs to bring natural light into your home.
American Custom Contractors
(301) 962-2919 americancustomcontractors.com
15728 Crabbs Branch Way, Rockville, Maryland
4.9 from 607 reviews
Halo Construction & Restoration
15269 Display Ct, Rockville, Maryland
4.9 from 187 reviews
Roof Masters
(301) 230-7663 www.roofmasters.com
9710 Traville Gateway Dr, Rockville, Maryland
4.5 from 157 reviews
Typical Rockville pricing runs about 350 to 650 USD per square for asphalt shingles, 700 to 1100 for metal, 1200 to 2300 for clay tile, 800 to 1500 for concrete tile, 550 to 900 for wood shingles or shakes, and 600 to 1000 for synthetic or composite shingles. Those numbers reflect the DC-metro labor market, plus the way permits and inspections ripple through the project timeline. If you're comparing bids, watch for whether the quote includes tear-off of the old roof, disposal, and a full attic ventilation check, since those line items can swing costs by several hundred dollars per square.
Metal roofs tend to hold steady in price, but they can spike during regional wind events when demand drives crews to full-tilt capacity. Clay and concrete tiles deliver long life, yet they cost more upfront and add weight; some homes require structural checks that can add to the project. Asphalt remains the baseline for most neighborhoods, especially on older stock with standard attic layouts. Synthetic or composite shingles offer a middle ground on price and performance, often appealing where a lower weight and faster install help during tight schedules after a storm.
Costs in Rockville are influenced by DC-metro labor pricing, permit and inspection requirements, and demand spikes after regional wind and hail events. Tree-heavy lots mean more debris management, more edge protection, and careful roof access, which can push labor time higher than a straightforward open-lot reroof. The mix of older homes and more complex suburban rooflines also translates to additional nailing zones, ventilation considerations, and sometimes custom flashing details. Expect the crew to spend extra minutes navigating branches, skylights, or multiple penetrations, all of which can lift price per square.
After a wind or hail event, gather before-and-after photos, note any leaks, and document debris accumulation on the roof and gutters. Insurance claims benefit from a clear log of dates, weather conditions, and observed damage, especially where tree impact or granule loss is visible. When sourcing bids, ask for a line-item breakdown: tear-off, disposal, underlayment replacement, and any necessary flashing or roof vent work. If you're planning a transition to a heavier tile or metal, factor in possible structural reinforcement and a longer lead time for specialty crews.
Don't let upfront costs delay a critical repair - these contractors offer payment plans to fit your budget.

Presidential Exteriors
(301) 664-2403 presidentialexteriors.com
2301 Research Blvd Suite 300, Rockville, Maryland
4.7 from 1431 reviews

Four Seasons Home Improvement
(301) 948-2678 www.4seasonshome.com
15730 Crabbs Branch Way, Rockville, Maryland
4.9 from 51 reviews

Home Tech Exterior
(301) 637-9019 hometechrestoration.com
15825-B Crabbs Branch Way, Rockville, Maryland
4.7 from 218 reviews
In the Rockville/DC-metro market, insurers commonly ask for documentation of roof age and condition before or during claims handling. Carriers tighten underwriting on older roofs, so the clarity of your paper trail matters more than ever. If a claim is triggered by wind or hail, expect an adjuster to scrutinize not just the damage but the roof's baseline health, age, and recent maintenance history. Being able to show a coherent picture helps keep the process from stalling or dipping into disputes you don't need.
Because adjuster inspections are common after wind or hail losses, homeowners benefit from preserving dated photos, contractor inspection notes, and permit records. Start with a current set of high-resolution photos that capture shingles, flashing, valleys, vents, and any prior repairs. Add notes from a trusted local roofer that describe the roof's age, notable wear patterns, and visible weak points. If possible, keep copies of permits or prior warranty letters and any correspondence with the insurer about the roof's condition. This material becomes a concrete reference when the claim moves through the adjuster's desk.
With older roofs, carriers often require evidence that installation or repairs meet current standards and that the roof was properly maintained before the loss. Photos dated before the incident help establish a baseline, while post-loss images document new damage. Clear, consistent documentation can influence whether the claim covers repair, partial replacement, or full reroofing. A well-organized file reduces back-and-forth and helps avoid delays caused by questions about the roof's history.
Start a simple roofing file and keep it in a place you can access quickly after a storm. Have a local reputable contractor perform a pre-storm safety check so you have an independent assessment on hand if needed. Record any previous repairs with dates and the contractor's notes. If a hailstorm strikes, respond promptly with photos and a written summary of the roof's condition leading up to the event. This proactive record can be the difference between a smooth claim and a drawn-out process.
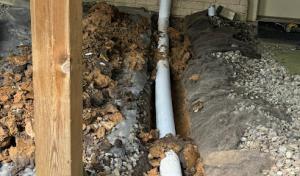
Rockville's mature tree canopy means leaf buildup, branch abrasion, and debris near valleys, gutters, and roof-to-wall transitions are a recurring challenge. During maintenance and reroofing, inspect valley metal and flashing where branches rub or leaves clog drainage paths. In fall, clear gutters and downspouts promptly to prevent ice dam formation along eaves and low-lying valleys. When trimming, direct branches away from roof edges and skylight surroundings to reduce impact damage and future wear on sealants. If shingles near tree lines curl or lose granules faster, it's often a minor misalignment at flashing or improper extension of gutter offsets. Schedule a careful reflash during reroofing if signs of wear show up at the intersection of roof-to-wall joints. Document observed tree contact and debris history for your insurer to avoid disputes after a storm event.
Skylights are a meaningful specialty in this market, and leak complaints often center on flashing integration during reroofing rather than the Skylight unit alone. When planning a roof replacement, ensure flashing transitions are tested around the curb, flashing bends, and fastener patterns. A dedicated sealant strip at the curb should be compatible with the chosen roofing material, and any adjacent seam tape should be inspected for UV wear after the first winter. If shingles extend over the skylight, verify that the rake and soffit details maintain proper drainage to avoid water pooling on the flashing apron. During inspection after a storm, check for gaps where the curb meets the roof plane and for loose or missing fasteners, especially if previous contractors used improper clearance or backer rod.
Low-slope sections on additions, porches, and transitions deserve separate detailing because they weather differently from the main steep-slope roof in mixed suburban stock. Look for inadequate pitch, inadequate flashing at a wall intersection, or misaligned edge metal where water can pool and seep. Ensure counter-flashing at coping stones or parapets is intact and that weep openings remain clear. When reroofing, specify independent detailing for these areas to avoid a single-point failure at transitions. In winter, pay attention to ice buildup at transitions where low-slope surfaces meet steeper planes, and seal any momentary gaps promptly to protect the underlying deck.
Find specialists in TPO, EPDM, and built-up flat roofing systems for residential and commercial properties.
Halo Construction & Restoration
15269 Display Ct, Rockville, Maryland
4.9 from 187 reviews
DNB Construction
(301) 362-7663 www.dnbroofing.com
5710 Wicomico Ave, Rockville, Maryland
4.9 from 112 reviews
The Flat Roof Specialists
(301) 686-4376 sites.google.com
5712 Wicomico Ave, Rockville, Maryland
5.0 from 24 reviews
After a significant wind or hail event, the local market signals that reroofing with cleanup included and rapid response is the priority for homeowners. In neighborhoods shaded by mature trees and perched on older suburban stock, the ability to mobilize crews quickly, protect landscaping, and minimize interior disruption matters as much as; if not more than, the sticker price. Homeowners assess how a contractor plans to stage a cleanup, cover debris, and coordinate with insurance timelines so that a reroof progresses without prolonged exposure to winter cycle freeze-thaw.
Rockville has a visible presence of long-established, family-owned and locally operated firms. Homeowners favor these companies because they are easier to reach after a job is finished, can return for service visits, and know the local handling of after-storm cleanup. The ability to navigate city-specific workflows, coordinate with nearby trades, and follow up on any lingering concerns is a practical comfort when storms have rattled a roof that's lived through multiple Maryland winters.
The market emphasizes manufacturer-certified installations and robust warranties, because insurers and homeowners alike value documentation on older roofs. When a past roof age meets a new storm event, understood warranty terms and documented product lines help support claims and future maintenance plans. Contractors who can present clearly itemized warranty transfer language and install certifications tend to stand out in Rockville's climate and insurance environment.
You want a contractor who can provide a realistic timeline, demonstration of weather-resistant detailing, and a clear plan for temporary protection if immediate tarping is needed. Ask for project resumes, crew lead qualifications, and references from other local homeowners with similar roof lines and trees. Confirm responsiveness for post-storm checks and any follow-up visits.
Gather contemporaneous photos of the damage, dates of the event, and a written assessment from the contractor detailing scope and materials. Retain all correspondence with the insurer, the adjuster, and the contractor, plus any warranty cards, product data sheets, and proof of lien waivers when applicable. This organized packet supports smoother claims and clearer post-install service.