Last updated: Apr 19, 2026
When a storm rolls through central Minnesota, Saint Cloud often sees sharp surges in roof claims as hail and high winds test every ridge, hip, and dormer. The impact isn't limited to visible dents; hail can bruise shingles beneath the surface, loosening granules and softening edges that will fail earlier in the next freeze cycle. Wind can peel shingles away from the lips of valleys, flashings, and joints, creating micro-leaks that only become obvious after pressure builds in the attic. The local pattern is predictable: a brisk hail event or gusty wind cycle followed by quiet days, then a bigger problem appears after a spring thaw when leaks show up inside ceilings and walls. In practical terms, that means you should treat a hail or wind warning as a trigger to check the roof as soon as safe access is possible, not weeks later.
Saint Cloud's cold winters push shingles, flashing, and deck fasteners through repeated freeze-thaw cycles. Water that penetrates a small crack or loose seam can freeze, expand, and widen the breach. Over several winters, that accelerated movement undermines decking, loosens nails, and drives hidden moisture deeper into attic cavities. Shingle wear-especially on lighter-weight asphalt or aging synthetic products-progresses faster when granules shed and edges curl. Flashing around chimneys, vents, and skylights is particularly vulnerable to movement from wind-driven snow and ice buildup. The outcome is a higher likelihood of interior leaks during spring melt, when the roof surface looks for the first time to be the gatekeeper of your home's dryness and energy efficiency.
Snowpack and winter precipitation can mask deterioration until the thaw reveals the consequences. A heavy spring melt can push moisture into decking and insulation before tiny imperfections become obvious. Ceiling stains, attic musty smells, or damp insulation often appears only after days of warmer sun soften the snow and expose where leaks have been silently forming. That delay makes timely post-winter inspections critical. If a winter storm left snow lingering on the roof, the thaw is your first real test-look for softened decking edges, dark stains along eaves, or new daylight flashing gaps visible from attic access.
After any hail or wind event, perform a focused roof check from ground level, looking for lifted shingles, exposed fasteners, or granule loss in gutters and downspouts. If climbing safely, inspect flashing around chimneys and vent pipes for movement or gaps; even a small gap can become a big leak with spring rain. In the attic, note any unusual warmth, moisture, or staining on decking and insulation. Document visible problems with photos and timestamps, and prioritize a professional inspection before the spring thaw intensifies the exposure. If damage is suspected, arrange a temporary weather barrier and limit attic heat stratification by ensuring proper ventilation-blocked or inadequate vents accelerate freeze-thaw damage and moisture buildup. In Saint Cloud, addressing these issues promptly matters more than in milder climates: the combination of central Minnesota hail, wind, and winter's relentless freeze-thaw cycle makes proactive inspection and timely repair not just prudent, but essential for durability.
Bold North Roofing & Contracting - St Cloud
(320) 429-7718 boldnorthroofing.com
Serving
5.0 from 14 reviews
Fortune Favors the Bold. Let us help protect your home so that you can go boldly into any storm or night. Whether you are looking to upgrade or working through an insurance claim, you trust our local Minnesota team of professionals to provide high quality work that we stand by with a lifetime guarantee on our work and materials.

Rival Roofing
Serving
4.9 from 142 reviews
Rival Roofing is a trusted roofing contractor serving St. Cloud, Sartell, Sauk Rapids, and nearby areas. We specialize in roof replacements, roof repairs, storm damage restoration, and gutter installation for homes and businesses. As a local Minnesota company, we understand the challenges of harsh winters and storms. We offer free roof inspections, emergency roofing services, and insurance assistance. Every project is backed by top warranties and expert craftsmanship. When only the best will do, choose Rival Roofing — your #1 roofing contractor in Central Minnesota. Call today for a free estimate!
Studer-Built
Saint Cloud, Minnesota
5.0 from 1 review
Does your kitchen look like it's stuck in a previous decade? Could your living room use a little TLC? You don't have to settle for a home you don't love. Instead, turn to the pros at Studer-Built for help. We provide comprehensive home remodeling services in and around St Cloud, MN.
Higher Dimensions Roofing
(320) 204-6997 www.saintcloudroofing.com
Serving
5.0 from 226 reviews
Higher Dimensions Roofing is a Veteran Owned St Cloud MN Local Roofing and General Contractor. The team at Higher Dimensions Roofing is dedicated to educating and informing home owners on their best course of action. Whether it is a free check up on your roof, patch or repair, full replacement, or insurance claim guidance; Higher Dimensions Roofing can help you find the best solution.
Zack Novak Construction
(320) 250-6109 www.zacknovakconstructionmn.com
Serving
5.0 from 21 reviews
Whether you need to update your roof, siding or replace your window, you'll want to call Zack Novak Construction. Our local construction company serves residential and commercial clients throughout the Foley and Central MN areas. We'll build a personal relationship with you to make sure that you get exactly what you want out of your project. With over 25 years of experience, we'll always do the job right. We now offer financing.
Archcraft Exteriors
(320) 426-7373 www.goarchcraft.com
Serving
5.0 from 7 reviews
Roofing, Siding, windows and Storm Damage restoration in the St. Cloud, MN metro area.
LW Haugen Roofing
Serving
4.9 from 10 reviews
Your trusted, Residential and Commercial exterior remodeling company. We are a roofing company who is affordable and looking to build relationships with our clients. We emphasize on quality and integrity over volume. No one competes with our rates! Call today for a free consultation and free estimate. Protecting your home and business from the elements We would love to handle your next project. .
Legacy Restoration
(320) 200-5633 www.legacyrestorationllc.com
Serving
4.6 from 47 reviews
A home remodel can be fun and exciting – but also stressful when you work with contractors who are hard to get in touch with and cut corners. No matter the project, our dedicated team will guide you from start to finish with expert craftsmanship, quality materials, and a 5-star customer service experience.
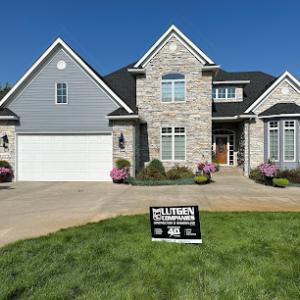
Lutgen Companies
Serving
4.9 from 328 reviews
Lutgen Companies has proudly called Central Minnesota home since our founding in 1983. We've been dedicated to building a better community by offering our customers the industry's best home improvement products, paired with outstanding craftsmanship and service. We can transform the exterior of your home with a range of high-performance products, including Roofing, Windows, Siding, Seamless Gutters and Decking. No matter the goal for your project, we are the home improvement company you can trust to deliver a successful outcome. Experience for yourself why we have a 97% referral rate by contacting Lutgen Companies for your home renovation today.
BD Exteriors
(320) 229-2855 bdexteriors.com
Serving
4.9 from 224 reviews
BD Exteriors was founded in Sartell, MN in 2001 by Brian Donnay. We are your locally-owned and -operated roofing, siding, gutters, and windows company serving St. Cloud Minnesota area and all of Central Minnesota, from Little Falls to Monticello, Foley to Freeport. We have properties in our portfolio ranging from single-family residential remodels to new and remodeled large commercial structures like churches and apartment complexes. Our team works with you to find the brands and products that best fit your needs. Every job we do has our name on it, so quality, craftsmanship and customer service is of the utmost importance to us. Just check out our reviews, or head over to our A+ rated Better Business Bureau page!
Cam Olson Construction
Serving
5.0 from 28 reviews
camolsonconstruction@gmail.com Hello, my name is Cameron Olson. I am a licensed, bonded and insured, roofing contractor in central Minnesota.

Ice Dams Removed
(320) 423-5313 icedamsremoved.com
Serving
5.0 from 45 reviews
With over a decade of experience, Minnesota's Ice Dams Removed provides professional snow and ice dam removal services for residential and commercial properties. Based in St. Cloud, Minnesota, our experts specialize in safely eliminating ice dams and preventing water damage. We utilize state-of-the-art, low-pressure steam equipment to effectively clear roofs without causing harm. Whether your property is local or nationwide, our skilled team is dedicated to protecting your home or business from the detrimental effects of ice and snow buildup. No job is to big or to small. We provide the best ice dam removal service for the winters worst ice dams.
The typical replacement window in Saint Cloud runs from late spring through early fall because winter conditions and snowpack disrupt installation. Homeowners should plan for a work calendar that avoids the heavy snows and extreme cold, which delay tear-off, moisture control, and sealing details. If a roof needs replacement, targeting late May through early September tends to align with the most predictable drying conditions and daylight hours. This window also aligns with the bulk of warmer days when crews can consistently work without weather-related interruptions that linger into late fall.
Spring in central Minnesota brings a thaw-and-rain pattern that can interrupt tear-off schedules and complicate moisture control during replacement. After a long winter, lingering ice dams, thawing snow, and unpredictable showers mean crews may need to pause mid-project to protect decking and underlayment. Plan for a flexible timeline that includes potential weather holds and buffer days for rainouts. Moisture management becomes critical during this period: use proper temporary protection, ensure roof venting functions are checked early, and coordinate material deliveries to minimize exposure of wet decking.
Fall wind and early precipitation in central Minnesota can compress the last reliable installation window before freeze-up. The second half of September and October often becomes the final stretch when temperatures are still comfortable but daylight starts to fade. If a project overruns into late October, the risk of cold-sensitive installations rises. Scheduling your crew with a predefined contingency for rapid wrap-up is prudent. The goal is to complete critical steps-like securing flashing, sealing transitions, and verifying ventilation-before the onset of consistently freezing conditions.
In practice, successful Saint Cloud projects set a hard target for commencement after the thaw has fully cleared and before the first hard frosts. Early-season scheduling should anticipate possible late-spring rain events and the need for moisture control measures during tear-off. Mid-season planning benefits from stable warm days and lower humidity, which help with shingle adhesion and ventilation checks. Late-season planning should prioritize avoiding the last week of October if forecasts show any likelihood of sustained cold or snowfall. A practical approach is to map your preferred start date to a two- to three-week weather outlook, with built-in buffers for rain gaps and cool snaps. This strategy minimizes interruptions and keeps the project moving toward a solid, well-ventilated, and properly sealed roof.
Before scheduling, confirm that the proposed start aligns with the window best suited to Saint Cloud's climate: late spring through early fall, with awareness of spring thaw and autumn precipitation. Have a contingency plan for potential weather holds and ensure the contractor can adapt the sequence to protect decking and moisture barriers. Ask about strategies for rapid flashing and ventilation verification once work begins, so the project stays on track during those finite installation days. A well-timed plan reduces exposure to harsh conditions and supports a durable, long-lasting roof.
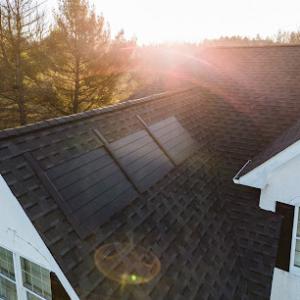
As you choose roofing materials in this central Minnesota climate, the terrain of Saint Cloud's weather patterns-frequent hail, strong winds, and long, freezing winters-shapes what performs best. Asphalt shingles remain a dominant choice, but the harsh exposure means impact resistance and cold-weather performance should be primary factors in any upgrade or replacement. When evaluating shingles, look for high wind resistance ratings and an asphalt formulation suited to rapid temperature swings. You'll also want to verify the underlayment and fasteners can handle freeze-thaw cycles without compromising the deck or ventilation system.
In this market, asphalt shingles are a practical blend of cost, ease of installation, and repair familiarity. For Saint Cloud homes, the selection emphasizes higher impact resistance and better performance in subfreezing conditions. Consider shingles with a thicker core, a more robust mat, and a favorable nail placement pattern to resist wind uplift after hail damage. The climate's freeze-thaw cycles can expose nail heads and seam intersections; choosing a premium underlayment and a well-sealed ridge line helps minimize moisture intrusion during thaws. A local contractor will also confirm that the existing roof deck is sound and free of soft spots, since snow load and repeated hail impacts can reveal hidden rot.
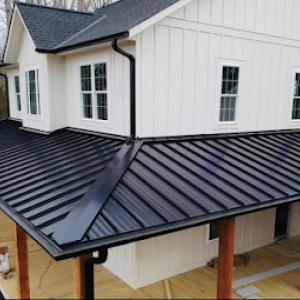
Metal roofing stands out as a serious upgrade option for snow shedding and durability, especially in a hail-prone climate. Metal panels shed snow more predictably, reducing ice dam risk and the weight of snow accumulations on the eaves. In hail events, metal's resilience helps prevent cosmetic and structural damage that can jeopardize ventilation and flashing details. When selecting metal, pay attention to coating quality and panel profiles that resist denting while maintaining a tight seal across the roof surface. Proper installation matters just as much as material quality; a stiffer substructure and precise fastening pattern help maintain performance through seasonal temperature swings. Adequate attic ventilation remains important under metal to control condensation and protect decking in winter.
Clay tile and concrete tile appear in the local market, offering long-term durability and distinctive curb appeal, but Saint Cloud's freeze-thaw conditions demand careful attention to underlayment, fastening, and structural suitability. Tile systems require a solid roof deck, careful spacing, and robust fasteners to withstand wind uplift and freeze-thaw expansion. Wood shakes and synthetic/composite products add texture and variety, yet each comes with its own caveats in this climate. Wood shakes can be susceptible to moisture-related warping and hail surface damage if not properly sealed and maintained, while synthetic products may offer good impact resistance but require compatible underlayment and proper flashing to endure cold snaps. Regardless of choice, the installation sequence must address attic ventilation, vented soffits, and properly oriented flashing to handle snow melt and ice formation at eaves and penetrations.
With the local climate in mind, prioritize systems that maintain a consistent seal against moisture and a solid deck structure. Assess existing ventilation pathways during replacement, ensuring soffit intake, ridge exhaust, and attic baffles are sufficient for the insulation level in use. Inspect flashing around chimneys, skylights, and vent pipes for hail-related damage, and plan re-flashing when needed to prevent ice damming. For any non-asphalt option, verify structural compatibility with the roof framing and ensure the fastener pattern is appropriate for freeze-thaw cycles and high wind conditions. Choosing materials that balance hail resistance, winter performance, and ease of maintenance will widely reduce long-term risk on this climate's roofs.
Prices in this market push higher quickly after summer hail storms when inspections, repairs, and full replacements are in higher demand. That spike isn't just a seasonal blip; it can affect both scheduling and material availability, so you'll often see longer lead times and tighter windows for installation crews. Shorter reliable installation seasons in Saint Cloud can tighten contractor scheduling and labor availability compared with milder markets, which means you may face fewer choices and slightly higher labor fees during peak windows. Winter conditions also matter: if a storm has compromised decking, ventilation paths, or flashing, inspectors will expect those issues corrected during replacement, shaping both scope and cost.
The recommended roof system should balance long Minnesota winters, hail exposure, and wind loads. Asphalt shingles remain the baseline for many homes, with typical costs in the range of 350 to 700 USD per square, depending on shingle quality and labor. Metal roofing commands higher upfront costs but can offer improved hail resistance and wind performance, generally in the 900 to 1500 USD per square range. For homes where the aesthetic or climate demands it, clay or concrete tile options expand the cost bands to roughly 1000 to 1800 USD per square for clay and 1000 to 1900 USD per square for concrete. Wood shingles or shakes sit around 650 to 1100 USD per square, while synthetic or composite shingles span roughly 600 to 1200 USD per square. In Saint Cloud, the total project price will reflect the material choice, roof complexity, and the extent of any decking or ventilation repairs required.
Expect an assessment that scrutinizes decking integrity, ventilation paths, and flashing condition, especially after harsh winter seasons. If moisture or rot is found, costs will rise to replace damaged decking and upgrade flashing details to meet the harsher winter and wind loads. Scheduling should anticipate potential delays caused by late-fall or early-winter weather, so you'll want a plan that aligns with the contractor's available crews and material deliveries. Budget a contingency for expedited inspections or additional corrections if hail damage reveals hidden issues during teardown.
Get a clear picture of your project costs upfront - no commitment required.

Assurance Construction Solutions
(651) 302-1637 www.assuranceconstructionsolutions.com
Serving
5.0 from 22 reviews
In Saint Cloud, a full roof replacement typically requires a building permit before work begins. The requirement helps ensure that the project meets local codes and safety standards, and that your neighbors aren't surprised by a mid-project street of tarps and crews. Before any shingle rip or decking work starts, you'll want to have the permit filed and approved. If the contractor promises a fast track, consider verifying their familiarity with the City's process so you aren't left waiting for plans to be reviewed after materials arrive.
The City of Saint Cloud Building Department reviews plans and schedules inspections during installation and again after completion. That means your project will be scrutinized in stages, not just at the end. It's common for the clerk to request details about attic ventilation, decking condition, and flashing material, especially when hail and freeze-thaw cycles are in play. Plan for a brief window where a reviewer may pause work to confirm that new decking or ventilation meets code. Having accurate, up-to-date drawings and notes from your contractor reduces the chance of rework and delays.
Saint Cloud inspections generally focus on decking condition, ventilation, flashing, and final verification, with processing times varying by department workload. Decking integrity matters because hail impact and ice buildup can reveal hidden rot or gaps. Proper attic ventilation helps manage condensation in long winter seasons and prevents moisture-related issues that compromise decking and underlayment. Flashing around chimneys, vents, and transitions needs to be continuous and corrosion-resistant to withstand wind-driven rain and freezing temperatures. Expect inspectors to check these details closely before granting approval to proceed or to close the project after installation.
Work should align with the permit's approved plan and schedule. Inspections are typically requested at key milestones: after roof decking is installed and before underlayment, during flashing and exterior envelope work, and again after all materials are in place but before final occupancy or utilization. If weather or supply delays push you off the planned sequence, coordinate with the Building Department and your contractor to avoid staging conflicts or missed inspection windows.
The final verification confirms that the entire roof system-ventilation, decking, flashing, and surface-meets Saint Cloud standards. A successful final inspection means the permit closed out and the project is officially signed off. If discrepancies arise, address them promptly with your contractor and schedule a reinspection to prevent lingering questions or future warranty disputes.
Saint Cloud homeowners are in a periodic roof-claim environment because central Minnesota hail and wind events regularly generate damage documentation needs. The weather pattern brings sudden denting from hail and gusty wind loads that stress shingles, flashing, and decking. In practice, that means many roofs endure more than one event over the life of the system, and documentation becomes a routine part of home upkeep rather than an exception.
Insurers serving Saint Cloud commonly expect photo records and may require an independent adjuster assessment before approving roof-related claims. Take routine photos after a storm, focusing on symmetry of wear, missing granules, and any lifted edges. If a claim proceeds, expect a careful review not only of visible damage but of the roof's overall condition, including vents, flashing, and underlayment. An adjuster who understands Minnesota winters will look for issues that could worsen with freeze-thaw cycles, so clear, well-lit images from multiple angles help.
Roof age and recent maintenance history can affect how claims are evaluated in the Saint Cloud market. A roof nearing the end of its expected life may receive less support for significant repairs, while a well-maintained roof could earn partial approvals for targeted replacements or upgrades. Keep records of past repairs, shingle batches, and any professional inspections, because the insurer may compare current damage against baseline conditions established at the last claim or service visit. On storm days, timely communication with the insurer-paired with consistent, documented observations-reduces confusion during the adjuster's assessment.
After a hail or wind event, perform a careful exterior walkaround focused on fasteners, edges, and any signs of moisture intrusion. If reports claim storm impact, realize that the combination of age, maintenance history, and local weather exposure will shape the claim's trajectory. When in doubt, coordinate with a local roofing professional who understands how damage often presents itself after freeze-thaw cycles, and who can help craft a documentation package that aligns with insurer expectations.
In Saint Cloud, the mix of hail-heavy seasons, strong winds, and long freeze-thaw cycles creates recurring stress on shingles, flashing, and decking. Homeowners often face replacement projects after a severe storm, so looking for a contractor who handles full tear-off and re-roof with care is essential. The local market includes both residential-focused firms and commercial-capable roofers, so you may encounter team sizes ranging from small crews to multi-person crews. Expect a fast response culture, but balance speed with thorough inspection and proper warranty documentation.
When a contractor shows up after a storm, request a full assessment beyond cosmetic damage. Look for signs of hidden damage: uplifted edges, nail pops, soft decking, and compromised ventilation paths. Reputable roofers in this market align their assessments with long-term reliability-especially to prevent leaks during spring thaws and fall freezes. Ask for a written scope that covers removal, decking check, flashing replacement, ventilation considerations, and a detailed cleanup plan. Ensure the proposal distinguishes between cosmetic repairs and true replacement if multiple layers exist.
Because re-roofing is a major share of the local market, many homeowners consider replacement rather than small repairs after a major event. A prudent decision follows a thorough decking and attic ventilation review. Favor contractors who can present objective criteria for when a replacement is warranted, rather than pushing another patchwork solution that may fail under freeze-thaw cycles. Check that the contractor can coordinate insulation and ventilation upgrades if needed to satisfy long-term performance goals.
Prioritize licensed, insured roofers with a solid track record in Saint Cloud's climate. Ask for local references, preferably homeowners who had to endure a harsh winter or a recent hail season. Inquire about crew training, site protection during work, and post-installation inspections. Confirm the roofer uses flashing and ventilation strategies designed to withstand repeated freeze-thaw cycles and storm-driven wind events, and that they provide a clear, supervised cleanup plan with a defined debris haul-away method.