Last updated: Apr 19, 2026
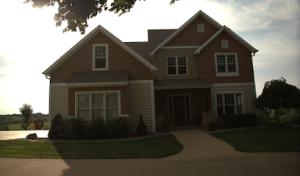
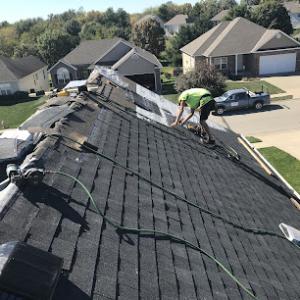
Saint Joseph's spring storm activity is a primary local driver of sudden roof damage and replacement timing. When the Missouri River bluffs spit out high-velocity hail and gusts, roofs that look fine on a sunny day can reveal blow-off shingles, dented metal, or compromised underlayment within hours. The window between a storm and a claim decision is tight, and the clock you see on notices from your carrier often starts ticking the moment the hail ends. Your roof is your first line of defense against moisture and wind-driven debris, and in this region, it bears the brunt of seasonal swings. If you hear hail or see loads of granules in your gutters after a storm, treat it as an alert, not a background noise.
The local insurance environment is shaped by frequent hail and wind claims, so homeowners are commonly asked for before-and-after photos, detailed damage documentation, and contractor estimates. After a storm, start collecting evidence immediately. Photograph all visible damage from multiple angles on the roof, plus interior leaks or ceiling staining if water has penetrated the attic or ceilings. Take wide shots that show surrounding debris or fallen branches, and close-ups of granules on shingles, lifted edges, or hail dents on metal profiles. Keep a dated record of all communications with the insurer, and note any temporary mitigation steps you take to protect property-like tarping a damaged area or removing standing water from the attic.
When you receive a claim assignment, respond quickly with organized files. An adjuster will compare the before photos you provided with the after condition of the roof and any related interior damage. If you suspect wind-driven debris has compromised soffits, ventilation, or decking, document those components separately. The more precise your documentation, the smoother the claim process tends to be. In Saint Joseph, it is not unusual for a single Spring season to involve multiple storms, which means adjusters will sometimes request a comprehensive scope that covers roof, ventilation, decking, and any attic moisture remediation.
Damage in our market often extends beyond the visible shingles to decking, attic ventilation, and insulation. After notable regional claim seasons, homeowners may see premium changes or coverage adjustments tied to roof age, deductible structure, or prior losses. Be prepared for an adjuster to review the entire roof assembly, not just the surface materials. You should expect to discuss the deck's condition, any required underlayment replacement, vent boot integrity, and potential fascia or drip edge issues. A practical approach is to obtain a few contractor estimates that itemize decking replacement, underlayment, and ventilation components separately. If the decking is found to be compromised, the claim may expand to a decking-and-ventilation project rather than a simple shingle swap.
Select a local contractor who understands the typical Saint Joseph roof, including common shutter effects from hail and wind, the way our weather patterns stress ventilation, and the realities of older housing stock. A trusted roofer will provide a meticulous damage assessment, clearly distinguishing cosmetic issues from structural concerns, and will help translate that into an insurance-friendly scope. Ask for a written, line-by-line scope that includes decking, underlayment, ventilation, flashing, and any necessary attic remediation. A skilled estimator will also flag potential future vulnerabilities you may not notice in the immediate aftermath, such as areas where future storms could cause recurrent damage if not properly addressed.
Once the claim is settled, you want a roof that resists the next spring blast. The goal is not just a cosmetic fix but a durable, code-conscious restoration that irons out latent vulnerabilities exposed by the season's tests. As a neighbor with eyes on the same storm cycle, you know that the best path is proactive: verify that all components-ventilation, decking, and flashing-are restored to a robust, weather-ready condition. That way, when the next round of hail and wind arrives, you've already lowered the odds of repeated claims and reduced the risk of hidden damage surfacing years down the line.
Full Roof Replacement Repairs & Seamless Guttering
(816) 259-9330 fullroofreplaceandrepair.com
Saint Joseph, Missouri
4.8 from 50 reviews
At Full Roof Replacement and Repairs, we specialize in providing top-quality roofing services for clients in Saint Joseph, MO. With our seamless guttering solutions, we ensure that your home is not only protected from the elements but also looks great. Trust us to deliver exceptional results every time.
Kingsmen Contracting
(816) 649-4839 www.kingsmencontractingllc.com
Serving
5.0 from 12 reviews
We are a commercial and roofing contracting business. We specialize in commercial roofing.We can handle all your commercial and residential roofing needs.We have been in business since 2018. We have 2 locations, One in Saint Joseph MO and our Main Office located at 1300 Locust St Suite D Harrisonville MO 64701

Roberts Roofing
(816) 232-0644 roberts-roofing.com
Serving
4.4 from 25 reviews
Our goal is to serve you in the most professional, honest, safe, and courteous manner possible. Our reputation is impeccable, our service is exceptional, and we truly believe that we are the best choice when selecting a roofing company for your project. No matter how big or small, Roberts Roofing is here for it all!

Midwest Homes & Restoration
(816) 336-1099 midwesthomesandrestoration.com
Serving
4.8 from 82 reviews
Midwest Homes & Restoration provides roofing contractor services to the Saint Joseph, MO area.
A-1 Roofing Renovation & Construction
Serving
4.4 from 92 reviews
Got A Dog 'Gone Roof That Needs to be Replaced! Call A1 Roofing for all your roofing needs. Serving the St. Joseph, Missouri & surrounding communities for over 20 years. We work with residential owners, business owners, and property managers to ensure quality roof replacement or repair. There are many factors to consider when choosing the right shingle, and the A-1 team will work to make the process seamless.
Epic Construction
Serving
4.9 from 76 reviews
Epic Construction Company is a leader in providing professional construction services, roofing repair and installation for our customers. We strive to create a successful partnership between our clients and our staff throughout the construction process. It is our pledge to establish lasting relationships with our clients by exceeding their expectations and gaining their trust through exceptional performance by every member of our construction team. We deliver custom homes for happy customers, every time! It’s about space and quality; it’s about the value and what you need. At Epic Construction Custom Home Builders, we really are putting the “custom” back in “customer”. From custom home building to roofing and remodeling, call us.

Hausman Metal Works & Roofing
(816) 232-7793 www.hausmans.com
Serving
5.0 from 2 reviews
At Hausman Metal Works and Roofing, our number one priority is doing your job right the first time, and every time. Our reputation for quality as a major sheet metal, and roofing contractor is unsurpassed. This is the reason for our substantial growth since our beginning in 1960.

B&K Roofing
Serving
5.0 from 6 reviews
B & K Roofing is a family owned and operated roofing company located in Saint Joseph Missouri. We’ve been serving the area since we started back in 1993. Over the decades, we’ve completed professional commercial roofing projects of all types and sizes, IB PVP, TPO, and much more.
Peak 2 Peak Roofing & Construction
(816) 752-4589 www.peak2peakroofing.com
Serving
4.9 from 72 reviews
Peak 2 Peak Roofing & Construction is committed to destroying the negativity that stems from dealing with or contemplating a contractor. Creating and maintaining value in your property starts on a foundation of trust. From our first interaction with you to the final clean-up and inspection, our team of experts is dedicated to transparency, availability, and communication. Our reputation hinges on your satisfaction and our ability to exceed your expectations. Let our experience create the best experience for you!
Heritage Roofing & Gutters
(816) 387-1331 heritagegutterpros.com
Serving
4.8 from 49 reviews
Heritage Roofing and Gutters, is family owned and your top choice for all your roofing gutter needs. As one of the premier roofing and gutter companies near me, we specialize in roofing and gutter installation, repair, and maintenance. Our expert team ensures your home is protected from water damage with high-quality materials and precise workmanship. We also offer free inspections and estimates. We work with all major insurance companies as well as offer financing! Trust Heritage Roofing and Gutters for reliable, efficient, and affordable roofing and gutter solutions. Contact us today for a free estimate!
J. Hatheway Roofing
(816) 385-4521 www.jhathewayroofing.com
Serving
4.1 from 7 reviews
J. Hatheway Roofing provides residential and commercial roofing and exterior services to Saint Joseph, MO and the surrounding areas.
Kemmer Roofing
Serving
5.0 from 5 reviews
We are a residential roofing company we offer free estimates and are licensed and insured we also install siding soffit and facia. Our entire crew are local guys with families locally we take pride in our work and want our customers to be happy
When a storm rips through with hail and high winds, shingles can lift, granules loosen, and underlayment become exposed in a hurry. In a city with bluff-backed weather exposure and an older housing stock, you can't count on quick debris cleanup or a clean roof line after the rain stops. An emergency tarping job buys crucial hours to control leaks, protect interior spaces, and prevent further damage while you line up a full replacement or more extensive repairs. The goal is simple: seal the most vulnerable spots fast so rain, wind-driven moisture, and ice damming don't sneak into ceilings and walls before you're able to schedule permanent work.
Storm-driven demand spikes can push legitimate roofing crews to full schedules quickly, and delays between a hail event and the start of a permanent roof replacement are common here. If the wind ripped up shingles, exposed underlayment, or created pooling on a sagging roof line, a same-day tarping response is your best defense. Look for contractors who offer emergency tarping as a standard service, with a clear plan for follow-up inspections, temporary leaks containment, and a fast path to permanent roofing once the weather window opens and crews can mobilize. In the days after a severe storm, the urgency to cover the roof remains even if daylight or roofing crews are scarce; prompt action minimizes interior damage and water intrusion.
In this area, spring hail and wind can leave product missing in patches, with wind-driven granules filling gutters and small leaks showing up around penetrations or along the edge of open decking. Fall wind events are notorious for shingle loss and exposed underlayment too, sometimes outside the peak hail season. Knowing these patterns helps you communicate quickly with a contractor: point out torn or missing shingles, flashing corrosion, and any staining or musty odors inside the attic. The faster the tarping crew can stage covers and secure tarps over the most compromised bays, the more you protect the home's interior from rapid temperature swings and moisture intrusion.
A trustworthy team arrives prepared to establish temporary waterproofing within hours of contact, assesses the scope for a permanent fix, and uses sturdy, secure tarps anchored with weighted boards or fasteners rated for wind. They should seal around exposed valleys, chimney chutes, and roof vents, and create a dry-in zone that keeps water away from attic spaces and ceilings. Ask for a written plan detailing where the tarp will cover, how long the dry-in is expected to last, and the steps for a follow-up inspection or repair appointment after the weather improves. If the roof is compromised, don't wait for a perfect forecast-get the tarp on and the interior protected as a practical, immediate safeguard.
When you can't wait, these contractors offer fast response times to stop leaks and prevent further damage.
The area's spring hail and wind storms hammer roofs differently than a mild-season city. In this market, asphalt shingles are the dominant material because they fit the common residential re-roofing workflow and the typical replacement budget. But Saint Joseph's blend of cold winters, hot summers, and spring storms creates unique expansion, contraction, and impact stress. That means every roof type-whether metal panels, clay or concrete tile, wood shingles, or synthetic composites-ages through a cycle of temperature swings and hail hits that shows up in sooner crack angles, loose edges, or degraded sealant joints. In practical terms, you will see faster edge wear on the lower slopes after a brutal February thaw, and you'll notice panel warping on metal roofs if rapid heating follows a cold night. The takeaway: design and installation details matter just as much as the material choice because the climate makes performance a moving target year to year.
Asphalt shingles suit the typical Saint Joseph home for a straightforward re-roof project, with a predictable installation process that supports a reliable warranty path after weather events. In this market, you'll often see multi-tab profiles paired with reinforced underlayment to resist wind uplift from spring storm bursts. The boosted warranty options can help when hail dents show up after a season, and the lighter weight of asphalt generally keeps the existing decking safer during reroofing. For homes with older decking, expect ventilation checks to surface as part of the project, since roof age and storm exposure often reveal ventilation and attic insulation gaps that can amplify seasonal stress.
Metal roofing delivers strong resistance to wind and hail and graphics-friendly long-term durability, but it behaves differently under temperature swings, especially at panel seams and fasteners. Clay and concrete tiles offer excellent hail resistance on impact but require careful attic-to-roof ventilation planning and a solid deck to avoid fracture under freeze-thaw cycles. Wood shingles or shakes give curb appeal and decent wind performance but can suffer from rapid weathering in freeze-thaw zones and require careful maintenance to prevent cupping or splitting. Synthetic or composite shingles aim to blend the best traits of the pack, offering design flexibility with improved impact resistance and lower maintenance needs in some systems, but they still depend on proper installation and ventilation for longevity.
When comparing options, start with the roof's current deck condition and the attic's ventilation health, since both influence how the material ages in seasonal swings and under hail. If a re-roof is needed after a harsh spring, plan for an inspection that verifies decking integrity, includes vented ridge lines, and accounts for wind-driven moisture. A practical path often mirrors the local market: asphalt for budget-friendly, quick-turnover projects; metal or tile for long-term resilience in exposed stretches or houses with higher wind exposure; and composites as a middle-ground choice that can balance aesthetic options with performance needs.
Across Saint Joseph, the typical cost ranges for roof replacements reflect a mix of weather exposure, an older housing stock, and the need to address decking, ventilation, and documentation when insurers are involved. Asphalt shingles commonly run from 320 to 520 USD per square, a spread driven by roof complexity, ashlar alignment, and the state of the underlying decking after a hail or wind event. Metal roofing sits higher, often 600 to 1000 USD per square, which can be a smart long-term choice in this climate where spring storms are frequent and aggressive. Clay tile and concrete tile carry substantial premiums-900 to 1600 USD and 800 to 1400 USD per square, respectively-reflecting weight, substrate preparation, and the logistical effort of careful installation on bluff-adjacent homes.
Wood shingles or shakes fall in the 700 to 1100 USD per square range, with cost sensitivities tied to roof pitch, ventilation needs, and treatment for local moisture. Synthetic or composite shingles typically range from 560 to 1000 USD per square, offering a lighter, often quicker-to-install option that can still address hail impact concerns. In older homes, costs may drift higher when decking repairs are necessary or when ventilation corrections become part of the package, particularly if the inspection phase uncovers subtle framing or soffit adjustments.
Local storm surges can push pricing upward when many homeowners are scheduling inspections, tarping, and full replacements at the same time. If crews are tied up, or if emergency tarping is needed after a hail event, you may see price pressures that stretch the lower end of the range toward the middle of the spectrum. In practice, timing and scheduling availability matter as much as material choice.
To plan realistically, start by estimating the likely material type based on your existing roof and desired life span, then add a buffer for decking, ventilation, and potential minor structural verification during the inspection process. When you factor in the surge effect and the potential for decking repairs, it's not unusual for bids to land above the basic per-square ranges, especially on homes with older framing or complex footprints. A thoughtful approach to material selection and scope helps keep repairs aligned with both weather realities and insurance expectations.
Don't let upfront costs delay a critical repair - these contractors offer payment plans to fit your budget.

Peak 2 Peak Roofing & Construction
(816) 752-4589 www.peak2peakroofing.com
Serving
4.9 from 72 reviews
In this area, a building permit is generally required for a full roof replacement. The City of Saint Joseph Building Division is the touchpoint for getting that permit, and they take a close look at the roofing scope to ensure it aligns with local codes and neighborhood expectations. The permit is issued once the scope is reviewed and approved, and it sets the stage for the work to proceed in a compliant manner. Knowing this upfront helps prevent surprises down the line when deadlines and weather windows collide with spring hail and wind activity.
Inspections in this process occur both during construction and after all work is completed. The Building Division will want to verify that the project followed the approved scope, that the ventilation plan is correctly implemented, and that any required updates to structural elements are properly addressed. A final inspection is needed to close the permit, so it is essential to keep the inspector informed of any changes that arise after the initial approval. Some projects may also require verification of venting changes or minor structural work, so documenting these details with your contractor from the outset helps ensure a smooth closeout.
During the inspections, expect the inspector to review decking and underlayment, roof sheathing, flashing details around chimneys and vents, and the overall roof-to-structure tie-ins. Ventilation changes are a common focus, especially after a hail or wind event that prompts a re-roof. If attic vents were modified or added, have the updated plan ready for review. Any requested minor structural adjustments will be checked for proper execution and code compliance. Clear access to the attic, roof, and any mechanical penetrations will expedite the process, so coordinate with the contractor to keep the job accessible for inspections scheduling.
Begin by confirming the project scope with the roofing contractor and submitting a complete permit package to the Building Division, including any structural notes or venting diagrams. Keep a detailed record of all changes and communications, and ensure the crew follows the approved plan during installation. After work is complete, schedule the final inspection promptly and be prepared to demonstrate compliance with ventilation and any structural updates. Having the original permit paperwork, inspection appointments, and a clean site at the time of inspection helps prevent delays and supports a timely permit closeout.
In older homes around the bluff and hillside neighborhoods, a simple shingle swap often reveals decking that's softer or warped after years of exposure to wind-blown hail and moisture. From ground level, a roof may look usable, but when a tear-off uncovers the substrate, you could face uneven support, dry rot, or batten-and-plank deterioration that isn't obvious from a quick leak call. That surprise can push a routine project into deck stabilization territory, with the need to replace boards or add bridging to keep the roof structure sound.
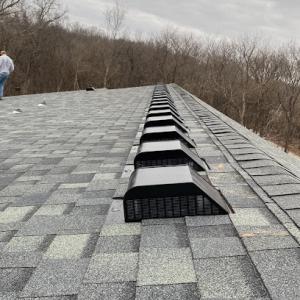
Venting and attic airflow aren't optional extras in this market; they tie directly into the long-term performance of any re-roof. In Saint Joseph, attic space tends to bear the brunt of rapid spring weather swings, and corrections to ventilation can prevent premature shingle failure and moisture buildup. If the tear-off exposes soffit, ridge, or baffle deficiencies, addressing these now saves you from repeated visits later and helps the new roof breathe properly through Missouri's storm cycles.
Where a straightforward shingle replacement might be planned, the hidden substrate or ventilation deficiencies found during tear-off often shift the job toward broader re-roofing work. That means more material handling, more detailed inspections, and a broader scope of work than a single-day overlay. You'll want to prepare for a project that can evolve as the deck and venting pictures come into focus, rather than assuming a quick, surface-only fix.
Spring in Saint Joseph brings the highest disruption risk because hail and storms can both damage roofs and overload contractor schedules. If a hail event is suspected or confirmed, start the process within 24 to 72 hours by safely inspecting accessible areas and documenting damage. Do not climb onto a damaged roof yourself; use a flashlight from the ground and note granule loss, dented metal, or lifted shingles. Phone at least two local roofers for on-site assessments within a few days to secure appointment slots before the rush. Insurance documentation matters, so keep a record of storm dates, photos, and any temporary leaks you taped or tarped to minimize interior damage. Expect tight calendars in the weeks after a major hail event; setting up a pre-authorization plan with your insurer can speed the claim once the contractor is chosen. On days with severe wind, prioritize safe access routes and temporary coverings to prevent collapses or further weather exposure.
Summer heat in Saint Joseph can slow installation pace and affect material handling on the roof. Plan installations for mornings and avoid the hottest afternoons to protect workers and materials. If you scheduled a tear-off, allow a buffer for asphalt shingles that can become brittle in heat and for roof decks that require extra ventilation checks after a long winter. Ensure crews have shaded breaks and clear staging space on the ground to keep equipment from overheating. Communicate any attic or interior heat concerns early so ventilation work can be adjusted without delaying the project.
Winter freezes and occasional snow in Saint Joseph complicate tear-offs and repairs, while fall wind events can affect debris control and roof access. If temperatures linger near freezing, discuss cold-weather installation practices with the contractor and plan for extended timelines. In fall, coordinate debris containment plans and ladder safety, as high winds can shift debris unexpectedly. Have a weather contingency ready and confirm temporary protection around openings to prevent interior moisture intrusion.
After a hail and wind event, insurers in this market expect thorough documentation. Hail and wind claims are common, but the outcome hinges on the records you provide. A well-documented claim helps separate legitimate damage from wear and tear and can influence how the carrier views repair versus replacement.
Gather before-and-after photos that clearly show shingle damage, lift, and flashing issues from ground and attic angles. Preserve date-stamped storm evidence, such as meteorological reports or local damage photos from neighbors. Obtain contractor estimates early, with itemized scopes of work and photos of affected roof areas, to anchor conversations with the adjuster.
Policy outcomes in this market can vary significantly by carrier and deductible level, so the claim strategy matters. Communicate clearly about the extent of damage, any related decking or ventilation concerns, and how the storm altered the roof's integrity. Be prepared to discuss whether a repair suffices or a full replacement is more prudent given the framing and attic conditions.
Choose a Saint Joseph-area contractor who understands how Missouri River exposure and spring storms typically affect old housing stocks. They should provide a written assessment, photos, and a detailed scope that aligns with the adjuster's expectations. Their involvement often streamlines the process and strengthens your documentation package.
Act promptly to prevent secondary issues, like leaks or ventilation problems. Start compiling your evidence as soon as it's safe, and keep a centralized folder with dates, photos, and correspondence. Clear, honest documentation reduces surprises and supports a fair claim outcome.
Although Saint Joseph is primarily a residential steep-slope market, some homes and additions still have low-slope sections that need different detailing and drainage attention. Those areas behave differently under storm-driven rain and rapid temperature swings, so neglecting them can invite slow leaks, pooled water, and accelerated wear around the edges. If a low-slope patch exists, pay attention to how water sheds toward the eaves and whether gutters and downspouts are effectively carrying runoff away from the fascia. In practice, this means ensuring proper overlaps, edge flashing, and a dependable membrane or field sealing that resists the relentless sun and freeze-thaw cycles that the river bluff environment amplifies.
Skylights become a recurring leak point when flashing ages through repeated hot-summer and freeze-thaw cycles. In this climate, heat expands metal, seals can dry out, and corners where the flashing meets the curb or the roofing membrane are prone to hairline gaps. Regular inspection should focus on the transition from skylight curb to roof, the condition of sealant around fasteners, and any staining that travels along the flashing. When leaks appear after a storm, the culprit is rarely just the glass-it's the flashing and its attachments failing to hold the line under repeated stress. Consider upgrading to a skylight with a sealed curb design and reinforcing the surrounding roofing so a future hail or wind event doesn't exploit weak points.
These problem areas often become more noticeable in Saint Joseph after spring storms because wind-driven rain exposes weak flashing and transition details. The combination of hail in spring and gusty winds can lift edges, peel back underlayment, or reveal where laps aren't adequately overlapped. A practical approach is to treat any moisture signature near a low-slope patch or skylight as a potential failure point, not a one-off nuisance. Address it proactively with reinforced flashing, proper seam sealing, and clear drainage paths that direct water away from vulnerable seams, transitions, and penetrations.
Find specialists in TPO, EPDM, and built-up flat roofing systems for residential and commercial properties.