Last updated: Apr 19, 2026
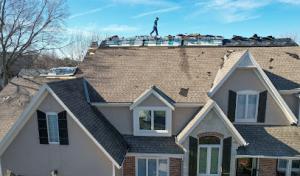
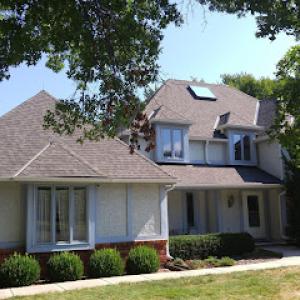
Spring hail and strong winds hammer roofs in this market, and the sudden surge in inspection and replacement work is part of the seasonal rhythm neighbors watch closely. When a storm rolls through, your roof can take hits you don't notice at first glance-shingles curled, granules washed away, and flashing bent where you can't see it from the ground. This is not a distant risk; it's the norm that shapes how quickly you need to respond. Waiting to see if damage is "visible" can cost you more in repair complexity later, especially when neighbors are already lining up for inspections and potential replacements. The local climate makes you confront urgency with every spring and summer thunderstorm, so the moment you suspect damage, you should treat it as time-critical.
In this market, carriers expect a tight chain of photo documentation and contractor-adjuster coordination before approving full roof scopes. That means your next move is not a quick call to a contractor for a rough estimate. You need a deliberate, well-documented record of damage: wide-angle shots of the entire roof, close-ups of compromised shingles, and images of hail impacts on vents, edges, and the valleys. Have notes ready on dates of storms, wind speeds if you've got them, and any leaks you've noticed inside the attic. A clean, organized photo log helps the adjuster see the damage clearly and reduces back-and-forth delays. Expect questions about the roof's age, past repairs, and the visibility of damage from different angles. Coordination between a trusted contractor and the adjuster should be scheduled early, with a plan to map each identified issue to a corresponding scope line item. This is not about speed alone; it's about building a precise, audit-ready file that prevents later rework.
The local contractor market shows unusually strong concentration in storm damage and insurance-claim work, reflecting how central weather losses are to roofing decisions here. That can drive both competency and competition, but it also creates pressure to move fast and fill a claim queue. When selecting a contractor, prioritize teams with a proven track record managing the entire claims process-scopes, product choices, and the documentation required by carriers. Expect August through early fall to bring the heaviest claims activity, which can strain scheduling. A dependable choice is a contractor who can provide a detailed damage summary that aligns with typical shingle and metal offerings popular in this area, and who can coordinate effectively with the adjuster to avoid gaps between inspection findings and the final scope.
First, protect what you can from further weather intrusion. Move valuables away from any interior leaks and cover exposed sections of the roof if it's safe to do so. Second, begin the documentation pipeline without delay: capture wide roof views, close-ups, attic signs of water intrusion, and any interior staining. Third, reach out to a local contractor who understands the timing of claim reviews and the expectations carriers hold for documentation and adjuster coordination. They should be ready to conduct a thorough, field-verified assessment and produce a line-item scope that matches the photos and findings. Finally, set expectations with your insurer for a multi-step process that can span initial claim intake, inspection scheduling, and the phased approval of a full replacement or repair plan. Being proactive keeps the process from stalling when demand spikes-and helps you secure the right, durable solution for the year ahead.
Find local contractors experienced in assessing and restoring roofs after hail, wind, and severe weather events.
M & M Roofing
(913) 782-7300 www.mmroofingkc.com
Street, 601 N Mur-Len Rd suite 22, Olathe, Kansas
5.0 from 150 reviews
Maverick Exteriors
(913) 268-6052 www.maverickexteriorskc.com
21436 W 107th Pl, Olathe, Kansas
5.0 from 101 reviews
Weddle & Sons Roofing of Olathe
(913) 732-8010 www.weddleandsons.com
18895 W 158th St, Olathe, Kansas
4.9 from 117 reviews
M & M Roofing
(913) 782-7300 www.mmroofingkc.com
Street, 601 N Mur-Len Rd suite 22, Olathe, Kansas
5.0 from 150 reviews
M & M Roofing, Inc. has been offering the best quality and service available to the Kansas City metro area since 1992. Our core values have always been and remain Quality, Knowledge, Integrity and Service after the installation or repair. We hope this web site is another tool available to help you select the best contractor and system for your project.
Maverick Exteriors
(913) 268-6052 www.maverickexteriorskc.com
21436 W 107th Pl, Olathe, Kansas
5.0 from 101 reviews
Maverick Exteriors, located in Olathe, KS, provides reliable roofing solutions with a focus on customer satisfaction and convenience. They offer free estimates, same-day service, and flexible financing options to make roofing projects stress-free and affordable. Fully insured and committed to safety, they back their work with a 100% satisfaction guarantee. Their team is experienced, professional, and ready to serve both English- and Spanish-speaking customers. Whether it’s a small repair or a full roof replacement, they bring prompt, high-quality service to every job. Maverick Exteriors is the trusted local choice for roofing done right, with the speed, care, and support homeowners deserve.
Weddle & Sons Roofing of Olathe
(913) 732-8010 www.weddleandsons.com
18895 W 158th St, Olathe, Kansas
4.9 from 117 reviews
We are a regional family owned roofing company serving the Kansas City Metro area. As a company, we've been in business for over 20 years and are dedicated to building better lives in our communities, among our employees, and for our clients through quality workmanship and trusted relationships.
Roofing Force
(913) 270-5440 roofingforce.com
529 N Lindenwood Dr, Olathe, Kansas
4.8 from 363 reviews
Have a roofing problem? We have a solution. From low cost, composition asphalt and composite roofing, to premium lifetime metal and polymer roofing solutions, we install it all. We also cover all storm damage restoration.
Vision Construction
(816) 743-4156 www.buildwithvisionllc.com
Olathe, Kansas
4.8 from 110 reviews
At Vision Construction we believe we are called to add value. Roofing, Siding, Gutters, Storm Restoration - Our process starts with a Free 21-Point Inspection of your project. We serve homeowners throughout states like Kansas, Missouri, Oklahoma, and Texas and take great pride when homeowners express to us that they actually enjoyed the experience.
Iconic Home Renovations
(913) 787-2654 www.iconichrkc.com
19933 W 162nd St, Olathe, Kansas
4.8 from 47 reviews
Iconic Home Renovation, based in Olathe, KS, is a premier general contractor serving Kansas and Missouri, specializing in top-quality roofing, siding, and decking services. As a GAF Master Elite contractor, we provide industry-leading roofing solutions backed by a 25-year workmanship warranty, ensuring durability and peace of mind. Our expert team also excels in siding repair and installation, including James Hardie products, as well as deck design, installation, and replacement. At Iconic Home Renovation, we’re dedicated to transforming your home and creating a lasting legacy of quality and craftsmanship.

Rescue Roofers
11052 S Green Rd, Olathe, Kansas
4.9 from 31 reviews
We offer residential, commercial and metal roofing systems, in addition, we have multiple styles and budgets to choose from within each roofing system to ensure we can meet all of our clients needs.
Good Faith Contracting
(913) 226-7073 goodfaithcontracting.com
15650 W 141st Terrace, Olathe, Kansas
4.7 from 83 reviews
After a storm, trust Good Faith Contracting to restore your home with expertise and care. Serving the heart of the Midwest since 2001 we specialize in comprehensive home restoration. From minor leaks to major hail damage, our skilled team ensures quality repairs and lasting results. Navigating insurance claims can be stressful, so we advocate for you, working with your adjuster to secure fair compensation. Illuminate your property with our lighting design and installation services, and rely on us for efficient snow removal. Good Faith Contracting: your partner in property care.
Erie Home
1562 E Spruce St, Olathe, Kansas
4.5 from 389 reviews
Since 1976, Erie Home has manufactured, supplied, and installed the best-performing roofing on the market. By providing ironclad warranties and convenient financing, we ensure that every homeowner we work with receives top quality service and value for their homes and properties. Erie Home professionals are the roofing company of choice in the greater Kansas City, KS area. Whether you need roof inspections or roof damage repair services, Erie Home has been the go-to roofing contractor for nearly 50 years because of our attention to detail and dedication to making sure our customers are satisfied with their results. Contact us today for a quote and see why we're the trusted roofing company Kansas City counts on.

VernCo Roofing
(913) 300-1878 verncoroofing.com
19961 W 162nd St, Olathe, Kansas
5.0 from 18 reviews
"VernCo Roofing is your trusted partner for residential and commercial roofing solutions in KC Metro and surrounding areas. Specializing in roof repair, replacement, and storm damage restoration, we are committed to delivering exceptional craftsmanship, superior materials, and outstanding customer service. Whether it’s a new roof, gutters, or siding, we’re here to protect your home and ensure your peace of mind. Contact VernCo Roofing today for a free inspection!"
Inspirational roofing & remodeling
(913) 802-7663 www.inspirationalroofing.com
16611 W 149th Terrace, Olathe, Kansas
5.0 from 13 reviews
Inspirational Roofing and Remodeling specializes in roofing, full house remodeling, and professional painting. Based in Kansas City, we help homeowners navigate insurance claims, providing expert inspections and handling paperwork to ensure fair settlements. Our remodeling services transform kitchens, bathrooms, and entire homes with precision and quality materials. We also offer interior and exterior painting to enhance your home’s beauty and value. Dedicated to excellence, we prioritize customer satisfaction with transparent communication, timely service, and superior craftsmanship. Contact us today for your home improvement needs!
Eco Green Roof Coatings
(816) 289-3659 www.ecogreenroofing.com
13644 W 129th Pl, Olathe, Kansas
4.7 from 12 reviews
Eco Green Roof Coatings specializes in commercial roof coating applications for properties of all sizes throughout Kansas City. With over 10 years of experience, we have repaired and protected roofs on warehouses, manufacturing plants, distribution centers, logistics facilities, and other commercial buildings. Whether you need commercial roof repair or want to reinforce and extend the life of your existing roof, our team has you covered. We work exclusively with Conklin Roofing products to deliver high-quality roof coatings designed to restore leaking or aging roofs and enhance durability, energy efficiency, and long-term performance—often making your roof better than new.
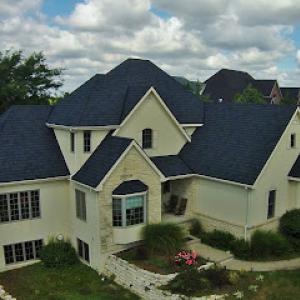
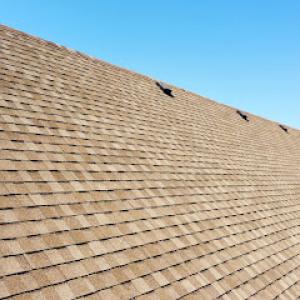
Asphalt shingles dominate the replacement market in this area, but metal, clay tile, concrete tile, wood shakes, and synthetic shingles all show up after severe spring and summer storms. Olathe's hot, humid summers and cold, icy winters drive how roofs behave year round. Thermal movement, sealant aging, and freeze-thaw durability matter more here than in milder Kansas locations. When a hailstorm rolls through, the goal is to pick a roof that handles quick rain and wind-driven impact while still staying functional as temperatures swing.
You'll often see asphalt on neighborhoods with long, pitched roofs and mid-height eaves. They strike a balanced chord between repairability, availability, and weather tolerance. In storms, standard three-tab or architectural styles perform well against wind loads, but hail can create divots that shorten service life. For best results, choose a product with good granule adhesion and a stout warranty, and plan for a quick roof deck inspection after hail events to catch hidden damage before it ages the sealant.
Metal roofs deliver strong wind performance and fast installation timelines when storms hit. Standing-seam systems can expand and contract with temperature swings, reducing lift risk and sealant stress. In a hot, humid summer, metal sheds heat more readily, so proper attic ventilation remains key to keeping interior temperatures reasonable and reducing ice dam risk in winter. If hail is a dominant concern, look for thicker panels and tested impact resistance ratings, plus a wind-resilience profile that matches local storm patterns.
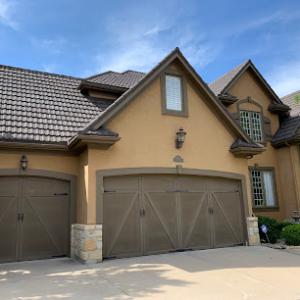
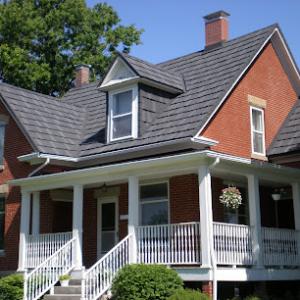
Clay and concrete tiles offer excellent hail resistance when properly installed, but they require a solid structural backing and careful underlayment to handle freeze-thaw cycles. In a climate with dramatic temperature shifts, ensure fasteners are rated for movement and that tiles are laid with appropriate gaps to allow for thermal expansion. These materials excel where long-term appearance matters and where a stiff roofline can carry their weight with confidence.
Wood shakes provide distinctive curb appeal but demand meticulous maintenance to resist hail pitting and moisture intrusion. Synthetic shingles mimic the look with often improved impact resistance and lower maintenance, yet they require compatible flashing and ventilation strategies to prevent premature wear. If choosing wood or synthetic options, verify warranty language covers hail impact and freeze-thaw cycling.
Material selection hinges on hail resistance, wind performance, and how quickly products can be sourced after regional storm events. Consider the typical storm calendar, the neighborhood roof pitch, and existing attic ventilation when aligning a replacement strategy with long-term durability and performance.
In this part of the Kansas City metro, storm-damaged roofs come with price bands that line up with national norms but tighten or expand based on local conditions. Provided local pricing ranges run from 350 to 700 USD per square for asphalt shingles and up to 900 to 2000 USD per square for clay tile, with other materials falling between those bands. If your roof is asphalt, you'll likely be working within that lower-to-mid range, while clay tile can push costs substantially higher. The mix of shingles, underlayment, and flashings you choose will push totals toward either end of those bands, and occasionally beyond, depending on specialty details of your roofline.
Storm-driven demand spikes in the Kansas City metro can push Olathe labor scheduling tighter and raise pricing pressure after major hail events. When a wave of claims hits after a blitz of hail, crews aggregate quickly, which can drive up per-square rates and push timelines out. If your project starts in the heat of a busy season, you may see a premium for expedited scheduling, especially for rooftops that require layered tear-offs or multiple trades to coordinate. The backyard weather window matters too: long, wet campaigns or sudden wind hits can stall work and add cost through extended construction calendars.
Costs in Olathe can also shift based on steep suburban rooflines, accessory work around skylights and chimneys, and whether hidden deck issues appear after winter moisture exposure. Steeper pitches are more labor-intensive, increasing both crew time and safety measures, which translates to higher per-square pricing. Skylights and chimney work add flashing, ventilation, and potentially additional waterproofing steps that fine-tune the total. Hidden deck issues discovered after winter moisture exposure can reveal more repair work beneath the visible surface, nudging the final bill upward. In practical terms, expect a modest uptick if your home has a complex roof geometry or several penetrations to seal.
Synthetic or composite shingles sit closer to the asphalt end of the spectrum, typically mirroring asphalt pricing but with better long-term durability. Metal roofs skew higher in the local market, offering a longer life but demanding a larger upfront investment. For clay tile, the rule of thumb is straightforward: the material itself commands the upper end of the scale, and the labor for installation can be specialized, reflecting in larger totals. If your home features a mix of materials or you're considering upgrades for better hail resistance, expect the estimator to present a blend of the bands discussed, tailored to your roof's specifics and the spring-to-summer storm pattern that dominates Olathe's weather cycles.
Get a clear picture of your project costs upfront - no commitment required.
Maverick Exteriors
(913) 268-6052 www.maverickexteriorskc.com
21436 W 107th Pl, Olathe, Kansas
5.0 from 101 reviews
Weddle & Sons Roofing of Olathe
(913) 732-8010 www.weddleandsons.com
18895 W 158th St, Olathe, Kansas
4.9 from 117 reviews

Allstate Roofing
(913) 782-2000 www.allstateroofing.com
523 N Mur-Len Rd, Olathe, Kansas
4.6 from 11 reviews
In this market, a full roof replacement typically requires a building permit rather than being treated as a no-paperwork repair. You can't assume the job is complete without formal clearance. The process helps ensure that the work meets local wind and impact standards, which matters after hailstorms and strong spring winds. If you're navigating an insurance claim, a permit also signals to adjusters that the project is legitimate and starts from a compliant baseline.
The city requires inspections at installation milestones and a final inspection, so scheduling with the building department is part of the project timeline. Before the first tear-off, call or check the online portal to outline the expected inspection dates and any required documents-plans, contractor licenses, and proof of compliance. Build in a little flexibility for weather delays, because inspections move with the calendar and season. Having a clear schedule helps prevent a paused project that could expose your home to remaining weather risks.
The permit must be posted on-site in Olathe, which is a practical compliance detail homeowners should confirm before tear-off begins. This posted permit acts as a visible reminder to neighbors, inspectors, and the insurance company that the work aligns with local codes. Ensure the posting is in a conspicuous, weather-resistant location where inspectors can easily verify the permit without climbing around the attic or siding. If the posting is obscured by tarps or debris, address it promptly to avoid delays.
Don't proceed with roof work while pending a permit or while inspections are outstanding. A lapse in inspection can trigger rework or fines and complicate insurance reconciliations after a claim. Keep a dedicated contact at the building department for updates and maintain copies of all inspection reports. If a contractor offers to "skip the paperwork" to save time, treat that as a red flag: in this climate, the permit trail is your protection and your proof when the project wraps up.
In this area, the decision to replace often follows a sequence: hail and wind damage is first addressed with emergency repairs, then a full replacement is pursued after the insurance scope is settled. Spring in Olathe brings that pattern into sharp focus, as frequent hail and gusty winds threaten shingles, flashing, and decking. If rapid leaks or substantial granule loss appear after a storm, start with an assessment that considers long-term performance rather than a quick patch. A full replacement is more likely when widespread damage is evident across multiple roof planes, not just isolated areas.
Hail strikes and high winds in spring can compromise the protective granules and lift shingles, exposing underlayment to moisture and sun. The urgency in spring is not only about stopping leaks but also about aligning with insurance timelines before the seasonal rush. Look for curling, missing, or cracked shingles, dented gutters, and exposed fasteners. If shingles show core damage or if granules are washing into gutters after a storm, plan for a replacement when the scope and payment align. In Olathe, roof lines often run long and narrow, so damage can propagate along hips and valleys even when only one section seems affected at first glance.
During summer, intense heat and humidity can slow down crew pace and complicate material handling, especially when back-to-back storms limit daylight and drying conditions. In this season, the integrity of sealants and flashing is tested by daily temperature swings. Consider how continued heat affects adhesive-backed underlayment and the curing of sealants around vents and chimneys. If crews are juggling multiple projects or delaying inspections due to storm clusters, a replacement plan should account for the likelihood of weather-induced delays and the need to stage materials efficiently to avoid exposed decking or compromised seals.
Winter freeze-thaw cycles in Olathe can reveal weak decking and complicate shingle sealing, especially on roof edges and overhangs where moisture lingers. Snow load and ice dam potential become deciding factors when evaluating the roof's remaining service life. Late autumn storms can compress end-of-year schedules, increasing the risk of rushed work or compromised quality if crews are pressed to finish before winter. If decking shows soft spots, cupping underlayment, or widespread micro-cracking in shingles after cold snaps, consider replacement sooner rather than later to prevent heat loss and further moisture intrusion once winter sets in.
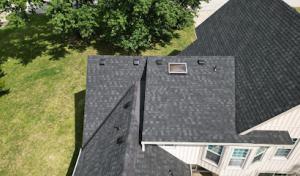
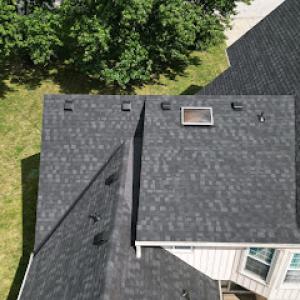
In Olathe, repeated hail exposure makes granular loss, bruising, and puncture-related damage a recurring concern on shingle and other impact-sensitive roofs. Shingles can look intact from the street while the surface is compromised, allowing moisture to infiltrate underlayment layers over time. That hidden wear often shows up after a heavy storm when you notice granule accumulation in gutters, darkened patches, or accelerated aging on sun-exposed slopes. If you skip a closer inspection after a hail event, minor bruising can quietly progress into leaks, loose granules, or accelerated edge wear that shortens a roof's effective life. If you suspect hail damage, a careful, on-roof evaluation is worth scheduling soon after the weather settles, especially on homes with older asphalt or lighter-colored shingles that tend to show impact more clearly.
Strong wind events in this part of Johnson County can lift or crease shingles and expose vulnerable ridge, hip, and flashing details. In practice, that means you might find small gaps along roof edges, missing tabs, or creased shingles that look only superficially damaged. The consequence is accelerated deterioration around ridge caps and around vent pipes where flashing seals are stressed. With continued exposure, wind can drive moisture into the attic space, warp underlayment, and threaten attic ventilation effectiveness. After a windy spell, an exterior inspection for loose fasteners, lifted shingles, or torn sealant joints is a prudent step to prevent accelerated wear and water intrusion.
Freeze-thaw cycling after moisture intrusion can reveal deck deterioration during tear-off, changing the final scope of work on older homes. When ice wedges into small deck gaps or compromised plywood, you may end up discovering rot or delamination that wasn't visible before teardown began. For older structures, that means the replacement scope can extend beyond the surface shingles to structural components and decking, increasing the complexity of repairs and the risk of unexpected delays. Staying attentive to signs of deck softness or sponginess during evaluation helps you plan for a more accurate, durable repair.
Olathe sits in a high-claim Kansas weather environment where hail and wind losses are common enough to shape how roofs are inspected and documented. When a claim starts, your goal is to assemble a clear, dated record of the roof's condition before and after storm events. This helps the adjuster see the full picture without chasing vague notes.
Keep pre-work photos from the season before damage and clear after photos once work is complete. Use wide shots of the entire roof and close-ups of visible hail impacts, flashing, and edge damage. Focus on whether ridge lines and valley sections show wear that could be mistaken for recent impact. Post-work images should show the finished materials, alignment, and seals.
Adjusters in this market commonly review damage scope with contractors before approval, making documentation quality especially important in Olathe claims. Include labeled images, dates, and a simple damage log that notes each area inspected, what was observed, and what was documented for replacement or repair. Consistency helps, especially when multiple storms are involved.
Keep all records in a single, easy-to-access folder: photos, notes, contractor inspection reports, and any correspondence with the carrier. If you have prior repairs, retain receipts and warranty materials for the same sections. Carrier reviewers may request proof that replacement complied with local requirements, so chain-of-custody for documents matters.
Submit your packet promptly after inspection. If the adjuster requests a scope review with your contractor, arrange a joint walkthrough or send clear, annotated photos showing the areas in question. Clear, organized documentation reduces back-and-forth and speeds the path to a settled claim.
After a hail event, the Olathe contractor market shifts toward rapid re-roofing and storm response. Homeowners will notice aggressive competition among nearby companies, all eager to secure quick projects. Expect several firms to emphasize fast scheduling, with crews ready to mobilize within days rather than weeks. In this climate, cleanup is a prominent hiring priority, because debris control in crowded residential neighborhoods matters to neighbors and inspectors alike.
Long-established and family-owned firms are common, but reliability hinges on who will handle permit posting, inspection scheduling, and claim documentation. Confirm at the outset that the contractor will manage the paperwork with the insurer and build a clear timeline for inspections. Ask for specifics: who will serve as the point of contact for each inspection, what documents will be filed, and how change orders are documented. It helps to choose a company that assigns a dedicated project manager to minimize miscommunication.
In this market, you need written scope, agreed-upon materials, and a defined sequence of steps from tear-off to final inspection. Request a detailed, itemized plan that includes staging areas for debris, daily progress updates, and a forecast for weather-related delays. Insist on a written warranty that covers workmanship and the roofing material, with a clear process for addressing incidental issues found during the job. The more you pin down in writing, the smoother the claim and inspection process will feel when the work is underway.
Cleanup is not a afterthought; it is a defining factor for neighborhoods where driveways and landscaping are close to the jobsite. Ask about daily cleanup routines, how haul-off will be handled, and whether the crew will sweep streets or sidewalks near your home after each day. A responsible contractor will outline containment measures and a plan to prevent nail and shingle debris from creating hazards for your family and neighbors. If you have a fenced yard or a shared alley, confirm access and waste disposal logistics before work starts.
Get a clear picture of your project costs upfront - no commitment required.
Maverick Exteriors
(913) 268-6052 www.maverickexteriorskc.com
21436 W 107th Pl, Olathe, Kansas
5.0 from 101 reviews
Weddle & Sons Roofing of Olathe
(913) 732-8010 www.weddleandsons.com
18895 W 158th St, Olathe, Kansas
4.9 from 117 reviews
Allstate Roofing
(913) 782-2000 www.allstateroofing.com
523 N Mur-Len Rd, Olathe, Kansas
4.6 from 11 reviews
Although pitched residential roofs dominate the housing stock in Olathe, the local contractor signal set shows meaningful availability for flat-roof and low-slope work, especially on newer additions, commercial-adjacent homes, and certain ranch or mid-century designs that were updated over the years. If your storm-repair plan includes a low-slope or flat section, you'll want a contractor who prioritizes proper drainage details, robust flashing around walls and penetrations, and compatible membrane selections that hold up under the springtime hail and summer wind cycles common to this area. Expect careful coordination with any attic ventilation and skylight interfaces to avoid trapped heat or moisture.
Specialty demands in Olathe include skylights, tile roofing, cedar shake, solar roofing, and roof coatings, but these are secondary to mainstream storm-driven re-roofing. When dealing with hail damage, skylight work is often paired with flashings and sealants that must meet both weather and impact-resistant standards. Tile and cedar shake require installers with experience in securing long-lasting fasteners and in-field shaping to resist wind uplift. Solar roofing adds electrical integration considerations that should be handled by technicians comfortable with local wind patterns and shading from neighboring structures. Roof coatings can offer temporary relief on flat or low-slope surfaces, but require a sound, intact substrate to be effective.
Homeowners with uncommon roof systems in Olathe should confirm that their contractor regularly handles that material rather than assuming every storm roofer does. If your roof includes materials like clay or concrete tiles, cedar shakes, or synthetic alternatives, ask for recent local projects and technician certifications specific to those products. For low-slope areas or hybrid configurations, request a detailed plan that demonstrates proper membrane layering, flashing continuity, and seamless transitions between diversified roof planes. In the context of a hailstorm claim, insist on a written scope that clearly addresses material compatibility, warranty terms, and the expected performance after the next severe weather event.
Find specialists in TPO, EPDM, and built-up flat roofing systems for residential and commercial properties.
Eco Green Roof Coatings
(816) 289-3659 www.ecogreenroofing.com
13644 W 129th Pl, Olathe, Kansas
4.7 from 12 reviews
All American Roofing
(913) 345-8000 www.allamericanroofingkc.com
15201 S Mur-Len Rd, Olathe, Kansas
5.0 from 5 reviews