Last updated: Apr 19, 2026
Leawood sits in the Kansas City metro hail-and-wind claim corridor, making storm-related roof inspections and insurance documentation a routine part of ownership. Spring hail is the defining local roof event, and regional storms can trigger a spike in replacement demand across Johnson County, which means timing and coordination become as critical as the repair itself. When a storm rolls through, neighbors notice shingles lifting, granules washing away, and gutters humming with impact marks. Don't wait for a weekend scare text from the HOA or a sudden lead-time surprise from a contractor-start your plan the moment skies clear.
Because Leawood commonly has higher-end steep-slope homes with tile, cedar, synthetic, and slate alongside asphalt, storm damage evaluation often requires distinguishing cosmetic impact from functional damage on premium materials. A cosmetic bruise on a slate tile or a scuffed cedar shingle might not threaten the roof's integrity, but a single cracked slate or delaminated cedar strand can cascade into leaks if not addressed promptly. Inspectors trained in premium materials know to check for hairline fractures that propagate under heat and wind, sealant failures around flashing, and fastener loosening that's invisible from the ground. Have a plan for a targeted inspection after each hail event, focusing on high-risk zones: roof valleys, edges, chimneys, and any area where bundled materials meet vertical surfaces.
Spring hail is the defining local roof event, and replacement demand can spike across Johnson County after regional storms, affecting scheduling and material lead times. If your roof uses tile or slate, the inspection window widens: some damages aren't visible from ground level, and alternate-access methods may be needed to confirm substrate integrity. A critical move is to document the exact storm date, wind speeds, hail size, and any interior signs of leakage that appeared after the storm. Insurance carriers rely on timely pictures and notes that trace the damage from impact marks to potential water intrusion. Delays can push a claim into a crowded calendar, prolonging exposure to further weather risk and complicating reuse of matching shingles or tiles that have long lead times.
Immediately after a hail event, schedule a professional roof inspection focused on your roof type. If you own tile or slate, request a stone-and-mortar assessment for broken pieces and edge cracks that could compromise wind resistance. For asphalt or synthetic shingles, insist on a wind uplift and substrate check beyond surface tears. Gather and organize visible damage photos, including close-ups of any cresting granules, cracks, or displaced flashing. If a claim is filed, maintain a detailed timeline: storm date, inspection date, report date, and subsequent repairs. Share this timeline with your insurer and contractor to keep the process transparent and to minimize back-and-forth delays that can cost you usable replacement windows.
Leawood homeowners benefit from pairing with roofers who understand the interplay between premium materials and storm cycles. Look for crews that can perform a careful material-by-material assessment and can explain how hail affects tile, cedar, or slate differently from asphalt. Ask for references with experience navigating similar HOA reviews and understand how replacement decisions may be influenced by visible aesthetic considerations. A trusted contractor will provide a clear plan for temporary protection if a full replacement isn't immediately feasible, preventing water intrusion during the interim window while you coordinate with the insurer and HOA for approvals and scheduling.
Next Level Roofing
(913) 671-9222 nextlevelroofingkc.com
4901 W 136th St, Leawood, Kansas
5.0 from 83 reviews
Serving Kansas and Missouri with quality residential and commercial roof replacements and repairs.
H&H Roofing & Restoration
(620) 332-9249 www.hhroofing.com
4400 College Boulevard Suite LL-140, Leawood, KS
4.9 from 88 reviews
H&H Roofing and Restoration is a market leader in the installation and repair of residential and commercial roofing. We also specialize in restoration and storm related solutions. When you choose to work with us, we will create a detailed written estimate of damages to ensure that the entire process goes smoothly. Our goal is to help as many customers as possible overcome their roofing problems through the use of the industry’s best products and materials. We are supported by a whole host of top-quality manufacturers to give our customers roofs that will stand the test of time. We also strive to provide exceptional customer service to make sure we achieve the result that you desire.
NextGen Restoration
(877) 835-7643 nextgenrestoration.net
2041 W 141st Terrace, Leawood, Kansas
4.6 from 101 reviews
Since 2015, NextGen Restoration has been Leawood, KS's trusted partner for comprehensive exterior solutions. Specializing as a general contractor, cladding expert, and roofing service provider, we bring unparalleled skill to every project. From meticulous storm restoration and robust roofing installations to seamless gutter services and house siding, our commitment is to revitalize and protect your home with lasting quality. We also offer expert basement remodeling to transform your interior spaces.
A&A Royal Contracting
(913) 735-4591 aaroyalcontracting.com
13220 State Line Rd, Leawood, Kansas
4.7 from 25 reviews
A&A Royal Contracting: Your trusted roofing contractor in Leawood, serving the community since 2019. Specializing in storm restoration, we handle roofing, siding, gutters, windows, and garage doors, ensuring your home is protected. Navigating insurance claims can be overwhelming. We expertly guide you through the process, advocating for the coverage you deserve. Let us help you restore your home and peace of mind.
KIKO Roofing
(913) 600-7330 www.kikoroofingkc.com
Serving
5.0 from 24 reviews
Kiko Roofing is a trusted roofing company serving Overland Park, KS, and surrounding areas. Specializing in both residential and commercial roofing, we offer a wide range of services, including roof replacement, roof repair, storm damage roofing, new roof installations, roof inspections, and gutter services. With years of experience, our team uses top-quality materials to ensure your property is protected from the elements. We provide durable and energy-efficient roofing solutions, including asphalt shingles and metal roofing, designed to withstand Kansas weather conditions. Additionally, we offer seamless gutter installation, repair, cleaning, and gutter guard installation to prevent water damage. Contact us today for a free estimate!

Accent Roofing Group
(913) 219-8972 www.accentroofinggroup.com
Serving
4.9 from 30 reviews
Looking for top-notch roofing services in Overland Park, KS, and nearby areas? Accent Roofing Group has you covered! With years of experience, our skilled team specializes in roof repair, replacement, and emergency services. Whether it’s fixing a leaking roof, installing durable metal roofing, or tackling storm and hail damage, we handle it all with care and precision. From shingle and asphalt roofing to flat and commercial projects, we’re your local experts for residential and business needs. Need a roof inspection or maintenance? We’ve got that too! Trust us to keep your roof in tip-top shape. Call Accent Roofing Group today for a free quote and let’s get started on your roofing solution!
Best Choice Roofing
(913) 210-4002 bestchoiceroofing.com
Serving
4.8 from 90 reviews
Best Choice Roofing is your trusted roofing expert and the Best Choice when it comes to choosing a Kansas City South roofing company with a commitment to impeccable customer service and expert roof replacement, roof repairs, and custom roofing services. In business since 2009, Best Choice Roofing’s industry-leading contributions to the roofing industry include a customer-first mentality, a dedication to top-quality products and a leadership team focused on the growth of its people. Because of this framework, we have created a loyal base of customers all over the United States.

Evolve Construction Inc KS
(800) 222-4100 www.evolveconstruction.com
Serving
5.0 from 44 reviews
Evolve Construction is a Top roofing & building contractor servicing locations all over the United States. We have built a reputation for restoring homes and buildings on time, using the best materials at a fair price.

Premier Roofing Company
(816) 254-7663 www.premier-roofing.com
Serving
4.4 from 397 reviews
Premier Roofing Company in Kansas City, MO, is your trusted local expert for asphalt shingle roofing and hail damage roof replacement. Serving homeowners, businesses, and multi-family communities across Kansas City and the surrounding metro area, our experienced roofing contractors provide exceptional craftsmanship, premium roofing materials, and unmatched customer care. Choose Premier Roofing Company in Kansas City for dependable asphalt roofing solutions, lasting protection, and superior results in Missouri's weather conditions.

Best Roofing Kansas City
(913) 318-8097 bestroofinginkansascity.com
Serving
4.9 from 126 reviews
Welcome to Best Roofing Kansas City, where you’re more than just a customer—you’re family! Our dedicated, approachable experts are always ready to listen, guide, and deliver top-notch roofing solutions tailored to your needs. We’re proud to serve our community with honesty, care, and a genuine smile. Let us take the stress out of your roofing project and leave you with lasting peace of mind!

AmeriPro Roofing
(913) 289-4750 www.ameriproroofing.com
Serving
4.7 from 232 reviews
At AmeriPro Roofing we specialize in exterior home repair & storm restoration focusing on roof repair, roof replacement, siding, and gutters installation and repair in Kansas. Since 2000, we have completed over 150,000 successful projects. We never complete a job until you’re fully satisfied. Our goal is to make your house look as good as the day it was built.

Cardinal Contractors
(833) 789-7663 cardinalcontractors.com
Serving
5.0 from 12 reviews
Cardinal Contractors has a full staff of knowledgeable estimators, roofing/siding/gutter specialists, designers, project managers, and experienced carpenters ready to assist you. We only use the best products that are installed by superior and experienced craftsmen. Cardinal’s mission is to serve and restore aged or damaged residential and commercial properties with the utmost care and attention to detail.
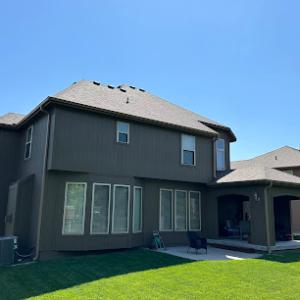
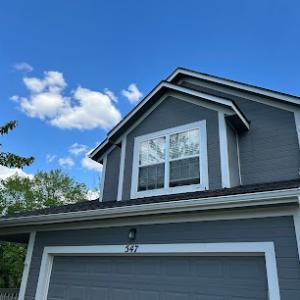
Leawood's roofscape is more diverse than many suburbs, with asphalt shingles, clay tile, concrete tile, wood shakes, synthetic/composite, and slate all actively used on upscale homes. Spring hail and wind are part of the rhythm, so a roof profile that resists impact and preserves long-term drainage is a practical priority. The mix also means matching existing massing and edge details matters for curb appeal and resale. When a replacement is needed, plan around the house's architectural cues and the prevailing neighborhood standards rather than chasing a single "latest" trend.
Many neighborhoods in this area impose architectural guidelines that elevate the importance of material matching and profile continuity. Replacing a roof is not a surface swap; it is a renovation that must respect the existing silhouette, rake lines, hip-and-valley geometry, and color harmonies with siding, gutters, and trim. In practice, that means reviewing samples with the contractor, bringing full-size shingle or tile bundles to compare shadowlines, and verifying that the chosen product's ridge and hip cap profiles align with the original rhythm of the home. When HOA review is involved, have a prepared, package-ready presentation showing the proposed material, color, and installation details to streamline approvals.
Asphalt shingles remain a common, flexible choice for many Leawood homes due to their balance of durability and ease of repair; when selecting asphalt, focus on impact resistance ratings and granule adhesion to withstand spring hail. Clay tile offers a classic look with strong thermal performance and long life, but it requires a structural assessment because the weight load is substantial and fasteners must be corrosion-resistant for Kansas moisture cycles. Concrete tile shares those benefits with a heavier profile and excellent durability; verify roof deck support and a careful installation plan for slope changes or transitions to prevent cracking at penetrations.
Wood shakes and shingles bring a distinct, warm character that aligns with some estate-style elevations; their susceptibility to moisture and hail damage means you should consider higher-end maintenance cycles and treatability for fire resistance in line with local expectations. Synthetic or composite shingles provide a modern, lower-weight alternative that mimics natural textures while often offering improved hail resistance and longer warranty terms. Slate, when the budget allows, delivers a premium, long-lived option with a refined profile; its installation is specialized and requires crews with slate experience to ensure proper fastener placement and surface integrity.
In this market, the decision extends beyond one season's need. The best approach blends architectural fidelity with practical durability, ensuring a seamless transition from old to new that maintains the home's character while delivering reliable weather resistance. Collaboration with a contractor who understands the distinctive Leawood roofscape-especially the way materials sit with parapets, dormers, and chimney stacks-is essential. When choosing a replacement path, consider not only the visible surface but also how the material behaves under Kansas spring hail, including impact resistance, water shedding efficiency, and the ease of future repairs.
Leawood roofs must handle hot, humid Kansas summers that can accelerate asphalt aging and make midday installation conditions more difficult. The combination of strong sun and elevated attic temperatures can soften asphalt shingles and stress underlayment, especially on steeper slopes common to upscale homes in this area. When heat is relentlessly high, temporary systems used during replacement or repair should be scheduled for cooler parts of the day, and aged surfaces may reveal soft edges or lifted tabs sooner than expected. In practical terms, schedule roof work for early morning windows, protect exposed edges with temporary coverings, and verify that crews use breathable, roof-compatible sealants that resist breakdown under long, hot afternoons. On existing roofs, look for cupping, curling, or brittleness that appears after long heat waves, and document these observations for your project notes and any insurance discussions.
Cold winters and freeze-thaw cycles in northeast Kansas put recurring stress on flashing details, penetrations, and underlayment transitions. In Leawood, flashing around chimneys, vents, and skylights should be treated as a focused point of potential failure. Freezing water can seep into minute gaps, expand, and widen gaps when temperatures rise, which amplifies the risk of leaks during spring thaws. A proactive approach is to inspect flashing corners and step-flashing at joints before the worst of winter arrives, and to ensure that sealants and metal flashings are corrosion-resistant and properly integrated with the roofing material. If a roof already shows loose or displaced flashing, address it promptly with a compatible repair method rather than waiting for a storm to stress it further. During replacement, insist on a continuous flashing plan that ties into counter-flashing at chimneys and at wall intersections, with careful attention to slope, drainage, and future movement of the structure.
Autumn wind-driven debris and rapid weather swings in the Kansas City area can expose weaknesses around valleys, chimneys, and roof-wall intersections before winter. Valleys should be cleaned of leaves, pine needles, and debris, then sealed with valley metal that overlaps properly and bridges any minor gaps behind shingle courses. Chimney and vent penetrations require correctly installed step or base flashing, plus an additional top flashing cap if wind loads are high or if there is frequent thermal expansion. For roof-wall intersections, ensure a continuous, integrated flashing detail that accommodates both the slope change and any shifts from seasonal temperature fluctuations. In practice, this means choosing flashing materials with proven performance in mixed-wind environments, securing fasteners according to profile, and verifying that sealants remain flexible through a broad temperature range. A thoughtful seasonal plan-inspection in late fall, targeted repairs after winter, and a mid-spring check-helps keep these critical details from becoming hidden failures when the next severe weather arrives.
Local replacement costs vary widely because premium materials are in steady demand. Asphalt shingles commonly run from 350 to 700 USD per square, while slate can push 1,500 to 3,000 USD per square. Clay tile and concrete tile sit in between, with roughly 900-1,900 USD per square for clay and 800-1,400 USD per square for concrete. Wood shingles or shakes typically range from 500 to 1,100 USD per square, and synthetic or composite shingles sit around 500 to 900 USD per square. These numbers reflect Leawood's preference for durable, curb-appealing options on upscale homes.
Costs in Leawood are often pushed upward by steep roof pitches, complex rooflines, and a variety of accessory details common on larger suburban estates. A roof with multiple gables, dormers, and intricately intersecting planes adds labor and waste, which shifts pricing beyond the base material rate. High-end underlayment, specialized flashing, and copper or zinc accents on valleys and ridges also contribute to the total. The same material can cost more on a tall, steep roof than on a simple, single-slope installation.
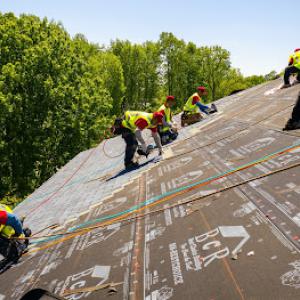
Regional storm surges can temporarily raise labor pressure and scheduling delays after spring hail events, especially for specialty installers who handle tile, cedar, synthetic, or slate systems. When storms hit, crews converge on Leawood homes, and that demand can elongate lead times even for standard asphalt jobs. Plan for potential spacing issues between measurement, material delivery, and on-site work, particularly if your home features long eaves, towers, or multiple valleys that require careful sequencing.
Start with a material preference that aligns with both the home's aesthetic and long-term maintenance profile. Get detailed bids that itemize roof section costs, accessory work, and waste disposal. If a premium material is in the plan, ask about staging the project to align with favorable weather windows and local crew availability, which can help minimize delays. Always factor contingency for extended timelines during post-hail periods, and compare warranties specific to steep-slope installations and complex rooflines.
Get a clear picture of your project costs upfront - no commitment required.

A full roof replacement in this market typically requires a building permit rather than treating reroofing as a no-paperwork project. The city's process is concrete: you submit project details including roof type, underlayment, and ventilation, and you earn a clear path forward through the city building department's inspection after completion. Skipping steps or misrepresenting a scope can lead to fines, delays, or even required removal of improperly installed materials, so it pays to align your plan with the permit expectations from day one.
Understanding the sequence is essential. Begin with a precise description of materials and the structure's ventilation plan, because the city review scrutinizes how the replacement interacts with attic ventilation and roof deck integrity. The permit review can surface questions about underlayment choices, attic space conditioning, and eave detailing, especially on steeper slopes common to upscale homes. If your design includes cedar, slate, or clay tile, be prepared to document weight considerations and any structural adjustments that might be needed to meet code or retrofit requirements.
In practice, the permit process creates a predictable window for work to begin and finish, but it can also slow a project if information is incomplete. A well-documented application helps prevent back-and-forth with inspectors and minimizes the risk of rework after installation. If your roof involves unusual penetrations, skylights, or solar, expect additional review items. Coordinating with the contractor to ensure the submission package mirrors the actual installed configuration helps avoid later punch-list items that hold up occupancy or occupancy-related timelines.
Some projects also face HOA review, which can complicate timing even after the city path is understood. HOA guidelines may dictate acceptable material choices, color palettes, and even the rhythm of staging and debris removal. Weather-sensitive decisions-such as selecting a color that withstands Kansas hail patterns or matching trim and gutters-should be discussed with the HOA early, because approvals can stall a project long after the permit is issued. If an HOA is involved, request a copy of design standards before selecting materials to prevent costly changes later in the process.
To stay on track, maintain open communication among the permit office, the contractor, and the HOA contact. Keep copies of submitted documents, notes from inspections, and any correspondence about required updates. Weather-driven delays are common in spring, so plan for inspection scheduling within the permit timeline and align expectations with the HOA review windows. In the end, a compliant, well-documented path minimizes risk of noncompliance and helps keep your replacement moving toward a solid, code-compliant finish.
Leawood homeowners are in a generally stable but high-claim insurance environment where hail and wind losses are common enough that adjusters often expect strong photo documentation and scope support. When a hail event hits, begin by photographing your entire roof from multiple angles, plus any interior impacts you notice in ceilings or attic spaces. Keep a dated, organized file of images, receipts, and contractor notes so the scope matches what the adjuster sees on the plan.
After major metro hail events, some carriers may tighten underwriting or raise deductibles, which can change the economics of repair versus full replacement for Leawood owners. If you receive a notice about deductible changes or coverage adjustments, contact your agent promptly to review how that affects a pending claim. Don't wait for a renewal to understand whether a larger replacement might be warranted rather than piecemeal repairs.
Because Leawood has many premium roof types, replacement cost evaluation can be especially important when policyholders need to document matching materials and specialty installation requirements. If your home uses clay or concrete tile, slate, or cedar, gather product details from manufacturers and verify that the proposed replacement materials match the existing profile and color, or that your policy supports a close match. Include photos of the surrounding roofs for reference when discussing continuity with the insurer.
Begin the claims process promptly after hail exposure, but allow enough time to assemble a thorough file. Insurers appreciate a clear narrative of damage, paired with a measured scope of replacement or repair. If the home is multi-story or has complex roofing features, consider enlisting a local roofer who can articulate scope specifics in a render-ready format for the adjuster.
Keep communication concise and documented. If a claim stalls, request a written reason and a defined next step, then coordinate with your roofer to provide updated scope or supplemental photos. In a market where strong documentation matters, having a trusted local contractor who understands Leawood's roof landscape helps you move through the process with fewer delays.
When a hail or high-wind event hits, the local contractor scene shifts quickly toward damage response, insurance processing, and rapid re-roofing. Homes with steep-slope asphalt, clay or concrete tile, cedar, and slate-like composites all demand different skills, and the best crews in this area coordinate with adjusters rather than merely showing up with buckets and tarps. Expect a flurry of offers, some cleanups, and a few hard truths about timing, scope, and quality that only show up after the first storm recap.
Premium materials require specialty handling, precise matching, and careful accessory work-ridge vents, underlayment transitions, flashing around chimneys, and proper valley setup. A contractor that claims to handle tile or slate-like products should demonstrate experience with the specific material you have, not just a generic "all roofs" approach. Cedar shakes or synthetic composites deserve crews who understand expansion, color consistency, and long-term performance in Kansas spring weather.
Ask for local projects with similar material; request a written timeline that includes cleanup goals and weather contingency plans; verify that the crew will supervise the job and manage waste responsibly. Check references from neighbors who had storms within the past two years and confirm that permits, HOA expectations, and any contractor-specific requirements were followed. A credible team will explain their process, provide a detailed scope, and stand behind workmanship for the life of the installation.
Document damage before any patch work starts, take clear photos from multiple angles, and note locations of dents, leaks, and displaced shingles. Insist on a written assessment from the contractor that aligns with your insurer's expectations, and resist pressure to sign before you have evaluated all options. Here, the best outcomes come from a very cautious, organized approach that prioritizes quality over speed and reliability.