Last updated: Apr 19, 2026
Central Pennsylvania's winter temperature swings around freezing create repeated freeze-thaw cycling that is hard on shingles, flashing, sealants, and roof penetrations. In this climate, water that seeps into small gaps can freeze, expand, and push apart laps, seals, and joints. When spring arrives and temps rise, that same moisture then contracts or evaporates, leaving micro-cracks and exposed fasteners behind. This pattern is a constant stress test for roofs that must perform through both icy winds and humid afternoons.
State College sits in central Pennsylvania where those freeze-thaw cycles are a defining roof force. The problem isn't only the cold snap; it's the way a warm, wet day after a cold night can drive condensation under shingles and underlayment, especially on roofs with older ventilation or compromised flashing. As a homeowner, you should assume moisture management is a year-round obligation, not a seasonal annoyance. If gutters are clogged or soffits are blocked, meltwater pools near edges and penetrates seals; if penetrations around chimneys, vents, or skylights are not sealed to a high standard, you'll pay the price when moisture migrates into the roofing system. The result is accelerated wear on sealants, vulnerable edge details, and weakened fasteners, which increases the risk of leaks after even modest thaw cycles.
Moisture control has to be proactive, not reactive. In humid summers, vapor can migrate upward and condense inside the roof assembly if there's inadequate insulation or improper intake and exhaust ventilation. That condensation, paired with late-season freezes, can lead to hidden rot and felt or underlayment breakdown long after the initial installation. Fixes should target the whole roof system: shingles that lie flat and seal properly, properly integrated flashing at chimneys and valleys, and continuous, well-seated underlayment with sound edge detailing. You'll want to verify that roof penetrations have clean, continuous sealants and heat-appropriate flashing that resists UV degradation and thermal cycling. Periodic inspections after freezes, thaws, and heavy rain help catch issues before a small leak becomes a significant problem.
Late spring through early fall is the preferred replacement window locally because central Pennsylvania winter conditions can interrupt tear-off, underlayment adhesion, and inspection timing. If replacement is considered, plan for a stretch of dry weather long enough to complete tear-off, install a compatible underlayment, and finish with a high-performance sealant and flashing that can tolerate repeated freeze-thaw cycles. In tight neighborhoods or student-rental blocks, ensure crews protect adjacent structures and maintain clear egress for emergency services during the project. For ongoing maintenance, schedule semi-annual inspections-ideally after the coldest and the warmest months-to catch micro-cracks, sealant failure, or flashing gaps before they escalate.
If a leak is suspected, address it promptly with a careful inspection of the roof surface, penetrations, and the most vulnerable edge areas. In this climate, delaying repair invites moisture migration that compounds existing damage and increases the risk of interior water intrusion during a sudden freeze-thaw event. A focused, timely response preserves the roof's integrity and reduces the chance of widespread interior damage during the next winter cycle.
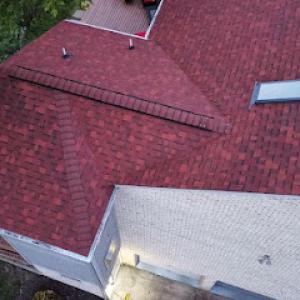
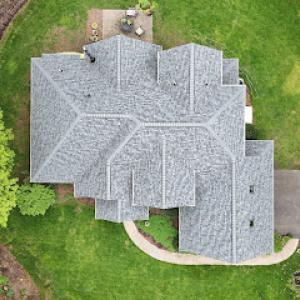
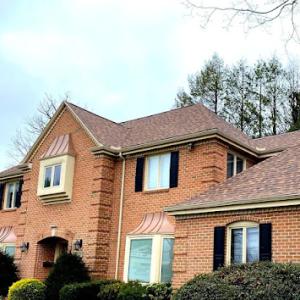
Asphalt shingles dominate reroofing in this area because they fit the common detached homes, townhomes, and many rental properties better than heavier premium systems. The freeze-thaw cycles, humid summers, and the borough's shared driveways and tree-lined streets mean you want something that handles moisture and temperature swings without soaking up maintenance time. In practice, that means a practical, field-tested choice that keeps TEOT (time, effort, and damage) down while staying serviceable across a broad neighborhood mix.
For most homes, asphalt shingles strike the right balance of install ease, repair familiarity, and performance under State College winters. They shed surface moisture efficiently when new and tolerate the freeze-thaw pattern you see year to year. To maximize longevity, choose a architectural or laminated style with a thicker asphalt profile, and pair it with a solid underlayment and proper roof edge detailing. In neighborhoods with older trees and frequent leaf litter, a darker shingle can help hide minor staining between cleanings, but be mindful of attic ventilation so heat buildup doesn't accelerate wear. If you own a rental property or a mixed housing stock, asphalt remains the most forgiving option for crews that encounter a range of roof shapes and access situations.
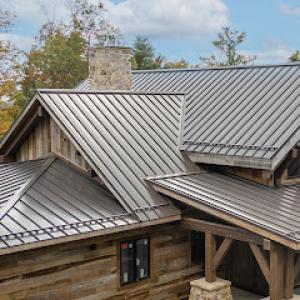
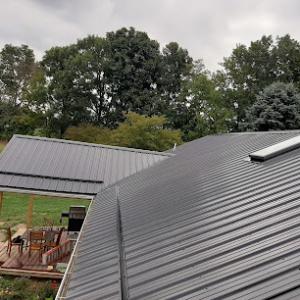
Metal is a strong regional fit for snow shedding and long-term durability. It stands up well to the freeze-thaw environment when installed with proper fasteners and a continuous underlayment. The long-term payoff is real, especially on homes where attic condensation risk is mitigated with good ventilation. However, detailing at eaves, valleys, and penetrations matters a lot because moisture can find its way into hidden channels if flashing and seals aren't meticulous. For practical results, look for a panel profile and seam configuration that minimizes water entry at joints, and ensure snow guards or snow stops are considered for steep sections where drifting can occur. If a lot of shade and wet microclimates are present around a porch or dormer, plan for additional intermittent maintenance to keep deicing channels clear and prevent ice dam formation behind complex roof geometry.
Clay tile, concrete tile, wood shakes, and synthetic/composite products appear less often and require closer review of structural load, moisture behavior, and maintenance expectations for older homes. Clay and concrete tiles add architectural value and excellent longevity, but their weight demands a solid structural assessment and, in many cases, a reinforced framing approach. The added mass can stress older rafters and trusses if the underlying structure isn't uprated. Wood shakes bring character and good insulation potential, yet they demand vigilant moisture management and periodic treatment to resist fungal growth and insect issues in humid seasons. Synthetic or composite shingles can offer decent performance with reduced maintenance, yet they still vary in how well they handle freeze-thaw cycles and color fading in sun exposure. For all these options, a careful review of the roof's slope, existing insulation, and the home's historical material footprint is essential before committing.
In this climate, any roof must contend with moisture management across seasons and the risk of ice damming where eaves are undersized or insulation is lacking. If the home has older construction or mixed materials, prioritize thorough attic ventilation and a robust flashing plan regardless of the chosen material. For rental fleets with many roof profiles, asphalt remains the most adaptable choice, but metal can pay dividends where snow shedding and long-term durability are priorities, provided the installation details are handled with care. When considering tiles, shakes, or synthetics, demand a load assessment and a realistic maintenance plan that accounts for State College's distinctive winter and humidity patterns.

ROOFX Roofing
1257 E College Ave, State College, Pennsylvania
5.0 from 175 reviews
Best Roofing Companies State College PA, ROOFX Roofing is the foremost roofing contractor in State College, PA. As your trusted partner in elevating the protection and aesthetic appeal of your home, we bring unparalleled expertise and a commitment to excellence. Our highly skilled and certified professionals specialize in a comprehensive range of services, from roof replacements and repairs to cutting-edge vinyl and James Hardie siding installations as well as seamless gutter installations. RoofX stands out as the go-to choice for transforming your roofing, siding, and guttering experience into a seamless journey of durability and beauty. Contact us today!
Buccos Roofing
(814) 801-3876 www.buccosroofing.com
2901 E College Ave SL275, State College, Pennsylvania
5.0 from 10 reviews
Buccos Roofing was founded in 2012 by Dan Easton, Mark Easton and Ernie Comfort. Together, the three Peters Township natives set out to serve the greater Pittsburgh community and never looked back. What once was a three-man, one truck crew, working out of a garage, is now an enterprise spanning the greater Pittsburgh area. They attribute their success to hard work, good friends, and family. Today, Buccos Roofing is home to over 25 roofing contractors and additional staff. Together, our team of experts work hard to provide our customers with the best roofing and exterior renovation experience possible. Our mission is to deliver reliable and enjoyable services to each of our clients, prioritizing their needs first.
RH Marcon
(814) 238-2800 www.rhmarcon.com
2500 Clyde Ave, State College, Pennsylvania
4.4 from 16 reviews
Experience and innovation. That’s what you will get when R.H. Marcon, Inc. handles your roofing project. For more than 35 years we’ve been one of Central Pennsylvania’s top roofing contractors. We combine our wealth of experience with the latest roofing techniques to install the perfect roof for your project, from traditional built-up roofs to sustainable, “green” roof systems for LEED certification.

Roofing King
(814) 813-2449 thekingofroofs.com
Serving
4.9 from 109 reviews
Roofing King in Pennsylvania specializes in residential roofing services, including storm damage restoration and gutter service. As a veteran-owned business, we are dedicated to serving our community with integrity. Benefit from no interest financing and no payments for up to 12 months, plus free roof inspections and estimates. We also offer 24/7 emergency services for your peace of mind. Based in Bellefonte, we’re your trusted local roofing partner, providing reliable warranties for lasting protection. Choose Roofing King for dependable residential roofing solutions in Pennsylvania.

Money Savers Construction
(570) 535-2850 moneysaversconstruction.com
Serving
4.2 from 13 reviews
Money Saver Construction provides metal, shingle, and rubber roofing as well as gutters to the Boalsburg, PA, area.
Little Ridge Roofing
(814) 357-5629 littleridgeroofing.com
Serving
5.0 from 59 reviews
Professional Amish Roofing contractor operating out of Bellefonte but serving surrounding communities. We are available for both commercial and residential jobs so be sure to call us for your roofing needs.
Midtech Standing Seam
(814) 644-4091 www.midtechstandingseam.com
Serving
5.0 from 71 reviews
Midtech Standing Seam, an Amish-owned roofing contractor, is redefining homes throughout State College, Pennsylvania. Specializing in the enduring beauty and exceptional quality of standing seam metal roofing, they elevate your property's curb appeal. More than just a roof, it's a lasting visual statement backed by a commitment to excellence. Experience the peace of mind that comes with a lifetime workmanship guarantee and impressive paint durability warranties. Discover how Midtech Standing Seam can transform your home.
Starway Roof Systems
(814) 680-3788 starwayroofing.com
Serving
5.0 from 461 reviews
Starway Roof Systems, established in 2016, is an expert in providing a comprehensive range of roofing services for homes in State College, PA & Lock Haven, PA and across Central PA. They are dedicated to offering customized solutions for all roofing needs, from identifying problems and recommending the perfect solution to the installation and maintenance of roofs, gutters, siding, and skylights. With their commitment to customer satisfaction and a team of experienced professionals, Starway Roof Systems ensures the long-term safety and security of your home's most crucial protective feature – your roof.

JB Roofing
(814) 231-2824 www.jb-roofing.net
Serving
3.9 from 26 reviews
JB Roofing we have proudly been serving Centre County Since 1948. We are you local Owens Corning preferred contractor Call us for all your roofing, siding, soffit, fascia, seamless gutters and gutter covers needs.
Sinking Valley Construction
(814) 329-8833 topusabrowse.top
Serving
5.0 from 6 reviews
We install quality metal roofs for an affordable price

Rockyridge Roofing & Construction
Serving
5.0 from 1 review
Family owned and operated, serving the local Centre, Clinton counties and surrounding areas. We offer a variety of choices for your new roof ... shingle or metal in a variety of color choices. Ask about our fantastic installation warranty !
J B Roofing
Serving
3.0 from 11 reviews
We are a general contractor offering roofing services that include: lifetime architectural shingles, 40-year metal, and 20-year rubber roofing. J.B. Roofing also has seamless gutters, siding, soffit, fascia, and shutters in a variety of 40 colors. We provide lifetime warranties on all our shingled roofs, seamless gutters, and soffit and fascia work. We depend on tried and true materials from suppliers like GAF, Certainteed, and Owens Corning, so you can, too!
A full roof replacement in State College Borough typically requires a building permit, while some minor repairs may not, making project scope definition important before work starts. The local housing stock, from older ranches to student rentals, often hides structural quirks behind layered shingles and cracked flashing. Before any tear-off or installation begins, you or your contractor must apply through the local Building Department. It helps to have a clear plan: note whether sheathing replacement, vent flashing, or gutter work is in scope, because those items can trigger additional approvals or inspections. If the scope shifts-say a leak is found once tarps come off-revisit the permit with the Building Department to avoid penalties or delays.
The contractor or homeowner is expected to apply through the Building Department before reroofing begins. In practice, that means coordinating a submission that includes project details, the proposed roofing material, and a site plan for access and staging. In neighborhoods where houses have limited eave space or nearby driveways used for student parking, it pays to map access routes with the inspector so personnel can bring in materials and equipment without disrupting neighbors or landscaping. If your roof requires tear-off, the department will likely request fall-protection plans or safety notes for working around mature shade trees common to the borough's blocks. Keeping a ready-to-submit package-permit application, material spec, and a brief scope of work-will streamline the process and reduce the time between approval and start date.
Inspections in the borough usually occur during tear-off or installation and again at final, with attention to roof installation quality and flashing. The tear-off inspection checks that old shingles and underlayment are removed to a clean, solid deck and that eaves, rakes, and valleys are properly prepared for a new layer. During installation, inspectors focus on proper nailing patterns, correct insulation and ventilation details, and flashing around chimneys, skylights, vents, and transitions to sidewalls. Freeze-thaw cycles in this climate make moisture management critical: inspectors will look for continuous underlayment, sound flashing that sheds water effectively, and properly sealed penetrations. The final inspection verifies that the roof assembly forms a continuous, weather-tight barrier and confirms that all ventilation components operate without obstruction. If adjustments are needed, the inspector will label required corrections and a follow-up visit will be scheduled. Communicate openly with the Building Department about any unusual roof features-such as complex ridges, dormers, or multiple roof planes-as these commonly require additional detailing to satisfy code and moisture-control expectations.
Plan around typical seasonal delays by submitting early in the plan year and confirming availability of the inspector for your preferred installation window. When you schedule work, build in buffer for weather-related pauses-freeze-thaw cycles can stall tear-off or install phases and extend permit timelines. For multi-story homes or rentals with limited access points, discuss staging with the inspector to minimize risk to adjacent structures and to ensure safe debris containment. Finally, keep communication logs and a copy of the permit on site; this helps when questions arise during the mid-project inspections and can avert unplanned work or rework that interrupts a steady installation pace.
In this college-town climate, insurance activity tends to rise after seasonal storms and hail events rather than following the rollercoaster of claims you hear about in larger catastrophe markets. That means adjusters are often trudging through a mix of older roofs and newer replacements, evaluating how a storm actually touched the materials rather than relying on headline numbers. You'll notice the pattern locally: more measured review cycles, with attention to how a roof has aged and how visible damage lines up with documented weather events.
When hail or wind has a claim-worthy moment, the adjuster will lean on photo documentation, material specifications, and contractor estimates to decide what to cover. Take clear, timestamped photos of dented shingles, granule loss, cracked or curling edges, and any exterior signs of moisture intrusion. Include close-ups of flashing, vents, and dormers, plus wide shots of the entire roof to show extent. If you have old shingles or unusual roofing components, have spec sheets handy. A well-documented narrative that ties observed damage to a specific storm helps prevent back-and-forth and speeds the review.
Insurers may favor replacement when a roof is near end-of-life or when storm impacts are clearly documented on roofing materials and related components. In State College, where freeze-thaw cycles punish aging systems, a contractor's assessment that points to widespread wear, with demonstrable storm-induced damage, can shift a claim toward full replacement. However, if the damage is isolated to a small area or the roof is relatively new, repair options may prevail. Understanding this nuance helps you set expectations with an adjuster before moving forward.
Freeze-thaw cycles here tend to push moisture into seams, rakes, and valleys, especially on older asphalt or wood shake systems. In humid summers, latent moisture can linger behind flashing and under shingles, underscoring the importance of inspecting in the fall after the last hot, wet spell. If moss or algae growth is present, it may complicate moisture assessments, so document these conditions as part of the overall roof health picture.
Begin by collecting recent storm photos and a roof condition log, then compare them to the roof's age and material specs. When you meet an adjuster, walk through the roof with the contractor's written assessment in hand, focusing on how moisture and temperature swings could have contributed to observed damage. If you're unsure, seek a local contractor who routinely documents damage with clear photos and measurements; their input can anchor the claim narrative and help ensure a fair review.
In this area, asphalt shingles typically run about $350 to $650 per square, metal from roughly $700 to $1200 per square, clay tile $1000 to $1800 per square, concrete tile $900 to $1500 per square, wood shingles or shakes $700 to $1100 per square, and synthetic or composite shingles $400 to $900 per square. Those ranges reflect State College's mix of older neighborhoods, student rentals, and suburban days with varying roof complexity. When you're budgeting, use these figures as a baseline and expect small deviations based on roof pitch, attic access, and the number of penetrations.
Costs in State College can rise when work is scheduled into the short central Pennsylvania peak season from late spring through early fall, when weather is more favorable and contractor calendars tighten. If a project lands in that window, you'll see higher bids or quicker-than-expected material hold-ups, which can bump labor and delivery timelines. Plan with a cushion for both price and timing, especially if you're coordinating multiple trades or letting a rental property cycle through tenants in the same season.
Older homes and rental-heavy properties around the borough can add cost through multiple reroof layers, decking repairs, flashing updates, and tighter site logistics compared with newer suburban subdivisions. In practice, that means more waste removal, possible decking re-sheathing, and careful maneuvering around tight driveways and on-street parking during busy months. If there are several layers to remove, expect a step-up in per-square pricing and a longer project timeline. For flats or multi-story homes with upper-story access challenges, crews may quote higher to cover safety gear and scaffolding needs.
Start with the local price ranges as your anchor, then add a 10-20% contingency for seasonality and aging infrastructure. If a roof has clay or concrete tiles, be prepared for longer lead times and potential weight considerations that could affect the underlying structure. For rentals and older neighborhoods, request a detailed scope that covers deck inspection, flashing updates, and waste disposal so the estimate reflects the actual work. Finally, compare several bids in the same season to gauge what's included in each price point and to spot any supplier or crew constraints common to the central Pennsylvania climate.
The mix of older in-borough housing and investor-owned student rentals creates a local landscape where deferred maintenance can show up as patchwork repairs. In neighborhoods near the borough core, many roofs have lived through decades of freeze-thaw cycles, with shingles that have seen better days and flashing that's developed places to leak. The result is a roof deck that might feel solid at a glance, yet reveals surprises after a tear-off-loose fasteners, compromised underlayment, or hidden rot. You'll want to anticipate these realities when planning a repair or replacement, especially if the roof supports living space or valuable attic ventilation.
Owners of rental properties in this market often plan around occupancy and academic turnover. That timing can press a reroof into a narrow window, sometimes rushing the project before tenants move in or after students graduate. The risk here is skipping a careful inspection of details that matter long term-consistent drip edges, vent placement, and integrated moisture barriers. If you manage or own a rental, build in a short inspection phase before the crew arrives, so flashing and penetrations align with the roof's expected life rather than the calendar.
State College roofs closer to the core have shown aging flashing at valleys and chimneys, modest ventilation shortfalls, and occasional deck surprises once the old roofing comes off. Freeze-thaw cycles drive moisture deeper, and improper drainage can magnify ice dam risk on mid-century structures. A practical approach is to test attic ventilation early in the season, check for condensation patterns after heavy rains, and budget for a careful reseal around penetrations once the old material is removed. For rental properties, confirm that turnover plans include a full, staged inspection of flashing, vents, and the deck to prevent repeat calls from tenants after a thaw.
Winter snow, ice, and freezing temperatures in the State College area can slow or stop reroofing work altogether. When jack frost visits, crews move slower, and material handling becomes trickier. Plan work windows around likely cold snaps and extended thaws, and be prepared for short pauses if a burst of severe weather drops a layer of ice. Your best bet is to target critical milestones for late fall or early spring, with contingency days set aside for frost cycles and subfreezing mornings that make roofing underlayment and nail guns balky. Clear driveways and staging areas before a storm, and keep ladders and safety gear accessible so crews can resume quickly when skies clear.
Spring and summer storms with wind can damage roofing components and also push back local installation schedules. In State College, gusty days can lift loose shingles, loosen flashing, and relocate fasteners, so expect inspections to tighten up after a windy system passes. Have a realistic backup plan if a large storm gaps your sequence, especially around graduation periods and early summer when rental turnover increases activity. Coordination with nearby projects helps prevent pileups on narrow streets and tight neighborhoods in the borough.
Autumn leaf drop and moisture are a practical local concern for installation timing, cleanup, and moisture control before winter returns. Leaves clog gutters and valleys, slowing drainage and inviting moisture intrusion behind rapid weather changes. Schedule main roofing work before peak leaf fall when possible, and allocate extra time for cleaning and debris removal. During the shoulder season, emphasize thorough resealing of penetrations and careful attic venting checks to minimize condensation as temperatures swing day to night.