Last updated: Apr 19, 2026
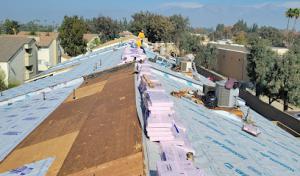
In the horse-property lanes of western Riverside County, spring brings a steady finish to the wet season and a clearer window for roof work. Rainfall is largely out of the way by late March, and the typical Norco drainage pattern settles into a predictably dry spell. That makes tear-off and dry-in scheduling more reliable than mid-winter, when occasional storms can interrupt progress and push crews into tight timeframes. Plan to target a mid-spring start if your calendar allows, coordinating with your contractor so roof deck exposure is kept to the shortest practical span. Dry-in during spring is helped by mild temperatures and lower humidity, which reduce the risk of moisture affecting underlayment and shingle laps. If your roof uses tile or composite, ensure the crew has a plan for secure staging and clean, efficient removal to minimize dust and debris blowing into the horse pastures nearby.
Late-spring to early-summer heat in inland western Riverside County can affect crew pacing, material handling, and the timing of exposed underlayment during installation. Dry conditions are common, but heat can tire workers and shorten productive daylight hours, so establish a realistic cadence with the contractor. For roof types with long runs of underlayment or tiles that require careful alignment, schedule the hottest days for higher-risk steps that can be paused when temperatures spike, and reserve cooler mornings for critical tasks such as securing underlayment seams and temporary tarping. Protect exposed areas with temporary windbreaks or tarps during brief, high-wind periods, and confirm that roof-to-ground access routes are clear to avoid unnecessary delays that could stretch into the hottest part of the day. Remember that long, uninterrupted stretches of sun can accelerate deck drying and impact the performance of certain underlayments, so a staged plan that alternates material handling with interior work can keep the project moving without compromising the roof's base.
Fall wind periods in the Santa Ana-influenced Inland Empire can complicate tile staging, tear-off safety, and temporary dry-in protection on open roofs. When Santa Ana winds arrive, crews should have a contingency plan for securing loose debris, protecting edges, and preventing wind uplift on exposed sections. Tile projects require particular attention to staging, as tiles added before the full wind cycle can be destabilized if not carefully aligned and secured. Temporary dry-in protection becomes more critical when gusts are forecast, especially on open roofs where tarping and edge protection must hold up under shifting air. Coordinate with the crew to align scheduling with reliable forecast windows, so gusty days do not stall progress or compromise safety. If a storm system sweeps through, expect the possibility of postponement and adjust your timeline accordingly, keeping in mind that fall's wind variability can be harder to predict than the more consistent spring or late-spring conditions.
To maximize the chances of a smooth replacement, align the project with a shoulder-season approach: aim for a spring start when the rainfall is mostly done and temperatures are moderate, then use the fall as a second preferred window if spring slots fill up. For tile-and-deck assemblies, build in extra time for staging and safety checks during wind-prone months, and ensure the crew has a clear plan for protecting underlayment during any temporary delays. Communicate clearly with the contractor about preferred sequencing-whether tear-off comes first or a partial teardown is staged to minimize exposed decks during windy periods. In Norco, the balance is to leverage dry, mild periods for the most labor-intensive steps while maintaining flexibility to adapt to the inland heat and Santa Ana winds. With that approach, the roof replacement can proceed efficiently without compromising performance or long-term durability.
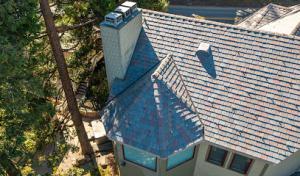
Tile roofs dominate the skyline of this community, and the look is part of the local character. The dry-summer heat of Inland Valley days stresses underlayment sooner than many homeowners expect, while the wet winters expose fast-moving issues that can hide beneath seemingly solid field tiles. The result is a roofing situation where the weakest link is often not the visible tile, but what lies beneath and how the roof handles seasonal shifts.
Clay and concrete tiles are common, but the underlayment beneath them often wears out faster than the tile surface in Norco's climate. Foot traffic during maintenance, plus age-related wear, can lead to small leaks that only reveal themselves after a winter rain when tiles still look serviceable from the curb. The risk is that loose or cracked tiles mask deteriorating underlayment, allowing water to migrate laterally and collect where it matters most-at joints, near penetrations, or along eaves. In practice, a replacement project should include a thoughtful check of the underlayment condition, not just a tile-by-tault of the field.
Many homes here use heavier roof systems, a carryover from Inland Southern California subdivisions. Those roofs are designed for long service life, but replacements must consider whether the old field tiles can be reused or if a full reset is warranted. Reusing tiles saves weight and preserves the look you paid for, yet it can inherit damaged flashing, old fasteners, or warped tiles that fail sooner than expected. On the other hand, a full reset provides a fresh base and ensures new underlayment, but adds immediate weight and cost. The decision should factor in the roof's age, the tile condition, and the contractor's assessment of flashing and penetrations.
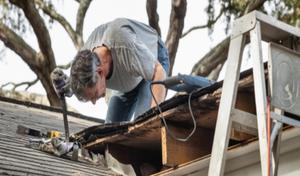
Norco's wind patterns and the regular need to access the roof for seasonal checks raise practical concerns. Heavier tile assemblies demand careful handling during replacement, and the risk of cracked tiles increases with rough handling or foot traffic. When planning a repair, insist on a plan that minimizes foot traffic on vulnerable areas and uses protective mats and proper fall protection. The goal is to preserve both the tile appearance and the integrity of the tile supports.
Leaking may originate below tiles that still look solid from the ground, especially around rake edges, hips, and valleys. A thorough inspection should include testing for hidden moisture, examining ridge lines for movement, and confirming that valley flashings have not corroded or deformed beneath the tile layer. Regular checkups after installation help catch problems before they become widespread, preserving both roof performance and curb appeal.
In Norco, scheduling replacement around the dry-winter rhythm matters. A spring or early fall window reduces exposure to peak heat and heavy rains, while enabling crews to test long-term seal performance before the next dry season. Your local pro should document underlayment condition, assess tile suitability, and present a clear plan for whether reuse or reset best serves your home's tile roof.
Find contractors who specialize in clay and concrete tile roofs, known for their durability and curb appeal.


Alpha & Omega Roofing
(888) 847-7663 www.alphaomegaroofing.com
593 Carson City Way, Norco, California
4.5 from 8 reviews
Alpha & Omega Roofing is the trusted roofing contractor in Whittier, CA and Southern California for over 50 years. Specializing in new shingle roofing installation in Santa Fe Springs, CA, we provide expert home roofing installation, commercial roofing, reroofing, roof repairs, waterproofing, maintenance, and emergency roof services. We offer free roofing estimates and complete roof installation with long-lasting results. As a leader in the roofing industry, our experienced team delivers quality, reliability, and peace of mind. Call now to schedule your estimate and protect your property with proven roofing solutions.
Circle City Roofing
(951) 736-5252 www.circlecityroofinginc.com
454 Sixth St, Norco, California
3.9 from 25 reviews
Roofing Contractor specializing in commercial, industrial and residential roof installations and repairs. Licensed, Bonded and Insured. Providing superior roofing and maintenance services. Every roof project is supervised from start to finish. We use
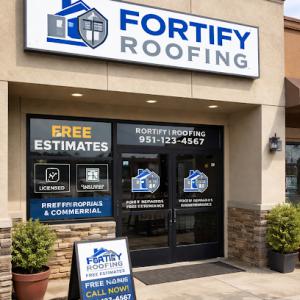
Fortify Roofing norco
3060 Hillside Ave, Norco, California
4.5 from 2 reviews
Fortify Roofing provides reliable residential and commercial roofing services in Norco, CA. We specialize in roof repairs, replacements, and inspections, delivering quality workmanship and honest service you can count on.
Roofing & More
(951) 394-0233 www.roofingandmorellc.com
Serving
4.8 from 163 reviews
Expert commercial, industrial, and residential roofing specialists serving Inland Empire, Orange County, Los Angeles County, Riverside, and San Bernardino. While expanding into Southern California's premier commercial roofing solution, we maintain our dedication to quality residential services. Specializing in energy-efficient installations, repairs, and maintenance for warehouses, offices, retail centers, and homes. Our certified team delivers superior workmanship with minimal disruption. We offer comprehensive warranties, emergency repairs, and preventive maintenance. Expert installation of TPO, EPDM, metal roofing, and cool roof systems. Licensed, bonded, and insured. Contact us for a free consultation.

American Highland Roofing
(951) 463-1512 americanhighlandroofing.com
Serving
4.8 from 60 reviews
At American Highland Roofing, we proudly provide top-quality residential and commercial roofing services. Our work is rooted in commitment, integrity, honesty and affordability. We offer competitive pricing, senior discounts, and warranty on all roof repairs and new installations. Whether you need a minor repair or a complete roof replacement, we are here to protect your home or business with expert care and reliable service.
4J's Roofing
Serving
5.0 from 22 reviews
4J's Roofing, Corp: crafting sturdy, beautiful roofs in Corona, CA. Based on Skylark Circle, we're more than just a roofing contractor – we're your neighbors dedicated to protecting your home. With quality craftsmanship and unwavering reliability, we ensure your roof is not only durable but also enhances your home's curb appeal. For a roof built to last and the peace of mind you deserve, choose 4J's Roofing, Corp.
Allstar Roofers Riverside
(951) 498-5637 roofersriversideca.com
Serving
5.0 from 44 reviews
Allstar Roofers Riverside offers a comprehensive range of roofing services tailored to meet your every needs in Riverside, CA. Our team has the expertise to handle any project with precision and excellence. From new roof installations to repairs and maintenance, we ensure that your property is protected from the elements while enhancing its aesthetic appeal. Our technicians are well-versed in the latest roofing techniques and use top-of-the-line materials to deliver exceptional results that stand the test of time. We are always ready to address your questions and concerns promptly, providing you with peace of mind throughout the entire roofing process. Contact us today for a consultation, and let us transform your roof!
Corona Roofing Solutions
(951) 621-0280 coronaroofingsolutions.com
Serving
5.0 from 14 reviews
Corona Roofing Solutions is your local roofing contractor that our mission is make sure you're happy. We warranty our work and don't leave your job until you are happy. Call us today and see the difference.
Calcom Roofing
(951) 277-6150 calcomroofinginc.com
Serving
5.0 from 6 reviews
Reliable Roofing Solutions for Southern California Commercial and Residential At Calcom Roofing, Inc., we provide top-quality roofing services throughout Southern California with a commitment to honesty, craftsmanship, and customer satisfaction. Whether you need roof repairs, replacements, inspections, or new installations, our experienced team works with a variety of materials including TPO, Coatings, tile, shingle, and flat. We understand the unique demands of the Southern California climate and deliver durable, energy-efficient roofing solutions that protect your property and enhance its value. Fully licensed, insured, and backed by solid warranties—trust us to get the job done right the first time. Call today for a free estimate
Sandoval Roofing
(909) 665-6386 sandoval4roofing.com
Serving
5.0 from 43 reviews
At Sandoval Roofing we make sure to offer great services for your roofing needs including great pricing amazing workmanship and most importantly we thrive on customer service and customer satisfaction and make sure your roof is well taken care of by our professional team

Guyou Roofing & Solar
(866) 344-7729 www.guyouconstruction.com
Serving
4.9 from 1364 reviews
What if you didn’t have to think twice about your bill every time you flipped a switch? We can make it possible through affordable clean technology solutions tailored to your specific needs. From retrofit lighting and energy consumption monitoring to solar energy system installation and battery solutions, our experienced, problem-solving energy experts can help you become energy-independent.
J P Roofing
(909) 261-6473 jproofingco.com
Serving
4.9 from 100 reviews
"We Got You Covered" JP Roofing specializes in giving our customers the best quality roofing. From residential to commercial roofing services, we got you covered. We specialize in cool roof systems, hot mop built up roofing, torch down, asphalt shingles, tile, water proofing, and repairs.
Re-roof projects in this horse-property, semi-rural area typically run with material-specific price bands. Asphalt shingles sit around 400 to 900 USD per square, reflecting quick installation and lighter underlayment needs. Metal roofing commonly lands from 700 to 1200 USD per square, driven by panels and fasteners designed to handle high summer heat and wind. Clay tile projects commonly range from 900 to 1800 USD per square, while concrete tile sits roughly 800 to 1500 USD per square due to heavier weight and longer install times. Wood shingles or shakes typically fall in the 700 to 1200 USD per square window, and synthetic or composite shingles run about 500 to 900 USD per square, offering a lighter option with decent wind resistance. These ranges capture typical Norco jobs and reflect material choice, roof complexity, and the access that crews have to ranch-style and tile-heavy homes.
Tile-heavy roof designs are common in Norco, and that affects both the price and the work sequence. Heavier materials demand more robust decking inspection, potential underlayment upgrades, and careful handling during tear-off and disposal. If the existing roof uses concrete or clay tile, expect additional labor to juggle broken tiles and to re-seat or replace underlayment to match the new system. Contractors often quote extra for scaffold setup around horse-fenced properties and for careful waste containment on rural streets. In practice, these factors push costs above the bare material price, and the neighborhood's larger lot sizes can extend job durations.
The dry-summer, wet-winter cycle in Norco affects when it's practical to re-roof. Winter rains slow progress and increase the risk of decking catching moisture, so many crews prefer a dry-window between late spring and early fall. Fall wind periods can also complicate scheduling, as many homeowners target the shoulder seasons to avoid heat or rain, tightening labor calendars. If fall wind events coincide with a larger project, labor availability can tighten, nudging both timing and bid price upward. Planning ahead helps, especially for tile replacements that require meticulous handling and potential crane or hoisting equipment for heavy materials.
When choosing tile or tile-like systems, include underlayment upgrades and potential deck stabilization as part of the quote, since these steps influence long-term performance in this climate. For asphalt and synthetic options, ask about extended warranties that address heat-expansion and wind uplift common to the area. If a project uses wood shingles or shakes, confirm treatment and grading to resist sun exposure and seasonal dryness. Your final budget should reflect material behavior in the dry-to-wet cycle, tile weight, and the labor intensity of underlayment work beneath reusable or replacement tile systems.
The most popular roofing material in the US. Find pros who install, repair, and replace asphalt shingles.
In this part of the district, a building permit is typically required for a full roof replacement. The City of Norco Building & Safety department is the gatekeeper for permit issuance and plan review. Your project will be checked for how the roof system interacts with the existing structure, including the choice of roofing material, underlayment type, and ventilation details. If a homeowner or contractor skips this step or cuts corners on plans, the risk isn't just a ticket; it's the possibility of noncompliant work that could delay occupancy and trigger rework.
Plan review focuses on how the roof assembly will behave in the local climate pattern-dry heat in the summer, wetter winters, and the wind-blown dust that can infiltrate underlayment and vents. Be prepared to provide specifics on the roof deck condition, attic ventilation strategy, underlayment ratings, and flashing details around walls, chimneys, and skylights. The review process helps ensure proper air flow, moisture management, and a durable tile or shingle system that stands up to Norco's seasonal swings. If plans raise questions about roof penetration or attic access, expect the reviewer to want clarifications or additional details.
Attention to underlayment type and proper ventilation is a recurring theme in this jurisdiction. The inspector will look for an adequately vented attic, with soffit, ridge, or mechanical ventilation meeting code guidelines, and with a continuous underlayment that protects the deck during weather transitions. Detailing around roof-to-wall connections and penetrations should be sealed and flashed to prevent leaks, given the dry summers and wet winters that test sealants and fasteners. Provide manufacturer installation instructions with the permit submittal to demonstrate compliance and to minimize the risk of later remedial work.
Inspections occur at key milestones, including rough-in or underlayment installation and the final inspection. Rough-in confirms the structural readiness and correct placement of underlayment and flashing before the final layers go on. The final inspection validates that the roof installation matches approved plans, that ventilation and underlayment perform as intended, and that all components are securely installed. Final approval is needed before the roofing job is considered complete, so plan appropriately for inspection windows and any required corrections. Missing final approval can stall occupancy and extend project timelines.
Norco homeowners are operating in California's tightened insurance market, where wildfire-driven underwriting changes can influence whether aging roofs are repaired, replaced, or reinspected. The pattern of dry summers followed by wet winters means insurers are scrutinizing roof condition differently than in more hail-prone regions. In practice, that means decisions can hinge on documentation and a demonstrated history of upkeep rather than on a single incident. The consequence is real: a well-maintained roof with clear records has a better chance of staying out of a denial pile, while gaps in paperwork can lead to more frequent scrutiny or coverage adjustments after a claim.
Carriers may ask for maintenance records, prior storm or leak history, and updated roof evaluations during underwriting or claims review. In Norco, where winter rain events occur more often than dramatic hail, the focus shifts to moisture management and underlayment integrity. Expect requests for service invoices, contractor notes, and any available diagnostic reports that document roof tile condition, flashing, vent integrity, and attic ventilation. If a leak has occurred, be prepared to show how it was addressed, whether underlayment was replaced, and what the subsequent inspections revealed. The goal from the insurer's side is to confirm that the roof has been actively cared for and that lingering vulnerabilities have a traceable fix history.
Because winter rains test roofs differently than driving hail, documentation of leaks, underlayment condition, and pre-loss maintenance can be especially important when pursuing coverage decisions. A record of timely repairs, repeated inspections after heavy rain, and clear notes on any degraded flashing or worn sealants can change a carrier's interpretation of risk. In a town where dry summers stress shingles and tiles, insurers look for proactive upkeep that demonstrates resilience against moisture intrusion and leaf-dusted gutters that impede drainage. Organized files-photos, dates, and contract details-make your position clearer during any review, reducing surprises at a critical moment.
Maintain a running file of recent roof-related work, including dates, scope, and contractor recommendations. After significant rain events, document seepage paths, attic moisture, and any staining or cushioned dampness around penetrations. Have an updated roof evaluation ready, especially if a claim might be contemplated in the near term. If aging components show wear or you've made notable repairs, keep the records tidy and accessible so they can be shared quickly when insurers request them.
Connect with contractors who help homeowners navigate the claims process from damage assessment to final approval.


You face a real, concrete risk during winter storms when roofs open up to driving rain. In this climate, the disruption from extended rainfall beats snow or hail hands down, so the focus is on fast leak response and rapid dry-in to minimize interior damage. When the sky opens, time is measured in hours, not days.
On tile roofs common in Norco, visible tile damage may be limited even when the real water-entry problem is failed underlayment exposed by winter rain. That means you cannot rely on surface look alone to gauge leakage risk. A compromised underlayment can deliver leaks far from any visible crack or missing tile, and water can trace its way behind the battens in surprising ways.
Emergency response is a meaningful local specialty signal, reflecting homeowner demand for quick tarping and leak containment when roofs open up during wet periods. If a leak starts, call for immediate tarping to create a temporary barrier while a full repair plan is set. The goal is to shut down the water path before it widens or causes interior damage to ceilings, walls, or insulation.
Dry-in readiness is non-negotiable. Have a board or tarp ready, a ladder system secured, and a designated person who can place protection within an hour of noticing a leak. The fastest route to dry-in is a staged approach: seal the opening; protect valuables below; then arrange a temporary fix that stabilizes the roof until proper replacement or repair can proceed.
Stay vigilant through winter fronts. If moisture lingers or a storm pushes through with gusty winds, treat any suspected opening as a priority, not a fallback. Your home's interior depends on it.
When you can't wait, these contractors offer fast response times to stop leaks and prevent further damage.
Norco's contractor market shows active demand for both solar-roofing coordination and flat-roof work, indicating that not all local projects are simple pitched tile replacements. When planning, ensure the roof plan and solar layout are integrated from the start. Confirm that rafters, sheathing, and roof-to-structure connections can support the added weight and wiring runs without compromising drainage or tile alignment. If a roof replacement is already underway, schedule solar install or relocation to align with the same work window to minimize trips and weather exposure of exposed sheathing.
Low-slope sections on additions, patios, or mixed-roof homes need different drainage and waterproofing attention than the city's more visible tile roof planes. Prioritize positive drainage away from walls and into properly sloped lines. Use a robust membrane system with a suitable edge termination that resists wind-driven dust and occasional winter rain. Pay special attention to the transition zones where low-slope areas meet pitched tile, ensuring continuous waterproofing at the flashing interfaces to prevent standing water or lateral leaks.
Roof penetrations from skylights and solar attachments are locally relevant because both specialties appear in the active contractor mix, making flashing quality a practical concern for homeowners. Use integrated flashings that seal around curbs, vents, and rafter tails without creating hidden gaps. In flash-first details, verify that step-flashing along tile courses remains flush with no gaps, and consider additional sealing at the tile-to-metal interfaces where wind uplift can lift a misaligned edge. For skylights, ensure curb installation includes proper counter-flashing and head flashing that stay watertight through winter showers and spring winds.
Tile and low-slope transitions benefit from matching sealants and coatings that resist dust accumulation and UV bake. Plan for periodic inspection after the wet season, focusing on flashings, penetrations, and membrane seams. Keep the solar array clean and free of debris to maintain efficiency, and check for wobble or looseness in mounting brackets after heavy winds. A proactive approach helps preserve performance across Norco's dry summers and wet winters.
Find specialists in TPO, EPDM, and built-up flat roofing systems for residential and commercial properties.