Last updated: Apr 19, 2026
Ontario's Inland Empire climate blends very hot, dry summers with a wetter winter season, so roof aging is driven by both prolonged UV exposure and seasonal moisture. That dual stress means membranes, underlayment, and surface layers can degrade faster than in milder climates. When planning replacement timing, track both sun-damaged edges and the onset of winter rain. A roof that looks fine in late summer can show leaks or moisture damage once the first winter storms arrive if the underlayment and flashing have been pushed past their life limits by heat and wind. The goal is to attack deterioration before a true leak develops, not after.
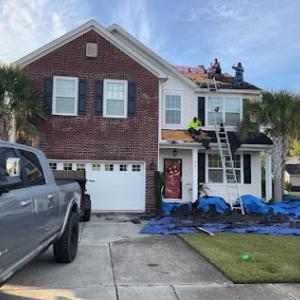
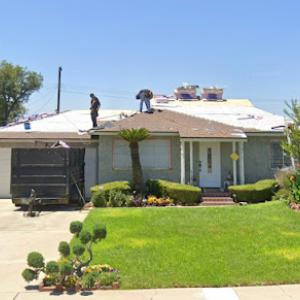
Fall Santa Ana wind events in the area can lift vulnerable edges, move dust under tile and flashing areas, and turn small defects into active leaks before winter storms arrive. These winds tend to expose fasteners and edge laps that were otherwise holding steady through summer. If a roof shows loose edge tiles, lifted flashing, or increased dust infiltration into gutters and vents after a heat season, treat that as a red flag for proactive replacement planning. In practice, that means prioritizing edge repairs or a complete edge seal and flashing reinstallation ahead of the typical Santa Ana window, when feasible, to blunt wind-driven damage before it compounds with rain.
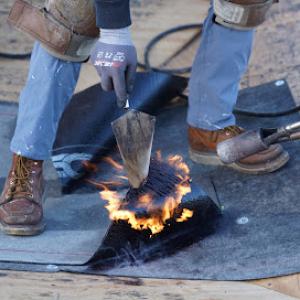
Spring and winter weather in this area can interrupt tear-off and dry-in schedules because gusty winds and rain affect underlayment exposure and installation timing. Underlayment can deteriorate quickly if torn and left exposed during windy, damp spells, and dry-in delays can invite moisture intrusion into attic spaces. When the forecast shows a string of unsettled days, plan for a staged approach: complete the tear-off in a weather-friendly stretch, then pause only long enough to secure temporary weather protection if a storm rolls in, and resume as soon as conditions permit. Those with tile or concrete tile systems should be aware that wind-driven debris can disturb batten alignment and ventilated roof decking, making early re-checks essential once rain stops.
Asphalt shingles in this climate contend with UV degradation, becoming brittle and curling at the edges after prolonged sun exposure. Metal roofing expands and contracts with heat, which can stress fasteners at trim and ridge lines if installation tolerances aren't precise. Clay and concrete tiles respond to heat by stressing mortar joints and reducing glaze integrity over time, rendering flashing and integration with roof penetrations susceptible to leaks when wind pressure drives dust and water under the laps. Wood shingles and shakes are especially vulnerable to rapid drying and cracking under heat, followed by moisture-induced swelling with winter rain. Each material type has a window where age-related fail points become visible-use those telltale signs as timing cues rather than waiting for a full-scale failure.
Begin with a structural check of the entire perimeter and flashing during late summer or early fall, before Santa Ana patterns intensify. If edge laps or flashing appear loose, address them promptly and consider a full edge re-seal as a preemptive measure. Schedule tear-off and dry-in during a period with extended dry, moderate temperatures, ideally avoiding the typical wind-prone weeks of late fall. Build in a contingency for gusty springs and late-wall storms; have fasteners, underlayment, and flashing components pre-stocked to minimize install downtime. Pay particular attention to attics and soffits; ensure ventilation remains adequate and that baffles and soffit vents aren't compromised by wind-driven debris during replacements. Finally, document signs of heat-related aging-cupped or curled shingles, cracked flashing corners, or faded edge zones-and use those observations to refine replacement timing for future seasons.
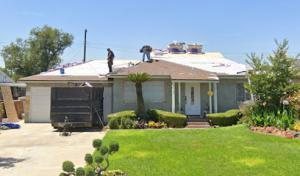
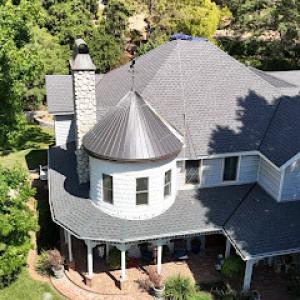
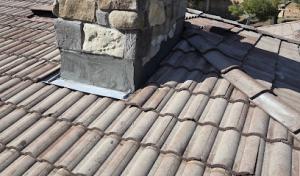
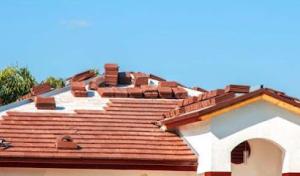
Clay and concrete tiles are the defining roof choice for most homes in this area, and that shapes every homeowner decision you'll face. Cracked and slipped tiles aren't just cosmetic concerns; they signal movement, sun heat cycling, and wind-driven debris that can expose underlayment and deck boards to the elements. Because tile systems rely on a precise pattern of fasteners and a well-sealed underlayment, a single cracked tile can create a pathway for water that accelerates wear below the surface. When planning repairs, focus not just on replacing individual broken pieces but on inspecting the alignment and integrity of the entire field of tiles. A well-maintained tile roof uses properly sized battens and a continuous underlayment that can accommodate the extra heat stress common to this Inland Empire climate.
Ontario's heat patterns push tile systems through repeated cycles of expansion and contraction. Over time, that motion can loosen fasteners, degrade the mortar or setting beds used for clay tiles, and wear down flashing around chimneys and vents. The waterproofing layer beneath the tiles is what ultimately governs whether a reroof is needed. If the underlayment shows signs of wear-permeation, soft spots, or delamination-tile replacement alone won't restore long-term performance. The smart approach is to assess the underlayment's condition during any tile-replacement project and plan for renewal if aging is evident. Proper ventilation in attic spaces becomes crucial here, helping reduce heat buildup that accelerates deterioration.
During Santa Ana events, wind-driven debris can lift edges, dislodge fasteners, or force gaps beneath the tile where water can enter. Tile roofs in this area often have reinforced edge details to resist uplift, but aging sealants and flashing are vulnerable after years of sun exposure. When considering reroof timing, look beyond visible broken tiles and pay attention to the condition of valley metal, ridge coverings, and hip flashing. Wind exposure also means that underlayment should be continuous and well-secured, with no loose laps that could flap and abrade over the life of the roof. A proactive assessment after the storm season can catch issues before they cascade into more extensive water intrusion.
Since tile roofs are common here, it's common to see a mix of fixes on the same house. An isolated tile replacement might be sufficient if the underlayment and deck show no signs of wear and the rest of the roof is sound. Conversely, when the underlayment shows aging or moisture has penetrated beneath multiple tiles, a more comprehensive approach is warranted. Contractors skilled with tile systems will dig into the roof's build-up-tile, underlayment, and deck-before deciding whether to patch or replace. In practice, that means a careful inspection that differentiates surface tile issues from fundamental waterproofing concerns. If in doubt, prioritize underlayment assessment; it often dictates the roof's true remaining life and informs replacing strategy without unnecessary cost.
Begin with a professional roof inspection after the hot months and again after the rainy season to map out heat-related wear and post-storm damage. Require a written assessment that details tile condition, underlayment age, flashing integrity, and ventilation status. If tiles are cracked or slipped, replace them in matched batches to preserve the roof's appearance and performance. Ensure the contractor tests for water intrusion in the attic and checks valley and step flashing for signs of corrosion or lifting. Finally, establish a simple maintenance cadence: remove debris from tiles and gutters, and monitor for any gradual changes in tile alignment or evidence of moisture migration. This vigilant approach helps you navigate the unique blend of heat, rain, and wind that shapes Ontario homes.
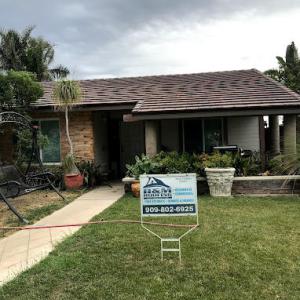
Find contractors who specialize in clay and concrete tile roofs, known for their durability and curb appeal.
Legend Construction Services
(909) 321-0989 lcservicesinc.net
4315 E Lowell St D, Ontario, California
5.0 from 15 reviews

J P Roofing
(909) 261-6473 jproofingco.com
Ontario, California
4.9 from 100 reviews
"We Got You Covered" JP Roofing specializes in giving our customers the best quality roofing. From residential to commercial roofing services, we got you covered. We specialize in cool roof systems, hot mop built up roofing, torch down, asphalt shingles, tile, water proofing, and repairs.
Sandoval Roofing
(909) 665-6386 sandoval4roofing.com
3117 Thoroughbred St, Ontario, California
5.0 from 43 reviews
At Sandoval Roofing we make sure to offer great services for your roofing needs including great pricing amazing workmanship and most importantly we thrive on customer service and customer satisfaction and make sure your roof is well taken care of by our professional team
Golden Roofing Ontario
1165 E Philadelphia St, Ontario, California
5.0 from 30 reviews
Golden Roofing Ontario is your premier roofing service provider in Ontario, Canada. With a commitment to excellence and customer satisfaction, we offer a comprehensive range of roofing services to residential and commercial clients. ur team of skilled and experienced roofing professionals is dedicated to providing top-quality services to meet all your roofing needs. Whether you need roof repairs, roof replacements, roof installations, or roof inspections, we have the expertise and knowledge to handle the job with precision and care. Contact us today to schedule a consultation and discover why we are the preferred choice for roofing services in Ontario.
B & M Roofing
1931 S Benson Ave, Ontario, California
5.0 from 26 reviews
B & M Roofing provides residential and commercial roofing services to the West Inland Empire and surrounding areas.

Ontario Roofing
(909) 330-4661 roofingontario.net
4335 E Lowell St STE G, Ontario, California
4.9 from 48 reviews
Ontario Roofing is the best roofing contractor in the Ontario, California area that you could have work on your home. We are able to work on any kind of residential or commercial roofing project.Whether you need roof repairs or a new roof installation we have a variety of options and pricing to fit your specific needs.Give us a call today and we offer a no cost, completely free estimate on your next roofing project.
Code 4 Roofing Specialists
(855) 720-1072 code4roofing.com
Ontario, California
5.0 from 21 reviews
Code 4 Roofing is a proudly woman-owned business that provides high-quality roofing and home remodeling services. Our team boasts over 20 years of roofing experience, ensuring every project is executed professionally and skillfully. Our services cover many needs, including roof repairs, installations, and replacements. We also specialize in interior and exterior home remodeling, such as siding, deck, and patio constructions, among other services! At Code 4 Roofing, we are proud to be a trusted partner for residential and commercial clients. Choosing us means choosing integrity, excellence, and quality. Experience the Code 4 Roofing difference—where your satisfaction and our craftsmanship are our priorities.

CRS Commercial
(951) 681-6000 www.crscommercial.com
2220 E Cedar St, Ontario, California
4.9 from 29 reviews
Since 1997, CRS Commercial has been a trusted name in commercial exterior services across California. As a premier commercial exterior new construction and remodeling company, we work with industries such as hospitality, retail, education, healthcare, and more to transform and protect their properties. As a premier commercial exterior remodeling company, we work with industries such as hospitality, retail, education, healthcare, and more to transform and protect their properties. Our team combines decades of experience with cutting-edge products and seamless installation techniques, ensuring every project meets local building codes and the highest standards of excellence.
Legend Construction Services
(909) 321-0989 lcservicesinc.net
4315 E Lowell St D, Ontario, California
5.0 from 15 reviews
We are Licensed Contractors we obtain a C-39 for Roofing and our B for General Construction. We have been in business for 21 years! LCS Is Bonded, Insured, Licensed and obtains Workers Comp to ensure that our customers get a job well done and that our employees are safe! Give us a call on your next project we do it all!
Above All Roofing
(909) 910-0878 sites.google.com
1457 E Philadelphia St, Ontario, California
5.0 from 10 reviews
Above All Roofing is a trusted, locally-owned roofing company specializing in residential and commercial roofing services. We provide high-quality roof installations, repairs, replacements, and inspections, using durable materials and expert craftsmanship. Whether you’re dealing with storm damage or planning a full roof upgrade, our team delivers reliable service with honest pricing and guaranteed results. We’re committed to protecting your home or business—one roof at a time. Contact us today for a free estimate!

FR Roofing Services
(909) 269-8669 www.frroofingservices.com
Ontario, California
4.6 from 22 reviews
FR Roofing Services is a trusted roofing contractor based in Rancho Cucamonga, CA, providing high-quality residential and commercial roofing solutions. We specialize in roof repairs, roof replacements, shingle roofing, tile roofing, flat roofing, leak detection, storm damage repair, and full roof inspections. Our team proudly serves Rancho Cucamonga, Upland, Ontario, Claremont, La Verne, Glendora, San Dimas, Montclair, Chino, and Chino Hills. With honest pricing, excellent workmanship, and fast response times, FR Roofing Services is the local roofer homeowners count on for reliable, long-lasting results.
Escandon construction
(909) 278-6548 www.escandon-construction.com
1358 N Sultana Ave, Ontario, California
5.0 from 8 reviews
ESCANDON CONSTRUCTION INC .#1123673 license remodeling work and demolition , KITCHEN,SHOWER,FLOORS,PLUMBING,DRYWALL,CARPENTRY FINISH,ROOF REPAIR,STOCCO,CONCRETE,PAINT EXT AND INT INSOLACION,FENCE&HVAC REPAIR

Rocket Roofing
(800) 720-0775 rocketroofingca.com
Serving
4.9 from 56 reviews
Rocket Roofing Contractors are the most experienced commercial roofing company in California. We know how to fix your leaky roof so that you can focus on running your business. You need a reliable roof over your head if you want to run a successful business. Let us take care of your roof repairs so you can rest easy knowing the job is done right.
Ontario's heat, winter rain, and Santa Ana winds stress roofs in ways that shorten life and shift replacement timing. Tile systems, common on many homes, push project totals higher because heavier materials, accessory components, and more labor-intensive repairs are common compared with basic shingle roofs. Costs can rise when summer heat slows installation pace, when winter rain compresses scheduling, or when wind events cause short-term demand spikes for leak response and reroofing. Permit requirements through the city and any added plan review for structural changes can affect total reroof cost and timeline in Ontario.
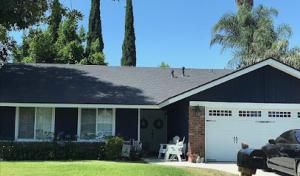
Asphalt shingles remain a practical baseline in this market, especially for smaller or mid-sized homes with standard roof lines. In Ontario, heat can accelerate granule loss and uplift stress, while winter rain can reveal vulnerable edge details during replacement. Expect costs in the reported range, with labor and disposal pushing totals higher on two- or three-ply configurations or when skylights, vents, or drainage upgrades are required to accommodate the reroof. In many cases, the lighter weight and faster installation of asphalt can help limit project duration, but local heat may still elongate cure and seal times for new underlayment. Typical cost: 350 to 700 USD per square.
Metal roofs withstand Santa Ana winds well and shed heat efficiently, but the installation in Ontario often involves extra labor to secure battens, underlayment, and accurate panel alignment on complex roof geometries. The extra time and accessory components lift the ticket price versus plain shingles, especially if color matching and wind-rated trims are needed. Heavier metal systems also interact with existing roof decks differently, potentially exposing structural considerations that add cost. Typical cost: 800 to 1300 USD per square.
Clay tile is a common sight on prestige homes here, though it brings substantial weight and more frequent repairs. The heat and wind can cause cracked tiles and fasteners to loosen, demanding careful replacement from experienced crews. Transportation and handling of heavy tiles, plus reinforced decking or additional supports, push the project higher, especially on larger or older structures with mixed roof lines. Typical cost: 1200 to 2300 USD per square.
Concrete tile shares many characteristics with clay tiles but often carries its own weight distribution nuances. In Ontario, dense panels and long spans multiply handling complexity, which shows up in labor time and coordination with underlayment upgrades. The durability helps justify the higher upfront cost, but expect accessory components and possible structural adjustments to drive totals upward in hotter months and during wind events. Typical cost: 1000 to 2000 USD per square.
Wood shingles or shakes respond vividly to intense sun, wind-driven dust, and seasonal rain, and they require meticulous sealing and maintenance. In this climate, accelerated wear from sun and moisture cycles can accelerate replacement frequency, and matching new wood to existing color and grain adds to labor. Costs trend higher where repairs are needed to adjacent features or where untreated decks demand additional protective layers. Typical cost: 650 to 1500 USD per square.
Synthetic or composite shingles offer versatility against heat and wind, with generally easier installation pacing than natural materials. Local projects still see premium pricing when tile-like aesthetics are desired or when the roof geometry calls for extra trim and fasteners to meet wind performance standards. Typical cost: 700 to 1200 USD per square.
The most popular roofing material in the US. Find pros who install, repair, and replace asphalt shingles.

A full reroof in Ontario typically requires a permit issued by the City of Ontario Building & Safety Department. That permit is not just paperwork; it is a formal acknowledgment that the project will meet local structural, fire, and wind-resistance standards. Skipping this step or treating it as an afterthought can trigger meaningful delays, stop-work orders, and penalties once inspectors notice the project in progress. When planning, you should schedule a pre-application check with the department to understand which documents, drawings, and specifications will be needed for a smooth review.
Ontario inspections commonly focus on underlayment, ventilation, and fire-rated roofing details, with final inspection after installation is complete. The heat and Santa Ana wind exposure that residents endure here place extra emphasis on vent placement, attic airflow, and the integrity of underlayment seams. If the roof uses tile or composite materials, inspectors will verify that transitions around chimneys, vents, and skylights are properly sealed and that any penetrations meet local fire-safety requirements. Having a detailed ventilation plan and clearly labeled underlayment layers can help prevent back-and-forth with the inspector and reduce rework.
If a reroof in Ontario includes structural changes or significant scope changes, the city may require plan check review before approval. That means more time in the schedule and potential adjustments to framing, rafter spacing, or roof deck conditions. It's not merely about the finished look; structural alterations must align with local wind-load expectations and climate conditions. If the scope expands to add skylights, large vents, or a change from a steep to a low-slope system (or vice versa), expect the plan check to scrutinize connections, load paths, and drainage details.
Begin by gathering as-built information, including attic ventilation, existing deck condition, and any previous repairs. Have a licensed contractor prepare the permit application with stamped drawings that reflect not only the chosen roofing system but also any ventilation and fire-rated assemblies. Be prepared for the city to request adjustments if the plan misses critical fire barrier details or rainwater management provisions. Coordination between the permit phase and the installation phase minimizes the risk of work stoppages and keeps the project moving toward a compliant, durable roof that stands up to Inland Empire heat, winter rain, and Santa Ana winds.
Insurance underwriting in this Inland Empire setting has tightened, and the impact lands squarely on homeowners with older roofs or properties in zones carriers screen for wildfire risk. The heat, winter rain, and Santa Ana winds that shape Ontario's weather make the roof a more scrutinized asset, and that scrutiny often shows up in policy choices and claim decisions. If a roof is approaching or passes its expected life, expect insurers to look more closely at age, materials, maintenance history, and visible wear before approving coverage or payouts.
When a claim is filed, insurers may request proof of roof age, replacement invoices, photos, and contractor documentation to verify what has been done and when. Records that demonstrate timely maintenance, recent replacements, or upgrades can influence how a claim is reviewed. In Ontario, where shingles, tiles, or metal panels face intense sun, wind-driven debris, and seasonal downpours, documentation can carry as much weight as the visible damage itself during the claims process. Having a clear, organized file with dated photographs and receipts can help avoid friction during evaluation.
A homeowner should plan for the reality that wind and rain events here often produce localized, limited damage rather than catastrophic loss. That distinction matters because insurers frequently rely on precise documentation to determine coverage for small but real problems. A missing or ambiguous report of a wind-damaged edge, nail pop, or flashing deterioration may lead to delays or questions about claim legitimacy. Proactively keeping a log of weather-related incidents, even minor hail or wind scouring on a tile or shingle edge, can streamline a review if a claim is ever needed.
For replacements or renovations, think through how an aging roof aligns with wildfire risk screening and underwriting standards. If the roof shows signs of advanced wear, failure to address it promptly can affect both claim outcomes and long-term insurability. In a climate where seasonal stressors converge-intense sun, sudden downpours, and gusty winds-the care taken to document the roof's baseline condition and subsequent changes becomes a practical, protective step homeowners can take when conversations with insurers begin.
Connect with contractors who help homeowners navigate the claims process from damage assessment to final approval.


Ontario hosts a substantial commercial and warehouse presence, so low-slope roofing knowledge is unusually relevant in this city compared with many purely residential suburbs. Flat and low-slope sections show up on additions, patio covers, and mixed roof designs, making drainage and membrane wear a regular consideration during the wetter winter periods. In these situations, the reliability of the waterproofing layer and the surrounding flashing is the first line of defense against leaks that can impact living spaces and business interiors alike.
Low-slope surfaces drain differently than pitched roofs, so proper slope, edge detailing, and drainage outlets matter more here. In Ontario, winter rain can pool on unprotected membranes, accelerating wear and leading to premature failures if edge seals or penetrations aren't carefully managed. When planning maintenance, focus on outside edges, transitions to higher-slope sections, and areas where parapets or planters share the same membrane. Seasonal cycles-hot sun in the Inland Empire reach and damp, cool winters-drive material fatigue in membranes and coatings, so inspections should be more frequent after the wettest months.
Roof coating services are active in Ontario's contractor market, reflecting local demand for extending the life of low-slope and aging roof systems under strong sun exposure. Coatings can buy time by sealing micro-cracks and enhancing reflective properties, which reduces heat-related delamination and blistering. For aging systems, consider a coating program that targets high-wear zones like entrances, loading bays, and transitions from metal or concrete decks to roof membranes. Coatings should be matched to the existing substrate and tested for adhesion under typical seasonal cycles seen here.
Regular inspections should focus on drainage performance, membrane adhesion, and flashing integrity around penetrations and edges. Look for pooled water after rain events, especially near parapets or changes in roof plane. Address UV-damaged surface areas promptly, as sun exposure accelerates wear on coatings and membranes. When planning replacements or upgrades, give priority to sections that serve commercial or mixed-use structures, where even small leaks can disrupt operations or occupant comfort.
Find specialists in TPO, EPDM, and built-up flat roofing systems for residential and commercial properties.
Ontario Roofing
(909) 330-4661 roofingontario.net
4335 E Lowell St STE G, Ontario, California
4.9 from 48 reviews
Affordable Roofing & Rain Gutters
(626) 262-4376 www.affordableroofingservice.com
Serving
4.3 from 36 reviews
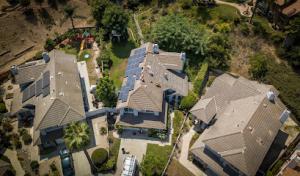
Ontario's strong sun exposure makes roof penetrations from solar installations especially relevant when evaluating flashing condition and future reroof planning. Solar arrays sit on hot, sun-baked surfaces that accelerate flashing wear around penetration sleeves, rails, and mounting brackets. When inspecting a roof tied to a solar system, emphasize the seal along edge flashing, the condition of end caps, and any signs of wrinkling or degradation on underlayment beneath mounts. Plan for longer-term reroof sequencing that preserves the integrity of penetrations, allowing replacement of underlayment and flashings without disturbing the array more than necessary. In practice, space solar hardware away from ridge lines when feasible to reduce wind uplift stress, and verify that fasteners into framing are spaced to limit movement from thermal expansion.
Skylight-related leak work is a meaningful specialty in Ontario's contractor market, suggesting homeowners here frequently need repairs at curb, flashing, or surrounding roofing transitions. Begin with a careful curb assessment: look for voids where flashing meets the curb, check for settled or cracked curb mortars, and test for membrane continuity beneath the skylight base. Pay attention to the intersection of skylight flashing with adjacent tiles or shingles and to any dust buildup that hides hairline leaks. Reinforce surrounding transitions with compatible sealants and proper step flashing, since weather cycles can widen gaps after heavy rains and Santa Ana-like winds.
On tile and composite roofs common in Ontario, reroof planning should account for how penetrations and mounted equipment affect replacement sequencing and waterproofing details. Penetrations for vents, satellite dishes, or solar hardware should be mapped so the new roof layer can overlap properly without creating dry spots or exposed fasteners. When tiles or composites are replaced, ensure that integration with flashing, underlayment, and sealants preserves continuous waterproofing around every penetration. Plan to refresh nearby flashings and ensure proper step flashing continuity across transitions where mounted equipment enters the roof deck.
Find contractors who integrate solar panels or solar shingles into your roof for long-term energy savings.


Ontario's contractor market shows a clear emphasis on reroofing speed, thorough cleanup, affordability, and long-established firms. Homeowners here actively prioritize getting the job done right the first time, with crews that minimize disruption and leave little debris behind. When screening candidates, look for a firm that demonstrates consistent response times, a track record of completed reroofs in similar housing stock, and a clear process for protecting landscaping and driveways from heat, dust, and wind-driven debris common near foothills and logistics corridors.
Because Ontario has many active roofing contractors, homeowners need to verify who is actually set up for the specific roof type involved, especially tile, emergency leak work, or low-slope systems. Tile roofs require careful removal and reinstallation practices to prevent breakage and water intrusion, while low-slope work demands proper flashing and drainage details. Ask for recent tile projects, confirm crew experience with your exact product (tile, metal, or composite), and request a plan for rapid response if a leak appears during storms or Santa Ana events.
Warranty offerings are a visible market signal in Ontario, making workmanship terms and manufacturer-backed coverage an important comparison point rather than an afterthought. Examine both the workmanship warranty length and what it covers (adhesives, flashing, fasteners, and labor to repair leaks). Require written confirmation of manufacturer coverage that aligns with the chosen roof type, and verify who administers the warranty if a claim arises-the contractor or the manufacturer. A solid warranty should accompany a clear maintenance schedule and documented expectations for seasonal inspections.