Last updated: Apr 19, 2026
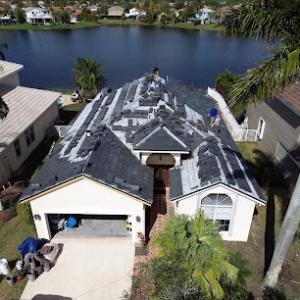
Tropical systems race across South Florida with little warning, and the wet season compounds the risk of delays during a roof tear-off. For homeowners in this inland Broward County area, the dry season is a window to complete full roof replacements with minimal interruption. The forecast rarely gives you a long stretch of safe, dry days alone; when a storm track shifts, work pauses not just for safety but to avoid costly re-tears. Plan around those inevitable rain cells, and prioritize a tight schedule that moves quickly from tear-off to dry-in.
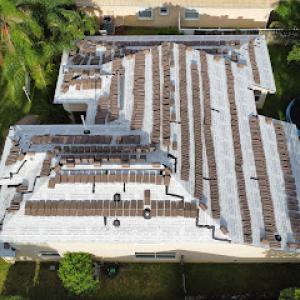
The city's wet summer pattern brings frequent rain interruptions during tear-off and dry-in. Leaks can happen during the project, especially if a storm pushes through mid-process. You should expect a tighter schedule, with crews buffering for sudden downpours and short, intense rain bursts. The goal is to finish the tear-off and achieve a reliable dry-in before a tropical system raises the risk of wind-driven damage to an exposed deck or underlayment. Build in extra contingency days so a single storm doesn't derail months of planning.
As an inland Broward County city, the area is not dealing with direct salt-spray exposure like barrier-island communities, but it still faces major wind and rain impacts from tropical systems crossing South Florida. Wind-resistance starts with the roof itself, but the timing matters just as much. If a named storm forms in the Atlantic, you need to decide whether to accelerate the project or secure temporary protection quickly to minimize vulnerable openings. The sooner you act on risk signals, the less the wind will exploit lingering gaps or unsealed edges.
The local roofing market shows strong demand for emergency response and storm-related work, matching homeowner concern about leaks and temporary protection after tropical weather. When a storm approaches, responders prioritize securing openings and deploying rapid tarps or temporary enclosures. If you're in the path of a likely event, coordinate with a contractor who can provide swift stabilization before a full roof replacement proceeds. Being proactive with temporary protection can buy you crucial time and reduce downstream damage.
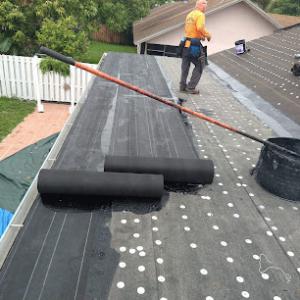
Full roof replacements are most reliable when framed around an extended dry spell. For homes with high wind exposure, consider initiating tear-off during the early dry season and advancing quickly through underlayment inspection and ventilation checks. If a storm looms, pre-arrange protective measures and staged personnel to respond rapidly. Keep an emergency contact list ready for after-storm assessment, so a small leak doesn't escalate into interior water damage. In short, time your project to dodge the wet-season disruptions, while maintaining readiness for rapid storm-response steps.
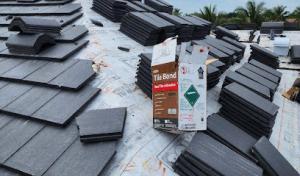
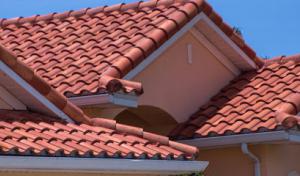
In this market, storms arrive with a punch, and the wind pressure on roofs has to be ready for rapid squalls and long-lasting exposure. The typical Pembroke Pines home mixes asphalt shingles, metal, clay tile, concrete tile, wood products, and synthetic/composite shingles, so choosing one system isn't a single-page decision. When you're evaluating options, prioritize wind-rated assemblies that match the local climate: a roof that resists uplift in a Category 3-level wind event, and flashing details that hold tight through heavy rain without leaks. A practical step is to review the roof's fasteners, underlayment, and edge treatments alongside the visible materials, because good-looking shingles don't help if the edges peel in a Florida afternoon thunderstorm.
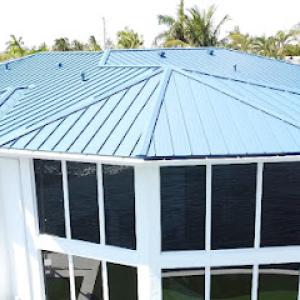
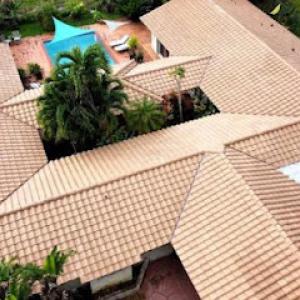
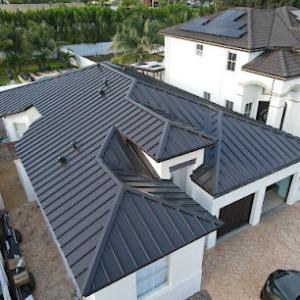
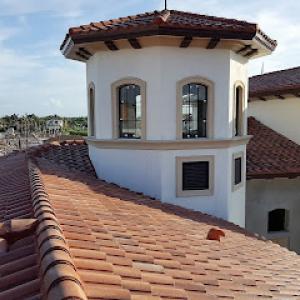
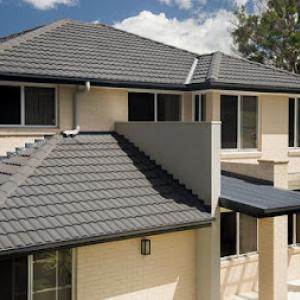
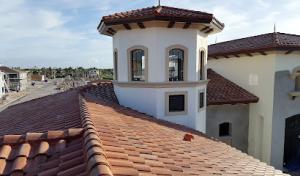
The common local mix means material choice is a major decision, not a single-market move. Asphalt shingles stay common for cost-conscious replacements, but they must be paired with wind-rated underlayment and properly nailed, especially on higher-wind sides of the home. Metal roofs are favored for long life and wind resistance, but installation quality matters just as much as the panel profile and the attachment method. Clay and concrete tiles bring outstanding durability and a strong wind performance when properly seated and fastened; however, their weight and installation nuance require careful structural checks and professional evaluation on existing structures. Wood products and synthetic/composite shingles offer varied looks and performance, with synthetics often delivering impact resistance and reduced maintenance. For a Pembroke Pines project, think about the roof's slope, the corresponding drainage plan, and how each system handles wind-driven rain around edges, hips, and dormers.
Tile and metal specialization is especially prevalent among local contractors, reflecting how often homeowners here compare long-life wind-rated systems against lower-cost shingle replacements. If you lean toward a tile option, concrete or clay, plan for a thorough structural assessment to support the weight and to ensure proper battens and fasteners for wind uplift. For metal, inspect the rib design, seam type, and edge detailing. A metal roof can outpace shingles on wind resilience and longevity, but only when installed with corrosion-resistant fasteners and a robust sealant strategy around penetrations like vent pipes and skylights. In practice, you'll want to bring up the specific wind rating and installation method during bids, because two metal roofs can perform very differently under the same storm.
Low-slope and flat roof sections are a familiar challenge in this market, and they matter for additions, patios, and commercial-style roof areas that require different drainage and membrane details than steep-slope roofs. For these areas, the membrane choice, edge details, and drainage plane must be designed to handle Florida's heavy rain patterns without ponding. Look for a proven approach to flashing at transitions, parapets, and penetrations, plus a reliable warranty on the waterproofing layer. When selecting a system for these sections, prioritize materials and crews with documented experience in Florida's humidity and heat cycling to minimize membrane repair needs after storms. A careful install here yields long-term resilience that aligns with the region's wet-season demands.
In Pembroke Pines, the price you pay for a roof replacement is driven more by wind resistance requirements, underlayment choices, and attachment details than by a single preferred material. Local pricing reflects stricter Broward County wind standards, and those requirements can push a project from a straightforward job to a code-forward install with enhanced fasteners, additional sealants, and more robust hurricane clips. Materials themselves span the usual options-shingles, metal, concrete tile, clay tile, and low-slope systems-but the delta between materials tends to be wider here than in markets dominated by one roof type. Asphalt shingles sit at the lower end of the spectrum, while metal and tile options can swing high depending on fasteners, batten systems, and the reliability of the underlayment chosen. Expect wide swings if you shop by price alone, not by long-term performance.
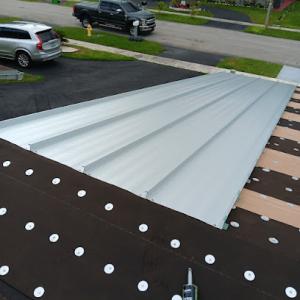
Local pricing is heavily shaped by wind-resistance requirements, underlayment choices, and attachment details that matter more in Broward County than in lower-wind inland markets. A standard replacement in this area typically includes a code-appropriate underlayment, upgraded fasteners for the sheathing, and a hurricane-rated attachment plan for the edges and hips. These add-ons can add a noticeable premium compared with milder-wind regions. If a contractor recommends a double-layer or vented underlayment, you're looking at a higher upfront cost but better long-term performance against rain-driven wind and tropical humidity. For metal roofs, the clips, deck integration, and sealant choices also influence price more here than elsewhere. The practical takeaway: ask for a breakdown that separates underlayment, fasteners, and attachment hardware so you can compare apples to apples.
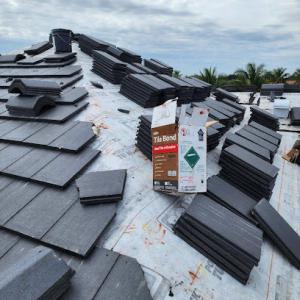
The city's broad mix of tile, metal, shingles, and low-slope systems means homeowners here often see larger price swings between materials than in markets dominated by a single roof type. Clay and concrete tile bring premium pricing, not just for the material but for the additional weight, roof deck reinforcement, and specialized installation techniques that ensure wind resistance. Concrete tile often costs more than clay tile in practice when you factor in structural considerations and fastener choices. Metal roofing runs from moderate to high, depending on panel profile, coating, and attachment method. Asphalt shingles remain the most budget-friendly option but still need wind-rated underlayment, impact-resistant thoughts, and proper nailing patterns to meet local wind standards. Your total cost per square can vary widely as the mix shifts; plan for a broader range when requesting quotes.
Costs can rise sharply after tropical weather because Pembroke Pines sits in the broader South Florida storm-demand surge zone where labor and scheduling tighten quickly. The typical replacement window can compress when crews are diverted to urgent storm work or when supply chains tighten for specialty materials. If a storm has just passed, expect not only higher labor rates but potential delays as crews juggle multiple urgent projects. For planning, aim to secure a contractor before the peak wet season when possible, and ensure that the contract covers weather-related scheduling contingencies and material lead times. This proactive approach helps keep your project on track despite the seasonal surge in demand.
In this market, the cheapest option isn't always the best long-term value when wind performance and underlayment quality are factored in. Prioritize a clear plan for wind-driven rain resistance, credible underlayment choices, and precisely specified attachment methods to ensure resilience through the next hurricane season.
Rockstar Roofing
13791 NW 19th Ct, Pembroke Pines, Florida
5.0 from 622 reviews
Rockstar Roofing, Inc. is your trusted roofing partner in Pembroke Pines and beyond. Since 2020, we’ve been delivering expert roof repair and replacement services to homeowners and businesses across Broward and Miami-Dade counties. Our skilled team uses premium materials and advanced techniques to ensure durable, weather-resistant roofs that stand the test of time. From Pembroke Pines to all of Miami-Dade & Broward, we’re known for reliable service, transparent communication, and unwavering commitment to customer satisfaction. Whether you need emergency roof repairs, routine maintenance, or a full roof replacement, we’ve got you covered. At Rockstar Roofing, Inc., we take pride in protecting what matters most
Segura Roofing
(786) 860-4909 www.seguraroofing.com
8461 NW 7th Ct, Pembroke Pines, Florida
4.9 from 61 reviews
Segura Roofing is a trusted roofing contractor serving South Florida, specializing in residential and commercial roofing solutions. From roof installations and repairs to inspections, we deliver high-quality craftsmanship and reliable service. As a family-owned business, we’re committed to protecting what matters most—your home or business—by using top-tier materials and treating every project like it’s our own.
T&S Roofing Systems
(954) 852-2654 www.tsroofingsystems.com
15800 Pines Blvd Suite 300, Pembroke Pines, Florida
4.9 from 81 reviews
Since 2004, T&S Roofing Systems has been providing quality roofing services to homeowners and building owners in Miami-Dade and Broward County Our team is focused on estimating projects accurately, installing our roofs with the highest standard of quality and safety, and delivering with the most professional service. #1 Residential Roofing Company with a reputation built on reliability, trust, and quality, we specialize in providing hassle-free roof repair and roof replacement services. For over 20 years, T&S has been the most trusted roofer by homeowners and businesses in the Miami and Broward areas, ensuring their roofs are secure, durable, and stand out among the rest.
Thompson's Roofing
(954) 967-1918 www.thompsonsroofing.com
8570 Stirling Rd SUITE 102-333 SUITE 102-333, Pembroke Pines, Florida
4.9 from 124 reviews
We are your premier South Florida Roofing contractor. We specialize in all roofing Tile Shingle Flat Tapered Flat Repairs Inspections
RMS Group
(954) 363-1617 rmsroofinggroup.com
Pembroke Pines, Florida
4.9 from 39 reviews
With years of experience in the roofing industry, we provide expert roofing solutions tailored to our customers’ needs. Our skilled team is committed to delivering high-quality workmanship, using premium materials, and ensuring every project meets the highest safety and durability standards. Whether it’s a small repair or a full roof replacement, we take pride in protecting homes and businesses in Davie, FL.
Caye Works Roofing
(305) 456-8514 www.cayeworks.com
Serving
4.9 from 125 reviews
Professional roofing services in Miami-Dade and Broward. Regardless of the size of your project, we are here to help you in any way that we can.

Tiger & Son Roofing
(954) 441-4630 www.tigerandsonroofing.com
Serving
4.8 from 125 reviews
For over 35 years, Tiger and Son Roofing has been providing top-quality roofing services to South Florida. From minor repairs to complete roof replacements, our experienced team is dedicated to protecting your home or business.
BMG Roofing
(954) 434-1562 www.bmgroofing.com
Serving
4.8 from 40 reviews
Residential and commercial roofing needs Reroofs, repairs, tile, shingle, flat, waterproof coating systems, metal A+ rating BBB Fully licensed and insured
Sawgrass Roofing
(954) 860-5325 www.sawgrassroofing.com
Serving
5.0 from 77 reviews
At Sawgrass Roofing, customer satisfaction and quality workmanship are our top priority! We are a family owned and operated business, Licensed and Insured. We are a full-service residential roofing company located in Sunrise, Florida. At Sawgrass Roofing we specialize in all roof types including shingle roof replacement, tile roof replacement, metal roof replacement and flat roof replacement. Our services include roof maintenance, roof leak repairs, fascia replacement and more. We pride ourselves in providing our customers with the best service, quality materials and workmanship every time! If you are looking for a reputable roofing contractor in Broward County, look no further! Call today for your FREE roof estimate 954-860-5325 (LEAK).
Cotect Roofing
(954) 773-5205 www.cotectroofing.com
Serving
4.9 from 60 reviews
"Cover your dream, protect your investment" LIC# CCC1333250
A 1 Pro Services Roofing Corporation
(954) 443-2828 www.a1proservicesroofing.com
Serving
4.3 from 38 reviews
We offer a wide variety of roof services, and expert advice. We believe in being honest, reliable, and professional; we guarantee it. We have been serving Broward and Miami-Dade counties for over the past 25 years.

Parkerhaus Roofing & Sheet Metal
(954) 798-4615 www.parkerhausroofing.com
Serving
4.9 from 55 reviews
Parkerhaus Roofing is a Broward County roofing contractor based in Hollywood, FL, serving nearby Miami-Dade and Palm Beach. We provide residential and commercial roof replacement, roof repair, roof installation, roof inspections, and 24/7 emergency roof tarping. Our crews service shingle, tile, metal, and flat systems including TPO, modified bitumen, and EPDM—installed and repaired to Florida Building Code. From storm-damage documentation and insurance coordination to code-compliant reroofs, Parkerhaus Roofing delivers dependable workmanship, clear communication, and fast local response.
A full roof replacement in Pembroke Pines requires a permit through the City of Pembroke Pines Building Department. That permit is not a formality - it sets the frame for wind-rated performance, drainage, and proper installation practices that stand up to the local hurricane season. Knowing this upfront helps you align your project timeline with weather windows, which is especially important given the wet-season pressure that can complicate prolonged work.
The contractor typically submits the application with project plans, roofing material information, and wind-resistance details, then pays the required fees before work proceeds. In practice, this means your roofing team should bring or upload a complete package: a site plan or roof layout if required, product data sheets for the chosen shingles, tiles, or metal, and documentation that demonstrates wind-resistance performance for the specific roof geometry and affected zones. Expect questions about attic ventilation, underlayment, and flashing details since these elements influence wind uplift resistance and drainage, which are critical in this region's climate. If you have any remodel components or changes to eaves, fascia, or skylights, have those notes ready to accompany the application. The timeline can hinge on how quickly the city processes the packet, so coordinate with your contractor to avoid vacation-season backlogs or sudden weather gaps.
Roofing inspections occur after installation and again at final, with the city verifying code compliance and workmanship before the permit can be closed. The first inspection focuses on whether the installation follows the approved plans, underlayment continuity, proper fasteners, and correct flashing around chimneys, vents, and penetrations. The final inspection confirms that everything is completed to code, including alignment with wind-resistance standards, proper ventilation, and drainage provisions. To smooth the process, ensure a clean, accessible roof and clear pathways for inspectors to review critical details, especially around edges and transitions. If any deficiencies are found, your contractor will address them on the spot or schedule a follow-up visit. Planning ahead for inspection windows helps avoid delays that can push replacements into less favorable parts of the hurricane-season calendar.
In the hurricane-exposed Broward County routine, insurance carriers tighten underwriting when roofs age or show wind vulnerabilities. Pembroke Pines homeowners encounter a market where carrier pullbacks and premium shifts are real consequences of weather risk. The strength of a roof isn't just about surviving a storm; it's about how a claim will be handled afterward. Durable construction, proper fastening, and documented wind resistance can alter both insurability and the course of a future claim.
Adjusters may request wind mitigation information and prior claim history as part of the evaluation process. That means being ready with organized proof of your roof's resilience can prevent delays and reduce friction during a claim. Gathering and maintaining permit records, product data, photos from installation, and the final inspection documentation creates a credible, easy-to-reference file you can present quickly when needed. This isn't about fear; it's about smoothing an already stressful process.
A practical set of documents speaks volumes when a storm threat looms. Keep a digital and print archive of roof system components: the wind-resistance features of the assembly, photos that clearly show edge fasteners, hip and ridge details, and any hail or wind damage records from the past. Document replacements with dates, the contractor's name, and the specific product lines used. If a prior claim exists, file the claim summary and repair receipts where they're readily accessible.
This market rewards the use of durable assemblies and replacements that align with code and best practices for high-wind exposure. When selecting materials, prioritize systems with strong wind ratings and proven performance in hurricane environments. The right choices can impact insurer confidence, especially if the installation is verifiable and well-documented. A well-done, code-compliant update not only improves resilience but also supports smoother claim handling if the unexpected occurs.
On a practical level, establish a simple, ongoing record-keeping habit. After any roof work, file the contractor's warranty, product data sheets, and a brief summary of what was upgraded. Schedule yearly checks of fasteners and seals around vulnerable edges, and photograph changes as they happen. By maintaining these records, a homeowner in this climate protects both the roof's performance and the insurance narrative that may unfold when a storm approaches.
Connect with contractors who help homeowners navigate the claims process from damage assessment to final approval.
Parkerhaus Roofing & Sheet Metal
(954) 798-4615 www.parkerhausroofing.com
Serving
4.9 from 55 reviews
In this city, prolonged heat and humidity accelerate aging in exposed roofing materials, especially lower-cost systems that absorb intense South Florida sun. Asphalt shingles, for example, can become brittle and curl sooner than they would in milder climates, reducing valley and edge protection. Tile and metal surfaces suffer under relentless sun exposure when coatings or finishes wear thin, leading to surface checks, coating delamination, or selective darkening that traps heat. The consequence is more rapid deterioration of seals, penetrations, and vent flashings, which often manifests as higher vulnerability to leaks during the heavy wet season. Durable performance hinges on selecting materials with proven UV resistance and on timely maintenance of edgeTerminations, hip and ridge lines, and vents before heat-induced cracks propagate.
During tropical events, wind uplift and wind-driven rain become recurring local concerns, making edge details, flashing, and underlayment performance more important than appearance alone. Poorly secured fasteners or undersized clips can fail under gusts, lifting shingles or tiles and exposing underlayment to moisture infiltration. Flashings around chimneys, skylights, and roof-to-wall transitions are high-risk areas when sealants age or flashings separate. In Pembroke Pines, the risk compounds with flat sections and low-slope areas where water can pool along seams, increasing the chance of leakage after a storm. Regular inspection after storms is essential to catch hairline separations before they allow water intrusion.
The prevalence of tile, metal, and flat-roof specialists reflects common local failure points such as cracked or displaced tile, fastener and flashing issues on metal, and ponding or seam problems on low-slope sections. Cracked clay or concrete tiles can shed, crack, or shift under foot traffic or ground movement, creating immediate leak paths. Metal roofs may develop loose fasteners, distressed sealants, or corroded edges where flashing meets roofing panels. Low-slope or tar-and-gravel-like systems are prone to ponding, seam failures, and compromised waterproofing if the membrane or sealant dries out or degrades. Early detection, targeted maintenance, and timely panel or tile realignment help prevent costly water damage during the long wet season.
Extend the life of your existing roof with reflective or waterproof coatings that protect against UV and moisture.

In this market, re-roofing is more common than new builds, so the best crews focus on replacement workflow, fast dry-in, and thorough cleanup. You are sizing your contractor not just for a roof swap, but for a smooth transition through Florida's wet season, with minimal disruption and rapid protection from leaks. Look for a company that treats each project as a coordinated sequence from tear-off to final inspection.
The right contractor can compress the timeline without compromising quality. Ask about their typical replacement workflow, including staging, roofer arrival timing, and how they seal the structure between steps. A solid plan should show you a clear start-to-finish schedule, defined responsibilities for each crew member, and a dry-in method that stands up to heavy rains while the interior stays protected.
Quick response and cleanup are hiring priorities in this climate, where storm-driven leak calls press the schedule and debris control matters in dense suburban neighborhoods. Confirm that the crew uses daily cleanup routines, manages waste containment, and removes debris from your property and street-facing areas before leaving each day. A proven storm-response mindset often translates to fewer post-project call-backs.
Residential service is dominant, but many contractors also work commercial roofs, so you must verify the crew regularly installs the exact roof type used on your home. If you have tile, metal, or low-slope systems, ensure the team has current, hands-on experience with that specification. A mismatch between project type and crew specialty can introduce avoidable risk and delays.
Request recent project references from neighbors with similar homes, and review before-and-after photos focused on replacements rather than repairs. Ask about response time to storm-related calls and their process for temporary tarping and leak mitigation. Schedule a face-to-face meeting to walk through your roof, discuss wind-resistant details, and confirm that the contractor can deliver the exact system you require.