Last updated: Apr 19, 2026
In this inland north Miami-Dade corridor, storm season stretches from June through November. That places you squarely in the heart of hurricane risk for planning and execution. Dry-in performance matters almost as much as the actual roofing system chosen. When a tear-off is needed, scheduling must align with a window of consistently dry afternoons to achieve a same-day dry-in. Delays due to afternoon thunderstorms can compromise decks, underlayment, and the roof-to-wall connections, leaving the home vulnerable to sudden wind-driven rain. Plan ahead with your contractor for a clear daily dry-in target, and be ready to adjust timing to capture a dry spell between storm fronts.
South Florida wind exposure demands rugged edge detail and secure attachment. In this climate, the most important decisions revolve around how the roof attaches to the wall, how drip edges are integrated, and how fasteners penetrate the structure. Expect to specify heavy gauge starter and rake boards, with fasteners rated for high wind zones and proper sealing to resist water intrusion at the perimeter. The underlayment choice should be high-performance and compatible with the chosen roofing material, ensuring a watertight transition at eaves, hips, and ridges. For tile or metal, confirm that edge panels and gutters integrate with wind-rated clips and sealants designed to breathe moisture without leaking.
The wet-season humidity and sudden downbursts demand underlayment that remains effective under heavy rain exposure and high heat. A reinforced synthetic or self-sealing underlayment that resists tearing during rapid deck movement is essential. In areas with tile or metal, specify underlayment that acts as a secondary barrier under all edge details, around chimneys, and at roof penetrations. Consider a breathable, moisture-rated barrier where appropriate to prevent trapped humidity from compromising roof decking. The goal is a dry, stable substrate before any roofing material is installed, even if storms roll in late in the day.
A clean tear-off reduces hidden damage, but it must be executed with precision and speed during Opa-locka's thunderstorm-heavy routine. Inspect the roof thoroughly before removal to identify compromised sheathing, damaged nailing surfaces, or hidden rot. If inspection reveals deteriorated decking, budget for replacement and re-nailing beyond the existing footprint to restore rigidity against anticipated winds. On the day of tear-off, have a plan for rapid removal, secure temporary covers for exposed sections, and a dry-in crew ready to seal all penetrations and edge details before any new material is laid down.
Material choice should reflect both local exposure to wind and the practical realities of a hot, storm-prone climate. Favor systems with proven wind resistance and compatible fastening methods for Florida wind zones. While tile and metal offer long-term durability, ensure the chosen system includes edge clips, secure fasteners, and a sealant strategy designed to resist salt spray and high humidity. The contractor should provide a test of wind resistance for the system in use and tailor detailing to the home's specific roof geometry and load requirements.
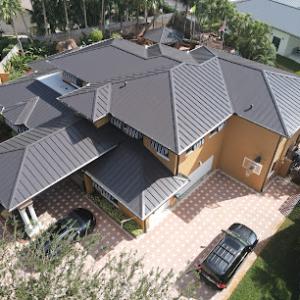
In this part of Miami-Dade, roofs come in a broad mix: tiles, metal, shingles, and low-slope assemblies shoulder a lot of summertime use. Local contractor activity clusters around metal roofing, tile roofing, and flat or low-slope systems because those are the types most often updated or replaced after a storm. The hurricane-driven standards here push every replacement toward wind-resistance upgrades that work with the climate and the way roofs are actually used in daily life. When planning, expect to see multiple roof types adjacent to each other on a single block, which means detailing helps prevent cross-system issues at walls, edges, and transitions.
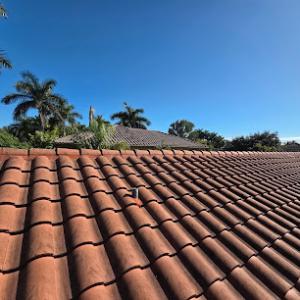
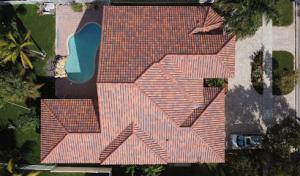
Concrete and clay tile are common around this area, and that sticks out in practical terms: the tile's weight and the potential for breakage mean deck condition and replacement matching matter more than in lighter-roof markets. Before any tile swap, inspect the sheathing and rafters under the deck for moisture damage, rot, or prior poor nailing patterns. If the deck is compromised, a tile replacement should go hand in hand with strengthening or replacing the underlying structure to avoid cracking during a gust. When you choose a tile, look for classes that emphasize wind uplift resistance and proper installation of underlayment and continuous edge fasteners. For long-term performance, ensure the battens and fasteners are rated for high-wind zones and that flashing around valleys, chimneys, and vents is continuous and integrated with the deck's drainage plan.
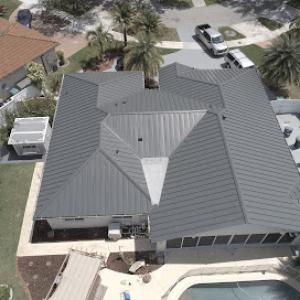
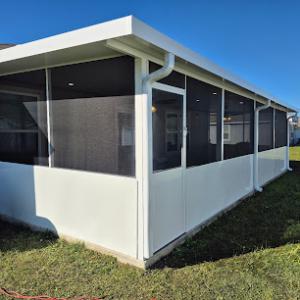
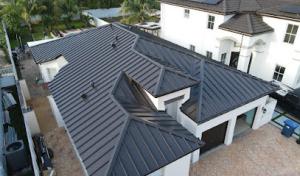
Metal roofs are a practical fit for this climate because they shed heat and resist corrosion with proper coatings, but even there, wind-driven debris and panel seams require attention. A metal roof installed with a true through-fastened or concealed-fastener method must have an uninterrupted umbrella of sealant and matching flashing at any roof-to-wall interface. For low-slope sections-porches, additions, or commercial-style structures-ponding water can become a problem quickly during Florida's heavy summer rains. A careful slope, properly installed underlayment, and well-sealed edge details mitigate water intrusion and flashing failures. Inspect valleys and corners regularly after heavy rain events, and confirm the chosen system has a tested wind-resistance rating that aligns with local expectations.
When multiple roof types share the same structure, the transitions demand extra care. The low-slope segments should be coordinated with the steeper sections to ensure gutters, downspouts, and drip edges align without creating standing water paths. Pay particular attention to how tile and metal meet at eaves and ridges, because improper flashing can become a primary entry point for wind-driven rain. If a section needs repair or replacement, treat it as a system decision rather than a single panel change. Strengthen fasteners at all transitions and ensure the roof-to-wall interfaces maintain continuous weather protection. In practice, this means choosing compatible materials for flashing and sealants and confirming the contractor sequences tile or metal installation to protect the underlying deck from moisture and wind uplift.
Florida's high volume of wind and storm claims means homeowners should expect closer insurer review of roof age, prior repairs, and photo documentation. In practice, that scrutiny can slow claim processing, especially after a big event when adjusters are juggling many properties at once. If your roof has had patches or small repairs in the past, expect questions about those fixes and how they held up. Gather any available records-inspection notes, contractor receipts, and photos-from the last several years so you can demonstrate a consistent history of maintenance. Being ready with clear, dated images helps a claim file stay on track rather than get tangled in paperwork delays.
In this market, claim timing matters because post-storm contractor demand surges can slow inspections, temporary dry-in, and replacement scheduling. A flooded phone line and crowded insurance desks are common after a tropical system. To minimize wait times, document what you see as soon as possible: timestamped photos from multiple angles, dates on canvassing notes, and a short, precise description of observed damage. If you can secure temporary protection promptly-like tarping or weatherproofing measures that are appropriate for your home-the insurer often views this as responsible stewardship, which can streamline the process. Expect that inspection windows may stretch weeks into the dry season when storms are less frequent but still possible, so plan accordingly for potential long gaps between assessment and repair start.
Wind-driven rain from tropical systems can create leak paths that are not obvious from the ground, especially around ridges, valleys, penetrations, and low-slope transitions. In particular, high winds can lift shingles, tiles, or flashing enough to allow moisture to travel laterally and reach ceiling planes far from the obvious damage. Inspect around vent stacks, skylights, chimney bases, and along roof-to-wall connections after every storm. Inside, look for staining near ceilings or walls that may indicate a slow drip rather than a single burst of water. If unusual dampness shows up inside, pause further DIY attempts and call a professional to assess both the interior and the exterior envelope. A cautious, thorough approach helps prevent a small issue from unfolding into a larger claim and more extensive repairs later.
Connect with contractors who help homeowners navigate the claims process from damage assessment to final approval.
Sunlight Roofing
(305) 231-2000 sunlightroofing.com
Serving
5.0 from 193 reviews
Sunlight Roofing is South Florida’s trusted roofing contractor proudly serving Miami-Dade and Broward County. We specialize in roof repairs, roof replacement, and new roof installations for residential and commercial properties. Our licensed and insured team works with Metal, Shingle, and Tile Roofs, providing reliable, professional, and high-quality roofing services designed to protect your home or business. We take pride in delivering honest estimates, timely communication, and exceptional craftsmanship on every project. Call us anytime for a roof inspection or consultation and experience why homeowners and business owners across South Florida trust Sunlight Roofing for their roofing needs.
Perkins Roofing - Miami
(305) 518-1059 perkinsroofing.net
Serving
4.8 from 164 reviews
Perkins Roofing - Miami provides expert roof repair, roof replacement, and maintenance services for homes and businesses in Miami. Call now for a free estimate! Perkins Roofing is a licensed, insured, family-owned roofing company serving South Florida for 40+ years. Based in Miami, we provide commercial and residential roofing services, including roof repairs, re-roofing, emergency services, roof maintenance, and leak prevention. We also offer impact windows, impact doors, and exterior painting. From St. Lucie to Monroe County, trust our team for quality work. Call 305-687-6521 for a free estimate!

Jireh Roofing Contractor USA
(305) 900-9322 www.jirehroofingcontractorusainc.com
Serving
4.9 from 210 reviews
Jireh Roofing Contractor USA, INC is a family-owned business with licenses covering Six significant construction categories. We specialize in delivering top-notch roofing and construction services to both commercial and residential property owners throughout the state of Florida. Our foundation rests upon years of experience, unwavering determination, and a commitment to craftsmanship. We pride ourselves on offering roofing and construction services that are not only high in quality but also affordable and reliable. Providing Roofing Service in Miami, Broward, Palm Beach County & Areas Near You! Disclaimer: We are NOT associated with any other “Jireh Roofing” we are a ONE AND ONLY entity under licensure as, Jireh Roofing Contractor USA INC!
Z Roofing & Waterproofing
Serving
4.6 from 139 reviews
Z Roofing & Waterproofing has been providing quality service in the commercial, residential, and industrial roofing industry since 1998. Our services include waterproofing, new roof installations, repairs, annual maintenance, and more. We are fully licensed and insured and offer warranties for up to 20 years, so that you can rest assured you’re protected. Our experienced team builds on years of expertise while incorporating the latest technological advancements to provide you with the best roofing and waterproofing services in the industry. At ZRW, we take pride in our work and concentrate on exceeding our customers’ expectations. We strive to create long term relationships with our clients by offering quality, integrity and lasting value.
Miami Aluminum Roof
(786) 488-4912 miamialuminumroofs.com
Serving
4.4 from 55 reviews
At Miami Aluminum Roof we are committed to providing our customers with optimal satisfaction and quality in all our projects. Through the qualified work of our team as well as the continuous improvement of our company supported by the best products and technologies on the market.

Tiger & Son Roofing
(954) 441-4630 www.tigerandsonroofing.com
Serving
4.8 from 125 reviews
For over 35 years, Tiger and Son Roofing has been providing top-quality roofing services to South Florida. From minor repairs to complete roof replacements, our experienced team is dedicated to protecting your home or business.
Stateside Exteriors
(267) 276-3232 statesideexteriors.com
Serving
4.9 from 44 reviews
If you're searching for an exterior contractor, there's no one better than Stateside Exteriors. Our four decades of experience make us the go-to choice for your home improvement project. We provide roofing services throughout New Jersey. Whether you need a few asphalt shingles replaced or you're replacing your commercial rubber roof, our team will get the job done right.
Florida Roof-Tech
Serving
4.6 from 146 reviews
Florida Roof-Tech is a residential and commercial roofing contractor established in 1990. We have years of experience in the business and believe in pursuing excellence. We offer complete roof replacement and roof repairs and a fair cost and with a very reliable roofing contractor. We are a very reliable and highly competent roofing contractor that will take care of your roofing projects? Get in touch with us today to schedule your free estimate.
Proper Roofing Inc. - Top Rated Roofing, Windows & Remodeling.
(786) 891-1771 www.properoofing.com
Serving
5.0 from 612 reviews
With nearly three decades of experience, Proper Roofing has been a trusted leader among Miami's roofing companies. Specializing in top-tier roofing solutions, their team of expert contractors provides superior service for both residential and commercial properties. Whether you need a full replacement, professional repair, or a new installation with shingles, tile, or metal, their commitment to using quality materials ensures lasting results. Their expertise also extends to exceptional kitchen and bathroom renovations, bringing a new level of craftsmanship and reliability to your home improvement projects.

Omega Roofing
(954) 464-8699 commercialroofservicesfl.com
Serving
4.8 from 68 reviews
Benefits of Commercial & Residential Roofing Maintenance and Services We provide hard work Maintenance and Services for our Clients. Our Installed roofing systems with adequate maintenance avoids emergency call into your property. Early research helps identify issues; providing the resources for extending the life cycle of al types of the roofing systems. LEAKS MAKE A CHEAP ROOF EXPENSIVE. YOUR BUSINESS DESERVES THE BEST. WE DELIVER IT. GET IN TOUCH OMEGA COMMERCIAL ROOFING SYSTEMS Omega Florida Commercial & Residential Roofing Company Your roofing Experts in Dade and Broward County as well as South Florida
Segura Roofing
(786) 860-4909 www.seguraroofing.com
Serving
4.9 from 61 reviews
Segura Roofing is a trusted roofing contractor serving South Florida, specializing in residential and commercial roofing solutions. From roof installations and repairs to inspections, we deliver high-quality craftsmanship and reliable service. As a family-owned business, we’re committed to protecting what matters most—your home or business—by using top-tier materials and treating every project like it’s our own.
All Pro Roofing Group
(786) 891-4117 www.allproroofinggroup.com
Serving
5.0 from 58 reviews
Roofing. Metal, Tile, Shingle, Flat roofs. Roof repairs
In this market, asphalt shingles sit at the more affordable end, but local dynamics keep their price competitive only when labor demand is normal. Expect a typical installed cost in the lower-to-mid range of the statewide guide, roughly 350 to 650 USD per square. Scheduling during the dry season helps limit weather delays that can stretch crews' time on a single roof. If a home has a flatter, mixed roof profile, the project can stay on the lower end; more complex geometry or steeper pitches common in older Opa-locka homes pushes the total closer to or into the mid-range.
Metal systems are widely available here, with strong local access due to the number of tile- and metal-specialist crews. That access can improve material handling and turnaround but may still tilt prices upward compared with asphalt when premium finishes are chosen. Installed costs typically run from about 700 to 1,100 USD per square. The higher end reflects complex flashings around chimneys or vent stacks and the need for precise wind-rated fastenings to meet local wind standards. Scheduling in the dry season remains a practical guard against weather-driven delays.
Clay tile is a common choice for South Florida homes, and local specialists often deliver tighter timelines for tile installs. Expect costs in the 1,000 to 2,200 USD per square range, depending on tiles' profiles and underlayment requirements. Tile roofs benefit from dry-season work windows, but their weight and installation complexity can extend labor time, especially on homes with irregular shapes or multiple roof planes.
Concrete tile shares many of clay tile's performance traits with a slightly different cost envelope. Typical installed pricing runs roughly 900 to 1,600 USD per square. As with clay, labor time rises with complex geometry and mixed roof types, and premium fasteners or rain screens may be added for wind resilience.
Synthetic or composite options offer a balance between longevity and cost. Expect 350 to 750 USD per square, with local price variation reflecting the availability of qualified installers and the desired warranty level. Dry-season scheduling helps minimize weather-related interruptions, particularly on larger or multi-plane roofs.
Fiber cement shingles sit mid-range in durability and cost, commonly ranging from about 500 to 900 USD per square. Local crews with experience in fire- and wind-resistance applications can streamline installation, but roof complexity and existing deck configurations influence final time and price. As with other materials, plan for drier months to avoid storm-season delays.
Don't let upfront costs delay a critical repair - these contractors offer payment plans to fit your budget.

Roofing Nation Llc Roofing Contractor
(305) 249-1011 www.roofing-nation.com
Serving
5.0 from 80 reviews
A full re-roof in Opa-locka typically requires a permit through the City of Opa-locka Building Department. Before any shingle, tile, or metal goes up, your contractor should file the project paperwork, and you should be prepared to provide project details such as roof type, total square footage, and any structural or drainage changes. The permit process helps ensure the project meets Miami-Dade area wind-resistance standards and local building codes tailored for our hurricane-season realities.
The local inspection flow is structured to keep you (and your home) protected through the critical stages of construction. Early in the job, you typically encounter a tear-off or underlayment stage inspection. This visit verifies that the old roofing material has been removed or properly prepared, and that the underlayment and flashing meet code requirements for weather resistance. A second, finish-oriented inspection then confirms that the new roof system is installed to spec, with correct fasteners, sealants, and ventilation. Finally, a completion or final inspection closes the permit and records the project as finished. Coordinating these inspections with your contractor helps avoid delays and ensures continuity through storm-season swings.
Permit turnaround in this area is often about one to two weeks, but it can stretch depending on workload and weather interruptions. During storm season or citywide demand spikes, approvals can take longer, so planning ahead is essential. If a storm threat looms or a contractor anticipates back-to-back projects, there is a higher chance that inspection scheduling becomes tight. In practice, communicate openly with the Building Department and your contractor about anticipated timelines, and keep a buffer in your project schedule to accommodate potential delays.
Preparation tips for homeowners include having a clear project scope ready for the permit packet-roof type, square footage, and any additions or penetrations to walls or chimneys. Ensure the contractor provides a detailed sequence of work so the inspection team can follow the progression without repeated visits. If a delay arises, ask your contractor to request interim inspections only as necessary to maintain compliance, rather than waiting for a single, drawn-out inspection window. Noting weather windows and typical seasonal fluctuation in your calendar helps synchronize permit processing with dry spells ideal for indoor work and material staging.
In Florida, insurer pullbacks and tighter underwriting have made roof age, visible condition, and documentation more important for renewals and replacements. The combination of hurricane demands and the summer thunderstorm pattern means a roof that shows any wear or inconsistent maintenance can raise flags during a policy review. When a claim is filed after a storm, the insurer will look for mismatches between what happened and what was reported as maintenance. In this market, clear records help keep decisions predictable and less prone to surprise.
Homeowners in this market should keep dated photos, permit records, inspection approvals, and contractor invoices because insurers may scrutinize whether damage is storm-related or maintenance-related. A photo trail from pre-storm condition through post-event repairs can demonstrate a sequence that supports a claim. In practice, that means storing images by date, labeling what each image shows, and preserving receipts for every repair or upgrade. The goal is to create an easily navigable story for an underwriter who might not see your home in person.
Choosing materials and installation details that perform well in South Florida wind and moisture conditions can affect both claim outcomes and future insurability. A roof system that demonstrates robust attachment, corrosion resistance, and adequate drainage reduces the chance of wind-driven damage escalating into a larger claim. Similarly, detailing that resists moisture intrusion under tile or shingle exposures minimizes hidden wear that insurers dread after a storm. A careful selection and precise workmanship provide tangible value when the policy examiners review the roof's resilience.
Every roofing choice carries implications beyond immediate repair. The insurer may view a replacement with non-standard components or improper integration with existing structures as a signal of risk. Even routine maintenance, if poorly documented or executed, can influence future insurability. In this climate, maintaining a transparent, well-documented path from assessment to completion helps protect both the home and the policy standing over time.
Connect with contractors who help homeowners navigate the claims process from damage assessment to final approval.
The hot, humid subtropical climate around Opa-locka accelerates wear you can feel in everyday roofing: moisture retention can sap underlayment and fasteners, algae staining sits on shaded tile and metal, sealant fatigue shows up sooner, and attic heat load adds strain to ventilation. When choosing materials, consider how they handle prolonged humidity and rapid dry-out cycles after storms. Metal and concrete tiles tend to shed heat differently than asphalt, but all systems benefit from a well-ventilated attic and a tight, moisture-aware installation detail set. The goal is to minimize heat build-up and water intrusion long after the crew leaves.
Wet summer conditions can expose open roof decks to sudden rain if crews do not dry-in quickly, making project pacing more critical than in drier climates. Plan sequencing so that deck work, sheathing, and underlayment advance only as fast as the roof can be dried and sealed. If a storm rolls in mid-project, temporary coverings and rapid moisture checks become essential. Consider staging materials to avoid long exposures on open decks and maintain clear communication with the crew about drying times between rain events. A steady, weather-aware pace helps protect the interior from water intrusion and reduces rework.
Dry-season installation windows are often preferred locally because they reduce interruption risk from daily thunderstorms. Align major steps-deck approval, underlayment application, and final fastener patterns-with predictable dry spells. For flat or low-slope roofs, ensure fabric and membranes are installed during those calm weeks to minimize wind uplift risk once a storm pressure pattern returns. In all cases, verify that attic ventilation stays effective during longer installation days, and that any added condensation control is integrated before sealing the roof. This attention to timing keeps a project on track and reduces surprises when the sky finally opens up.
In this area, wind-driven rain finds its way through the seams and flashing around skylights, vents, and equipment curbs long before it tears through the main field of the roof. The combination of sudden summer downpours and rapid temperature swings can reveal tiny gaps that might seem minor during calm days. If flashing isn't tight at these points, you'll see leaks sooner after a thunderstorm than you would across the broad surface.
Skylights and vent assemblies demand careful, continuous flashing that compresses properly against both tile and shingle transitions. Pay attention to corners, valleys, and fastener penetrations. Replacing worn or discolored booting around vents and checking the base seal where the curb meets the roof deck will reduce ongoing vulnerability. In mixed roof sections, where a low-slope area ties into steeper tile or shingle runs, flashing must be coordinated across materials so that water cannot find a path at the seam.
Homes with mixed roof sections are especially vulnerable where low-slope areas meet steeper tile or shingle sections. The junctions in these zones often carry the bulk of water during a storm, and any misalignment or improper sealant can become a leak hotspot after a heavy rain. If a seam or flashing looks strained after a storm, address it promptly. Small, persistent drips at transitions are a warning sign that a broader issue at the penetration area may be developing.
During the hot, thunderstorm-heavy months, inspect penetrations after each major storm and before the next dry spell ends. A quick interior check for damp spots around vents or skylights can catch trouble early, before it migrates into insulation or framing. If you notice recurrent moisture at a specific penetration, call in a pro to reflash and reseal the curb, rather than letting it linger.
Find contractors experienced in skylight installation, flashing, and leak repairs to bring natural light into your home.
Roofing Nation Llc Roofing Contractor
(305) 249-1011 www.roofing-nation.com
Serving
5.0 from 80 reviews