Last updated: Apr 19, 2026
The main weather risk for roofing schedules hits hard during the summer monsoon, roughly July through September. Heavy rain and gusty wind can leave tear-offs exposed and delay dry-in, turning a rushed replacement into a moisture trap. When those sudden downpours hit, you can watch a freshly exposed underlayment soak and shift, while shingles or tiles still cure or settle. The risk isn't just leaks right away; it's accelerated wear on exposed seams, fasteners, and flashing seals that have not yet been flashed with full set-up in place. If your crew is rushing to beat a storm, insist on a robust dry-in plan that accounts for possible rain days and the likelihood of shifting winds driving rain under eaves and along ridges. In this climate, a poorly staged dry-in can linger for days, compounding heat and sun exposure that degrade materials before they're fully protected.
The high-desert climate punches your roof with intense sun and heat, especially on south- and west-facing slopes. UV radiation ages exposed components quickly, from underlayment to shingles and metal flashings. In Sierra Vista, you'll notice faster chalking on asphalt shingles and quicker delamination on membrane surfaces if underlayment gets prolonged sun exposure before final sealing. Even when a roof looks intact, the daily sun can bake the roof deck, making late-stage sealant failures more likely after a storm. This is not just about color fade; it's about structural resilience over years. The pre-leak damage often starts as micro-cracks and dried-out asphalt, progressing before any drip becomes obvious. Planning needs to assume a shorter lifetime for exposed edges and fasteners in the sunniest directions. If you're evaluating materials, consider how each option performs under high heat and how well edge metal or flashing resists buckling when temperatures spike.
Spring and fall emerge as the most practical replacement windows for this climate. They dodge the peak summer heat that accelerates aging and helps reduce the chance of a monsoon storm interrupting the job. With spring or fall, you're balancing cooler days, milder winds, and a more predictable monsoon pattern, so crews can achieve a clean, dry-in finish before the next hot spell or storm front arrives. If a replacement must occur in summer, target early summer weeks with the best weather forecast windows, and secure a contingency plan for rain days. In those cases, insist on a weather-myned schedule: a solid tarp and wind-resistant edge protection, a guaranteed dry-in sequence, and a rapid inspection after any storm cell to address fastener loosening or flashing displacement before the next monsoon event.
Coordinate with your contractor to map a weather-aware sequence: remove, cover, reseal, and dry-in in a single, uninterrupted operation when possible, with a clear contingency for rain days. For south- and west-facing slopes, pay extra attention to flashing and edge metal-these areas endure the most sun exposure and storm-driven rain. Insist on high-quality underlayment rated for rapid drying and wind-driven rain, plus secure fastener patterns that resist wind uplift. Finally, schedule a mid-project inspection if a storm passes through, ensuring there are no signs of water intrusion or deck exposure that could compromise the roof's long-term performance.
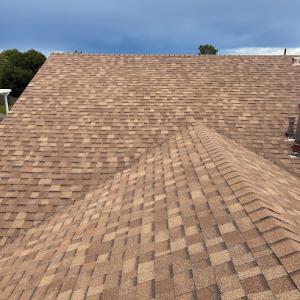
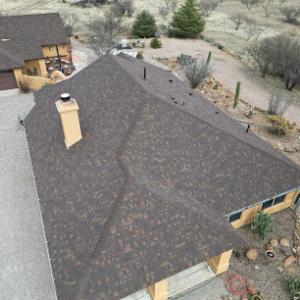
The dominant residential roof types in Sierra Vista are asphalt shingles, metal roofing, clay tile, concrete tile, wood shingles or shakes, and synthetic or composite shingles. Each has its own rhythm of aging under the high-desert sun, heat cycling, and the short, disruptive summer monsoon. Asphalt shingles handle the heat well enough in most homes, but shallow profiles can show edge wear sooner where dust and wind strip granules. Metal roofs resist UV fade and heat transfer, yet flashing and fasteners still need attention after monsoon winds. Clay and concrete tiles stay cooler on sunny days, but the weight and tile laps mean edge and underlayment details become critical, especially as UV exposure weakens the bedding over time. Wood shingles or shakes provide a classic look, yet their resinous cores can dry out and crack with the intense sun, while synthetic or composite shingles aim to balance fade resistance with lighter weight, though some products may weather differently under wind-driven dust.
In this climate, prolonged UV exposure and heat cycling are major drivers of material wear, while monsoon winds test fastening, edge details, and underlayment integrity. Expect asphalt shingles to experience accelerated granule loss in sun-baked panels, and keep an eye on nail heads near rakes and hips where heat cycling can loosen sealing over multiple seasons. Metal roofs tend to keep interior temperatures reasonable, but seam connections and flashings must hold up to gusts that sweep across the hills. Clay and concrete tiles stay more stable in color during the hot months, yet the weight-bearing laps and their bedding must remain watertight as the shade lines shift through the seasons. Wood shakes expand and contract with heat and dry air, which can widen gaps if maintenance lags. Synthetic shingles often resist UV fading, but dust abrasion and heat cycles still require periodic checks to confirm edge seals and fastener integrity.
Persistent dust and wind between storms can collect under tile laps, around flashings, and in valleys, making maintenance and inspection more important than in wetter climates. After the monsoon, inspect for loosened laps or lifted edges where wind-driven rain might have driven underlayers. Dirt and grit can hide small cracks in tiles or asphalt, so lighting a careful, up-close visual inspection after dust events helps catch problems before they propagate. For metal roofs, check seam closures and fasteners along eaves and roof-to-wall junctions; dust buildup can mask minor leaks and corrode exposed metals over time. Underlayment should be inspected as soon as a dry stretch allows access to the attic or crawlspace, paying particular attention to any signs of moisture intrusion near valleys and penetrations. For tile roofs, keep gutters clear and monitor the roof edge flashing where monsoon winds push rain at odd angles. Regular, targeted inspections after the late-summer monsoon help catch problems while access remains convenient and before heat intensifies interior attic temps.
Nomad Home Improvement
Sierra Vista, Arizona
4.8 from 20 reviews
From custom roofing services to comprehensive repairs, we'll work with your budget to provide affordable services that will be worth every penny. Choose NOMAD Home Improvement for high-quality, professional handyman services done the right way, every time.
Artistic Roofing Systems
(520) 458-6781 artisticroofingllc.com
5362 S Santa Elena Ave, Sierra Vista, Arizona
4.4 from 30 reviews
We're on top of what matters most, Our services include Residential and commercial Reroofs, Roof Repairs, Gutters, Pergolas, Metal Roofs, Flat roofs, Maintenance, New Construction
Marquez Roofing & Remodeling
Sierra Vista, Arizona
4.9 from 7 reviews
Marquez Roofing and Remodeling is a family-owned business that encompasses a family trade passed down from generation to generation. We are dedicated to providing an excellent quality of work that you can count on for generations to come.
SandFlat Roofing
(520) 508-0927 sandflatllc.com
999 E Fry Blvd Suite 316, Sierra Vista, Arizona
5.0 from 5 reviews
At SandFlat Roofing, we protect your roof and investment from weather, age, or unforeseen events. Our expert team works with insurance companies and offers financing options for your peace of mind. We are licensed, bonded and insured! Trust us for comprehensive solutions tailored to your needs. license ROC 346219
Clay and concrete tile are common here, but the climate often outlasts the underlayment beneath them. When the tiles look sound from the ground, the underlayment and other hidden water-shedding layers may already be nearing the end of their life. That mismatch creates a quiet failure mode: water can seep through valleys, around penetrations, or at tile transitions long before a visible roof leak appears. The consequence is damage that travels inward, so a tile that seems fine may be masking a compromised foundation for later rot, mold, or structural stress.
Monsoon activity in this high-desert setting tends to be brief but intense, and the wind can push rain into vulnerable junctions even when the field tiles look serviceable. Valleys-where water concentrates-and tile-to-vent, vent-to-flashing, and vent-to-tile transitions are especially at risk. If gutters are clogged or flashings are marginal, the storm-driven rain can overwhelm a roof that appears ordinary from the curb. The result is damp ceilings or hidden rot that shows up only after the next monsoon lull.
Dust, heat, and strong sun accelerate aging in flashing, underlayment, and the fasteners that hold everything together. Cracked or slipped tiles are a visible concern, but the overlooked parts-the edges of the underlayment, the seal around vent flashings, and the integrity of the ridge cap-often fail first in this climate. Regular inspections should focus on these zones, not only on tile color or crack status. A tile that looks fine might be masking deteriorated underlayment or loose fasteners that invite leaks during wind-driven downpours.
When you walk the roof after a monsoon storm or during a dusty stretch, pay attention to seams where tiles meet penetrations and at transitions. If a valley shows signs of moisture staining or soft decking, address it promptly even if the tiles above seem intact. Because the underlayment ages more quickly than the surface tiles in this environment, you'll benefit from a proactive schedule that treats the hidden layers as the critical line of defense.
Schedule targeted checks after monsoon events and during periods of extreme heat. Focus on flashings, underlayment condition, and the stability of tiles in vulnerable transitions. If a tile is cracked or slipped, replace it promptly, but also verify the surrounding materials for signs of water infiltration. In this climate, prevention hinges on catching hidden wear before it transitions into visible, costly damage.
Sierra Vista can see occasional hail in spring and stronger wind-driven rain during monsoon season, so homeowners often need to separate cosmetic wear from event-based damage. When a storm passes, pull back a corner of a shaded area on the roof if safe, and inspect from the ground with binoculars or a flashlight at dusk. Hail marks, cracked shingles, broken tabs, and exposed fasteners are the kinds of clues that matter. Document everything you see with clear photos from multiple angles, including close-ups of any damaged edges, flashing, and the valleys. Do not assume shallow dents or granule loss are cosmetic; wind-driven rain can exploit weaknesses that aren't visible at first glance.
In this region, insurers may request roof age, photos, and prior claim history after hail or wind events before approving replacement decisions. Gather the basic facts: roof type, approximate installation year, and any prior hail or wind claims on the policy. Create a simple event log noting the date of the storm, wind speeds if known, and how long the roof sat exposed to rain afterward. When you file, attach the photo set in chronological order, clearly labeling areas of concern. A concise narrative that ties observed damage to the storm's timing helps claims reviewers separate weather-driven wear from preexisting issues.
Cosmetic wear-fading, minor granule loss, or isolated surface scuffs-is common after several high-desert summers, but it often doesn't drive a full replacement. The goal after a storm is to identify damage that compromises safety or performance: cracked or missing shingles, displaced flashings, or signs of moisture intrusion in the attic. Pay special attention to valleys, drip edges, and edges of overhangs, which tend to reveal leaks first. If you're unsure, a brief, targeted inspection by a licensed roofer can provide a professional opinion on whether the event caused concealed damage that should be documented for the claim.
Because the local insurance market is generally stable rather than a chronic catastrophe market, documentation quality after a specific storm event matters more than broad market panic. Assemble the evidence promptly while the damage is freshest, but avoid rushing critical photos or notes. Keep a running file with the storm date, your roof's age, the claim reference, and any correspondence. If a adjuster visits, be ready to show the event log, photos, and a simple diagram of the roof layout. Clear, organized documentation tends to move the process forward more smoothly than scattered notes or vague claims.
Your immediate action after a hail or monsoon event is to protect the interior from potential leaks by placing a temporary, non-intrusive covering over obvious openings if safely feasible. Do not delay sending the documentation package to your insurer while weather conditions remain favorable for a quick follow-up inspection. When in doubt, enlist a local roofer for a no-pressure review of the most vulnerable roof areas and to help curate the most compelling, storm-specific evidence for your claim.
Typical Sierra Vista pricing aligns with the local mix of sun, dust, and occasional heavy wind. Asphalt shingles run about 350 to 800 USD per square, a range driven by underlayment choices and the need for UV resistance in the high desert sun. Metal roofing clocks in from 600 to 1200 USD per square, reflecting both panel quality and wind-load considerations common to this area. Clay tile sits between 1000 and 1800 USD per square, while concrete tile runs from 900 to 1500 USD per square. Wood shingles or shakes are generally 700 to 1200 USD per square, and synthetic or composite shingles fall into the 600 to 1100 USD per square band. In other words, the material you pick translates directly to a noticeable difference in upfront cost, with long-term value often tied to durability against heat and monsoon-driven moisture.
Costs in Sierra Vista can rise during the monsoon season when weather delays reduce production days and increase the risk management needed to keep roofs dried in. The narrow replacement window means contractors may charge a premium for expedited materials handling, tarping, and additional fasteners designed to withstand wind-driven rain. If a roof project starts just as monsoon moisture peaks, watch for staged payments tied to weather windows and for crews juggling longer timelines. Planning ahead for the seasonal surge helps avoid last-minute price shifts and gaps in material availability.
Tile-heavy Southwestern architecture in Sierra Vista can increase labor and repair complexity compared with simple shingle tear-offs, especially when underlayment replacement is the real scope. Clay and concrete tiles often require careful removal and reinstallation, additional roof gridwork, and matching accessory pieces like hips and ridges. Underlayment plays a bigger role here because high-desert UV exposure accelerates aging, making a robust membrane a sensible investment. If the project includes replacing underlayment, anticipate added cost, but also longer life and better performance during monsoon rain events.
Choose a material with proven UV resistance and wind performance for these conditions. If budget allows, allocate extra for underlayment and ventilation upgrades to prolong the roof's life in the high-desert sun. For clay or concrete tile, expect higher labor costs but longer cycles between major repairs, thanks to strong durability when properly installed. If monsoon timing is tight, lock in a start date with a contingency plan for weather holds and keep communication clear with the contractor about necessary rain protection measures.
A roof replacement in Sierra Vista generally requires a building permit through the City of Sierra Vista. The permit process is designed to ensure that new materials and installation methods meet local codes, wind uplift requirements, and the high-desert climate realities that shape long-term performance. Before any shingles come off or new underlayment goes down, you or your contractor should pull the permit, submit project details, and confirm any neighborhood or HOA setbacks that might apply. Having the permit lined up early helps prevent delays that can pile up during the hot months when access to inspections is more limited.
Permit review and inspections are handled by the local building department. In practice, inspections occur at two key milestones: at the rough or underlayment stage and again at final. The rough/underlayment inspection verifies that decking, underlayment, and wind-rated components are properly installed and secured to withstand the high-desert sun and occasional monsoon winds. The final inspection confirms that all roofing work complies with current code, flashings are correctly integrated, and the system is watertight. Your inspector may also check attic ventilation and condensation controls as part of the overall roof health assessment. Plan for the necessary paperwork and access windows to avoid reworks.
Scheduling in Sierra Vista can be affected by coordination with the department and by monsoon weather, so inspection timing can directly influence project duration. Monsoon-driven rain can create temporary hold-ups or postponed inspection slots, especially during peak monsoon months when crews juggle several permits and weather windows. If a forecast shows a heavier storm pattern, the project may shift to protect newly installed underlayment and flashings. Communicate with the permitting office and the contractor about proposed timelines, and build in a small buffer to accommodate potential delays. Keeping the inspector informed of weather-related contingencies helps maintain accurate projections for start-to-finish timing and reduces the risk of weather-induced setbacks.
Have the permit number readily visible on-site and ensure access for inspectors during their scheduled windows. Prepare documentation that shows roof deck condition, underlayment type, wind-rated shingles, and any hail-resistant features if applicable. If the project involves any structural changes or venting upgrades, include stamped plans from a licensed professional. Finally, align your contractor's calendar with city inspection days to minimize downtime and keep the project advancing through the hot season with fewer interruptions.
In this high-desert setting, the most telling signs show up after the monsoon season, even if a roof looks fine from the street. The intense sun can age surface shingles and exposed flashing quickly, while the short, intense bursts of rain and wind can reveal weaknesses that were hidden by dry conditions most of the year. Visible surface wear-fading, curled edges, and granule loss-doesn't always mean a full roof replacement is needed, but it does signal that the underlayment and flashing may be nearer their limits. Because of the UV exposure, aging often advances in the upper portions of roofs first, and notches and valleys can deteriorate faster than the ridge. In Sierra Vista, you may notice a discrepancy between curb appeal and the roof's real condition once a storm hits, especially if the storm carried dust and wind-driven debris.
Dust and wind mean post-storm checks are more practical here than waiting for leaks to appear. After a rain event, walk the perimeter with a focused eye on flashing around chimneys, vents, and roof-to-wall transitions. Look for loose or lifted shingles, exposed underlayment at the edges, and any dark streaks that might indicate moisture intrusion behind the exterior layer. Examine low-slope sections and any repair patches, where wind-driven rain can exploit gaps. Inside the attic, if accessible, inspect for damp spots or a musty odor that could point to compromised underlayment. Remember that some issues live hidden under the surface; the goal is to catch signs of compromised barriers before they translate into interior problems.
A roof may appear acceptable from the street while underlayment or flashing issues progress, especially after a hot, sunny spell followed by a monsoon deluge. If you notice shy of catastrophic failure-like consistent dripping during heavy rain-but see exposed, wrinkled, or torn underlayment, or flashing that's buckled, plan for a closer assessment. In Sierra Vista, addressing these early indicators promptly helps preserve the roof's integrity through the next spring or fall weather window. A cautious evaluation now can prevent a larger, more disruptive repair later.