Last updated: Apr 19, 2026
Oceanside's Mediterranean pattern means roofs endure long dry, sunny stretches that bake shingles and tiles, followed by wetter winter periods that test seals and flashings. The result is a wear cycle where the most visible damage often mirrors the calendar rather than a single storm event. Dry summers can dry out sealants and coatings, making fasteners more prone to micro-leaks once the rains return. This means attention to the timing of inspections matters: after the first heavy winter rains, you'll often find leaks that weren't apparent during the sun-soaked months.
In practical terms, plan proactive checks for the transition from summer to winter. Inspect around edge details, penetrations, and flashing where heat cycling can loosen sealants. Look for hairline cracks in the underlayment near valleys and along ridgelines, especially in shingles and low-slope areas that see persistent sun exposure. If you spot gaps or drying caulk, address them before the next seasonal shift. Short-term fixes can help you bridge to the next dry period, but long-term resilience requires resealing or replacing compromised components before leaks become active with winter storms.
Homes closer to the coast face marine moisture and salt air that can accelerate corrosion on metal components, flashings, fasteners, and rooftop accessories. Salt-laden air aggressively attacks metal flashings at joints and penetrations, and it can corrode fasteners in roof decks and tacked-on accessories over time. The consequence is a gradual weakening of roof-to-wall transitions, vent stacks, and edge metal, which may reveal itself as rust stains, loose flashing, or rusted screws that no longer hold securely.
Action revolves around targeted inspections and timely replacements. Routinely test the condition of metal components in hidden corners-valleys, rake edges, and behind exhaust vents-where corrosion can progress without obvious surface symptoms. If fasteners show any discoloration, looseness, or brittleness, replace them with corrosion-resistant varieties designed for coastal environments. When replacing or resealing, prioritize flashings and trims at coastal areas and around any accessories that extend beyond the roof plane, such as skylights or HVAC stacks, to maintain a watertight seal through salt and spray cycles.
Fall and spring wind events in this area can stress ridge, edge, and tile attachment details even when the city is not experiencing major storm disasters. Wind can pry shingles at the hips and ridges, lift edges, or work against tile fastenings, particularly on low-slope sections. The effect is gradual loosening: small lifts or creaks that don't scream failure but reduce the roof's ability to shed water during a heavy rain.
Keep a close eye on edge all-around fasteners and the condition of ridge caps after high-wind days. For tile roofs, ensure ridge and hip tiles are properly seated and that mortar or bedding remains intact. If you notice any loose tiles, displaced shingles, or rapidly worsening edge wear, plan prompt re-seating or re-bedding. In homes with metal components, check for signs of corrosion at ridge caps and along eave edges following windy periods, and replace compromised elements before wind event seasons intensify.
Underlayment lives behind the visible surface, and its aging timeline is accelerated by cycles of heat and moisture. In this climate, look for loosened or bubbled underlayment near penetrations and in valley areas after hot spells followed by rain. Flashings should be inspected where they intersect with walls, chimneys, and vent stacks; any lifting or corrosion flags the need for resealing or flashing replacement. A practical approach is to schedule a focused inspection after the first heavy rain of the season, then again after a few windy days, to catch the two-stage wear pattern that Oceanside roofs often exhibit.
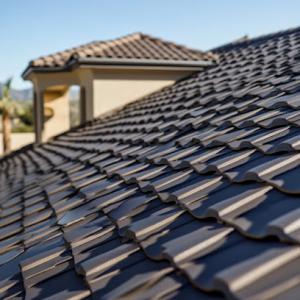
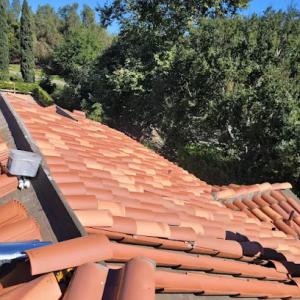
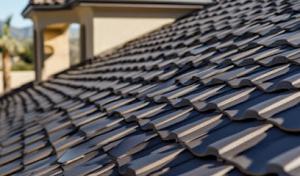
Tile roofs dominate many Oceanside neighborhoods, with clay and concrete tiles forming a familiar coastal silhouette. Even when the tiles themselves survive decades of sun and wind, the true heartbeat of a long-lasting tile roof is the underlayment, the mastics, and the sealants that sit beneath. In this market, underlayment condition is a major replacement driver, because tile can be reusable while the layer underneath deteriorates from salt spray, UV exposure, and temperature swings. If you notice hairline cracks or softness in the underlayment once you lift a tile during inspection, it's a sign that replacement or retrofit is likely needed sooner than you'd expect from the visible surface.
When operating in this sun-heavy climate, plan for more aggressive aging of the rot-proofing elements under your tiles. Sealants around vent boots, penetrations, and roof-to-wall transitions may fail early due to heat cycling and coastal humidity. The result can be slow leaks that aren't obvious from ground level. Regular checks after heavy marine winds or a particularly hot season help catch failures before they escalate into interior water intrusion. If you're choosing replacement tiles, look for profiles that minimize sun exposure on underlayment, and consider installing high-performance underlayment with a robust moisture barrier and UV resistance.
Low-slope and flat roof systems are a meaningful part of the local market, especially on multifamily, mixed-use, and commercial properties along older developed corridors. These roofs often rely on a single-ply membrane or built-up assembly with field joints and penetrations that must withstand wind-driven rain and coastal humidity. In Oceanside, you'll want to prioritize membrane materials and detailing that resist hail impacts, wind uplift, and thermal aging. The visible surface may look sound, but if the edge details, flashing, and roof-to-wall transitions aren't watertight, leaks can emerge from the membrane lap joints or around flashings after a long dry spell followed by a sudden coastal rain event.
Key maintenance considerations for low-slope systems include the condition of coatings, mastics, and sealants. Even when the surface looks intact, aging mastics along perimeters, parapets, curbs, and breakpoints can crack and delaminate under sun exposure. Inspect drip edges, perimeter details, and scuppers for corrosion or pooled water. Coastal winds can lift peripheral seams, so periodic resealing may be warranted to maintain a continuous weather barrier. You'll also want to ensure proper slope and drainage remain unobstructed by debris or vegetation, since any ponding accelerates membrane deterioration.
For tile roofs, do periodic underlayment checks from the attic or by roofing professional, especially after seasons with heavy marine air or storms. If tiles loosen or crack, replace broken units promptly and assess the underlayment condition before re-covering. For low-slope roofs, schedule a thorough inspection of membranes, flashings, and mastics every couple of years, with immediate attention to any signs of blistering, cracking, or rusted flashings. In both cases, prioritize products and detailing designed for coastal climates, and maintain a regular cleaning cycle to remove salt deposits and organic buildup that can degrade seals and coatings.
Find contractors who specialize in clay and concrete tile roofs, known for their durability and curb appeal.
On Point Roofing Repair
(951) 240-6202 onpointroofingrepair.com
Oceanside, California
5.0 from 316 reviews
Boyce's Roofing & Repair
(760) 583-9326 www.boycesroofing.com
4083 Oceanside Blvd #D, Oceanside, California
4.9 from 142 reviews

Late spring through early fall is generally the most favorable reroof window in Oceanside because crews can work through the city's drier season with fewer rain interruptions. A clear sequence helps protect underlayment, flashing, and existing trim from repeated exposure to moisture. If you can align tear-off and deck replacement within that stretch, you reduce the risk of weather-driven delays that push projects into uncomfortable heat or unexpected rain pockets. Planning to start after the long Santa Ana lull can also mean better consistency in material handling and fewer weekend gaps.
Winter reroofs require tighter dry-in planning because seasonal storms can bring enough rainfall to expose unfinished tear-offs and weak flashing details. In practice, this means ensuring that roofers have a firm path to complete deck work, install underlayment, and secure flashing in a tightly sequenced schedule before any significant rainfall. If a winter window is the only option, build in extra dry-in buffers, such as temporary weather barriers and staged material deliveries, so a single storm doesn't derail the entire sequence. Short, well-coordinated workdays help keep interior spaces dry and minimize the chance of needing to redo edge details after a rain.
Summer heat in Oceanside can speed wear on exposed underlayment and sealants if projects are delayed or staged too long before final roofing is installed. If a summer reroof is the plan, target a tight, front-loaded schedule: remove and replace underlayment and installation components as early in the day as possible, then seal and finish in the cooler early-evening hours when feasible. Staying ahead of heat-related stretch and sag in synthetic underlayment or asphalt products can prevent buckling or delayed curing of sealants. Consider shaded staging areas and protective covers for exposed decking during the hottest weeks to protect the roof's core from sun damage before the final roof layers go on.
Coordinate with crews to minimize the number of times the roof is opened and closed, reducing water intrusion risk between stages. For long, tile-heavy or low-slope roof types common near the coast, plan a single, continuous tear-off-and-install cycle rather than piecemeal stages. Communicate clearly about dry-in goals, especially if coastal humidity and marine air can affect adhesive products or sealants. Have a contingency plan for short-notice weather changes, including ready-to-roll tarping and expedited material delivery slots, so a favorable window isn't squandered by a sudden turn in marine wind or a surprise shower.
Get a clear picture of your project costs upfront - no commitment required.


On Point Roofing Repair
(951) 240-6202 onpointroofingrepair.com
Oceanside, California
5.0 from 316 reviews
Welcome to On Point Roofing Repair located in Wildomar, CA, where you will get the most professional roofing services around! When your hip and valley roofs are around 15-20 years old, they usually need a tune-up since valleys get clogged up with dirt and derbies, sudden earthquakes break tiles, mortar caps crack, tiles slip down, chimneys will have flashing problems, vent pipes will need to be resealed. That is why our focus is quality, ensuring we never cut corners even when it's more expensive. We pride our honesty, integrity, and quality workmanship.
Boyce's Roofing & Repair
(760) 583-9326 www.boycesroofing.com
4083 Oceanside Blvd #D, Oceanside, California
4.9 from 142 reviews
The team at Boyce's Roofing and Repair install peace of mind to customers throughout Oceanside, Vista, San Marcos, Escondido, and the surrounding areas. Whether you have a residential or commercial property and no matter what your roof is made from, the skilled team of highly-trained technicians are ready to help. They run their company with honesty, integrity, and reliability. They will not cut corners and always provide excellent customer service and high-quality products. Your roofing technician will always be on time or early and the company stands by that reputation. They want to build strong relationships and build exceptional roofs. To schedule your initial service, call Boyce's Roofing and Repair today!
Rise Up Roofing & Construction
(760) 802-2103 www.riseuprac.com
2182 S El Camino Real, Oceanside, California
5.0 from 9 reviews
Rise Up Roofing and Construction offers a comprehensive range of roofing services for homeowners and businesses in San Diego County. From the initial construction of new roofs to repairs and renovations, their team of skilled professionals uses only the highest quality materials and adheres to the latest industry standards. They can also tackle a variety of construction projects, including custom home building, window installation, and gutter services, ensuring a seamless and stress-free experience for their clients.
Gen819 Roofing & Solar
3760 Oceanic Way STE 501, Oceanside, California
4.3 from 12 reviews
Gen819 Roofing & Solar is a licensed, insured and bonded roofing contractor located in Oceanside, Ca. We are highly specialized roofers who combine cutting edge solar technology and installations with top tier quality roofing materials and solutions for all types of constructions. Our most sought after services are metal roofing for residential and TPO flat roofs for commercial clients. We are an employee-owned company that competently serves our happy customers since 2008 in the greater San Diego area and its suburbs in North County Oceanside, Carlsbad, Encinitas, Escondido, Vista, San Marcos, La Jolla and Rancho Santa Fe.
Drew The Roofer
(760) 415-0022 www.drewtherooferinc.com
731 Point Cabrillo, Oceanside, California
5.0 from 1 review
Drew The Roofer provides residential roofing services to the Oceanside, CA area.
Joe's Roofing
Oceanside, California
5.0 from 1 review
Joe's Roofing is a locally owned and operated business serving the Carlsbad and surrounding area. We pride ourselves in our passion for our work and our customer loyalty. Please give us a call and let us put our experience to work for you!

Atlas Roofing
(619) 793-3543 atlasroofingpro.com
Serving
5.0 from 59 reviews
Atlas Roofing is a trusted roofing contractor serving San Diego County, providing top-quality services for both residential and commercial properties. Specializing in new roof installations, roof repairs, shingle roof installations and repairs, clay tile roof installations and repairs, as well as flat roof installations and repairs, we offer comprehensive solutions tailored to the needs of our clients anywhere in San Diego, La Jolla, Vista, Del Mar, Chula Vista. Our team of experienced roofing professionals is dedicated to delivering high-quality craftsmanship using durable materials, whether it’s for an asphalt shingle, clay tile, or flat roofing system like TPO, as well as roof sheathing service.

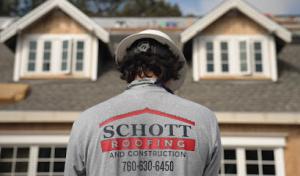
Schott Roofing & Construction
(760) 630-6450 www.schottroofing.com
Serving
4.8 from 46 reviews
Schott Roofing provides residential, commercial and HOA roofing, gutter and other exterior and interior improvement and repair services throughout the San Diego County area. Call today or visit our website for a free estimate.
Barranco Roofing
(760) 454-6770 www.barrancoroofing.com
Serving
4.8 from 22 reviews
At Barranco Roofing in Vista, CA, we take pride in delivering exceptional roofing services. What sets us apart is the personal touch in our services. You’ll speak directly with the owner, ensuring that there’s no middle man. Our 15 years of experience in roofing services means that you can count on us for quality and reliability. Whether it’s residential or commercial, we have got you covered.
Roof Maxx of Carlsbad, CA
Serving
5.0 from 37 reviews
Roof Maxx® is a scientifically formulated and 100% safe, plant-based roof rejuvenating spray treatment that was developed by renowned scientists from the world’s largest private research and development company.
Built 2 Last Roofing
(760) 539-8159 b2lastroofing.com
Serving
5.0 from 42 reviews
At Built 2 Last Roofing, we’re more than just a roofing company, we’re your partners in protection, quality, and peace of mind. Specializing in residential and commercial roofing, as well as repair and replacement services, we are dedicated to ensuring that your property is safeguarded with durable, high-quality roofing solutions. We have the expertise to handle any job, big or small. With years of industry experience, we’ve established ourselves as trusted roofing experts. Our team is fully licensed and insured, providing you with confidence and assurance that your roofing project is in the hands of professionals.

Roof King Roofing & Solar
(760) 941-5464 sandiegoroofking.com
Serving
4.0 from 49 reviews
Roof King Roofing & Solar: Your Trusted Total Protection Solutions Company. With 100+ years of combined experience, we offer honest, high-quality workmanship for residential, commercial, and industrial projects. As a preferred provider for HOAs and property managers, we specialize in new roofs, repairs, and solar panel installations. Trust us for complete roofing and solar solutions that safeguard your property and secure your financial future. Save money with solar and shield yourself from rising energy costs today. Call TODAY for a FREE ESTIMATE. New Roofs Roof Replacement/Re-roofing Roof Repairs/Maintenance 24-hour emergency leak repair Rooftop/Ground-mounted solar installers Solar panel installation and inverter services
The coastal climate in your area shifts what you pay for roofing materials. In Oceanside, the typical cost ranges you'll see are: asphalt shingles from about $350 to $700 per square, metal roofing from $600 to $1100, clay tile from $900 to $1800, concrete tile from $800 to $1500, wood shingles or shakes from $400 to $900, and synthetic or composite shingles from $450 to $900 per square. These figures reflect what a homeowner faces when sourcing materials that can stand up to sun, salt air, and wind along the coast. The lower end covers basic performance, while the upper end accounts for heavier or more durable options that behave better in heat and humidity.
Oceanside homes with tile roofs can see higher reroof costs because projects often involve heavier materials, more complex loading and staging, and underlayment-focused tear-off work. Tile projects frequently require additional crane or specialized crew time, robust roof decks, and careful handling to avoid cracking. If you have clay or concrete tile, plan for longer timelines and potentially more labor-intensive installation, which translates to higher total dollars even if the square-foot price for material remains in the typical range.
Coastal exposure can increase replacement of rusted flashings, fasteners, and penetrations in Oceanside, adding scope beyond the field roofing material itself. Salt-laden air and frequent humidity can corrode metal components faster, so you should budget for upgraded fasteners, corrosion-resistant flashings, and more meticulous sealing around penetrations. Expect the project to include more attention to flashings, vent pipes, and chimney details, which can swing both cost and durability in the long run.
Start with a roof assessment that notes whether your deck and underlayment are still solid, as this directly affects cost. If your roof uses heavier tiles, request a breakdown that separates material, staging, and underlayment work. Compare bids not only on price per square but on included scope for rust prevention, fastener upgrades, and flashing replacement. For coastal homes, prioritize bids that emphasize corrosion-resistant components and a thorough tear-off plan, since those choices drive both longevity and long-term value.
The most popular roofing material in the US. Find pros who install, repair, and replace asphalt shingles.
Gen819 Roofing & Solar
3760 Oceanic Way STE 501, Oceanside, California
4.3 from 12 reviews

A full re-roof requires a permit through the City Building & Planning Department. That means your project starts with proper paperwork, not a casual phone call or a quick online submission. In this climate, the city expects careful documentation that reflects the coastal realities-salt air, sun exposure, and wind-so plan on a real plan review process that digs into details about underlayment, venting, and fasteners. If a permit never shows up on the jobsite, you'll be chasing a stop-work order, not finishing on schedule.
Oceanside's permit process includes plan review and scheduled inspections as the project progresses rather than treating reroofing as a no-contact paperwork item. A good contractor will submit drawings and material choices that demonstrate compatibility with coastal conditions: roof vents positioned to minimize moisture entrapment, fastener patterns that resist wind uplift, and underlayment choices tested for marine exposure. Expect questions about attic space, ventilation strategy, and drip edge details. If any element doesn't meet city expectations, this review becomes your early signal to adjust before any tool touches the roof.
Rough-in and final inspections in Oceanside are used to verify underlayment, nailing, and venting compliance before the job is fully closed out. In practice, that means inspectors will look closely at how the roof deck is prepared, the quality and placement of nails or screws, and the integrity of ventilation paths. The rough-in stage checks the critical moisture and wind-resistance setup, while the final inspection confirms everything remains sealed against coastal humidity and salt spray once the new roof is in place. If something isn't up to code, the project stalls and you'll need to address it before closing the permit.
Communicate early with a contractor who understands how the Oceanside permit cadence intersects with your roof's material choice and local weather patterns. Missing a scheduled inspection can trigger delays and rework, so align your timeline with the city's process and keep the jobsite accessible for inspectors' arrival.
California's insurance market has tightened underwriting, and Oceanside homeowners may be asked for roof age, upgrade history, and wind-resistance documentation during renewals or policy review. The combination of coastal sun, humidity, and steady wind exposure means insurers look for a track record of durable materials and timely upkeep, not a single storm event. Documentation helps translate a roof's real-world performance into confidence during a renewal discussion.
In Oceanside, claim support is stronger when homeowners keep dated photos, permit records, inspection sign-offs, and invoices showing recent reroof or repair work. Photos should cover the entire roof, flashings, vents, and any areas that have shown wear or staining over the years. Store digital copies with timestamps and printed backups in a dedicated file. Collect seasonal inspection notes (even quick scans) and any contractor quotes that reflect material choices and wind- or moisture-resistant upgrades. When you can, obtain a signed inspection report after repairs and keep the original purchase or installation receipts.
Because Oceanside roof damage often comes from cumulative sun, moisture, and wind exposure rather than one dramatic event, documentation of condition before and after seasonal storms matters. Maintain a simple calendar of seasonal checks, noting soft spots, chipped coatings, lifted edges, or granule loss. If a storm or salt-laden gusts affect the roof, photograph promptly and file the report or invoice alongside the pre-storm baseline. Consistent records can smooth renewals and support appropriate coverage decisions.
Connect with contractors who help homeowners navigate the claims process from damage assessment to final approval.


Oceanside's sunny climate makes rooftop solar a common roofing coordination issue, so reroof planning often includes detach-and-reset sequencing and flashing review around mounts. When you're upgrading or adding panels, map out the path of gas and vent stacks, and plan for panel mounting rails to land on solid, continuous roofing surfaces. In coastal neighborhoods with long-lasting UV exposure, the roof deck under solar mounts should be inspected for any prior flashings that have split or peeled at the seams. Given the salt-laden air, ensure all mounting hardware is corrosion-resistant and that flashing around mounts is installed with extra sealant and proper drip edges to divert moisture away from penetrations. If a roof is nearing its service life, consider coordinating a full reroof or a reinforced edge treatment before solar installation to minimize future flash failures.
Skylight penetrations in this area need close attention because winter rain can expose long-developing seal or curb failures that stayed unnoticed through the dry season. Inspect the skylight curb for any micro-cracks around the fasteners, paying special attention to the transition from curb flashing to the roof. In Oceanside's salt-rich air, sealant aged from previous seasons can turn brittle; replace weather sealant and recheck gasket integrity around the glass once a year. When installing new skylights, specify a well-sealed curb with corrosion-resistant fasteners and consider a low-profile flashing that minimizes wind uplift risk on the coast. A careful test of the drain path and flashing overlap helps prevent water tracking along roof sheathing during heavy winter rains.
On coastal roofs in Oceanside, penetrations and accessory flashings are often the first places where corrosion and moisture entry show up. Treat every vent, chimney, and antenna mount as a potential trouble spot by upgrading to stainless or coated aluminum flashings and using a dual-layer seal around the flashing base. Regular visual checks after windy or stormy periods are essential; look for lifted edging, peeled sealant, and traces of white salt bloom on metal parts. When scheduling repairs, prioritize flashings that sit directly over eave lines and near Salt air corridors, because those areas are most prone to accelerated wear. Keeping a proactive maintenance cadence helps extend roof life amid coastal sun, humidity, and wind.
Find contractors who integrate solar panels or solar shingles into your roof for long-term energy savings.
Gen819 Roofing & Solar
3760 Oceanic Way STE 501, Oceanside, California
4.3 from 12 reviews