Last updated: Apr 19, 2026
Mililani sits in Central Oahu at a higher elevation than Honolulu's coastal neighborhoods, giving a cooler but still humid environment that keeps roofs damp longer after rain. This humidity tends to slow drying after a shower, which means a tear-off or roof-penetrating project remains wetter for longer than you might expect. When planning replacement, factor in these extended moisture cycles so decking and underlayment aren't exposed during peak rainy periods. The result is a longer window where you should protect fresh layers and staged materials from lingering dampness.
Oahu's wet and dry seasonal pattern matters here because repeated wet-season showers can interrupt tear-offs and increase the risk of exposing roof decks to moisture mid-project. If a crew is scheduled to remove and replace during late wet season or early in the transition to dry season, anticipate more weather-driven pause days. Build contingency time into your project plan, and arrange for materials to be stored in a dry area when weather interrupts work. A phased approach that prioritizes the most vulnerable sections of the roof during calmer spells helps reduce exposure of exposed decking to rain, wind-driven spray, and humidity.
Moisture retention, algae, and wind-driven rain are more relevant than direct marine corrosion for many inland roofs. Since salt spray is less of a factor in Mililani, the primary threats are moisture-related: faster algae growth on shaded slopes, accelerated shingle and tile aging from humidity-driven swelling and drying cycles, and wind-driven water intrusion at overlaps or penetrations. When scheduling a replacement, consider inspecting and possibly replacing flashing and penetrations ahead of the main tear-off to minimize the number of times decking sees rain while the roof is open.
Coordinate replacements for periods with predictable dry spells within the transition from the wet to the dry season, but anticipate lingering humidity that can slow drying even on sunnier days. Start by selecting a window with several consecutive dry days, but allow a cushion for brief showers that are common in this upland climate. On any project, plan additional drying time after roofing underlayment installation, particularly if there have been several damp days preceding the work. If a roof deck or trusses show signs of moisture during tear-off, pause the replacement until decking moisture levels are acceptable again, and consider running extra ventilation in the attic during the process.
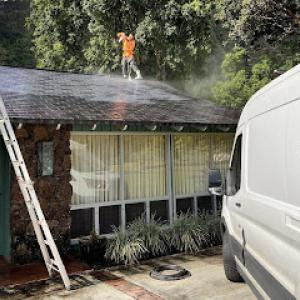
Before starting, have the roof's exterior washed to remove algae buildup so that shingles or tiles lie flat and seal properly when laid. After completion, schedule a detailed inspection after the first few heavy rain periods to verify there are no hidden leaks or trapped moisture in the decking. Focus on ensuring that ridge vents, soffits, and under-eave areas remain clear; wind in this area can push rain into vulnerable joints. For homes with shaded sections or mature trees, anticipate faster algae regrowth and plan for periodic cleanings or coatings that resist staining, ensuring that the roof remains watertight through subsequent wet seasons.
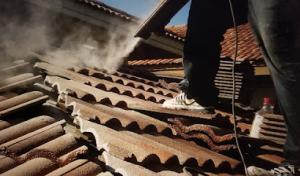
Mililani's upland Central Oahu setting hurls tropical weather through the neighborhood in rapid bursts. Leaks don't always announce themselves during a prolonged storm; they often show up during sideways rain when rain lasers through the wind. In these moments, a roof that looked sound a few hours earlier can reveal soft spots, fluttering underlayment, or damp decking long before a visible breakthrough on the surface. The risk is not only from heavy downpours but from persistent, wind-driven rain that targets the most exposed edges and seams around your home.
Subdivision-style homes here commonly feature roof penetrations, valleys, and attached garage transitions. Those details are where wind-driven rain finds its way in even when the main field shingles or tiles still look serviceable. Valleys can trap debris and push water under flashing; penetrations for vent pipes, skylights, and attic access create narrow channels for moisture to slip past once wind pressure shifts. An elevated, wind-softened neighborhood breeze will push rain toward these junctions, and every gap becomes a potential entry point if flashing or sealant has aged or failed.
Because Oahu weather can shift quickly, emergency dry-in after a leak is especially important when a wet-season shower pattern leaves little time for exposed underlayment or decking to dry. If you notice active dripping during a sideways rain event, prioritize a temporary dry-in to protect the interior from water intrusion and further structural exposure. The key is sealing the opening fast-covering soft spots, sealing around penetrations, and securing any shifting flashing-so you can pause the rain-driven damage while a permanent repair plan is set.
You should perform a targeted inspection after each sideways rain event, focusing on penetrations, flashing joints, and the transitions to garages or sunrooms. Look for loose shingles or tiles, lifted edges, or darkened areas that signal moisture intrusion behind the field. If a leak is detected, don't wait for daylight or a calm forecast to address it; implement a temporary dry-in to shore up the vulnerable area and minimize further exposure. Keep a stock of lightweight, weather-resistant covers and a basic flashing sealant on hand for quick applications. Remember: the wind can reveal hidden weaknesses fast, so immediate action is essential to prevent escalating damage.
When you can't wait, these contractors offer fast response times to stop leaks and prevent further damage.

Mililani Roofing
(808) 400-8985 mililaniroofingco.com
95-390 Kuahelani Ave, Mililani, Hawaii
5.0 from 2 reviews
Our top-notch roofers are ready to handle any repair or replacement job for residential or commercial buildings. Our team has years of experience in both repairs and installation and can handle any project from start to finish with skill and expertise. We specialize in shingle roofs, tile roofs, flat roofs, metal roofs, slate roofs, rubber roofs, asphalt shingle roofs, and much more! No matter the size or complexity of the job - we’re here to make sure that your roof is properly fixed up!
ProBuilt Hawaii Roofing & Rain Gutters - Oahu
(808) 468-8544 probuiltoahu.com
Serving
4.8 from 109 reviews
ProBuilt Hawaii Roofing & Rain Gutters - Oahu - Formerly known as - True Home Hawaii and Ohana Construction - is a full-service roofing company servicing the needs of all residential and commercial roofing systems. Dedicated to providing customers with the highest standard of service and workmanship, True Home Hawaii has served the Island of Oahu one customer at a time. Our goal is not only to meet the roofing needs of our customers, but to leave them with a Superior Experience, one which they will remember for a lifetime and one they will tell others about.
Koolau Roof Tech
(808) 292-2205 www.koolaurooftech.com
Serving
5.0 from 42 reviews
Since 1982, our family has taken pride in building relationships throughout our local community and providing local-style five-star service. Three Generations later, the Kobashigawa family has successfully owned and operated residential construction companies that began on the Windward side of Oahu. Since then we have grown to continue to serve and protect our Kamaaina homes by helping to maintain and extend the life of your roof with advanced technology and environmentally sustainable treatment systems. Koolau Roof Tech provides roof health assessments to help extend the life of your roof with our eco-friendly products that are safe for the environment, pets and plants.
Kapili Roofing & Painting
(808) 621-7663 www.kapiliroof.com
Serving
4.9 from 376 reviews
Kapili is a Hawaii roofing contractor that has been serving the island of Oahu since 2007. With generations of experience in the roofing industry, we specialize in providing top-quality services for residential and commercial roofs. We've installed roofs all over Honolulu County, including: Mililani, Waipahu, Wahiawa, Waianae, Kapolei, Ewa Beach, Waialua, Kaneohe, Kailua, North Shore. We are now offering Kauai roofing services to home and business owners. We also offer painting, Whether you need a new roof and exterior/interior painting, Kapili has the expertise to meet your needs.
Aluminum Shake Roofing
(808) 847-8885 www.oahumetalroofing.com
Serving
4.9 from 18 reviews
Aluminum Shake Roofing has been providing durable metal (aluminum, copper, and stainless steel) roofs and exterior cladding to Hawaii single-family and multi-family homes, light commercial properties and beautiful buildings since 1989. Licensed in Hawaii (BC-15135), we have the equipment and experience required to fabricate and install special custom metal fabrications for your project. Product and installation warranties are important, and ours are superior...just like our products and workmanship. We promise to communicate with you before, during, and after your project. We are proud to introduce the first wind-resistant, 304 stainless steel bracket for PV rail installations on Aluminum Shake roofing without any external penetrations
Surface Shield Roofing Company
(808) 739-9599 www.surfaceshieldroofing.com
Serving
4.3 from 27 reviews
Surface Shield Roofing Company delivers expert roofing and remodeling solutions in Waipahu, HI. As a trusted commercial general contractor, we specialize in roof restoration, commercial roofing, metal roofing, residential roofing, and home remodeling. Our experienced team combines advanced tools, proven techniques, and a commitment to quality to ensure durable, long-lasting results. We prioritize safety, efficiency, and customer satisfaction on every project. From routine maintenance to complex installations, Surface Shield Roofing Company protects your property with precision and professionalism. Contact us today to schedule a consultation and experience reliable roofing solutions you can trust.
Amakua Raingutters
Serving
4.3 from 6 reviews
When you own a property, it’s your responsibility to keep the roof from leaking and the siding from rotting, but what about your rain gutters? Rain gutters are an important property feature that’s often forgotten and neglected. Homeowners may not have time to give their gutters the attention they need, but that’s why Oahu residents should call on Amakua Raingutters. Located in Wahiawa, HI, Amakua Raingutters provides all of Oahu with the rain gutter repair and installation services they need. After 12 years in the rain gutter installation business, Amakua Raingutters is proud to be considered an industry expert. Their crew is highly trained, and they make it their mission to stay up-to-date on the latest rain gutter technology.
Action Roofing Hawaii
(808) 782-1035 www.actionroofinghawaii.com
Serving
4.8 from 24 reviews
Action Roofing Hawaii is a locally owned and operated roofing service provider with over 35 years of experience catering to the needs of commercial, residential, and industrial clients in Honolulu and across Hawaii Island. Established in 2005, the company offers a comprehensive range of roofing solutions, including waterproofing, sheet metal work, gutter and downspout systems, as well as crane, hoisting, and rigging services. Action Roofing Hawaii is fully equipped to handle roof inspections, maintenance, restoration, conversions, repairs, and insurance claims, providing expert recommendations and delivering exceptional results.

FBC Roofing
(808) 236-0756 www.fbc-hawaii.com
Serving
4.7 from 150 reviews
FBC Roofing, based at 3050 Ualena Street Unit D in Honolulu, is your premier roofing contractor providing top-notch roofing services across the Hawaiian Islands since 2009. Specializing in roof repair, roof replacement, and new roof installation, we cater to both residential and new-build projects. Our expertise includes metal roofing, shingle roofing, and asphalt roofing, ensuring durable and leak-proof solutions. With GAF Master Elite certification, we guarantee premium materials and reliable workmanship. We also offer gutter installation and repair services. Schedule a free roof inspection now—call (808) 236-0756, and let us safeguard your home today!
Roof Maxx Hawaii
(808) 522-7663 getroofmaxx.com
Serving
4.9 from 30 reviews
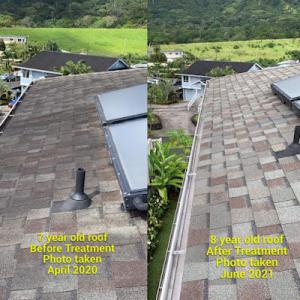
Replacing your asphalt roof costs thousands of dollars and is a disruption to your daily life. For an affordable and less invasive alternative to a roofing replacement, reach out to the experts at Roof Maxx Hawaii in Mililani, HI. This locally owned and operated roofing company offers a specialized application to prolong the lifespan of roofing systems for clients across central Oahu. Asphalt roofing becomes weathered and susceptible to leaks after years of taking a beating from Mother Nature. This trusted team uses an environmentally friendly application to restore shingle pliability, permeability, and adhesion.
On Top Roofing
(808) 744-7144 www.ontoproofinghawaii.com
Serving
4.9 from 10 reviews
On Top Roofing is a proven industry leader in the residential and commercial roof replacement marketplace, utilizing the best products, offering excellent customer service, and providing top-quality craftsmanship. From the first contact to the final walk-through inspection, our local, experienced team will guide you through the whole process of finding the right solution that fits your budget and needs, even assisting through the insurance process when filing claim. With over 30 years of roofing experience, and 15+ as a company, know with confidence and be assured that you will not be disappointed and have made the right choice when selecting the top roofing company on the Island of Oahu.
All Around Roofing & Waterproofing
(808) 226-8864 aaroofinghawaii.com
Serving
4.9 from 110 reviews
For over 15 years, All Around Roofing & Waterproofing has made a name for reliable roof repair and replacement services to residents and businesses in Kailua. Our focus on hard work and perseverance has earned us a solid reputation as one of the best roofing contractors in Hawaii. We’re not just any typical Oahu roofing company; we provide our residential and commercial roofing services with the Aloha spirit!
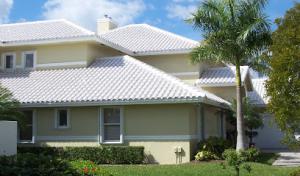
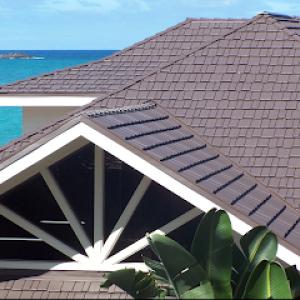
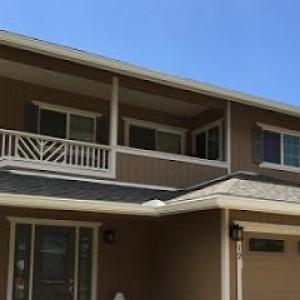
Mililani's housing stock presents a broad mosaic: asphalt shingles, metal, clay tile, concrete tile, and even some wood shake roofs all share the same market. Each material has its own strengths in the upland Oahu climate, so choosing a roof isn't a one-size-fits-all decision. In planned-community neighborhoods, roof lines and overhangs are often uniform, which means the choice you make for one home can influence nearby replacements, maintenance cycles, and overall curb appeal. Understanding how the local climate interacts with each roof type helps you choose a long-lasting option that also blends with your community's aesthetic.
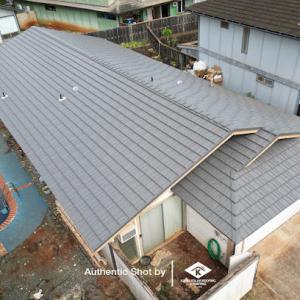
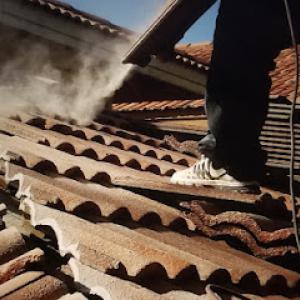
Concrete and clay tile are common on Oahu, and Mililani is no exception. Their weight places greater emphasis on the condition of the underlayment, especially as roofs reach replacement age. Tile breakage is more likely when the underlayment has softened or shifted, and that weakness can lead to leaks during the frequent wind-driven showers that sweep across the upland hills. When you inspect or plan a replacement, prioritize a high-quality underlayment compatible with tile systems, and ensure attic ventilation supports roof longevity. Proper fastener patterns become even more critical to resist wind uplift, a factor homeowners must discuss with a qualified installer who understands the local wind profiles.
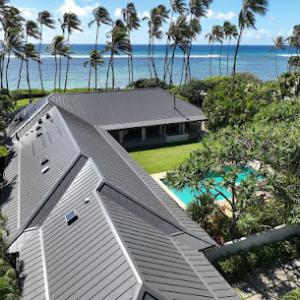
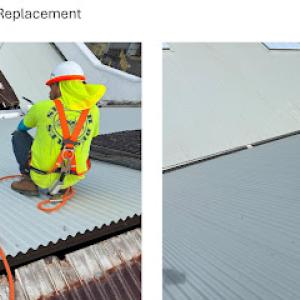
Metal roofs hold up well to Mililani's wind and heavy rain, with the potential for excellent long-term performance when installed correctly. The panels' rigidity and fastener strategies help shed moisture efficiently and resist uplift in gusty conditions. When considering metal, examine panel seams, the type of coating to withstand UV exposure, and the integrity of flashings around chimneys, skylights, and vents. In neighborhoods where shade trees are common, metal can also help with heat management, reflecting harmful rays while maintaining a cooler attic. Although metal often carries a higher upfront cost, its durability and quick drain paths can be advantageous in a climate where rainfall is a frequent guest.
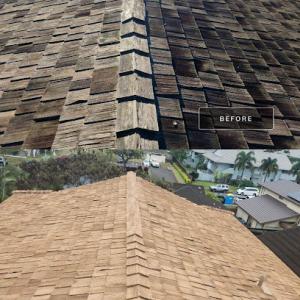
Asphalt shingles remain a practical choice for re-roof projects in many Mililani homes, especially in areas with uniform roof lines that benefit from quick, straightforward installations. They adapt well to a range of roof pitches and can be paired with breathable underlayment to manage humidity and condensation. If the home's structure uses mid-range roof heights, asphalt can provide dependable protection with easier maintenance cycles. For homes where the surrounding architecture favors a traditional look, asphalt shingles offer a familiar and compatible option without compromising on weather resistance when paired with a quality underlayment and good attic ventilation.
Wood shakes and other fiber-cement alternatives present a distinct aesthetic in the community, but their performance hinges on moisture and UV exposure management. Wood shakes require diligent maintenance to prevent rot in high-humidity pockets and to resist wind-driven damage. If choosing wood, invest in protective coatings and ensure the roof has adequate ventilation to slow weathering. For all tile and shake options, slope and support structure must be evaluated during replacement planning to avoid underlayment failure and to accommodate the tile's weight distribution over the framing.
In Mililani, the most dramatic leaks often hide beneath your roof covering. Visible roof shingles, tiles, or metal can look sound while the waterproofing layer beneath grows compromised. Tile roofs are especially prone to this pattern: the underlayment may deteriorate long before you see material failure on top, so leaks begin as a slow drip from flashing corners or low-lying valleys rather than a dramatic shingle blowout. That means you could be chasing damp patches for years if you focus only on replacing the visible roof skin. The real trigger is the condition of the underlayment and its ability to seal against moisture, wind-driven rain, and the inevitable sun exposure that accelerates aging.
Persistent humidity on Oahu keeps roof assemblies damp longer than you might expect. When moisture lingers, flashing details-where roof planes meet walls, vents, and chimneys-need to perform as a reliable second line of defense. If underlayment or secondary water barriers have begun to fail, the combination of humidity and wind can push small leaks into bigger headaches. Homeowners often underestimate how long damp conditions can persist after a rainstorm, which can shorten the practical life of the entire roof assembly. For those upgrading or replacing, this is not just about a thicker membrane; it's about choosing materials and placements that resist ongoing moisture exposure and that maintain a dependable seal even after years of sun, rain, and wind.
Insurers in Hawaii may ask for stronger wind ratings or upgraded underlayment, which makes underlayment choice a practical decision rather than a purely technical one. A roof that performs well here does more than shed rain; it preserves the structure behind it when wind gusts slam through the valley and across the tile seams. When you're evaluating upgrades, think beyond immediate leaks and toward a durable, moisture-resilient core. The underlayment is the first line to hold up under Mililani's blend of wind-driven rain, humidity, and UV exposure, and it often dictates how long the roof system remains reliable before a full replacement becomes necessary.
Extend the life of your existing roof with reflective or waterproof coatings that protect against UV and moisture.
Roof replacements in Mililani are routed through the City and County of Honolulu's permitting system, not a separate Mililani-specific department. This means your project must align with the same rules that govern other upcountry and urban Honolulu roofing work, with some timing quirks tied to island-wide processes. Knowing that your home sits in a cooler upland setting with wind-driven rain and higher humidity helps you anticipate plan review questions and required details.
The usual process starts by compiling basic contractor information and a clear project scope. The plan review relies on accurate drawings or descriptions of the replacement, including roof type, materials, ventilation, and attachment methods. When Mililani projects are submitted, the reviewers look for details that address wind load, drainage, and potential impact on surrounding properties. Have your licensed contractor prepare the submittal package so it clearly shows adherence to Honolulu's building code requirements and any neighborhood-specific considerations that may influence access, staging space, or temporary weather protection.
Inspections happen at multiple stages, and each one must be successfully completed before final approval is granted. Typical milestones include an initial permit intake/plan review, framing or underlayment verification if applicable, and a final inspection after completion. Because Mililani projects rely on the same city-wide inspection framework, scheduling can affect timelines, especially during busy seasons or after heavy rain events. It is wise to align your inspection windows with predicted weather gaps and to confirm dates with Honolulu's building department as your project progresses.
Work with a contractor who understands how wind exposure and the island's humidity can influence inspection findings. Expect questions about underlayment choices, fastener corrosion resistance, and flashing details that must withstand coastal humidity and upland wind. Keep a dedicated contact at the building department handy, and allow buffer time for plan review comments, additional documentation if requested, and rescheduling any inspection if rain interrupts progress. By coordinating early and maintaining clear lines of communication, the Mililani roof replacement can stay on track within the Honolulu permitting framework.
In Mililani, you'll notice a wide spread in material costs due to the roof type and the island logistics. Provided local cost ranges run from about $350 to $700 per square for asphalt shingles, $900 to $1800 for metal, $1200 to $3000 for clay tile, $1000 to $2800 for concrete tile, and $600 to $1600 for wood shingles or shakes. Those figures reflect not only the material itself but the transportation, staging, and supply availability you'll encounter on Oahu. When you're comparing bids, focus on the installed price per square and what's included (underlayment, fasteners, flashing, wind-rated components) rather than just the base material price.
On Oahu, roofing costs are influenced by island material logistics and labor availability, which can make premium systems and specialty components more expensive than mainland homeowners expect. If a contractor needs to special-order tiles or import specific fasteners, you'll see a higher per-square price than the mainland average. Likewise, if the crew schedules align with busy periods, watch for premium crew rates or expedited timelines. In Mililani, where homes sit in upland, wind-driven rain and UV exposure accelerate wear, so you may justify selecting higher-wuty roof assemblies that resist wind uplift and slow UV degradation, even if the upfront cost is steeper.
Wet-season delays and storm-driven demand spikes can raise effective project costs in Mililani by extending schedules, increasing dry-in needs, or limiting contractor availability. Expect possible delays between material delivery and the start of work, and consider contingency for weather windows when planning. If you're replacing a roof during peak storm season, discuss potential cost impacts with your contractor and budget accordingly for possible schedule extensions or expedited material procurement.
Get a clear picture of your project costs upfront - no commitment required.

Mililani sits in the cooler upland Central Oahu zone, where wind-driven showers and high humidity press on every roof after storms. Shingle uplift, flashing joints, and edge terminations bear the brunt of these weather patterns more quickly than in milder coastal areas. A roof that might seem solid after a gentle shower can show hidden weaknesses when strong trades sweep through, especially on older homes with mixed shingles, metal, or tile. Expect that life cycles shorten when UV exposure compounds the wear from constant moisture and wind.
Insurance adjusters in this market tend to scrutinize storm-related damage with a careful eye. After a storm, you should be prepared to show close-up photos of lifted shingles, damaged flashing, and any signs of water entry inside ceilings or walls. Carriers may request permit records and contractor invoices to verify work history and material choices. In Mililani, where the roofing mix is diverse, a detailed before-and-after record helps the adjuster see whether the claim aligns with observed conditions or if preexisting wear is a factor. Having a clear timeline and organized documentation can smooth the path to a fair assessment.
Some insurers require higher wind ratings or upgraded underlayment for Hawaii homes, which can influence material selection during a re-roof. In a Mililani home, that means the decision tree can tilt toward components that resist uplift and resist moisture ingress more robustly than standard packages. If a claim is approved to move forward, expect discussions about wind-rated shingles, enhanced underlayment, and flashing systems that stand up to the state's wind-rain cycle. This reality makes thorough planning and precise documentation essential.
Connect with contractors who help homeowners navigate the claims process from damage assessment to final approval.

ProBuilt Hawaii Roofing & Rain Gutters - Oahu
(808) 468-8544 probuiltoahu.com
Serving
4.8 from 109 reviews

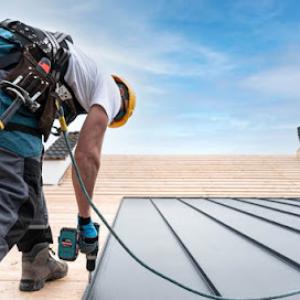
In Mililani, the active contractor market leans heavily toward residential re-roofing rather than new construction, which matches the needs of aging subdivision homes. This means you'll often find long-standing, neighborhood-based crews who know the local roof styles, UV exposure, and wind-driven rain patterns that hammer Mililani homes. Look for crews with established service tracks, not just flashy marketing, so you're investing in a partner who stays through the life of the roof.
Long-established and quick-response companies are common in this market, suggesting homeowners here prioritize reliability and fast leak response during Oahu's rainy periods. When evaluating options, ask how they schedule after-hour calls, how quickly they can mobilize after a storm, and what their warranty handling looks like in practice. A contractor with a local service desk, ready crews, and transparent communication reduces the stress of sudden leaks and storm debris.
Cleanup is a frequent selling point locally, which matters in tightly spaced neighborhoods where reroof debris can impact driveways, yards, and neighboring properties. Confirm a written cleanup plan: daily removal during tear-off, tarping to protect landscaping, and a final debris haul that includes ladder, nails, and shingle remnants. Verify how they protect neighboring driveways and gates, and whether you're responsible for any cleanup if debris strays onto adjacent lots.
Begin with referrals from neighbors who recently reroofed and ask about the crew's timeliness, pace of work, and how weather interruptions were handled. Request a detailed written plan that includes storm-response commitments, site protection measures, and the sequence of work from removal to finish. Check for a local office or storefront you can contact easily, and confirm licensing and insurance coverage are current. A responsive estimator who tours the site, notes roof specifics (shingle exposure, edge details, and valley life), and provides a clear timeline will help you avoid last-minute changes.
Inquire about their experience with common Mililani roof types and the impact of upland rain on deck and eave systems. Ask for recent project photos with notes on wind and moisture challenges, references you can call about leak response, and proof of cleanup standards tied to neighboring property protections. A contractor's ability to tailor a plan to the area's unique humidity, UV exposure, and wind will show in the workmanship and ongoing service you receive.