Last updated: Apr 19, 2026
During the drier months, roughly May through October, you gain the best odds of keeping tear-off staging and attic access dry. In this microclimate above Pearl Harbor, even small weather hiccups can cascade into days of delay, so plan your most aggressive phases-tear-off, deck prep, and underlayment installation-when the forecast shows extended dry spells. When you see a string of sunny days, schedule the bulk of roof removal and re-nailing tasks to ride that dry window. A few extra days of planning in advance pays off in fewer interruptions and less exposure to wind-driven leaks.
Winter storm periods and heavy trade winds on Oahu can interrupt staging and leave bare sections exposed if drying-in drags on. Expect gusts that lift lightweight materials and push rain into vulnerable seams. In Aiea, those interruptions are not rare and can derange a project that isn't dialed in with a tight sequence. Build a conservative schedule buffer around late fall and winter forecasts, and insist on a staged, day-by-day plan that locks in weather-ready tasks. If a front looks probable, you should have roof covers secured and all loose materials lashed down before the first gust hits. The goal is a quick, dry-in cycle that minimizes exposure of underlayment and deck to the humid air and potential moisture lift.
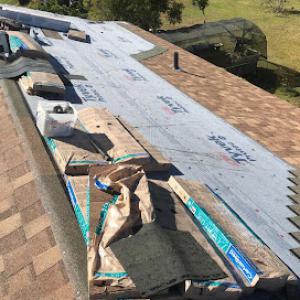
Aiea's warm, humid tropical conditions slow drying and compress exposure windows for underlayment during active reroof projects. In practice, this means you may need more time between tear-off and roof-cover completion to allow patches and sheathing to acclimate, dry, and vent. If you push too aggressively, you risk wrinkled or compromised underlayment, premature adhesive curing, and increased vulnerability to rain intrusion during a sudden shower. Schedule a realistic drying-in phase, especially after deck prep and membrane placement, so the roof can shed moisture before final fastening and finish work. Communicate clearly with crews about daily humidity and forecasted rain so they can adjust their sequencing on the fly.
Coordinate with your roof team to align the most exposed stages with the driest windows available, and embed a robust contingency for wind events. Start with a precise tear-off plan during a dry spell, then accelerate deck prep and underlayment in the intervening days, followed by a controlled, weather-guarded dry-in. If a cold front or strong trade wind is forecast, adjust the timetable to front-load rain-sensitive steps and seal vulnerable seams early in the day. In this climate, successful reroofing hinges on balancing a tight, weather-aware schedule with generous buffers for drying, so you reduce leak exposure and weather delays without sacrificing quality.
Aiea sits in a humid trade-wind belt with steep microclimates that push heat, moisture, and salt exposure right onto roof surfaces. The dominant reroof choices-asphalt shingles, metal, clay tile, concrete tile, wood shingles or shakes, and synthetic or composite shingles-each respond differently to that mix of high humidity and strong sun. In this environment, heat tolerance and moisture management matter as much as, if not more than, rain alone. Long-term performance is judged against salt-air-adjacent Oahu conditions, not just rainfall, so your selection should anticipate sun exposure, wind-driven spray, and the occasional tropical downpour.
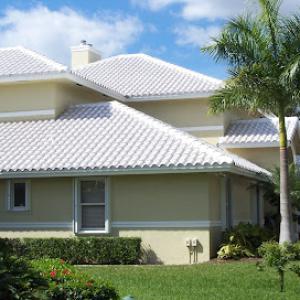
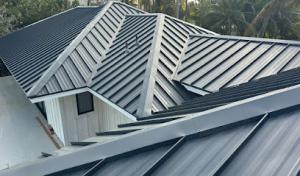
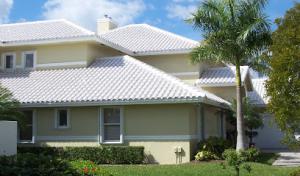
High humidity accelerates roof deck and fastener corrosion in exposed metal systems if coatings or penetrations aren't robust. It also pushes moisture into organic substrates such as wood shingles or shakes, increasing the risk of rot or mold if ventilation isn't adequate. Clay and concrete tiles typically handle salt spray well and resist warping, but their weight, attic ventilation needs, and underlayment compatibility become critical in a climate that cycles between intense sun and heavy humidity. Asphalt shingles are a familiar option, but the adhesive performance and dimensional stability under constant humidity and heat demand proper installation practices and compatible underlayment. Synthetic or composite shingles aim to blend toughness with lighter weight, yet they still rely on well-sealed flashings and proper roof ventilation to manage humidity-driven issues.
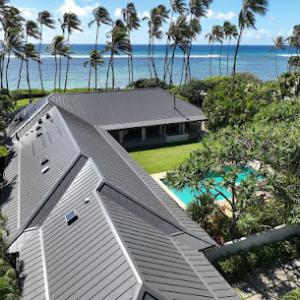
Tile and metal are common Hawaii reroof discussions because long-term performance is measured against the full salt-air and sun exposure, not just rain. Clay and concrete tiles resist moisture well and hold color under sun, but their installation must account for local ridge and eave ventilation to prevent heat buildup beneath the tiles. Metal roofs gain in longevity when painted or coated to resist corrosion, and when fasteners are corrosion-resistant and integrated with a sound sealing system. Both material families benefit from careful flashing detail around chimneys, vents, and skylights to prevent moisture intrusion during intermittent trades-wind-driven moisture events. If you opt for tiles, plan for additional weight and confirm structural support to handle long-term wind and heat cycles. If metal is chosen, consider a reflective, light-colored finish to mitigate heat gain and reduce attic temperatures.
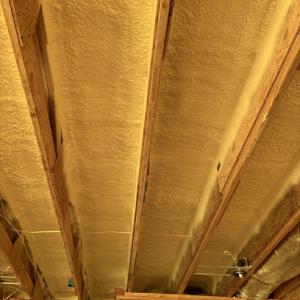
Expect Aiea's microclimates to stress your roofing system unevenly across elevations and slope. Favor systems with robust underlayment and proven corrosion-resistant fasteners, especially in zones near the leeward harbor exposure. Ventilation is not optional: an adequately vented attic keeps temperatures lower, slows moisture buildup, and extends the life of shingles, tiles, or metal sheets. Flashings around vents, skylights, and transitions should be continuous and corrosion-resistant, with attention to sealants that tolerate tropical humidity. Regular inspection after the wet season helps catch slow leaks or tarnished fasteners before they become bigger problems. If you notice persistent damp spots on the interior ceiling, prioritize a targeted inspection of the roof-to-wall interface, flashing, and chimney penetrations, as these are common failure points in humid climates.
Aiea falls under the City and County of Honolulu, so full reroof projects on this part of Oahu typically require permit submission through Honolulu's building process. The permit path is not a quick checkbox; it is a formal process that expects a defined scope, accurate plans, and clear execution steps. The permit office looks for details that cover structure, flashing, underlayment, drainage, and interfaces with existing gaps or penetrations. Because the leeward humidity and trade-wind exposure in this area can stress materials differently than inland locations, the plans should reflect wind-driven rain considerations and the anticipated movement of the roof line during storms.
The reroof permit path generally includes submitting scope and plans, waiting through plan review, and then scheduling inspections during and after installation. In Aiea, plan submittals often require drawings that show roof slope, deck condition, and details for hips, ridges, and transitions to walls or chimneys. Expect a back-and-forth with the plan reviewers if the project touches drainage scuppers, overflow details, or if there are alterations to existing ventilation or attic access. Having a clear sequence-demolition of old roofing, deck preparation, new underlayment, installation of primary roofing, and final flashing details-helps reviewers visualize the full workflow and reduces cycles.
Inspection and review queues in Honolulu can delay project starts or final closeout, which matters in Aiea when homeowners are trying to avoid wet-season exposure. Plan review times can vary with the season and workload, especially as reroofs compete with new construction and other code-required upgrades. To align expectations, submit all required documents at once and include a concise scope narrative that explains weatherproofing measures specific to Aiea's microclimates. If a reviewer requests clarifications, respond promptly with updated drawings, material specifications, and any site-specific condition notes. Delays in this phase often push the start of actual work into more humid periods, so proactive communication is key.
Permits set the cadence for inspection windows, which are typically staged: pre-installation, mid-project, and final closeout. In Honolulu, inspections can influence the sequence of equipment tie-ins, venting, and flashing integrity checks. On Oahu's ridge-to-harbor microclimates, inspectors will look for proper underlayment installation and secure, weatherproof flashing around penetrations. Plan for potential reseating or minor corrections based on inspection findings, and coordinate your contractor to adjust sequencing so that critical weatherproofing milestones occur before the next storm front approaches. Weather-aware scheduling helps keep the project on track and minimizes waiting in the wet season.
Emergencies aside, permit-related delays often stem from incomplete documentation, mismatched drawings, or material specification gaps. Have your contractor compile a comprehensive package: scope of work, material datasheets, roof layout, and attachment details for hips and valleys. If Honolulu's inspection queue is long, consider pre-booking inspection slots when the weather forecast shows a dry window, reducing the risk of weather exposure while awaiting final approvals. For Aiea homes, maintaining open lines of communication with the permit office and the contractor minimizes back-and-forth that can stall progress during wetter months.
Typical Aiea reroof pricing runs about $420 to $800 per square for asphalt shingles, $650 to $1100 for metal, $900 to $1600 for clay tile, $800 to $1400 for concrete tile, $750 to $1250 for wood shingles or shakes, and $550 to $900 for synthetic or composite shingles. These ranges reflect not just roof size but the way island logistics shape material availability, crew scheduling, and transport to steep ridge lines common across Oahu. In practice, the cheapest option can become the priciest if the supply chain tightens or crews are juggling back-to-back projects in adjacent neighborhoods.
On Oahu, reroof costs are strongly affected by island material logistics and labor availability. When a particular material is in high demand or scarce locally, even small delays can push crews onto tighter schedules and push up material transport and handling costs. In Aiea, the mix of older housing stock, varied roof forms, and proximity to Pearl Harbor means delivery routes and crane or rigging needs can differ house to house. Those practical frictions often show up as a higher, less predictable per-square price compared with dry, mainland-style bidding.
In Aiea, costs can rise when weather windows tighten and many homeowners try to book work in the drier season at the same time. The same weather pattern that makes summer feel pleasant also concentrates project starts into a shorter window, stressing crews and increasing bid competition. If a contractor needs to fragment a job into smaller segments to fit the schedule, the per-square cost can edge upward. Planning ahead for a longer, staggered schedule can help spread labor and materials costs more evenly across the project.
On Top Roofing
(808) 744-7144 www.ontoproofinghawaii.com
99-1421 Koaha Pl Bay 6, Aiea, Hawaii
4.9 from 10 reviews
On Top Roofing is a proven industry leader in the residential and commercial roof replacement marketplace, utilizing the best products, offering excellent customer service, and providing top-quality craftsmanship. From the first contact to the final walk-through inspection, our local, experienced team will guide you through the whole process of finding the right solution that fits your budget and needs, even assisting through the insurance process when filing claim. With over 30 years of roofing experience, and 15+ as a company, know with confidence and be assured that you will not be disappointed and have made the right choice when selecting the top roofing company on the Island of Oahu.
K-Aloha Roofing
(808) 650-5012 k-aloharoofing.com
99-927 Iwaena St #104, Aiea, Hawaii
5.0 from 3 reviews
K-Aloha Roofing, based in Aiea, Hawaii, is your trusted roofing contractor, offering top-tier roofing services across O‘ahu, Kaua‘i, Maui, and Hawai‘i Island. Our comprehensive range includes roof repairs, installations, replacements, and commercial roofing solutions. Specializing in shingle and new roof installations, we ensure your home or business withstands Hawai‘i’s weather challenges. With 24/7 emergency response and free consultations, we provide personalized, efficient, and reliable service. Choose K-Aloha Roofing for quality craftsmanship and peace of mind; contact us today at 808-650-5012 or visit our office at 99-927 Iwaena St. #104, Aiea, HI.
Shafer's Roofing
(808) 688-9082 www.shafersroofing.com
Aiea, Hawaii
5.0 from 2 reviews
Shafer’s Roofing has been installing high quality roofs throughout Hawaii since 1979. We have consistently been one of the leading providers of home improvement services for decades due to our skill and attention to customer service. Shafer’s Roofing offers professional roofing services and solutions for both commercial and residential clients in Kapolei, HI and the surrounding regions. For over 4 decades, our woman owned, local company has created beautiful homes and businesses by using top-quality materials installed by licensed and insured experts with years of training and experience. Though Shafer’s has roofing right in our name, there are so many other home and business improvement services that we can perform for clients
Roof Maxx Hawaii
(808) 522-7663 getroofmaxx.com
Serving
4.9 from 30 reviews
Replacing your asphalt roof costs thousands of dollars and is a disruption to your daily life. For an affordable and less invasive alternative to a roofing replacement, reach out to the experts at Roof Maxx Hawaii in Mililani, HI. This locally owned and operated roofing company offers a specialized application to prolong the lifespan of roofing systems for clients across central Oahu. Asphalt roofing becomes weathered and susceptible to leaks after years of taking a beating from Mother Nature. This trusted team uses an environmentally friendly application to restore shingle pliability, permeability, and adhesion.

FBC Roofing
(808) 236-0756 www.fbc-hawaii.com
Serving
4.7 from 150 reviews
FBC Roofing, based at 3050 Ualena Street Unit D in Honolulu, is your premier roofing contractor providing top-notch roofing services across the Hawaiian Islands since 2009. Specializing in roof repair, roof replacement, and new roof installation, we cater to both residential and new-build projects. Our expertise includes metal roofing, shingle roofing, and asphalt roofing, ensuring durable and leak-proof solutions. With GAF Master Elite certification, we guarantee premium materials and reliable workmanship. We also offer gutter installation and repair services. Schedule a free roof inspection now—call (808) 236-0756, and let us safeguard your home today!
All Around Roofing & Waterproofing
(808) 226-8864 aaroofinghawaii.com
Serving
4.9 from 110 reviews
For over 15 years, All Around Roofing & Waterproofing has made a name for reliable roof repair and replacement services to residents and businesses in Kailua. Our focus on hard work and perseverance has earned us a solid reputation as one of the best roofing contractors in Hawaii. We’re not just any typical Oahu roofing company; we provide our residential and commercial roofing services with the Aloha spirit!
Pamalu Roofing
Serving
4.9 from 27 reviews
Pamalu Roofing is a family-owned company with 45+ years of experience serving homeowners across Honolulu, Kailua, Ewa Beach, Kapolei, and Pearl City. Our licensed and insured team specializes in roof repair, roof replacement, re-roofing, skylight installation, and gutter services — all built to handle Hawaii’s salt air, heavy rains, and hurricane winds. Known for our expertise in finding and fixing leaks the first time, we’re also trusted to guide Oahu homeowners through the insurance claim process after storm or wind damage. Whether you need a small roof repair or a full replacement, you can count on Pamalu Roofing for quality, reliability, and local care.
ProBuilt Hawaii Roofing & Rain Gutters - Oahu
(808) 468-8544 probuiltoahu.com
Serving
4.8 from 109 reviews
ProBuilt Hawaii Roofing & Rain Gutters - Oahu - Formerly known as - True Home Hawaii and Ohana Construction - is a full-service roofing company servicing the needs of all residential and commercial roofing systems. Dedicated to providing customers with the highest standard of service and workmanship, True Home Hawaii has served the Island of Oahu one customer at a time. Our goal is not only to meet the roofing needs of our customers, but to leave them with a Superior Experience, one which they will remember for a lifetime and one they will tell others about.
Kapili Roofing & Painting
(808) 621-7663 www.kapiliroof.com
Serving
4.9 from 376 reviews
Kapili is a Hawaii roofing contractor that has been serving the island of Oahu since 2007. With generations of experience in the roofing industry, we specialize in providing top-quality services for residential and commercial roofs. We've installed roofs all over Honolulu County, including: Mililani, Waipahu, Wahiawa, Waianae, Kapolei, Ewa Beach, Waialua, Kaneohe, Kailua, North Shore. We are now offering Kauai roofing services to home and business owners. We also offer painting, Whether you need a new roof and exterior/interior painting, Kapili has the expertise to meet your needs.

MRC Roofing
(808) 842-4464 mrcroofinghawaii.com
Serving
4.8 from 65 reviews
MRC Roofing is a trusted, locally owned roofing company serving Hawaii’s residential, commercial, and industrial sectors with expert roofing solutions. Specializing in roof installation, repairs, maintenance, and inspections, MRC Roofing provides durable and reliable roofing systems tailored to the unique demands of Hawaii’s tropical climate. Whether it’s installing new roofs, repairing leaks, or providing regular maintenance, their team of skilled professionals ensures top-quality results using the best materials and industry practices. With years of experience, MRC Roofing is adept at handling various roofing types, including asphalt shingles, metal roofs, tile roofing, and flat roofs. They also offer solar-ready roofing systems and en...
Oahu Roofing & Repairs Honolulu
(808) 746-7377 oahu-roofing.com
Serving
5.0 from 84 reviews
Oahu Roofing & Repairs has our main location in Honolulu. Centrally based we are able to provide roofing services throughout Honolulu and on Oahu. We always recommend you get at least 3 estimates for your roofing project & we hope that Oahu Roofing & Repairs is one of them. We specialize in new roof installations and roof replacements. We can demolish an old existing roof & install the new roof in a matter of a few days depending on the size of your roof. Our prices are extremely competitive as the other roofing companies in Honolulu are skilled & competitive as well. We provide both residential & commercial roofing services & we can handle any type of roofing project. Call us for a free estimate & guidance on your upcoming roofing project.
Protech Roofing & Insulation
(808) 845-1300 www.protechroofinghonoluluhi.com
Serving
4.7 from 34 reviews
Looking for a roofing contractor in Honolulu, HI? Look no further! At Protech Roofing & Insulation, we pride ourselves on delivering exceptional quality and unparalleled customer service. We offer free roof inspections to ensure your home is in perfect condition. Whether you need residential roofing contractors or spray foam insulation experts, our professional team is here to help you. Plus, we honor our military and seniors with special discounts. Your satisfaction is our priority. Contact us today for all your roofing and insulation needs and experience the Protech difference!
Aiea roofs on Oahu can see damage from winter storms, heavy trade winds, and occasional tropical storm conditions rather than hail-driven loss patterns common elsewhere. The humid, leeward mix and ridge-to-harbor microclimates mean small vulnerabilities-edge drip lines, flashing hooks, and fasteners-can become noticeable with sustained wind and moisture. In practice, that means a roof that looks solid after the storm can reveal soft spots or slow leaks once rain drives in from an unusual angle. The key is treating every brisk wind event as a reminder to inspect more than the obvious shingles; the real threats hide in the details.
Wind events in this part of Hawaii often turn minor edge, flashing, or fastener weaknesses into active leaks during the same storm cycle. A few inches of roof edge lift or a loosened nail line can create a highway for moisture that travels along underlayment and into the decking. Because the coastline and inland breezes converge here, flashing seams near chimneys, vents, and dormers deserve extra attention after every windy spell. Don't assume a clean, dry surface means nothing is amiss-wind-driven spray and rapid temp shifts can push moisture into seams that otherwise look intact.
Temporary work stoppages during tropical weather are a real scheduling issue for reroof projects because exposed decking can take on moisture quickly in humid conditions. If a storm watch is issued, plans should pivot toward securing the site, protecting open decking, and avoiding simultaneous heavy rains and roof work. Flexible sequencing-preparing flashing and underlayment in advance, then pausing on active wet days-helps limit moisture intrusion and reduces the chance of calling back for leaks once the weather clears.
Find local contractors experienced in assessing and restoring roofs after hail, wind, and severe weather events.

ProBuilt Hawaii Roofing & Rain Gutters - Oahu
(808) 468-8544 probuiltoahu.com
Serving
4.8 from 109 reviews
When you file a roof claim, having a clear, complete set of supporting documents speeds things up. In Hawaii, reroof claims are typically easier to process when you can provide photos, permit records, and a clearly documented full replacement scope. Take fresh photos from multiple angles, focusing on affected areas, flashing, ridge lines, and any interior water intrusion. Save prior roof material samples if you have them, and keep a concise list of repairs or replacements you expect. Keep these items organized in a single folder you can share with your adjuster, contractor, and insurer. If a contractor helps compile the scope, make sure the document reflects the full replacement plan rather than isolated repairs.
Wind-related and storm-related roof claims on Oahu can affect both processing time and premium outcomes, making early documentation especially important in Aiea. Leeward exposures with humid trade winds mean shingles and underlayment can show wear quickly after a storm, but wind-driven damage sometimes appears subtle at first glance. Photograph even seemingly minor issues-lifted shingles, torn flashing, dented gutters-then note the date of any storm events. Establish a timeline that links observed damage to specific wind events. Sharing this with your adjuster early helps prevent delays caused by questions about when the damage occurred or whether maintenance contributed to the condition.
Because Honolulu permits are part of the reroof paper trail, Aiea homeowners benefit from keeping permit and inspection records with their claim file. Include any permit numbers, inspection dates, and final inspection confirmations related to the reroof. If you used a contractor who coordinated the permit process, request copies of the paperwork and attach them to your claim package. A well-organized paper trail reduces back-and-forth and supports a smoother settlement, especially when multiple trades or stages are involved. Maintain both digital and physical copies of these documents for quick reference during conversations with your insurer and adjuster.
Connect with contractors who help homeowners navigate the claims process from damage assessment to final approval.
On Top Roofing
(808) 744-7144 www.ontoproofinghawaii.com
99-1421 Koaha Pl Bay 6, Aiea, Hawaii
4.9 from 10 reviews
Aiea's humid climate makes low-slope sections and roof penetrations more leak-prone when drainage, flashing, or drying time is compromised during reroofing. When rain turns heavy or trade winds shift moisture around the attic, any small flaw-missed seam, loose flashing, or insufficient slope drainage-can become a pathway for water intrusions. On a roof that already battles daily salt air and humidity, a single compromised detail can translate into multiple leaks over time.
Wind-driven rain during the wet season can find the tiniest gap and exploit it quickly. Coatings on aging low-slope or weathered sections are sometimes applied as a stopgap to extend life, but they are not a substitute for proper flashing and drainage work. If a coating is chosen, expect more frequent inspections and a higher risk that moisture will penetrate where the coating doesn't form a perfect seal around penetration details. The emphasis is on achieving a true, continuous weather-tight surface, not just a temporary layer over worn material.
Skylight and penetration detailing matter more in a wet-season leak calls because wind-driven rain can exploit small flashing failures quickly. In practice, that means every vent stack, chimney, and skylight needs a tightly sealed boot and a well-contoured flashing collar that matches the roof's slope and roof deck condition. In Aiea, where roofs sit beneath humid mornings and trade-wind gusts, even minor misfits around these features can become persistent leak sources.
During reroofing, prioritize a complete, meticulously detailed approach to low-slope sections and penetrations. Request a comprehensive drainage plan that ensures water moves toward designated outlets and away from seams. Insist on flashing installed with proper lap joints, integrated with surrounding material, and tested under simulated wind-driven rain if possible. After work, schedule a careful follow-up inspection right before the wet season ramps up to catch any slow drips before they become stains on ceilings.
Find specialists in TPO, EPDM, and built-up flat roofing systems for residential and commercial properties.

In this market, the pool of roofers leaning toward residential reroofing is the norm, not the exception. You'll notice firms that carve out substantial time for home comfort projects-shingle swaps, tile re-covers, and minor structural refreshes-rather than a shop primarily chasing big new-construction jobs. When you're evaluating bids, prioritize crews that show steady, repeat work with homes similar to yours. Long-standing local companies often carry a portfolio that reflects the humidity-driven wear and ridge-to-harbor microclimates that shape Aiea houses, more so than glossy marketing language from out-of-area outfits.
Humid trade-wind windows can turn even a small leak into a dramatic disruption. Look for a contractor whose proposed schedule emphasizes rapid response during active leaks, as well as a cleanup plan that minimizes disruption from tear-off debris. In practice, that means clearly defined work hours, daily cleanup at the end of each shift, and a crew ready to mitigate water intrusion quickly if a squall rolls through. A tight, visible cleanup routine is often the best signal that a team can manage the climate's quirks without leaving you with debris blown into landscaped beds or pool areas.
What matters most in Aiea is what you can verify locally. The strongest referrals come from neighbors with similar lot layouts and exposure-homes perched above Pearl Harbor, with southern exposures and steep roof pitches. When speaking with a contractor, demand recent, on-site references from nearby blocks and, if possible, access to a few completed projects that show how the crews handled humid seasons and wind-driven debris. A robust local footprint is a practical guide to predict performance in your own roof refresh.
The timing of reroof work in this area hinges on seasonal humidity and trade-wind patterns. A contractor with a proven plan for efficient material staging, tarp setup, and wind-safe tear-off sequences can protect interior spaces during the wetter months. You'll want to understand how the crew buffers against sudden showers, how long each phase typically takes, and what contingency steps they've rehearsed for a quick shift in weather. This is where the value of a well-practiced local team becomes obvious, especially when imperfect skies threaten a project's momentum.
Finally, trust grows when communication is consistent and transparent. Seek a crew that assigns a single point of contact for updates, weather notices, and on-site decisions. In a market where quick turnarounds and visible progress earn credibility, a contractor who communicates clearly about daily goals, potential delays, and post-install checks-particularly for flashings and seam work-will stand out as a reliable neighbor you can rely on through the whole reroof journey.