Last updated: Apr 19, 2026
Moline sits in the Quad Cities market, where hail and wind events drive a high volume of roof inspections, repairs, and insurance claims. Spring hail and rain deliver the first wave of damage, often showing up as bruised shingles, lifted edges, or granule loss that enthusiasts might dismiss as cosmetic. Fall wind events pack a different punch-shingles can be peeled back, flashing can bend, and debris may be scattered across roof surfaces, creating hidden pathways for water entry. Winter compounds these threats: ice dams form where heat escaping from the attic meets a cold exterior, and repeated freeze-thaw cycles push minor flaws into big leaks after a storm. This timing matters because claim activity tends to spike right after these seasons, and the window for documenting damage before freeze-thaw cycles intensifies can close fast.
Look for signs that sync with Quad Cities patterns. After a hail event, check for bruising on shingle surfaces, darkened granule spots in gutters, and soft or cracked edges at valleys and underlayment transitions. Wind-driven gusts can lift shingles along the edges, around chimneys, and near vents, leaving slim lines of exposed deck or roof felt. In winter, ice damming concentrates near gutters and eaves; you may notice unusual icicles, damp patches on ceilings inside the attic, or staining along interior walls where water has tracked from damaged flashing or missing shingles. Even small cracks at flashing around chimneys or vent pipes can become major leaks when freeze-thaw cycles expand and contract material. Given the Quad Cities insurance environment, these signals often lead from cosmetic damage to structural vulnerability if not addressed promptly.
If a hail or wind event just hit, perform a rapid exterior check from a safe vantage point: walk the perimeter and note bowed or displaced shingles, lifted edges, and any missing granules. Photograph before any temporary repair, since insurers frequently request documentation to validate claims. If shingles are visibly damaged or flashing shows gaps, arrange a temporary cover or tarping to limit water intrusion, but avoid climbing on a slick roof alone-safety first. Contact a local roofing contractor with storm-repair experience; they should be able to perform a rapid assessment, prioritize vulnerable areas (valleys, vents, eaves), and provide a phased plan that aligns with expected insurance review timelines. Maintain a detailed log of storm dates, leaks, and repair needs, and keep all receipts and contractor communications organized. When a claim is filed, expect adjusters to focus on hail impact patterns, wind-driven damage around penetrations, and any prior freeze-thaw damage that could worsen a minor issue into a larger failure.
For homes facing repeated exposure to hail, wind, and freeze-thaw cycles, prioritize roof assemblies proven to withstand Quad Cities stressors. Beyond selecting durable materials, focus on effective installation details: reinforced edge fastenings, proper underlayment, and correct flashing around chimneys and valleys. Regular inspections after each storm season help catch creeping issues before they escalate, turning small problems into interior leaks during harsh winters. Keep a ready-response plan for rapid temporary repairs and ensure that your chosen contractor follows a cold-climate detailing mindset so that minor flaws don't snowball into expensive damage once temperatures swing low.
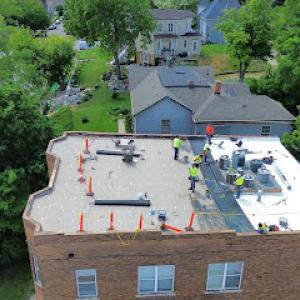
When a severe hailstorm sweeps through the Quad Cities, the pattern of damage on a roof can be deceptively uneven. Shingles may show sunken bruises, granule loss, or edge lifting, while metal portions can reveal denting or subtle perforations that aren't obvious from the ground. The Mississippi River bluff exposure compounds wind-driven impacts, so a roof that seemed fine after a mild storm can deteriorate quickly during a frame of consecutive hail events. In practice, the most reliable sign of trouble is a sudden interior drip after a heavy rain, or a noticeable temperature difference inside the attic as cold air meets a compromised barrier.
In the Quad Cities, insurers frequently request photo documentation, prior-damage history, and a detailed scope of work before approving roof claim payouts. This means you should be prepared to show the roof's condition from multiple angles, highlight any preexisting issues, and clearly outline what you want repaired or replaced. Carriers in this market may also ask for wind-rated shingle specifications and installation timelines after severe storm periods, so having product information and a record of contractor milestones can speed the process. Delays are common if these items aren't readily available when the adjuster visits.
Because claim activity is elevated after regional hail and wind events, homeowners in Moline benefit from documenting elevations, soft-metal impacts, and interior leak timing as soon as damage appears. Take high-resolution photos or short videos of each roof plane, including gutters, vent stacks, and any metal flashings. Note the highest exposure direction and any visible hail marks that align with nearby trees or structures. Track when leaks become noticeable inside the home, especially after storms, and keep a running log of weather events that coincide with new roof concerns. If possible, preserve copies of prior repairs or previous claim details so the adjuster can distinguish between old damage and new storm-related failures.
Coordinate an on-site inspection with a contractor who understands Quad Cities weather patterns and roof construction common to local homes. Ask for a wind-rated shingle specification as part of the replacement plan, and ensure the install timeline accounts for cold-season work windows and potential freeze-thaw delays. Communication matters: brief your insurer with a concise scope of work that aligns with the visible damage, includes any required underlayment or flashing replacements, and labels each area with its corresponding photos. After a hail event, nearby roofs often receive extra attention, so timely, organized documentation minimizes back-and-forth and clarifies exactly what needs to be repaired to restore long-term protection.
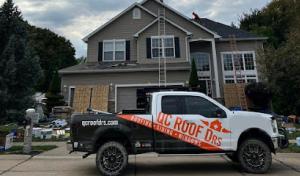
Connect with contractors who help homeowners navigate the claims process from damage assessment to final approval.
Fisher Construction
(309) 203-2111 fisherconstructionllc.com
161 5th Ave, Moline, Illinois
5.0 from 52 reviews

Quality Construction Advantage Group
(309) 790-3021 qualityconstructionqc.com
1465 41st St #2, Moline, Illinois
5.0 from 43 reviews
Storm Recovery Roofing & Siding
(309) 524-3109 stormrecovery.com
1509 3rd Avenue A, Moline, Illinois
5.0 from 26 reviews
Fisher Construction
(309) 203-2111 fisherconstructionllc.com
161 5th Ave, Moline, Illinois
5.0 from 52 reviews
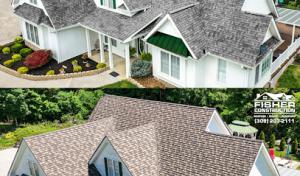
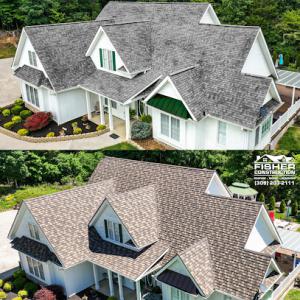
Fisher Construction is the top choice for exterior remodeling in the Quad Cities, serving both residential and commercial properties. Our skilled team specializes in roofing, windows, siding, gutters, and doors, delivering top-quality craftsmanship and lasting results. We are fully licensed, bonded, and insured in Iowa and Illinois, and we’re committed to maintaining the highest industry standards. Customer satisfaction is our priority, and we strive to make every project seamless and stress-free. We also offer free estimates to help you plan with confidence. Trust Fisher Construction to handle your exterior remodeling needs with professionalism and care.

Quality Construction Advantage Group
(309) 790-3021 qualityconstructionqc.com
1465 41st St #2, Moline, Illinois
5.0 from 43 reviews
Quality Construction Advantage Group is a roofing contractor in Moline serving Rock Island, East Moline, Silvis, and nearby areas. Our roofing company offers residential roofing, roof repair, asphalt shingle, metal roofing, and more. We also specialize in siding, gutter, window, and door services. Customers love us because of our comprehensive roof warranties and affordable roof financing options. We also have industry affiliations and certifications such as IKO Code Plus Certified. If you want to experience how your most trusted Moline roofing company embraces our motto “The Trusted Quad Cities Roofing Contractor", call us now for a free estimate! 24 Hour EMERGENCY REPAIR SERVICES AVAILABLE!
Storm Recovery Roofing & Siding
(309) 524-3109 stormrecovery.com
1509 3rd Avenue A, Moline, Illinois
5.0 from 26 reviews
Storm Recovery Roofing & Siding is a qualified roofing and siding company in Illinois & Iowa. Our project managers deliver outstanding service and support. All of our work is guaranteed and complies with the highest industry standards. If you need to repair your damaged roof or replace your outdated siding, we can help. We specialize in restoring homes and commercial buildings. If your gutters are broken and causing water damage to your property, we can replace them too! You can count on us to help you with the insurance claim process and restore your home exterior back to new.

NorthStar Roofing
3325 Avenue of the Cities, Moline, Illinois
4.8 from 53 reviews
NorthStar Roofing is the trusted choice for residential and commercial roofing in Moline, IL. Licensed, bonded, and insured in Illinois and Iowa, we specialize in roof repairs, replacements, new construction, emergency services, and storm restoration. Our expert team delivers fast, high-quality service using materials like shingles, metal, tile, cedar shake, TPO, EPDM, and more. We also offer siding, framing, gutters, and insurance claim assistance. With 24/7 emergency services and free inspections, NorthStar Roofing makes roofing simple, stress-free, and built to last.
A1 General Contracting
2241 52nd Ave, Moline, Illinois
5.0 from 17 reviews
A1 General Contracting, LLC is a Quad City based contractor that specializes in exterior storm restoration work. We are locally owned and operated. Licensed and bonded in Illinois, and Iowa. offering services for residential and commercial. Mainly roofing, siding, and gutters. Insurance claims is our specialty. Free estimates and consultations for any exterior work, and some interior. A proud member of the Better Business Bureau. We are an Owens Corning Preferred Contractor. Call us today for you home's needs.
Midwest Complete Construction
Moline, Illinois
4.3 from 94 reviews
Call Midwest Complete Construction for residential & commercial roof installation, repair, or replacements in the Quad Cities. We offer gutter, siding, & window services.
Olde Town Roofing
(309) 738-5550 oldetownroofing.com
4540 River Dr, Moline, Illinois
3.9 from 83 reviews
We are a full service general contractor with offices in Moline, Il Marion, IA Des Moines, IA and Mason City, IA We specialize in Roofing, Siding, Gutters, and New Home Construction.

Pinnacle Roofing Consultants
(515) 706-1188 www.pinnacleroofingconsultants.com
1515 5th Ave Suite. 424, Moline, Illinois
4.4 from 17 reviews
Pinnacle Roofing Consultants has surpassed excellence and quality, now serving multiple states: Iowa, Illinois, Wisconsin, Minnesota, and Arizona. Our experienced team handles all forms of roofing, including storm damage restoration for both residential and commercial properties. We are committed to delivering exceptional customer service and utilizing advanced techniques to ensure our customers receive the best possible results. We have a team that specialize with insurance claims. Our headquarter office is located in Moline, IL and have offices in Appleton WI, Phoenix AZ, and Des Moines IA. Contact us for your roofing needs.
Dan Hanell Construction
(309) 797-8200 www.danhanellconstruction.com
3900 24th St, Moline, Illinois
4.0 from 42 reviews
PROUDLY SERVING THE QUAD CITIES SINCE 1992 Specializing in Roofing, Siding, Windows, Gutters and Insulation 40+ years in business. Plenty of incredible referrals, and GREAT reviews on AngiesList, Facebook, YellowPages, and an A+ BBB rating. Questions? Free quote? Call today. “It's not what we do, It's the way we do it!”
Harold's Roofing & Home Improvement
(309) 792-2424 www.haroldsroofingil.com
Serving
4.9 from 67 reviews
Family owned residential roofing, siding, and gutter contractor. In business over 40 years in the Quad Cities. Shingled roof and flat roof installation. Specializing in hail storm restoration. Owens Corning preferred contractor. Serving East Moline, Moline, Davenport, Bettendorf, Rock Island, and surrounding areas. Small commercial work.
A+ Roofing & Siding
(563) 349-4420 www.aplusroofingandsidingco.com
Serving
4.9 from 524 reviews
At A+ Roofing and Siding Company we are a local business that has been serving the Quad Cities and surrounding areas for 24 years with an A+ BBB rating . We offer 100% financing and lifetime warranties on all projects. We offer free estimates with no high pressure sales tactics. We also specialize in insurance restoration claims and can help you through the process start to finish. We are the only company in the Quad Cities that has a showroom where every shingle color can be viewed on the outside of the office for customers to come by at their convenience and not have to be pressured by sales people in any way. Call today for your free estimate or stop by the showroom office.
Green Valley Roofing Siding Windows
(563) 322-2044 www.greenvalleyroofing.com
Serving
4.7 from 78 reviews
We think it's important for you to be able to call us and talk to someone who can give you answers. We welcome calls and invite you to ask about any of the services we offer. If it's on your home's exterior, we can usually help, from virtually any type of Roofing imaginable to Siding, Windows, Doors, Gutters, and Gutter Guards. We also install skylights! We offer financing. We have lots of experience and will work with your insurance company. Today, we serve the entire Mississippi Valley region around the Quad Cities, with satisfied customers in Bettendorf, Davenport, Moline, Rock Island, and nearly every nearby town, from Aledo to Muscatine, Milan to Clinton, and beyond. Call TODAY for a Free Estimate.
The Quad Cities weather pattern-Mississippi River bluff exposure, frequent hail events, and harsh freeze-thaw cycles-drives distinct timing challenges for a full roof replacement. In winter, temperatures swing below freezing often enough to make underlayment adhesion and shingle sealing unreliable. Cold months stretch the installation window and risk gaps where water can intrude during a storm. In spring, even when melting snow is gone, rain and hail can interrupt work and degrade a roof that's already softened from winter stress. Planning around those windows helps avoid rework and moisture damage later on.
Full replacement during cold snaps requires clear stretches of dry, thawed weather and careful handling of materials that don't behave well in low temperature. If the forecast promises a string of cold days or frequent refreezing, hold off on starting or staging work on days with forecasted subfreezing highs. Insist on roof systems that are designed for cold-weather installation, and verify crew practices for heating up ice barriers, fastening, and shingle seating when the temperature climbs above freezing but remains cool. If a project begins late in winter, expect longer timelines and adjust accordingly so the underlayment and fasteners achieve proper sealing once temperatures permit.
Spring in this area often arrives with rain and hail that can halt progress mid-shingle installation. A roof that endured a hard winter is more susceptible to micro-damage and moisture retention, so dry installation windows are critical. If a storm track brings heavy rain or hail through May, consider shifting the schedule to follow a pattern of dry days, not a single window. Staging materials in a sheltered spot and protecting newly installed sections with temporary weather barriers can help limit damage between delays.
Summer heat can slow crew pacing and complicate material handling, especially when roofing bundles are hot to the touch and shingles expand in the sun. Plan for mid-day heat breaks and flexible start times to keep workers efficient without compromising seal and alignment. Ensure sufficient shade and water on site, and factor in shorter, more frequent lifts of materials to reduce heat exposure for both crew and substrate.
Fall wind and storm scheduling pressure can tighten contractor availability before winter. If a high-wlight storm season is expected, secure a start date well in advance and build a buffer for unexpected shingle damage discovered during tear-off. Clear communication about anticipated weather gaps helps avoid rushed work that could compromise installation quality as temperatures begin to fall. Consider sequencing the project so critical steps-tear-off, deck inspection, underlayment, and final sealing-are completed in a logical, weather-resilient order to minimize exposure between stages.
Get a clear picture of your project costs upfront - no commitment required.
Fisher Construction
(309) 203-2111 fisherconstructionllc.com
161 5th Ave, Moline, Illinois
5.0 from 52 reviews
Quality Construction Advantage Group
(309) 790-3021 qualityconstructionqc.com
1465 41st St #2, Moline, Illinois
5.0 from 43 reviews
In Moline, asphalt shingles are the dominant practical choice because they fit the area's reroofing-heavy housing stock and are commonly specified for hail and wind replacements. The texture and color options align well with older Quad Cities homes that have seen decades of freeze-thaw cycles, while still offering a straightforward, repair-friendly profile for storm-damaged roofs. When selecting an asphalt system, focus on shingles with good impact resistance ratings and wind-limited installation guidance from the local contractor community. Proper underlayment and ice-dam protection remain essential to survive the bluff-side winds and winter freezes that push moisture toward eaves and penetrations.
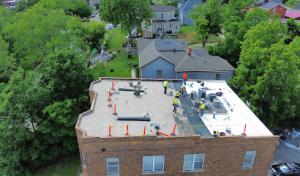
Metal roofing is relevant for homeowners prioritizing snow shedding and longer-term durability through freeze-thaw cycles and summer heat swings. In this climate, metal can dramatically reduce snow load concerns on steep slopes and offer excellent wind resistance, which matters after severe storms. The material's reflectivity helps moderate attic temperatures during hot spells and can pair well with reflective coatings or color choices that resist thermal expansion. Availability in the local market is solid, making metal a sensible option for mixed-age homes where reroofing projects aim to extend life with fewer tear-offs. Expect a more precise labor window for panel installations and flashing details tied to the region's typical attic configurations and vent placements.
Tile and wood options exist locally but are far less prevalent in the contractor market, making installer availability and repair matching more limited than for asphalt systems. Clay and concrete tiles bring long lifespans and a classic aesthetic, but they demand structural evaluation, especially on homes with older framing or limited load-bearing capacity. Wood shingles and shakes deliver authentic character but require vigilant maintenance to prevent moisture intrusion and fire risk in certain microclimates. If choosing these, verify the local contractor's experience with sound fastening, frost-related expansion, and storm-driven impact mitigation to avoid brittle edges during mid-winter outages or hail events.
Regardless of material, the local storm history underscores the need for a detailed installation plan that accounts for hail, wind, and freeze-thaw patterns. Look for shingles or panels rated for impact resistance and wind uplift, plus proven attic ventilation and effective gutter integration to handle rapid snowmelt and freeze cycles. The right choice balances initial resilience with long-term repair accessibility, so that after a severe spring hail event, repairs can be matched quickly to the original system type and color.
Typical Moline material pricing runs about $350-$550 per square for asphalt shingles, $700-$1100 for metal, $1000-$1800 for clay tile, $900-$1500 for concrete tile, $550-$900 for wood shingles or shakes, and $600-$1100 for synthetic or composite shingles. Those numbers reflect the Quad Cities market where storm recoveries and cold snaps push demand and pricing, especially after hail or strong winds. When you're shopping, expect that asphalt shingles will be the most common yet still sensitive to storm-driven scheduling, while tile and wood systems ride longer lead times and tighter labor pools after major events.
Storm-driven demand in the Quad Cities can push labor scheduling tighter and raise reroof pricing after major hail or wind events. In practice, that means a rapid surge in contractor lead times and possible price bumps if a hail map shows widespread damage across your neighborhood. If you're evaluating a replacement in the wake of a big storm, expect to contend with busier crews and some premium-for-availability costs on top of material pricing. Planning ahead, when the weather window is calmer and the crews aren't racing from job to job, can help keep the project on a steadier budget.
Moline roofs sit under harsh winter cycles that accelerate freeze-thaw stresses, bluff winds, and summer hail darts. Asphalt remains the most economical and common, but the Quad Cities weather pushes some homes toward metal or synthetic options for longer life under repeat wind-driven impacts. Clay and concrete tiles perform well but come with higher installation costs and heavier structural demands. Wood shingles and shakes offer a traditional look but may require more maintenance in freeze-thaw cycles. Synthetic or composite shingles strike a middle ground on cost and durability, with pricing typically in the $600-$1100 per square range.
Begin with a clear scope: full tear-off versus overlay, presence of old pipe boots or flashing issues, and the need for underlayment upgrades. Storm seasons can tighten scheduling, so book ahead if you're expecting a replacement in spring or fall. Compare at least three bids, with a focus on the breakdown: material, tear-off, disposal, and any specialty labor for tiles or shakes. If your home uses tile or wood, verify installer experience with those systems and confirm that the crew can handle the extra weigh and wind resilience requirements common to Moline. These steps help keep the project on target when Quad Cities weather and insurance considerations circle back into the cost.
A full reroof in Moline typically requires a permit through the City of Moline Building Department. Before any tear-off begins, verify permit status with the building office, and submit the project plan that shows roof coverage, venting, and practical details for weather-imposed delays. The permit process helps align with local wind and hail considerations and keeps the work visible to formal oversight during critical weather windows.
Moline requires a completion inspection after the reroof is installed. Inspectors check several key details to confirm code compliance: proper underlayment installation, correct nailing patterns and fastener spacing, roof-ventilation adequacy, and overall adherence to approved plans. Expect the inspector to verify attic ventilation balance and the presence of any necessary flashing around chimneys, valleys, and vents. If any part of the job deviates from the approved plan, corrections will be noted for completion before final sign-off.
Inspection timing in Moline can shift when weather interferes or when roof access is unsafe. During wet, snowy, or windy periods, both the permit holder and the inspector should anticipate possible rescheduling. Plan for alternative inspection windows if the forecast promises soaking rain or ice, and ensure safe access to the roof and eaves. Communicate promptly with the building department if access concerns arise due to ice buildup, ground conditions, or street debris.
Keep a tidy job site and maintain up-to-date contact information with the Building Department and your contractor. Have all required documentation on hand at the time of inspection, including permit cards, plan sets, and any wind-hail specific details relevant to Quad Cities conditions. If a weather delay occurs, request guidance on rescheduling timelines to avoid blocking the final inspection.
Ice dams form a threat when winter in the Quad Cities pushes meltwater toward the eaves during repeated freeze-thaw cycles. Snow on the roof may shed unevenly, and once heat from the attic or a sunny stretch of day meets the cold edge, meltwater can back up under shingles. The result is a slow seep that often manifests as a hidden attic stain or a damp ceiling, with ice forming along the eave where it most tightly hugs the house. This is not a single event-it creeps in after several thaw freezes, so a proactive approach to insulation and ventilation matters as much as a roof deck.
Post-storm leak tracing in the Quad Cities often requires distinguishing whether the source is field shingle damage, flashing failure, or openings around penetrations. After hail or wind, look first at exposed shingles for bruising or cracking, then at step and chimney flashing where joints meet. Inspect skylight flashes and curb connections, and check penetrations for loose fasteners or lifted seals. If water shows up far from a visible storm path, expand the inspection to eave edges, rakes, and attic access hatches. Document the sequence of leaks with dates and weather notes to aid insurance review.
Skylights need special attention in this climate because snow, ice, and seasonal seal movement can expose flashing weaknesses during winter and spring rains. Monitor the skylight seals for compression-set or gaps where the curb meets the roof. Ice dam pressures can force slow leaks through the flashing joints long after the shingle damage has begun. A careful, staged inspection helps prevent a small leak from becoming a larger interior problem.
Find contractors experienced in skylight installation, flashing, and leak repairs to bring natural light into your home.
Green Valley Roofing Siding Windows
(563) 322-2044 www.greenvalleyroofing.com
Serving
4.7 from 78 reviews
33 Carpenters Construction
(563) 344-3323 www.33carpentersconstruction.com
Serving
4.4 from 64 reviews