Last updated: Apr 19, 2026
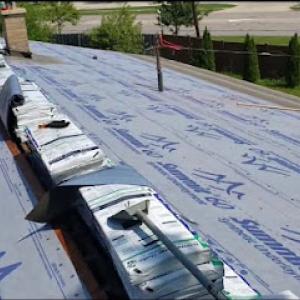
Midland's harsh winters and repeated freeze-thaw cycles make attic ventilation and air sealing central to roof performance, not optional upgrades. When attic air leaks up into the roof line, warm indoor air meets a cold roof deck, melting a thin layer of snow that refreezes at the eaves. That cycle builds ice dam thickness and forces meltwater to back up under shingles and into the attic. If soffit vents are blocked, insulation is compressed, or attic baffles are missing, the risk compounds quickly. A correctly sealed attic, paired with continuous, balanced ventilation, keeps the roof deck closer to exterior temperatures and dramatically reduces dam formation. In practice, you want airtight at the attic ceiling plane, with a clear path for dry cold air to circulate from soffits to the ridge. Do not overlook even small gaps around wiring, pipe penetrations, and attic hatch access-the smallest leak invites moisture intrusion during the next thaw.
Winter snow and ice delays are common, and ice dam formation is not a cosmetic problem-it can force water intrusion that damages decking, sheathing, and interior ceilings. When bitter cold presses in and temperatures swing above freezing during midday thaws, the dam cycle accelerates. The attic's venting must respond to those cycles: high airflow during warm periods, controlled, reduced venting during extreme cold to prevent a wind-chill effect on the roof deck. In practice, this means ensuring ridge vents or turbine vents are clear, soffit intakes are unobstructed, and insulation sits flush against the ceiling plane without compression. A properly insulated and vented attic acts as a shield, reducing the likelihood of warm roof segments melting snow that later forms dangerous dams at the eaves.
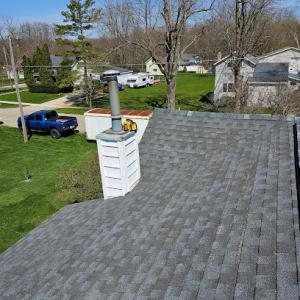
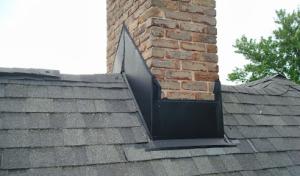
As the snow recedes, Midland's spring thaw exposes seam, flashing, and underlayment weaknesses that stayed hidden while roofs were frozen. Ice damging is often a symptom, not the root cause. If flashing around chimneys, skylights, and transitions shows rust, lifting, or gaps after thaw, moisture can travel behind shingles, accelerating wood rot and interior staining. Underlayment integrity is tested under stress when ice dams back up water pressure against the roof line. Look for soft spots in the ceiling drywall, new stains, or musty odors in upper rooms after a warm spell. If any of these signs appear, don't delay: the issue extends beyond cosmetic damage and can threaten structural integrity. Have a trusted local roofer inspect the attic and roof deck for compromised insulation, air leaks, and compromised underlayment. A targeted fix now-air sealing, insulation improvements, and selective flashing rehab-prevents a cascade of costly repairs as Midland thaws continue.
Start with a thorough attic air-sealing plan aimed at eliminating drafts. Seal all penetrations with appropriate sealant and insulation-compatible foam, and install airtight baffles to maintain uninterrupted vent paths. Reassess insulation levels to ensure the attic floor is at or above recommended depths for your home size and square footage, then verify that ventilation is evenly distributed between soffits and ridge. If you notice inconsistent roof deck temperatures during winter checks, contact a local professional to test for insulation gaps and verify vent functioning. In Midland, proactive air sealing and strategic ventilation are your best defense against ice dams and moisture damage during the freeze-thaw cycle.
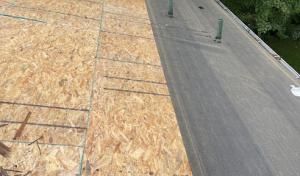
Late spring through early fall is the optimal replacement window in Midland because winter snow and frozen conditions interfere with tear-off, sealing, and inspection timing. During this stretch, roofers can safely remove old layers, install underlayment, and complete venting work without the delays that deep freezes impose. Choosing this window reduces the chance of weather-driven setbacks and gives a clearer path to a proper seal before the first snowfall. The goal is to finish the project with dry-in conditions that hold up under Midland's freeze-thaw cycles, so a homeowner should plan for a window when temperatures consistently allow roofing crews to work without extreme cold. That means aligning start dates with warm days and predictable weather patterns, not just the calendar.
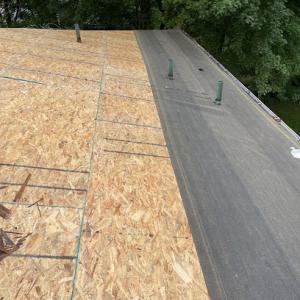
Spring storms in Midland raise the risk of moisture intrusion during active projects if dry-in sequencing is poor. If shingles go down before the underlayment, or if roof vents aren't tied in before final sealing, rain showers can find ways into the attic or living spaces. The practical approach is to lock in a sequence that treats the dry-in as a critical milestone: first, scaffold and safety checks; second, underlayment and flashing; third, ventilation and drip edge; fourth, shingles or the chosen covering. In spring, moisture can ride on wind-driven rain, so temporary tarps and quick-dry strategies should be part of the plan. A tight schedule that minimizes time with open roof decks during wet periods pays off by preventing interior moisture problems and mold risk.
Fall gusts and debris events in Midland's shoulder season can accelerate wear on aging roofs before winter snow loads arrive. Debris from nearby trees can clog vents and valleys, provoking moisture standoffs that stress seals and drip edges. The practical response is to schedule pre-winter inspections and a proactive debris-clearing sweep as the project nears completion. Ensure chimney and vent terminations are free of leaves, and that snow guards or ridge vents are properly secured to resist fall winds. Landscaping considerations matter too: secure loose branches or trim near the project site to reduce debris intake during late-season storms.
Because Midland experiences strong spring storms and variable fall winds, a reliable weather buffer becomes a real asset. Work with the roofer to identify a stretch of several days with moderate temperatures and low precipitation probability for the critical dry-in phase. If a surprise storm arrives, a temporary cover or wind-resistant shutdown plan can prevent weather from interrupting the job and exposing underlayment to moisture.
In this climate, the roof's ability to shed snow and resist thaw cycles is driven by the roof system and proper ventilation. While the season sets the pace, the chosen material should facilitate reliable performance through freeze-thaw cycles and moisture exposure. The best choice balances durability, weight, and ease of installation so that the project can stay on track within the optimal window and withstand Midland's seasonal extremes.
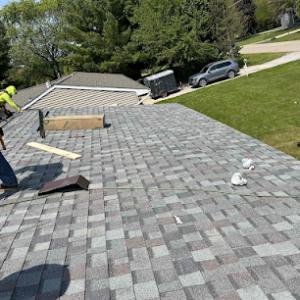
Asphalt shingles remain the baseline replacement choice. In Midland, you'll see a straightforward, cost-effective option that holds up reasonably well through the long snow seasons and freeze-thaw cycles. The typical cost range is about 350 to 520 USD per square for asphalt shingles. This material pairs well with common suburban layouts and avoids the elevated risk of moisture intrusion that can accompany more fragile roofing systems if not properly vented and underlaymented on a full replacement. A practical approach is to budget for underlayment quality and a solid attic ventilation plan to curb ice dam formation and moisture buildup during January through March.
Metal is a common upgrade path for homeowners prioritizing snow shedding and longer service life. In Midland, metal roofs can help reduce the weight load and manage meltwater more efficiently, which translates to fewer ice dam concerns when paired with proper insulation and ventilation. Expect costs in the roughly 450 to 850 USD per square range. The higher end reflects thicker panels, premium coatings, and specialized installation. For homes near trees or with complex rooflines, extra fasteners and flashing may push the price toward the upper end, but the payoff is notable in reduced freeze-thaw stress and potential long-term energy savings.
Clay and concrete tile are available in this market but are less typical for Midland's mainstream housing stock. structural review, specialized labor, and logistics can push pricing toward the upper end of the provided ranges. Expect to see wide swings depending on roof pitch, existing decking condition, and the need for significant framing or insulation adjustments. Clay tile tends to offer excellent durability in dry periods but can be sensitive to freeze-thaw cycles if not installed with proper ventilation and moisture management. Concrete tile shares similar considerations but can be slightly more forgiving on impact resistance.
Project costs can rise when winter damage creates spring demand surges, when older homes trigger extra decking repairs, or when unusual roof configurations slow permit review and scheduling. In older neighborhoods with mixed rooflines, extra decking work or sagging sections are not unusual after heavy snows. If an extended cold snap follows a storm, the supplier and crew scheduling can tighten, nudging the final price. A well-planned replacement that includes robust underlayment, balanced ventilation, and attention to roof-to-wall connections is the most reliable defense against moisture intrusion and ice dams, particularly on full replacements.

Midland Roofers
(989) 303-7877 roofersmidland.com
Midland, Michigan
5.0 from 25 reviews
At our core, we prioritize our customers' satisfaction and are committed to exceeding expectations. We strive to deliver on our promises by taking the next step towards excellence. Our range of roofing solutions for residential and commercial purposes brings a number of benefits. For a glimpse of how we can elevate your roofing projects, visit our website. With extensive experience as a roofing contractor in our region, we understand the unique climate conditions and roofing options that work best. Due to the unpredictable nature of Michigan's climate, we highly recommend asphalt shingles for their suitability. In addition, we support metal roofing systems, which are known for their exceptional resistance to harsh weather conditions.
Walkers Quality Roofing
(989) 600-6622 walkersqualityroofingllc.com
2216 E Ashman St, Midland, Michigan
5.0 from 11 reviews
At Walkers Quality Roofing, we pride ourselves on providing top-notch roofing services in Midland, MI and surrounding areas. Our team of experienced professionals is dedicated to delivering high-quality workmanship and exceptional customer service. Whether you need a roof repair or a new installation, you can trust us to get the job done right.
Herbert Roofing
(989) 447-9571 www.herbertroofing.com
1164 James Savage Rd, Midland, Michigan
4.7 from 21 reviews
We understand that roofing repairs and replacement are expensive. That’s why we always provide affordable, transparent pricing to our clients. Herbert Roofing provides all customers with upfront estimates and quotes for recommended roofing services. This way, you always know exactly what your total cost will be before starting work on your property. We also include everything in writing, so you have a clear line of sight into the work, cost, and time required for each phase of the roofing project. You can rest assured there won't be hidden fees––or surprises––at the end of your project
Chad Moody Building & Remodeling
(989) 573-0881 www.chadmoodybuilding.com
1719 Sandow Rd, Midland, Michigan
4.6 from 24 reviews
Chad Moody Building and Remodeling is a remodeling, building, and roofing company located in Midland, Michigan. We offer a variety of services to meet all of your home-improvement expectations. We have many options of quality products for your kitchen, addition, and roofing needs. We offer competitive pricing of high-grade shingles for new roof and replacements. We seek to exceed your every expectation and need!

3900 Centennial Dr Unit D, Midland, Michigan
5.0 from 7 reviews
MWA-Commercial Roofing Solutions represents a number of reputable manufacturers in the commercial exterior construction industry, including Elevate Building Products (formerly Firestone), GACO, Genflex, Georgia-Pacific DensDeck, Kemper System, Rooftop Anchor Fall Protection, Elemex Architectural Facade Systems, Structure Monitoring Technology (SMT), AC Tech Moisture Mitigating Primers, and Hickman Edge Systems. As their sales representatives and market development specialists, we provide architects, design professionals, roofing contractors, and building owners with comprehensive technical solutions and design options. We aim to ensure that our clients receive the best possible service and high-quality products from our trusted manufactu...
Innovative Exteriors
(989) 484-9877 innovativeexteriorsmi.com
2303 S Duncan Rd, Midland, Michigan
4.6 from 9 reviews
Innovative Exteriors, Inc. is a premier flat roofing contractor in Midland, Michigan, with over two decades of expertise in high-quality Duro-Last® roofing systems. They offer services across Mid-Michigan and surrounding areas, specializing in installation, repair, and maintenance for both residential and commercial properties. Their commitment to excellence includes offering durable, energy-efficient roofing options with fewer seams and leaks, backed by industry-leading warranties. Innovative Exteriors prides itself on its dedication to customer satisfaction, ensuring quality service and support throughout the lifecycle of each project.
Midland Roofers MI
(989) 600-5703 www.midlandroofersmi.com
1719 Sandow Rd, Midland, Michigan
4.4 from 7 reviews
"Roofing Experts in Michigan With 38 years of experience, Midland Roofers is your trusted partner for all your roofing needs in Michigan. Whether you need a new roof, re-roofing, repairs, or maintenance, our team delivers top-notch craftsmanship and personalized service. Also being a licensed builder, can take the worry and stress off from you. We specialize in re-roofs, additions, and remodels, ensuring that your roofing project is completed to the highest standards. Contact us today for a free estimate and let us protect your home with quality roofing solutions."
Roof Maxx of Midland, MI
(989) 859-6751 www.askbenhow.com
Serving
5.0 from 38 reviews
Roof Maxx of Midland, MI offers an eco-friendly, affordable alternative to traditional roof replacement. Our plant-based formula restores the protective oils in your asphalt shingles, extending your roof's life by up to 15 years with three simple treatments. Save thousands and protect your home without the hassle and cost of a roof replacement. Contact our team today!
Harding Builders
Serving
5.0 from 10 reviews
Licensed & insured. Serving the Tri Cities since 1982. Roofing, siding, windows, soffit, fasica, & gutters.

Storm Master Exteriors
(989) 488-4846 www.stormmasterexteriors.com
Serving
4.7 from 78 reviews
Storm Master Exteriors in Freeland offers reliable exterior home services throughout the Saginaw and Midland areas. With over 20 years of experience, we specialize in roofing, siding, windows, insulation, gutters, and decking, ensuring homes are both durable and stylish. Our team focuses on quality workmanship and honest service, providing free estimates with no gimmicks. For homeowners seeking roof replacement Freeland, we deliver trusted solutions tailored to your needs. We’re proud to serve our community and build lasting relationships through integrity and dedication. Let Storm Master Exteriors enhance your home’s value and protection. Call us today to get started!
King Contractors
(855) 978-5464 www.kingcontractorsmi.com
Serving
5.0 from 32 reviews
Our roofing solutions are custom tailored to provide superior durability and unmatched protection for your home or business. Trust us to deliver exceptional quality and expertise, ensuring that your investment stands strong against the test of time. We are now servicing the entire state of Michigan!

"Son of a Burch" Roofing & Repair
(989) 313-2796 www.sobroofing.com
Serving
4.9 from 29 reviews
Roofing and Repair. Call only button please text 1-989-313-2796. Serving our community one roof at a time. New home owner? Remodeling for a flip? Notice a water spot on your ceiling? Winter ready? Chimney removal? WE OFFER OUR CLIENTS AN AFFORDABLE RANGE OF SERVICES: CHIMNEY REMOVAL AND REPAIRS REPLACING BROKEN SHINGLES WIND DAMAGED ROOFS LEAKS WATER DAMAGE WOOD REPLACEMENT REPLACING METAL FLASHING AND DIVERTING WATER TO PREVENT FURTHER DAMAGE VALLEY REPLACEMENT, AND VENTILATION ON ROOF. Let us help save your roof! sonofaburchroofingllc@gmail.com
For most full roof replacements in Midland, a building permit is required through the City of Midland Building Department. The permit process is not just a box to check; it guides critical safety and performance practices that matter for Midland's long snow seasons. The city expects proper underlayment, ventilation, and adherence to fire codes, especially on homes with mixed ages and construction styles. Before breaking ground, gather the required forms, a basic roof plan, and any existing architectural details that influence vent placement and attic airflow. Working with a licensed roofer who understands local expectations helps prevent delays and ensures the project aligns with the permit checklist.
Midland inspections are typically scheduled during and after installation to verify underlayment, ventilation, fastener patterns, and fire code compliance. Expect a inspection window that may span multiple visits as the crew completes sections of the roof. The first inspection often focuses on roof deck access, underlayment type and placement, and nailing patterns. A mid-project check can catch issues that would otherwise trigger rework once the roof is nearing completion. The final inspection confirms proper ventilation balance between soffit, ridge, and any powered or passive exhaust, and it validates that all penetrations and flashing meet local fire and wind standards. Clear, accessible attic and mechanical room spaces help inspectors move through quickly, reducing downtime on cold days.
Older or unusual homes can trigger a brief plan check before work proceeds, which matters more here than in places with purely over-the-counter reroof permits. Historic or irregular roof lines may require additional notes on eave overhangs, valley configurations, and skylight flanges. A plan check may ask for details on attic ventilation strategies, including intake and exhaust calculations, to assure proper moisture control through freeze-thaw cycles. If your residence has retrofitted insulation or nonstandard framing, provide documentation or drawings to illustrate how the new roof system interacts with existing ventilation channels. This upfront diligence helps reduce back-and-forth with the Building Department and keeps the project on schedule during Midland's winter months.
Coordinate with the contractor to have the site ready for inspections: clear access points, safe walking paths on icy days, and a dedicated area for materials that won't block emergency egress. Ensure attic spaces are accessible for inspection of ventilation routes and that any mechanical equipment in the attic is clearly labeled. Keep a copy of the permit documents and the approved plan readily available on site, so inspectors can reference the exact specifications. If adjustments are needed after an inspection, respond promptly with revised drawings or notes to avoid prolonged project pauses. Clear communication with the Building Department helps align timing with Midland's cold-season scheduling and minimizes delays caused by weather or supply gaps.
Asphalt shingles, metal roofing, wood shingles or shakes, clay tile, concrete tile, and synthetic or composite shingles are all active material categories in Midland's market. Each brings different performance traits when the winter season hangs on for months and every thaw refreezes at the eave. The right choice hinges less on looks and more on how the roof handles snow, ice, and moisture over a slate of freeze-thaw cycles.
Midland's freeze-thaw pattern places a premium on edge performance and long-term moisture management. Brittle or aging materials are especially vulnerable, because trapped moisture expands and can worsen cracking, edge lift, and flashing separation. Materials that tolerate cold temperature fluctuations, and that resist creeping moisture toward the attic, tend to hold up better year after year. The goal is to pick a roof that can shed snow efficiently while staying resilient against the repeated freeze-thaw stress.
Snow shedding is not just about a roof's slope; it's about how the system works with ice and moisture migration. In Midland, an underlayment that resists moisture intrusion plus a solid, continuous ventilation path in the attic becomes part of the armor against ice dams. Shingles or panels that seal well at seams, plus a well-installed drip edge and flashing, help minimize meltwater backing up toward the eaves. If a roof section is aging, upgrading to a material with a proven track record for cold performance can reduce the risk of dam formation.
Material choice should be matched to the home's existing structure and attic setup. A well-ventilated attic reduces warm, moist air that can condense and freeze on the underside of the roof deck. If the attic has limited intake or exhausted vents, some materials perform better with a retrofit to the ventilation plan. The goal is to create a balanced system, so the roof isn't fighting heat buildup in winter or heat loss in the attic that drives condensation.
In neighborhoods with a mix of older and newer homes, practical performance often beats novelty. Composite or synthetic shingles provide a modern balance of rigidity and flexibility, while metal roofing offers strong snow-shedding capability with a long lifespan. Clay and concrete tiles bring durability but can be heavier and require structural verification. Wood shingles or shakes lend a traditional look but demand careful maintenance in freeze-thaw cycles. The best choice aligns with how the home handles snow, how the attic is vented, and what the existing structure can support over decades of Midland winters.
In Midland and across Michigan, hail and wind claims are usually handled within standard homeowners coverage rather than through a separate local catastrophe framework. This means your policy's typical coverages and deductibles apply, and the process centers on documenting damage and showing how it impacts the roof's integrity. If a big storm hits, expect the insurer to review not only the visible weather marks but also how moisture may have entered attic spaces and underlayment. The consequence of incomplete or late reporting can shift from a quick fix to a larger repair or replacement decision, so prompt, accurate action matters.
Insurers in this market commonly ask for photos documenting hail exposure, shingle condition, and the progression of visible damage before approving scope. Photograph the entire roof from multiple angles, close-ups of impacted edges, and any signs of moisture intrusion inside the attic or along the eaves. Keep a dated log of when you notice changes, such as curling shingles, lifting edges, or attic condensation after a storm. If you have prior roof reports or maintenance records, include those to show the baseline condition. Organized, dated records help avoid disputes about what happened when and why repairs or replacements are necessary.
During larger weather events affecting Midland, adjusters often coordinate directly with roofing contractors, making organized photo records and dated notes especially important. Have your contractor ready to receive the initial scope and to provide professional appraisals that align with the insurer's requirements. If the contractor photographs the roof at the same times as the adjuster, discrepancies diminish and the path to a clear resolution shortens. This collaboration can prevent back-and-forth that drags out claims and leaves you exposed to additional moisture risk.
Avoid delaying documentation after a storm, as shifting snow and thaw cycles can mask early damage. Do not rely on memory alone for hail or wind exposure timing; back it with dated photos and notes. Also, be wary of temporary repairs that may look sufficient but fail to address underlayment or ventilation issues that a full replacement or detailed assessment might reveal later. Your proactive documentation becomes the backbone of a fair, timely settlement and protects against hidden moisture complications that could surface after the next freeze.
Older homes carry character, but that same character often triggers closer scrutiny during roof work. Plan review and inspection attention surge when roof geometry, ventilation, or prior modifications don't fit standard expectations. Deep hips, unusual valleys, or mismatched dormers can spotlight underlayment and flashing concerns that ripple into attic and ceiling spaces. In these cases, the roof system isn't just shingles; it's a complex junction of vents, soffits, and eave details that must behave together through Midland's harsh winters.
Local contractor signals show recurring demand for chimney, attic insulation, and skylight-related work, indicating that replacements often involve adjacent detail repairs rather than shingles alone. When a roof reaches the end of its life in an older neighborhood, the scope frequently includes flashing around chimneys, vent stacks, and skylight penetrations, plus the insulation and air sealing that feed or hinder moisture control. These elements can be as telling as the roofing material itself about long-term performance in freeze-thaw cycles.
Moisture problems in this area frequently trace back to transitions and penetrations stressed by winter movement and spring thaw. Where two building assemblies meet-between roof deck and eave, or around a dormer-water can exploit every small gap. Ice dam risk grows when attic ventilation drops or insulation is uneven, allowing warm roof sections to melt snow that refreezes at the eave. The result is a slow, creeping moisture process that shows up as stained ceilings, peeling paint, or warped decking long after the snow melts. Addressing these details early helps keep roof life intact and interior spaces dry.
Find contractors experienced in skylight installation, flashing, and leak repairs to bring natural light into your home.
Chad Moody Building & Remodeling
(989) 573-0881 www.chadmoodybuilding.com
1719 Sandow Rd, Midland, Michigan
4.6 from 24 reviews

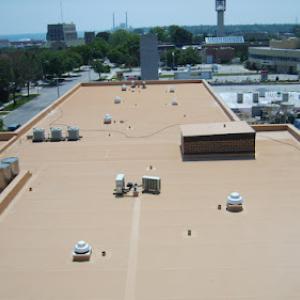
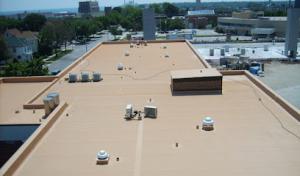
Flat and low-slope roofing is a meaningful but secondary specialty in Midland, reflecting local demand on commercial buildings and some residential additions rather than citywide dominance. In winter, the flagstone pattern of freeze-thaw stress means drainage reliability becomes critical on these surfaces. Standing water that lingers through subfreezing periods can refreeze into ice dams at roof-to-wall interfaces, driving membrane wear and leaking risk. Prioritize a roof plan that favors adequate slope, positive drainage paths, and clear gutters and scuppers. A thorough inspection after every heavy melt helps catch sump-like low spots before they become trouble, and it's smart to verify that drip edges and edging details shed water outward rather than funnel it toward penetrations.
Midland's longer cold spells mean a membrane must resist repeated freeze-thaw cycles without micro-cracking. The choice of seam details, penetration flashing, and edge termination matters as much as the core membrane itself. In practice, look for a system with robust detailing at curbs, skylights, and any transitions to steeper roofs. Vectoring the roof's thermal movement through properly spaced fasteners and compatible adhesives reduces delamination risk during temperature swings. When the project involves additions or retrofits, ensure the low-slope section integrates with the wider roof assembly to avoid trap points where moisture can accumulate and refreeze.
Roof coatings appear in the market but only as a limited specialty, suggesting restoration is a niche solution in Midland rather than the default replacement path. Coatings can add a temporary seal over minor leaks or brighten a worn surface, but they don't replace the need for a sound membrane and proper drainage in a climate with repeated freeze-thaw cycles. If coatings are considered, treat them as a supplemental step within a broader strategy, not a standalone cure.
Ongoing maintenance is key. Schedule seasonal cleanouts of gutters, confirm that drainage paths remain open after snow events, and inspect seals around penetrations for signs of lifting or aging. When a low-slope section is part of a larger retrofit, coordinate with the overall roofing plan to ensure consistent substrate prep, flashing continuity, and membrane compatibility across transitions. In a snowy climate, proactive monitoring after storms often saves more extensive repairs later.
Find specialists in TPO, EPDM, and built-up flat roofing systems for residential and commercial properties.
Herbert Roofing
(989) 447-9571 www.herbertroofing.com
1164 James Savage Rd, Midland, Michigan
4.7 from 21 reviews
Innovative Exteriors
(989) 484-9877 innovativeexteriorsmi.com
2303 S Duncan Rd, Midland, Michigan
4.6 from 9 reviews

In this market, reroofing projects often win on a track record of longevity and straightforward workmanship. Midland contractors who have stood the test of time-long-established reputations built on solid crews and reliable material installations-tend to be the strongest hire signals. Homeowners look for clear explanations of what's being replaced, practical steps to prevent repeat issues, and a clean, predictable job sequence rather than flashy branding.
Quick response matters, because leak calls around winter ice and spring storms tend to cluster. A contractor that can assess damage promptly, stage materials efficiently, and schedule work without lengthy backlogs earns trust fast. When winter weather keeps crews in check, a firm that communicates accessibly and sticks to a realistic timeline helps homeowners avoid extended exposure to water intrusion.
Midland homeowners value cleanup as part of the package nearly as much as the install itself. A jobsite that ends tidy, with debris removed and no lingering nails or shingle scraps, leaves a lasting impression. The strongest hires pair solid workmanship with reliable daily cleanup, so neighborhoods in older suburbs and newer subdivisions alike see the same practical standard.
Warranty messaging is present but not dominant locally; homeowners here weigh proven local service just as heavily as premium branding. A contractor that offers clear post-install support, accessible contact, and a track record of standing behind work tends to outperform others. In today's market, a local team with consistent communication and thorough cleanup often wins over glossy marketing alone.