Last updated: Apr 19, 2026
Bay City's position near Saginaw Bay exposes roofs to cold, moisture-laden winter weather that raises the risk of repeated freeze-thaw cycles at eaves. Those cycles push meltwater up against ice formations, creating stubborn dams that back up water under shingles and into the attic or ceiling. When a nor'easter rolls in or a routine thaw hits weeks of subfreezing nights, the attic becomes a heat exchanger that drives moisture into edges and trims. This isn't abstract-every home with an older roof is playing a game of chance with ice dam development after a heavy snowfall.
Heavy winter snow in Bay City increases both roof-load concerns and the chance that meltwater backs up behind ice at gutters and lower roof edges. A roof designed to carry a typical snow load can quickly reach or exceed its limit when a few storms come one after another, especially if the roof deck and underlayment have aged. When meltwater backs up, it follows the path of least resistance to weak spots-old flashings, deteriorated shingles, and vent penetrations. The result is leaks that show up in ceilings and walls long after the first storm passes, often in places that were thought to be dry.
Older homes in this market commonly need roof replacement planning tied to attic ventilation and insulation performance because winter leakage is often tied to heat loss as much as shingle age. If the attic leaks heat, rafters become warm enough to melt snow near the eaves even when temperatures are cold, feeding the ice dam cycle. Poor insulation in the attic creates heat pockets that relentlessly push warm air toward the roof deck. Shingle age compounds the problem: worn or curled shingles offer less ushering space for meltwater to shed, increasing the risk of water intrusion at roof edges and penetrations.
Act quickly if you notice ice build-up along gutters or at the eaves after storms. Clear outside gutters only when safe, and never climb onto a slick roof without proper safety measures. Check attic access from the inside for signs of heat loss-condensation, staining, or a wind-driven draft near the attic hatch or pull-down stairs means heat is escaping where it shouldn't. Improve or confirm insulation in the attic to reduce heat that travels upward; aim for minimal attic-to-roof heat transfer, especially around dormers and kneewalls. Seal obvious air leaks around vents, chimneys, and pipe penetrations with appropriate sealants or spraying. If there are signs of ongoing leakage after storms, prioritize a professional roof and attic assessment to identify whether shingle damage, flashing failures, or deck deterioration are contributing to the problem. In homes with known age or prior leaks, plan for a targeted inspection of the entire roof edge and gutters, because this is where ice dams tend to form and where water intrusion is most likely to start. Immediate action on cold days-when meltwater refreezes into sharp ice along eaves-can save interior damage and extend the life of the roof and attic system.
Bay City homeowners contend with a shifting damage pattern: winter snow and ice create chronic leakage risks, while spring wind and hail events bring sudden, storm-driven claims. This means a single-season focus isn't enough. A roof that leaks after a thaw can coexist with shingles torn loose by a late-season squall. Treat each precipitation cycle as part of an ongoing vulnerability profile, and plan your claim approach accordingly. The key is readiness: document issues as soon as they appear, and keep a running record of how winter and spring weather impact your roof across the season.
Insurance adjusters in this market typically want clear, actionable proof. Start with photo documentation that captures the scope of any damage across multiple angles and lighting conditions-before any temporary repairs. Pair those images with dated notes that explain when issues were first noticed, how they progressed through thaw cycles, and any wind-driven impacts from the most recent storm. Gather contractor estimates that itemize the scope of work, including decked sheathing, underlayment, flashing, and any interior damage if present. A defined scope helps prevent back-and-forth and accelerates a fair evaluation. If you've already had a leak, show the sequence of events, including any temporary fixes you've implemented to stop further damage.
Spring storm interruptions in Bay City can delay scheduling and temporarily tighten contractor availability after wind or hail events. When a major storm hits, contractors prioritize emergency repairs, which can push out non-emergency roof work by days or weeks. Plan ahead by having a prioritized list of urgent repairs (for example, active leaks) and a secondary list for preventive work (like re-sealing flashing or resecuring loose shingles). If you suspect widespread hail impact, contact multiple contractors early to establish a realistic window for assessments and a defined scope of work. In the meantime, protect interior spaces with tarps or boards if access to the attic or ceiling is compromised.
Your claim package should include: a detailed description of what failed and when it happened, all photographic evidence, and a precise, line-item scope of work from a licensed contractor. Include any prior repairs to show the roof's condition history. If weather-driven damage is suspected to be a combination of ice damming in winter and wind-related shingle displacement in spring, present a cohesive narrative that links the observed damage to specific weather events. A coherent story helps adjusters understand urgency and prevent misclassification of damage as isolated or unrelated.
Keep a running file with photos, notes, and contractor communications. Establish a clear timeline of events tied to weather alarms and storms. If a claim is filed, respond to requests for documentation promptly, and provide a defined scope of work from a trusted contractor. In Bay City, the goal is to minimize exposure to leaks during thaw cycles and to secure rapid, accurate assessments after spring wind and hail to limit secondary interior damage. Stay vigilant: early reporting and precise documentation are your best defense against delayed repairs and disputed claims.
Find local contractors experienced in assessing and restoring roofs after hail, wind, and severe weather events.

BZAK Builders
(989) 316-1483 www.bzakbuilders.com
1313 N Johnson St, Bay City, Michigan
4.7 from 141 reviews

"Son of a Burch" Roofing & Repair
(989) 313-2796 www.sobroofing.com
502 King St, Bay City, Michigan
4.9 from 29 reviews

BZAK Builders
(989) 316-1483 www.bzakbuilders.com
1313 N Johnson St, Bay City, Michigan
4.7 from 141 reviews
BZAK Builders is a trusted Michigan construction company specializing in roofing, siding, soffit, fascia, and all exterior improvements. From custom deck building and outdoor living spaces to interior remodels, painting, flooring, and complete home renovations, we deliver high-quality craftsmanship built to last. Whether you need a small repair or a full renovation, our experienced team provides FREE ESTIMATES and is here to handle all your residential and commercial construction needs with professionalism, reliability, and care.
"Son of a Burch" Roofing & Repair
(989) 313-2796 www.sobroofing.com
502 King St, Bay City, Michigan
4.9 from 29 reviews
Roofing and Repair. Call only button please text 1-989-313-2796. Serving our community one roof at a time. New home owner? Remodeling for a flip? Notice a water spot on your ceiling? Winter ready? Chimney removal? WE OFFER OUR CLIENTS AN AFFORDABLE RANGE OF SERVICES: CHIMNEY REMOVAL AND REPAIRS REPLACING BROKEN SHINGLES WIND DAMAGED ROOFS LEAKS WATER DAMAGE WOOD REPLACEMENT REPLACING METAL FLASHING AND DIVERTING WATER TO PREVENT FURTHER DAMAGE VALLEY REPLACEMENT, AND VENTILATION ON ROOF. Let us help save your roof! sonofaburchroofingllc@gmail.com

Double Barrel Builders
(989) 341-0297 www.doublebarrelbuilders.com
29 Old Kawkawlin Rd, Bay City, Michigan
4.6 from 17 reviews
Double Barrel Builders is your number one roofing, soffit, fascia and siding installer. We offer excellent craftsmanship with affordable prices. Call us for your free estimate 989-341-0297.
Brown Thomas Roofing
700 3rd St, Bay City, Michigan
4.7 from 7 reviews
Local Residential Roofing Contractor, Statewide Commercial Roofing Contractor, New - Reroof - Repair - One Ply & Modified - Manville - Koppers. Asphalt & Fiberglass Shingles, Hot Asphalt Gravel Roofs, Dow Roofing Systems.Roofing Contractors, Building Contractors, General Contractors, Roofing Services Consultants
Honest Repairs
Center st, Bay City, Michigan
5.0 from 1 review
All exterior home repairs including but not limited. Roof repair, chimney caps, metal flashing small flats. Wood repair, gutter repair, siding repair, I started my Business to help people get good honest prices and work. Please call for any questions will beat most prices. Guaranteed satisfaction up to five year warranty for repairs. And discounts for referrals Thank you all
Kawkawlin Roofing
(989) 684-0561 www.kawkawlinroofing.com
Serving
4.5 from 13 reviews
Kawkawlin Roofing was established in 1964. We install low sloped single ply roofing systems & standing seam metal roofing. Commercial and industrial only. We utilize our 61 years of stability to provide top-tier roofing services with integrity, dedication, expertise, and exceptional workmanship. We build quality, long-lasting relationships with clients by emphasizing the importance of professionalism, transparency, and accountability. Kawkawlin Roofing’s team goes above and beyond to provide innovative solutions to complex problems. Our staff and crew value the client’s needs and are prepared and knowledgeable to help every step of the way.
Roof Maxx of Midland, MI
(989) 859-6751 www.askbenhow.com
Serving
5.0 from 38 reviews
Roof Maxx of Midland, MI offers an eco-friendly, affordable alternative to traditional roof replacement. Our plant-based formula restores the protective oils in your asphalt shingles, extending your roof's life by up to 15 years with three simple treatments. Save thousands and protect your home without the hassle and cost of a roof replacement. Contact our team today!

Storm Master Exteriors
(989) 488-4846 www.stormmasterexteriors.com
Serving
4.7 from 78 reviews
Storm Master Exteriors in Freeland offers reliable exterior home services throughout the Saginaw and Midland areas. With over 20 years of experience, we specialize in roofing, siding, windows, insulation, gutters, and decking, ensuring homes are both durable and stylish. Our team focuses on quality workmanship and honest service, providing free estimates with no gimmicks. For homeowners seeking roof replacement Freeland, we deliver trusted solutions tailored to your needs. We’re proud to serve our community and build lasting relationships through integrity and dedication. Let Storm Master Exteriors enhance your home’s value and protection. Call us today to get started!
Versatile Commercial Flat Roofing
(989) 401-1462 www.versatileflatroofing.com
Serving
5.0 from 8 reviews
Versatile Commercial Flat Roofing has years of experience in flat roof replacement. Our experts will install your flat roof replacement quickly and efficiently. As commercial roofers, we install flat roof systems throughout Michigan. We understand how important it is to feel confident and worry-free when it comes to your low slope membrane roof.
King Contractors
(855) 978-5464 www.kingcontractorsmi.com
Serving
5.0 from 32 reviews
Our roofing solutions are custom tailored to provide superior durability and unmatched protection for your home or business. Trust us to deliver exceptional quality and expertise, ensuring that your investment stands strong against the test of time. We are now servicing the entire state of Michigan!

Bay City Roofers
(989) 447-2167 tricitysprayfoaminsulation.com
Serving
4.6 from 19 reviews
Serving homeowners and businesses across Michigan’s Tri-City area - Saginaw, Midland, and Bay City - We offer expert spray foam insulation that seals every crack and dramatically improves energy efficiency, indoor comfort, and air quality. Our certified team provides professional installation, guiding clients from initial assessment to long-term comfort, regardless of the season. By creating tight air seals, delivering high R-values per inch, and functioning as a vapor barrier, our spray foam helps reduce drafts, moisture, mold risk, HVAC strain, and energy costs. With deep local knowledge and tailored solutions for Michigan’s temperature extremes, we are your best, trusted choice for clean, effective, and enduring insulation.
Harding Builders
Serving
5.0 from 10 reviews
Licensed & insured. Serving the Tri Cities since 1982. Roofing, siding, windows, soffit, fasica, & gutters.
In Bay City, the common re-roof market centers on asphalt shingles, with higher-cost options like metal, synthetic, tile, and slate becoming more sensitive to crew availability and structural complexity. This local pattern reflects how Saginaw Bay weather tests roofs, especially when quick leak response matters after winter storms. The numbers below provide a practical sense of what to expect for full re-roofs versus selective work, keeping Bay City's winter dynamics in mind.
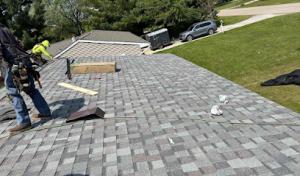
Asphalt shingles remain the baseline choice for most Bay City homes. When a full re-roof is needed, expect a typical square-range in the mid to lower end of the market, roughly 350 to 550 USD per square, installed. The appeal is straightforward: reasonable materials cost, faster tear-off, and crew availability that generally aligns with winter-spring scheduling windows. For many older homes with steep or complex rooflines, the tear-off can drag into late spring, pushing cleanup and re-nailing into a slower pace. If the job involves modest geometry but stubborn leaks after a heavy snow event, asphalt shingles offer reliable performance at predictable pricing.
Synthetic or composite shingles sit in a middle zone that balances durability with a more forgiving installation timeline than true slate. Expect roughly 450 to 800 USD per square for full replacement, depending on the exact synthetic product and roof complexity. In Bay City, synthetic shingles can be a smart choice when winter exposure is harsh and the roof has lower-slope sections that benefit from added moisture resistance. Metal roofing, while demanding a higher upfront cost, often sheds ice and snow a bit more efficiently and can reduce long-term maintenance if installed on strong, straight lines. Installed metal generally runs from 700 to 1100 USD per square, with cost spikes if the structure requires reinforced framing or specialized detailing to handle wind and ice loads.
Clay tile and concrete tile present a higher price tag, typically ranging from 900 to 1800 USD per square for clay and 900 to 1700 USD per square for concrete. Slate, the premium option, tends to land in the 1400 to 2500 USD per square range. In Bay City's climate, tile and slate can be compelling where the roof is already well-supported and there is a desire for long life and a distinct curb appeal. However, crew availability can swing timelines, and steep or older rooflines require cautious tear-off and careful cleanup, which pushes project sequencing and can extend the window from late spring into early fall.
When winter damage creates surge demand, Bay City projects can move faster in some months but slower in others, depending on weather and local crew schedules. For steep, older rooflines, tear-off and cleanup tend to take longer, especially when snow and ice require additional safety precautions. On the flip side, milder stretches in late spring and early fall can offer more consistent crews but may compress schedules if multiple houses in the neighborhood line up for replacement. If a replacement is planned, the higher-end materials will demand careful assessment of structural support and insulation continuity, with the cost implications reflected in both materials and labor complexity.
A full re-roof in Bay City typically requires a building permit through the local building department rather than proceeding as informal maintenance. Before any shingles come off or new underlayment goes on, you or your contractor should pull the permit with the city. Have the project scope ready, including the chosen roofing materials, underlayment type, and venting plan. If the house is part of a historical district or has near-neighbor concerns, be prepared to address any neighborhood review requirements or design standards that may apply. The permit process sets the official work boundaries and helps ensure winter conditions, storm debris, and snow load considerations are covered in the plan.
Bay City roofing projects commonly involve inspection coordination at the underlayment or rough-in stage and again after completion. The first inspection typically occurs once the roof deck, underlayment, flashing, and ventilation are in place but before shingles are installed. This stage confirms the roof's basic structure, drainage plan, and air barriers meet code requirements. The final inspection happens after the roof is completed and weatherproofed, verifying the installation aligns with the permit scope and approved materials. Coordinate with the building department to schedule inspections promptly, especially during the busy fall and winter seasons when weather can impact schedules.
Inspectors in Bay City are expected to verify that approved materials were used and that installation matches the permitted scope before final sign-off. This means confirming the shingle type or metal panel system, underlayment choice, flashing details around chimneys, vents, skylights, and valleys, as well as proper attic ventilation and snow-load considerations. If the permit lists a specific underlayment or attic venting arrangement, inspectors will check that what was installed matches those specifications. Any deviations require an approved change order before proceeding to the next phase of work.
To keep the process smooth, have the permit set readily available on the job site, with stamped drawings or product submittals accessible. Ensure the crew cleans up after each stage, especially the rough-in inspection, so inspectors can clearly view flashing details and edge metal. Document material delivery receipts and installation photos that demonstrate compliance with the permit. In winter months, ensure exposed roof areas are protected to prevent delays caused by snow and ice, which can complicate inspections and adherence to the approved scope.
Maintain open lines with the building department throughout the project. If a non-conforming detail is found, address it promptly with a formal change or addendum to the permit. Short-notice weather events, common in this climate, should be anticipated in the timeline, and any temporary leak-control measures should be documented and approved as needed. The goal is clear progress that aligns with Bay City's permitting standards and ends with a clean, code-compliant, and sign-off-ready roof.
In a city shaped by Saginaw Bay exposure, you look for roofs that handle heavy winter snow, ice dam risk, and the frequent mid-winter freeze-thaw cycles. Asphalt shingles remain the backbone of home exteriors, thanks to compatibility with the common pitched roofs you'll see on older and newer homes alike, and for balancing reliability with affordable replacement. When selecting a roof, prioritize options that provide solid wind uplift resistance, robust underlayment, and the ability to shed snow toward eaves where ice dams can form.
Asphalt shingles dominate the residential market here because they fit the area's large stock of standard pitched homes and remain the most budget-manageable replacement option. For Bay City winters, choose high-quality laminated or architectural shingles that offer better wind resistance and longer life in freezing temperatures. Pair any asphalt system with an upgraded underlayment and a well-sealed ridge cap to help minimize heat loss and reduce ice dam opportunities. Ventilation in the attic and proper insulation beneath the deck are essential complements; with cold snaps and lake-effect snow piling up, you want a crisp cavity air flow that curtails warm air migrating into the roof plane.
Metal roofing is a meaningful but smaller niche, often considered by homeowners focused on snow shedding, longevity, and lower maintenance in harsh winters. If choosing metal, look for standing-seam profiles with factory-sealed panels and snow guards that prevent dangerous sliding at eave lines. A well-sealed valley and integrated moisture barrier matter here, because metal's slick surface can still accumulate ice dams if heat leaks into the attic. Metal also benefits from precise installation on older homes where retrofits are feasible, but verify structural support and insulation continuity to ensure the full winter performance gains.
Heavy materials such as clay tile, concrete tile, and slate are available in local pricing data but are less typical choices and can introduce structural and installation complexity on older local homes. If an older roof or attic structure is already near capacity, these heavier options may require structural reinforcement and careful assessment of the existing rafter spans. Consider this path only if the home's framing and attic clearance can accommodate the added weight without sacrificing ventilation and drainage. For many Bay City houses, lighter systems paired with robust underlayment and enhanced ventilation deliver the best balance of reliability and ease of maintenance.
Regardless of material, prioritize continuous insulation, air sealing around penetrations, and a continuous soffit-to-ridge ventilation plan. In regions where snow accumulates, implement heat tape or integrated melting solutions along critical eaves and valleys to minimize ice dam formation. Inspect roof edges after heavy snows and look for loose shingles or damaged underlayment that could allow meltwater to travel inward. A proactive approach to flashing, gutter maintenance, and snow-clearing access reduces emergency repairs and helps extend roof life through multiple winters.
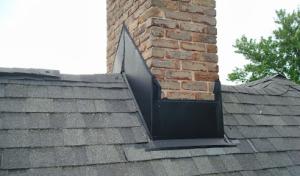
Older homes in this area often show tired flashing where chimneys meet the roof and around vents, skylines, and other penetrations. When a re-roof is planned, expect that these transitions will need careful detailing, not just a fresh layer of shingles. A hasty install can trap ice and meltwater along the chimney line, leading to leaks that show up long after a storm. The consequence is not only water in the attic but potential damage to ceilings, drywall, and insulation. Take time to examine step-flashing, counter-flashing, and the sealant at every projection. If flashing appears single-layered or lifted, plan for replacement rather than simple resealing. In the Saginaw Bay climate, where winter gets heavy, proper flashing is a first line of defense against repeated freeze-thaw cycles.
When older Bay City roofs leak, the culprit is not always the obvious water trail on the shingles. Water entry often rides along flashing details and then migrates to the interior. During inspection, trace the path from the interior back to the joints first, paying close attention to chimney, vent stacks, and valleys. If attic condensation shows up after a thaw, check whether the leak aligns with flashing laps or step-flashing at the roof deck edge. This approach saves misdiagnosis and directs repair to the real source, avoiding repeated call-backs after the next storm.
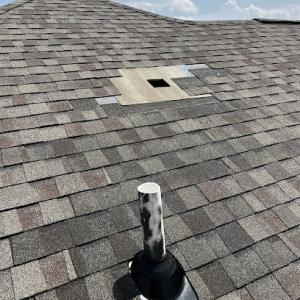
Where skylights are present, replacement planning should account for the curb condition and the surrounding flashing during a full re-roof. Skylight nailing flanges, curb height, and boot seals can fail with age, especially after tight winters and fluctuating temperatures. If the skylight curb is intact but the flashing shows signs of deterioration, replacement during a re-roof helps prevent leaks that might otherwise appear as soon as the snow melts. Give extra attention to shingle-to-flashing transitions around these openings to reduce long-term issues.
Find contractors experienced in skylight installation, flashing, and leak repairs to bring natural light into your home.

Chad Moody Building & Remodeling
(989) 573-0881 www.chadmoodybuilding.com
Serving
4.6 from 24 reviews
In Bay City, some homes and additions include low-slope sections over porches, garages, or rear extensions that age differently from the main roof. These zones can look fine at a glance but behave differently under winter weather. The low-slope areas are especially vulnerable when snow and ice linger longer than they do on steeper roof planes, so you'll want to treat them as separate trouble spots rather than an afterthought to the main roof.
If you are replacing the main roof, plan to evaluate attached low-slope sections at the same time. When a main roof is refreshed but a porch or garage area remains older, leaks can migrate from the low-slope spot into living spaces or attic bays. Have a careful hand-off between contractors, ensuring flashing, edge details, and intersections around low-slope portions are included in the same scope. If the low-slope area is unusually complex or cantilevered, consider a dedicated water barrier or membrane designed for continuous exposure.
Effective prevention starts with vigilant snow and ice management across the whole roof line, not just the dominant plane. Keep drainage paths clear and ensure downspouts flow freely away from foundations. Improve attic insulation and air sealing to reduce warm-air melt along the eaves that refreezes on low-slope sections. Pay special attention to ridge and drip edges where ice dams can form on these zones, and verify flashing transitions where the low-slope connects to the main roof. In Bay City, high-quality underlayment and continuous membrane transitions at the interface help reduce slow leaks that sneak in during long cold spells.
Porches and rear extensions often trap meltwater longer, creating slow leaks that can travel within wall cavities. Look for staining or softened sheathing near these connections after heavy snows. The best practice is to pair a thorough, coordinated inspection of both the main roof and any low-slope sections, with meticulous flashing and a robust drainage plan that accommodates winter linger. After storms, inspect eave lines and flashings for displacement or gaps that could permit moisture intrusion.
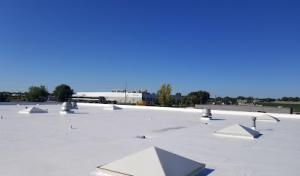
Find specialists in TPO, EPDM, and built-up flat roofing systems for residential and commercial properties.
"Son of a Burch" Roofing & Repair
(989) 313-2796 www.sobroofing.com
502 King St, Bay City, Michigan
4.9 from 29 reviews

Versatile Commercial Flat Roofing
(989) 401-1462 www.versatileflatroofing.com
Serving
5.0 from 8 reviews
In Bay City, roof insurance decisions are strongly influenced by weather-related claim activity tied to wind, hail, and winter snow load. Those conditions create a pattern where insurers scrutinize whether damage is a result of a single incident or long-term wear from repeated seasons. When a storm rolls through, expect a flurry of claims, and the emphasis will be on documenting the exact event and the sequence of damage observed on the roof and eaves.
Homeowners should expect adjusters to request date-stamped photos, damage notes, and contractor scopes that distinguish storm damage from age-related wear. Take clear, timestamped photos of shingles curled or lifted, flashing gaps, ice dam remnants, and any interior signs of leakage near ceilings or walls. Include photos of the entire roof and close-ups of problem spots. Have written notes that map observed damage to specific dates and weather events, and a separate contractor scope that itemizes storm-related repairs versus general replacement due to aging. This clarity speeds up the review and reduces back-and-forth with the adjuster.
Regional Michigan insurance market conditions can affect coverage options and make documentation quality more important before authorizing replacement. Because Bay City sits near Saginaw Bay with lake-effect snow and variable winter storms, policies may differ in how they define covered damage versus wear. Prepare to present a concise narrative linking each claim item to a defined weather event, including any prior repairs and the current condition of structural components, underlayment, and ventilation. The adjuster will weigh both exterior evidence and interior indicators when evaluating the extent of loss and the need for replacement versus repair.
Begin the process promptly after a storm or suspected weather-related issue. Gather the documentation package first: timestamped photos, a detailed damage log, and a contractor scope focused on storm damage versus aging wear. Communicate clearly with the insurer about the event window, the observed water intrusion, and the observed ice dam indicators from the previous season. If a replacement is considered, ensure the contractor's scope aligns with insurer expectations for storm-driven damage, not merely ongoing deterioration. This alignment helps secure decisions that reflect Bay City's winter realities.