Last updated: Apr 19, 2026
Hurricane season runs June through November, and wind-driven rain is the island's constant threat. On barrier islands like this, roof resilience isn't just about looks; it's about staying intact through back-to-back storms and sudden squalls that sweep from the Atlantic. When planning a roof project, choose timing that minimizes exposure to peak heat and tropical downpours. Calmer spring and fall weather offer the best windows for major work, especially if the goal is a complete roof replacement or a high-performance upgrade. If storms threaten, the priority shifts to keeping the home dry and secure until crews can safely complete work without compromising underlayment or attic insulation.
On this coast, every storm tests roof systems for wind uplift, sea-salt corrosion, and bulkhead gutters that need clearing. A robust dry-in strategy matters more than ever. Ensure flashing around chimneys, vents, and skylights is sound and that roof-to-wall connections are secure. Sealants and fasteners should be rated for salt exposure and high wind. Consider temporary measures for emergency dry-ins if a storm is approaching-industrial-strength tarps, sealant touch-ups, and rapid-deploy roof boards can buy critical time without inviting interior damage. If damage is suspected after a storm, document promptly with photos from multiple angles to support insurance claims and repair sequencing.
Local signals show unusually strong demand for storm-damage recovery and insurance-claim help, reflecting the reality that many homes here need post-storm response rather than purely elective reroofs. Build a short list of trusted contractors before the season hits, focusing on those with storm-repair track records and clear communication during crises. Immediate triage should prioritize securing loose shingles, stopping active leaks, and protecting interior spaces with temporary enclosures if necessary. Prompt, organized damage assessment minimizes further vulnerability, and having a pre-arranged plan helps families avoid being run ragged by out-of-town crews and inflated emergency rates.
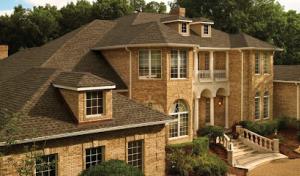
The island's architectural style leans toward higher-end metal and tile systems, both prized for wind resistance and longevity in salt-air conditions. When replacement is planned, select materials with proven coastal performance and coatings designed to resist corrosion and blistering. Metal roofing delivers impressive wind tolerance when installed with proper fasteners and sealants, while clay and concrete tiles offer long service life under grit and salt spray-provided underlayment and battens are compatible with the climate. Synthetic or composite shingles can bridge cost and performance for barrier-island homes that need quick, durable protection. Slate, while long-lasting, requires precise framing and mounting to resist salt-laden gusts on exposed ridges.
Seasonal checks should target fastener tightness, corrosion on metal edges, and the integrity of ridge caps. Clean debris from eaves and rain screens to prevent moisture buildup behind saturated underlayment. Verify attic ventilation remains balanced to avoid heat buildup that can accelerate deterioration after a storm. Regular inspections after a storm event help identify lift, ridge damage, or compromised decking before minor issues grow into costly failures. On this coast, proactive maintenance keeps a roof resilient through back-to-back weather and preserves the home's resort-style curb appeal even after the harshest season.
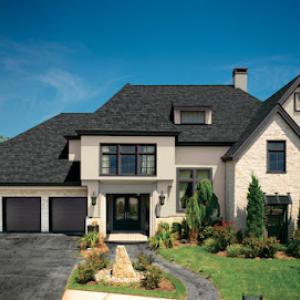
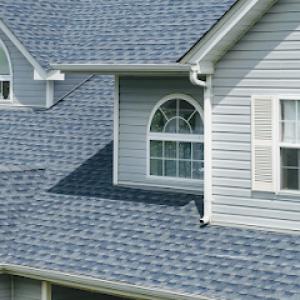
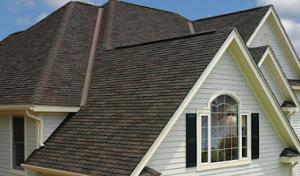
Hilton Head's dominant roof mix includes asphalt shingles, metal, clay tile, concrete tile, synthetic/composite shingles, and slate, reflecting both coastal performance needs and upscale island architecture. Your decision hinges on how a roof will look atop resort-style homes while standing up to salt spray, high humidity, and strong coastal storms. If the primary goal is a blend of curb appeal and reliable performance, start by matching the roof style to the house's silhouette: steeper, prominent profiles pair well with tile or metal, while a more modest roofline can still carry durable asphalt or synthetic options. The regional truth is that the right material often comes down to how it handles wind-driven rain and the salt-laden air that corrodes fasteners and flashing over time.
Exposed metal components deserve special attention because salt air accelerates corrosion. Choose metals with proven coastal performance, such as aluminum or galvalume-coated steel, and verify fasteners are stainless steel or graphite-coated to resist rust. A well-sealed edge, solid eave detailing, and continuous underlayment help prevent wind-driven water intrusion during hurricane seasons. For homes with architectural prominence, standing-seam metal offers clean lines and reliability, but ensure panels are rated for uplift and corrosion resistance. Regular inspection of screws, clips, and flashing is prudent, particularly after heavy storms when salt spray can find its way into microcracks.
Clay tile and concrete tile bring enduring curb appeal to steeper roofs typical of resort and coastal residential construction. Clay tile delivers natural resistance to heat and colorfastness, while concrete tile is often more economical and can be molded to mimic traditional clay looks. For Hilton Head, ensure tiles are rated for wind speeds encountered during hurricanes and that underlayment and battens are properly installed to prevent water infiltration if a tile becomes dislodged in a storm. Tile roofs benefit from meticulous maintenance of ridge cap and flashing where water can accumulate, and that solar exposure is balanced with appropriate underlayment to cope with humidity.
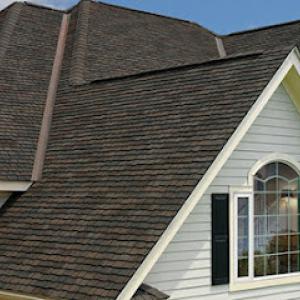
Asphalt shingles remain common for their balance of cost and performance, and modern synthetic/composite shingles offer improved wind uplift resistance and lighter weight. In the island setting, look for products with enhanced resistance to salt spray and UV degradation, plus integrated sealing adhesives for high-humidity environments. For taller, visually dynamic roofs, synthetic options can mimic slate or tile while delivering easier maintenance and faster repairs after storm events. Regardless of material, ensure a robust flashing plan around hips, valleys, chimneys, and vent stacks, as these are typical weak points exposed to soak-and-dwell conditions on barrier islands.
Any chosen roof type should be paired with a proactive maintenance routine. After a hurricane, inspect for loose or missing components, check fasteners for corrosion, and verify sealing around penetrations. Tile and metal roofs often reveal underlying concerns first, so targeted post-storm checks focusing on flashing integrity and uplift-prone areas will speed recovery and minimize interior damage. On this island, the aesthetic and structural goals align: select a material that honors the architecture, withstands salt and wind, and remains serviceable when storms pass.
Coastal South Carolina is an elevated wind and hail claim market, and that reality plays out in every storm season on the island. You often encounter insurers who scrutinize claims more closely after a hurricane or strong tropical system, so having thorough, dated documentation helps move things along. Collect age records that show when the roof was installed or last replaced, keep date-stamped photos before and after events, and assemble storm documentation such as wind speeds, rainfall, and any municipal reports. These details can shape how your claim is evaluated and how repairs align with your policy.
Some insurers have tightened coverage availability in high-wind coastal zones, which can affect whether you pursue repair, full replacement, or an upgraded wind-resistant system. In practice, this means a single weather event can lead to multiple repair decisions that ripple through your home's overall resilience. A repair that once seemed sufficient may now be revised to a higher-grade solution if the carrier views wind exposure or roof age as increasing risk. The decision hinges on the policy language, the roof's installed components, and the credibility of the storm-damage narrative you present along with your contractor's assessment. It's not simply about fixing shingles; it's about how the repair fits your home's long-term reliability in a barrier-island environment.
Wind-mitigation credits may be available depending on carrier and policy, making installation documentation and final inspection records more valuable in this market. If your insurer offers these credits, you'll see the practical impact in the form of improved coverage efficiency and potential premium adjustments over time. To position yourself for a favorable outcome, gather evidence that demonstrates your roof's current wind resistance and the durability of any upgrades. Documentation should reflect the roof's age, the construction details of fasteners and underlayment, any hurricane-rated components, and, crucially, the results of a qualified wind-mitigation assessment. A clear, organized file speeds up the claim review and helps the adjuster verify that the proposed mitigation aligns with policy expectations.
In the wake of a storm, avoid rushing into quick fixes that may complicate future claims. Talented local roofers who understand Hilton Head's climate-salt air, heavy summer rain, and hurricane exposure-can help you distinguish what needs immediate attention from what can be staged. Before signing off on replacements or upgrades, request written confirmations of the work scope, the expected performance benefits, and how the installation will be documented for future claims. After completion, insist on a final inspection report and keep both the contractor's notes and the insurer's approval documents in one secure place. This discipline reduces surprises when the next storm season arrives and keeps your roof's narrative consistent for any future coverage questions.
JW Roofing
(854) 683-0827 www.roofsbyjw.com
11 Palmetto Pkwy #106, Hilton Head Island, South Carolina
5.0 from 724 reviews
Whether your roof needs repairs after a heavy storm or you're looking to install a new roof, trust the experts at JW Roofing for all your roofing needs. Our friendly and professional team is fully licensed and insured to help you. We work on both commercial and residential roofs, spreading our knowledge and expertise throughout Hilton Head Island, South Carolina and the surrounding areas of Bluffton, Beaufort County, Jasper County, Charleston, down through the Savannah, Georgia area..Our teams use a wide variety of strategies, materials, and techniques to repair and install roofs.

Alliance Roofing
(843) 689-9400 allianceroofingpros.com
132 Island Dr, Hilton Head Island, South Carolina
4.9 from 95 reviews
Alliance Roofing has proudly served Hilton Head, Bluffton, Okatie, and the Lowcountry since 1995. As an Owens Corning Platinum Preferred Contractor, we provide expert roof inspections, repairs, and full replacements with trusted craftsmanship and 5-star service. From storm damage to aging shingles, our team delivers solutions that protect your home and give you peace of mind. We also offer professional siding and painting services to refresh your home’s look, enhance curb appeal, and add long-term value. Alliance brings the same dedication and quality that has made us the Lowcountry’s trusted choice for decades.

South Shore Roofing
(843) 258-4311 www.southshoreroof.com
6 Oleander St, Hilton Head Island, South Carolina
5.0 from 48 reviews
South Shore Roofing has more than 50 years of experience in the roofing industry and the best roofing team in Hilton Head, SC. Based on our experience, knowledge, and skills we can guarantee your premiere quality roofing services, so don’t hesitate to contact us today! We deal with quality products and materials for both residential and commercial roofing, conduct efficient roof replacement, roof repair, and roof installations, and offer free roof estimates.
RainTight Roofing
(843) 683-0199 raintight-roofing.com
315 Gumtree Rd, Hilton Head Island, South Carolina
5.0 from 44 reviews
Rain Tight Roofing's Owner is a 3rd Generation Roofing Contractor. We have an impeccable track record on Hilton Head Island with references to back it up. "We believe in doing it right the 1st time ! " We are a Local Roofing Contractor on Hilton Head Island and Not a Storm Chaser! Here since 2006 and will be here when the other guys are gone. "Poor quality is remembered long after low prices are forgotten ! " You’ve tried the rest now try the best!!

Quinn Roofing & Construction
(843) 279-3476 quinnroofingandconstruction.com
10 Lemoyne Ave Unit 509A, Hilton Head Island, South Carolina
5.0 from 63 reviews
Quinn Roofing & Construction provides roof installation, roof repair and gutter installation to the Bluffton and Hilton Head Island communities.
Hilton Head Roofing Company
(843) 258-8446 www.hiltonheadroofingcompany.com
23 Main St, Hilton Head Island, South Carolina
5.0 from 35 reviews
Looking for a reliable roofing contractor in Hilton Head, SC? Then Hilton Head Roofing Company is the one you're need. We provide commercial and residential roofs and repairs to meet your unique needs. We have the best equipment and our roofers have decades of experience to be sure that your home stays safe and dry. We offer free roof inspections to ensure that your roof is sustained at optimal levels. Our main priority is to take care of our great clients. Whether you need a new roof or need help picking the right shingles, we are always here to help. We also provide gutter repairs and servicing. You will be able to rest well knowing that Hilton Head Roofing Company is there for you so you to enjoy your house or office year round.
Your Hilton Head Roofers
(843) 258-8234 yourhiltonheadroofers.click
890 William Hilton Pkwy, Hilton Head Island, South Carolina
5.0 from 32 reviews
Looking for a reliable roofing company on Hilton Head Island? Your Hilton Head Roofers is here to help. We specialize in both residential and commercial roofing services, backed by years of experience. Our complimentary roof inspections can identify potential issues before they become major problems. From minor repairs to complete roof replacements, our skilled roofers handle it all with precision and expertise. In the event of storm damage, you can count on us for swift and reliable repairs. We understand the urgency and provide prompt assistance to restore your home. Trust Your Hilton Head Roofers to protect your investment and keep your property safe for years to come.

JCB Roofing / HHI, SC
(843) 342-2255 www.jcb-roofing.com
127 Jonesville Rd, Hilton Head Island, South Carolina
4.8 from 50 reviews
JCB Roofing, based in Hilton Head Island, SC, is a professional roofs & ceilings provider specializing in commercial roofing, TPO roofing, and roof coating services. We deliver durable, high-quality roofing solutions for commercial properties, ensuring long-lasting protection and energy efficiency. Our experienced team focuses on precision, reliability, and tailored service, handling every project with professionalism and care. Committed to superior craftsmanship and client satisfaction, JCB Roofing provides expert guidance, competitive solutions, and trusted support, helping businesses maintain secure, efficient, and well-maintained roofs.
Armor Exteriors
(888) 276-6799 www.armorexteriors.net
2 Corpus Christi Pl #200, Hilton Head Island, South Carolina
4.9 from 17 reviews
With over two decades in the industry we are experts in every roofing and siding system. This knowledge & experience lends itself to "out of the box thinking" and the ability to engineer projects to fit any need. Our entire staff is customer service forward, we provide an experience for our customer, not just a service.
Designer Roofing & Restoration
(843) 505-8647 www.designerroofs.com
44 Royal James Dr, Hilton Head Island, South Carolina
5.0 from 7 reviews
Designer Roofing & Restoration, established in 2014, is the go-to roofing contractor in Hilton Head Island, SC, and nearby areas. With over 25 years of industry experience and a commitment to quality, their skilled roofers have served more than 1000 customers. Specializing in metal roofing and repairs, Designer Roofing & Restoration prioritizes using top-tier products and materials to ensure durability and performance. They consistently deliver exceptional results, exceeding customer expectations with every project.
Roofer in Hilton Head
(843) 290-4753 rooferinhiltonhead.com
374 Spanish Wells Rd O, Hilton Head Island, South Carolina
5.0 from 7 reviews
We are a commercial and residential roofing company located on Hilton Head Island. We offer roofing, siding, gutter, and skylight services. Call us today for a free consultation. (843) 290-4753

Roof Care
(843) 683-0551 roofcarellc.net
188 Marshland Rd, Hilton Head Island, South Carolina
5.0 from 5 reviews
At Roof Care, our commitment revolves around securing your residential or commercial space through superior roofing services. Backed by extensive industry experience, we pride ourselves on consistently delivering excellence, reliability, and unparalleled customer satisfaction. Whether conducting thorough roof inspections, installing durable metal roofs or asphalt shingles, or safeguarding your property with top-notch gutter installations, we provide a comprehensive suite of services to ensure the protection and longevity of your home or business.
Reroof projects on this barrier island are handled through Beaufort County rather than a standalone island department, so you'll work through the county development services process. This means planning, permits, and inspections all ride through the same county system that covers the broader Lowcountry. On Hilton Head Island, the local housing stock-everything from coastal shingle cottages to resort-style homes with metal or tile accents-relies on this county pathway for reroof approvals and documentation.
Beaufort County requires a building permit for any re-roof, so before lifting shingles or tiles, confirm your project with the county development services portal. The portal is the hub for submitting your reroof plans, noting the roof type, fastener details, underlayment, and weather-resistive barrier approach. It's helpful to upload product spec sheets and installation diagrams from the chosen roof system, since the coastal environment around the island places a premium on wind-updated details and water intrusion prevention. Expect the permit to reflect the new roofing material, scope of work, and any structural considerations if deck or eave work accompanies the reroof.
Inspection during a Hilton Head reroof typically includes a rough-in where applicable, followed by a final inspection. The final focuses on key coastal-application specifics: proper underlayment continuation to all penetrations, a precise nailing pattern tailored to the selected material, and a weather-resistive barrier installation that completes the line of defense against salty air, humidity, and hurricane-driven rain. If the project uses metal or tile systems, be prepared for inspection checkpoints that verify fastener corrosion resistance, sealant compatibility, and proper edge detailing to withstand salt spray. The county expects work at logical stage completion, with corrections documented and re-inspected if needed.
Coordinate with a contractor who understands the local wind loads, salt exposure, and seasonal storms. In hurricane-prone months, ensure temporary stabilization measures are in place during the permit window and that weather-exposed openings are protected to minimize interior exposure. When planning inspections, align the schedule with typical boat traffic or municipal response times to avoid delays. Since the county portal is the official channel, keep your digital plan submittals clear and complete to minimize back-and-forth and expedite your re-roof through the Beaufort County system.
Local cost ranges run about $350-$750 per square for asphalt shingles, $900-$1500 for metal, $800-$1800 for clay tile, $700-$1500 for concrete tile, $450-$900 for synthetic/composite shingles, and $1500-$3500 for slate. These figures reflect the island's mix of resort-style homes and higher-end coastal designs, where material choice drives a sizable portion of the total project. On many properties, a sharp edge in price comes from matching existing finishes and ensuring long-term performance in salt air and heavy rains.
Costs on Hilton Head can rise when storm demand surges after tropical weather, as emergency response and reroof scheduling become more competitive on the island. If a storm event creates a line of urgent replacements, availability for crews and delivery of materials can tighten, pushing both labor and material prices higher for a short window. Planning ahead for off-peak storm seasons can help lock in steadier pricing and smoother scheduling.
Higher-end coastal home designs and the prevalence of metal and tile systems can push projects above basic shingle pricing, especially when roof geometry and visible architectural detailing are involved. Complex hips, dormers, or curved parapets require additional detailing, custom fasteners, and precision in color matching. On Hilton Head, a roof with multiple elevations or ornate trim will typically cost more per square than a straightforward, simple-slope replacement, even when the underlying material is the same.
Start with a material match that respects salt-air durability and local wind demands. If choosing tile or metal, budget for integrated underlayment and fasteners designed for coastal service. For any high-end material, expect longer lead times for specialized crews; factoring this into the schedule helps avoid last-minute price spikes and rushed decisions during storm season. Build in a contingency for visible detailing and color coordination, which is common in this market.
Get a clear picture of your project costs upfront - no commitment required.

South Shore Roofing
(843) 258-4311 www.southshoreroof.com
6 Oleander St, Hilton Head Island, South Carolina
5.0 from 48 reviews
Your Hilton Head Roofers
(843) 258-8234 yourhiltonheadroofers.click
890 William Hilton Pkwy, Hilton Head Island, South Carolina
5.0 from 32 reviews
RoofTech Construction
1 Corpus Christi Pl Suite 101, Hilton Head Island, South Carolina
5.0 from 2 reviews
Spring and fall are favored for reroofing because they are drier and cooler than peak summer conditions. In a barrier-island setting, those shoulder seasons often provide more predictable schedules and better drying times after tear-off. Plan around the typical lull in tropical activity: you'll have fewer extended downpours and more stable mornings for a clean tear-off and a solid dry-in window.
Hilton Head's hot, humid subtropical climate brings heavy rain and frequent afternoon thunderstorms in summer, which can interrupt tear-off and dry-in schedules. If a storm pops up mid-week, be prepared to pause work and secure tarps and open joints. Contractors on the island often work in longer stretches during windows of several dry days, then pause to allow humidity to drop and roof decking to acclimate before tile or metal applications.
Tile and metal installations respond differently to climate shifts. For concrete and clay tiles, occasional cold snaps in winter can affect setting and cure times, so flexible scheduling around cool spells helps avoid micro-cracking or delayed adhesion. Asphalt and synthetic shingles are more forgiving with humidity but can suffer from rapid drying during extreme heat, which can complicate nail adhesion and sealant cure. If a storm risk looms in late summer, consider advancing or delaying segments to align with a dry-in forecast.
Before work begins, inspect the roof line for loose fascia, damaged underlayment, and wind-drifted debris that could complicate a rush tear-off. Confirm that the chosen roofing system aligns with the island's wind exposure and salt air; certain metal and tile systems perform better under storm loading. Have a plan for protecting landscaping and outdoor living spaces from overspray, ladders, and debris during the tear-off and installation phases.
Wind-driven coastal rain on the island makes flashing details more critical than inland markets, especially around penetrations where pipes, vents, and transitions meet the roof plane. A small gap or misalignment around a chimney, dormer, or skylight can funnel water right into living spaces during a strong squall. Pay close attention to step flashing, end dams, and apron details where shingles or tiles meet roof-to-wall transitions. In storms, fastener corrosion can loosen edge materials, inviting leaks that creep along eaves and into attic spaces.
Skylights show up frequently in the local service mix, and the signal for work is persistent. Leaks around skylight assemblies often come from fatigued glazing, failing seals, or poorly flashed curbs. In this coastal climate, wind-driven rain can grab the canopy and push water around the seal lip. If you notice condensation, staining, or musty odors near a skylight, have the flashing and curb checked-often the cure is a reseal, a curb replacement, or improved flashing transition to the surrounding roof material.
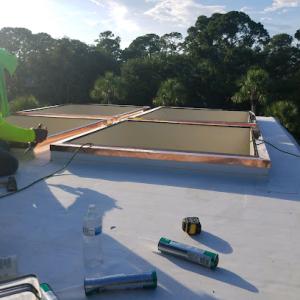
Flat and low-slope sections are common on resort-style homes here, and coastal rain tests those drainage and membrane details more than in drier inland markets. Look for ponding, inadequate primary drains, and exposed laps on the membrane. Over time, debris buildup blocks flow and accelerates regional wear. This is where drain scuppers and edge details fail first in a hurricane-season barrage. Regular inspection after heavy rain and before hurricane season helps catch blisters, edge tears, or seam failures before they spill into the attic.
Proactive checks after storms help prevent escalation; address issues promptly to minimize damage.
Find contractors experienced in skylight installation, flashing, and leak repairs to bring natural light into your home.

JW Roofing
(854) 683-0827 www.roofsbyjw.com
11 Palmetto Pkwy #106, Hilton Head Island, South Carolina
5.0 from 724 reviews
Alliance Roofing
(843) 689-9400 allianceroofingpros.com
132 Island Dr, Hilton Head Island, South Carolina
4.9 from 95 reviews

RainTight Roofing
(843) 683-0199 raintight-roofing.com
315 Gumtree Rd, Hilton Head Island, South Carolina
5.0 from 44 reviews