Last updated: Apr 19, 2026
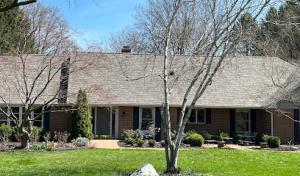
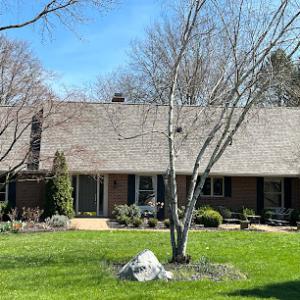
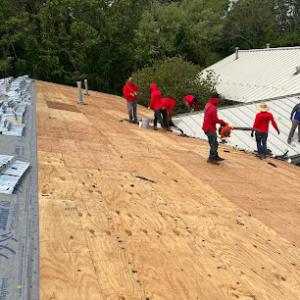
Lake Michigan's influence on the shoreline means roofs in this area face a relentless cycle: heavy lake-effect snowfall followed by thaw and refreeze. Snow piles up irregularly along the bluff and near the water, creating uneven loads that stress decking, underlayment, and flashing. When melt runs back toward eaves and refreezes, ice dams form, lifting shingles and forcing moisture under the roof. That setup is a fast track to interior leaks, warped fascia, and accelerated wear on gutters, vents, and vent pipes. The clock is ticking: without fast, targeted action, hardware near the edges becomes the first casualty, and repairs quickly snowball into bigger problems.
You should treat ice dam formation as an urgent warning, not a nuisance. Look for icicles and thick ice along eaves early in thaw cycles, especially on lower roof lines and near roof penetrations. If attic heat shows up as warm ceiling patches or you notice moisture staining after a melt, address it immediately. In areas with bluff exposure, flashing around chimneys, skylights, and vent stacks becomes the weak link first, often signaling that the roof isn't shedding meltwater fast enough to keep it from backing up at the eaves. The freeze-thaw rhythm around the lakefront makes these problems recurring rather than one-off incidents, so recurring maintenance is the smart plan.
Prevention here isn't guesswork; it's a set of concrete steps tuned to Saint Joseph's climate. Start with insulation and attic ventilation. A well-insulated attic reduces heat escaping to the roof, which means less snow melting into a drippy, dam-building waterfall along the eaves. Ensure soffit vents are clear and soffit-to-ridge ventilation is balanced to promote consistent cold roof surfaces during winter. Clear the roof overhangs of debris so meltwater can move freely to gutters, and upgrade seal strips around vents and flashing to resist repeated freezing and thawing. When a storm rolls in and you anticipate a heavy snow event, you want a plan to safely remove excess snow from overhangs. Do not rely on a storm window spanning several days-timely action reduces the chance of ice dam formation taking hold.
Homes in Saint Joseph often need roof work planned outside the snowy season, with the drier late spring through early fall window being the most reliable replacement period. If a roof is aging or shows repeated damage from dam-related moisture, schedule major repairs or replacement for late April through September when drying conditions depress moisture intrusion risks and allow for sound sealant and flashing installation. This window also minimizes the risk of weather-driven interruptions that could push critical tasks into a second winter. If you wait for the next snowfall to reveal the problem, you risk escalating damage that compounds more quickly in these lake-effect seasons. Plan ahead, protect the vulnerable eave lines first, and coordinate with a roofer who has experience navigating bluff-edge homes and shoreline exposure. Your best outcome rests on proactive planning during the dry months, followed by vigilant, season-long attention to flashing integrity and vent penetrations as winter approaches.
Residential roofs in this area endure a unique mix of winter wind events, summer thunderstorms, and periodic hail that can produce both sudden damage and disputed cosmetic-versus-functional damage claims. The lake-effect dynamics matter: gusts can drive rain under roofing edges, and hail can leave pinpoint dents or micro-cracking that looks minor at first glance but signals deeper issues after freeze-thaw cycles. When a storm rolls through, expect gutters to bear the first brunt, with shingles lifting or tabs loosening in vulnerable spots. Understanding this pattern helps you separate surface blemishes from structural concerns, which matters when discussing claims with insurers.
Michigan insurers in this market typically stay accessible, but they rely on solid documentation to process a claim smoothly. Date-stamped photos are essential, ideally taken immediately after the storm and then after any significant wind or hail event. Elevation-specific damage notes help distinguish issues caused by wind-driven effects from pre-existing wear. Roof-age information is also useful to show the overall condition baseline. For hail events, focus on dented or scored shingles, granule loss in gutters and downspouts, and any asphalt shingle wear that reveals the substrate. A simple, consistent photo set showing the roof from at least three angles per side, plus close-ups of edge flashing and skylights, can prevent back-and-forth requests that slow a claim.
Because Saint Joseph sees both wind-driven rain and hail activity, homeowners benefit from documenting gutters, skylights, flashing, and detached shingle tabs immediately after storms. Start with the gutters: check for crush points, loose hangers, and any obvious granule accumulation along the downspouts. Note any standing water along the eaves or near the foundation that could indicate improper drainage or hidden decking moisture. Inspect skylights for cracks, loosened seals, or condensation appearing between panes. Flashing at chimneys, vents, and valleys deserves special attention-lifted or corroded flashing can expand with freeze-thaw cycles and create unseen leaks. If detachments or liftings are noticed, photograph them with a ruler or known object for scale, and mark the approximate location on a roof plan for your insurer or adjuster.
A roofing professional can provide a critical second opinion on whether hail damage is cosmetic or functional. Look for local experience with your roof type-whether asphalt shingles, metal, tile, or synthetic options-and ask about wind-driven moisture scenarios common to bluff and shoreline homes. A pro can identify subtle issues such as moisture intrusion behind fascia boards, compromised underlayment, or flashing failures that may not be obvious from the ground. Insurers may request an independent adjuster, so having a trusted local roofer who can coordinate with the adjuster and provide a detailed damage map, including photos, notes, and age of the roof, can streamline the process and reduce back-and-forth.
A short dry-season window in this climate makes timely maintenance essential. Schedule pre-season inspections to catch wind-driven or hail-related wear before the next freeze. Address missing shingle tabs, uplifted edges, and flashing wear promptly to minimize moisture intrusion during early-season storms. Regular gutter cleaning and downspout checks help prevent water backup that compounds roof damage in freeze-thaw cycles. Keeping a documented, storm-ready photo library updated after each significant event builds a clear, progressive claim narrative should an insurer review be needed.
Find local contractors experienced in assessing and restoring roofs after hail, wind, and severe weather events.

CW Roofing
Serving
5.0 from 31 reviews
Roofing Contractor specializing in full roof replacements with asphalt shingles in Benton Harbor, Saint Joseph, Stevensville, and all of southwest Michigan/Northern Indiana.

Modern Roofing & Construction
(269) 923-9223 modernroofingandconstruction.com
Serving
4.9 from 66 reviews
Modern Roofing and Construction is a veteran owned and operated company out of Southwest Michigan. With over 25 years of experience we will provide the best experience for you from start to finish!

Lakeside Roofing Solutions
Serving
4.7 from 45 reviews
Lakeside Roofing Solutions is the leading roofing contractor in Michigan, offering top-notch residential and commercial roofing services. Our team of skilled professionals provides expert roof installation, repair, and replacement services, ensuring your property is well-protected from the elements. Additionally, we offer gutter installation and repair services to keep your property's drainage system functioning optimally. Choose Lakeside Roofing Solutions for all your roofing needs and experience unmatched quality and customer satisfaction.
DWB Roofing
Serving
5.0 from 78 reviews
Specializing in residential & commercial roofing with over 30 years of experience in the construction industry.
Bing's Construction
(269) 470-8482 www.bingsconstructionllc.com
Serving
4.7 from 73 reviews
Locally owned and operated construction company that has been serving Southwest Michigan for over 25 years. We provide total roof replacements and repairs for residential, commercial and multi-story properties. We love what we do and we guarantee quality craftsmanship you can depend on. We are dedicated to providing you the best quality products and services to ensure complete satisfaction.

Roof Wiz
Serving
4.9 from 163 reviews
Your roof is an important important parts of your home. It protects you, your family and the rest of your home from the elements. No one will care more about your roof than the experts at Roof Wiz. We offer a range of local roofing services throughout Southwest Michigan and Northern Indiana. You can depend on us for any kind of roofing work you need, from yearly roof inspections and storm damage roof repairs to full roof replacements.
Mighty Dog Roofing of Benton Harbor
(269) 231-8953 www.mightydogroofing.com
Serving
5.0 from 94 reviews
Mighty Dog Roofing specializes in Roofing, Storm Damage Repair, Siding and Windows. A locally owned and operated company is your choice for servicing St. Joseph. Mighty Dog Roofing is the most trusted name in the roofing industry, offering state-of-the-art 25 point inspections using our GoLive and Drone Superscan technology. This technology, matched with the highest quality products and superior workmanship, allows you to have peace of mind on the most important investment you have - your home.

Hass Roofing
Serving
5.0 from 3 reviews
Family Owned & Operated Since 1970 It's hard to believe its been more almost five decades since Ron Hass started helping homeowners throughout Berrien & Cass County! Throughout the years Ron has installed new roofs, done roof repairs or taken care

Sherriff Goslin Roofing: Benton Harbor
(269) 926-4240 www.sherriffgoslin.com
Serving
4.4 from 45 reviews
Specifically serving the Benton Harbor, St. Joseph, and Coloma areas since 1939, Sherriff Goslin Roofing Benton Harbor is a leading roofing contractor that specializes in providing high-quality, professional roofing services for residential homes, farm buildings, barns, and churches. Certified as an Atlas Pro® Diamond Level Contractor, the company offers expert workmanship, free roof inspections, and free roof estimates. When looking for trusted, reliable services, Sherriff Goslin Roofing Benton Harbor is the go-to roofing contractor for the best roof repairs and roof replacements the area has to offer.

Dennison Roofing & Gutter Toppers
(269) 371-4685 www.dennisonexteriorsolutions.com
Serving
4.6 from 110 reviews
We specialize in Roofing, Siding, Seamless Gutters & Gutter Topper, Soffit & Fascia and Replacement Windows.
Hired Guns Roofing
Serving
4.9 from 56 reviews
We strive for a personalized approach to customer service and satisfaction. All roofing projects, are planned and executed to the highest of standards. JD
Future Construction
(269) 213-5993 www.futureconstructionofswmi.com
Serving
4.7 from 41 reviews
Future Construction has been delivering superior roofing services as one of the top roofing companies in Bridgman, MI and surrounding areas for over 45 years. As a family-owned and locally operated company, we understand the roofing needs of our community. We're proud to be licensed, insured, and certified by industry leaders like CertainTeed, IKO, Owens Corning, and GAF. Whether you need a new roof, repairs, or emergency services, our team of roofers is here to protect your most valuable asset with our expertise and commitment to quality. Request a free estimate today and see why we're some of the top roofing contractors around.
The lake-effect pattern that hugs the bluff and shoreline means winter crews up here face repeated freeze-thaw cycles, wind-driven snow, and occasional rapid temperature swings. Ice dam prevention isn't a one-time fix; it's a seasonal habit, starting with proper insulation and ventilation to keep roof decks close to room temperature. In practical terms, that translates to attentive attic insulation, venting that won't clog with blowing snow, and roof edge details that allow melted water to flow away freely. For homes perched near the bluff, a little extra attention to underlayment along eaves and along rake edges pays off when a storm rolls in from the lake.
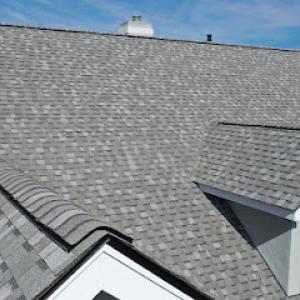
Asphalt shingles are the dominant practical choice around here because they balance initial cost with ease of repair after wind, hail, and winter weather. They tolerate a wide range of conditions on gambrel, Cape Cod, and brick veneer homes alike, and you can field-repair damaged areas without special equipment. When winters are heavy, consider investing in a higher-perimeter nailing strip and a wind-rated package, plus ridge venting that matches the attic's needs. The key in a lakeshore climate is ensuring adequate overhangs and drip edges to guide meltwater away from fascia and siding, reducing opportunities for moisture to infiltrate at the eave line during thaw cycles.
Metal roofing draws interest for its snow-shedding characteristics, which can materially ease the burden of heavy lake-effect snowfall. But the detailing at eaves, the selection of fasteners, and condensation control become especially important near the water. In Saint Joseph, you'll want a metal assembly with a proven ice-dam solution at the eave, a robust sealant strategy for fasteners, and a corrosion-resistant finish for coastal exposure. Condensation control under metal panels matters in colder months, so consider a reflective, vented underlayment system and careful attic moisture management to prevent moisture from migrating into decking or insulation.
Clay and concrete tile appear in the local material mix, but their weight and freeze-thaw exposure demand careful structure and underlayment decisions. In homes near the bluff, ensure the roof structure can handle tile weight, especially when balconies or overhangs introduce additional load. Freeze-thaw cycles can crack or deteriorate tiles if movement isn't addressed. The best approach combines a reinforced roof deck, a high-performance underlayment with proven moisture resistance, and a detailed ventilation plan to minimize ice dam formation from underneath. Where tiles are used, specify proper fastening patterns to withstand wind where shoreline storms push gusts along the water.
The cost landscape for a roof replacement in this area is tightly tied to a short preferred installation window between late spring and early fall. Local pricing tends to compress during those drier weather windows, so scheduling ahead matters. When a harsh winter season looms, Lake-effect weather can push more homeowners toward full re-roofs, which in turn creates seasonal labor pressure and tighter scheduling. That interplay can translate into longer waits for crews and higher availability costs as demand spikes.
Material choice drives cost in ways that align with Saint Joseph's housing stock and climate. Asphalt shingles remain the most common entry point for many homes, with a typical range around 350 to 650 USD per square. Metal roofing, favored by bluff-side homes for its wind resilience, runs roughly 700 to 1200 USD per square. If clay or concrete tiles are considered, expect premium pricing, commonly 1400 to 2600 USD per square for clay and 900 to 1600 USD per square for concrete, reflecting heavier decking and specialized installation, which can be necessary on older structures. Wood shingles or shakes span about 600 to 1100 USD per square, while synthetic or composite shingles offer a mid-range option at roughly 500 to 900 USD per square. In practical terms, a residential 1,000-square-foot replacement translates to about 10 squares, so costs scale accordingly.
Seasonality and scheduling have real consequences here. The dry-season window can compress, and a late frost or rapid melt can complicate underlayment and flashing work. When planning, build in flexibility for a few weeks of weather-driven delays and confirm that crews can arrive in the first weeks after that window to minimize exposed roof time. If the home is older, the budget should anticipate added expenses for ventilation upgrades, decking repairs, or flashing replacement to satisfy final inspection expectations. Those upgrades are common on aging homes with compromised rafter spacing or deteriorated decking, and they can push the total project cost beyond the basic material and installation numbers.
Ultimately, a Saint Joseph roof replacement balances material choice, seasonal timing, and the condition of underlying structure. Planning with those realities in mind helps prioritize essential upgrades without overstretching the budget during the late spring-to-fall rush.
Get a clear picture of your project costs upfront - no commitment required.

Sherriff Goslin Roofing: Benton Harbor
(269) 926-4240 www.sherriffgoslin.com
Serving
4.4 from 45 reviews

A full roof replacement in Saint Joseph typically requires a permit through the City of Saint Joseph Building Department. The permit process is not a formality to check a box; it ensures that the work complies with local building codes designed to handle Lake Michigan's winter stress, wind, and freeze-thaw cycles. Expect a review that looks at roof geometry, material type, and drainage details to minimize ice dam risk and moisture intrusion. Starting without the permit can trigger fines, forced uncovering of work, and delays that leave you with a mid-winter compromise you did not plan for.
The city reviews roofing permits and commonly requires inspections after underlayment or installation stages and again at final completion. Those staged checks matter in a climate where a single misstep in ventilation, attic air sealing, or underlayment quality can cascade into freeze-thaw damage and moisture migration. Plan your project around these visits and coordinate with your contractor to ensure access, material verification, and that the system will perform under typical winter loads. Missing an inspection window can push your schedule into unsafe winter weather and extend the project beyond the dry-season window.
Saint Joseph permit review may also involve ventilation considerations, which can affect scope on re-roof projects rather than simple tear-off-and-replace assumptions. If the attic is under-ventilated or if new or altered eave and soffit intakes are needed, the inspector may require adjustments to insulation, baffles, or vent placement. This is particularly relevant when the roof line interacts with bluff or shoreline exposures, where proper airflow helps control moisture buildup and ice dam formation. Communicate clearly with the builder about planned venting strategies, and be prepared for modest changes to the plan to satisfy both the permit reviewer and the house's long-term performance against winter weather.
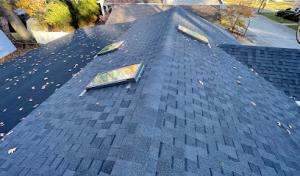
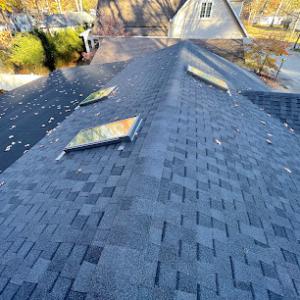
In a shoreline town with Lake Michigan influences, wind-driven rain and freeze-thaw movement make skylights, chimneys, and wall-to-roof transitions common leak investigation points. The combination of rapid temperature swings, blowing snow, and sharp edges near the bluff concentrates stress on flashing and sealants, so these penetrations deserve extra scrutiny after every heavy storm. Winter snow buildup followed by thaw can expose weak flashing details around skylights faster than on simpler roof planes, leading to interior drips that surprise homeowners who assumed the roof was handling winter just fine. In Saint Joseph, the local contractor market shows unusually strong skylight service activity, indicating that homeowners frequently need repairs around these penetrations. Those visits often reveal aging or undersized flashing, sunken fasteners, or deteriorated sealants that were never intended to endure repeated freeze-thaw cycles.
When inspecting skylights and their surrounds, look for rusted or popped nails along the drip edge, loose or cracked curb flashing, and gaps where chimney bases meet roof planes. Ice dam formation near skylights is not just an aesthetic concern; it can force water under the flashing and behind siding, where it hides until a thaw widens the damage. Pay attention to valleys and transitions where flashing meets vertical walls; those joints experience the most movement during freeze-thaw and are common leakage paths. If staining appears on ceiling drywall under a skylight, or if you notice condensation on the interior glass during cold snaps, treat these as urgent prompts to reseal or reevaluate the flashing details.
Coordinate seasonal checks that coincide with the lake-effect rhythm: late fall prep before snow, then mid-winter inspections if a thaw followed by a new snowfall occurs. Have a skilled roofer reflash skylight curb joints with corrosion-resistant materials and ensure seals are properly gapped to accommodate expansion and contraction. Consider upgrading vulnerable wall-to-roof transitions where the wall plane meets the skylight framing, and keep drainage surfaces clear of debris so meltwater moves away from penetration points rather than pooling against them. Regular maintenance is the most reliable defense against leaks that quietly grow from small flashing flaws.
Find contractors experienced in skylight installation, flashing, and leak repairs to bring natural light into your home.

Modern Roofing & Construction
(269) 923-9223 modernroofingandconstruction.com
Serving
4.9 from 66 reviews
Saint Joseph sits in a Michigan insurance environment where hail and wind claims are active enough that adjusters often look closely at roof age, maintenance history, and storm timing. That heightened scrutiny means keeping a straightforward maintenance log and noting any repairs as they occur can smooth the path when a claim is filed after a winter event or a mid-winter windstorm. Material aging, especially on roofs exposed to lake-effect elements, matters more than a generic age rating, so documentation during routine inspections helps set the baseline for future claims.
Unlike hurricane-stressed insurance markets, coverage access is comparatively stable here, but claim success still depends heavily on clear photo documentation and prompt reporting. When a storm hits, take wide exterior shots of the entire roof and close-ups of any damage, including gutters and flashing. Date-stamped digital photos are invaluable. If water intrusion is suspected, photograph interior signs of leaks in multiple rooms and keep track of when and where each issue began. Timely contact with the insurer, while the damage is fresh, reduces back-and-forth and aligns your claim with the documented timeline.
For Saint Joseph homeowners, documenting lake-effect winter damage separately from sudden storm damage can matter when discussing wear versus covered loss. Ice dam-related damage often shows on eaves, fascia, and attic entry points, while wind-driven events may produce differently oriented impact marks and blown-off shingles. Create a simple damage map: note where ice damming, snow load, or freeze-thaw cycles consistently affect the roof, and keep winter-season photos organized apart from any post-storm snapshots.
When filing, attach a concise narrative that links each photo to a date and location on the roof. Include known weather conditions and recent maintenance history. If an adjuster asks questions about prior repairs, reference receipts and service notes. Keep copies of everything and maintain a running log of communications to streamline the review process and support timely decisions.
Connect with contractors who help homeowners navigate the claims process from damage assessment to final approval.

In this community, low-slope sections on porches, additions, and mixed-roof homes face unique loads from lake-effect winter conditions. Ice, snow, and sharp temperature swings place a steady stress on flat or near-flat segments, and standing water during thaw can worsen moisture issues if drainage isn't reliable. The bluff and shoreline spots concentrate wind-driven snow and drifting debris, so a low-slope area that seems minor can become a moisture gateway if not addressed with careful detailing and durable materials.
When an addition ties into an older main roof, the transition point becomes a practical weak link in the local climate. Plan for continuous drainage paths that avoid dead-end puddles where ice dams form. Use integrated drip edges, properly pitched eaves, and strategically placed scuppers or gutters that handle seasonal pressure without clogging from leaves or shingle debris. Consider a single, consistent membrane approach at the transition to minimize seams where water can migrate. For porch roofs, keep drainage slope toward the longest run to prevent water backing up at corners or into interior soffits.
Choose materials and assemblies that tolerate freeze-thaw cycles and can shed lake-enhanced moisture efficiently. A high-quality deck or low-slope roofing membrane paired with compatible flashing reduces the risk of edge leaks at wall interfaces. Pay attention to ventilation at the attic-porch interface where warm air can meet cold surfaces, potentially creating hidden ice buildup. In areas where snow drifts commonly accumulate, specify thicker edge protection and reinforced fasteners to resist wind-driven shedding and wind-driven ice movement.
Seasonal inspection should focus on confirming that edges remain sealed, drains stay clear of leaves, and transitions look uninterrupted after storms. In spring, monitor for pooled water that persists beyond a brief thaw, and reseal or reseal-flash any suspect seams promptly to prevent moisture from seeping into the underlying structure. Regular checks after major storms help catch small issues before they become costly repairs.
Find specialists in TPO, EPDM, and built-up flat roofing systems for residential and commercial properties.
Sherriff Goslin Roofing: Benton Harbor
(269) 926-4240 www.sherriffgoslin.com
Serving
4.4 from 45 reviews