Last updated: Apr 19, 2026
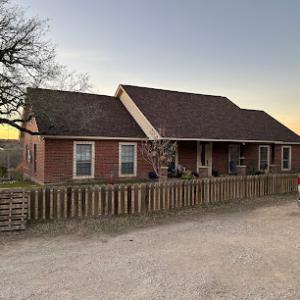
Spring hailstorms and severe thunderstorms are the dominant local roof-loss trigger in this part of Central Texas, and they drive a high volume of inspections and insurance activity. After a storm, the clock starts ticking not only on your roof, but on the paperwork that keeps a claim moving. Hail-damaged roofs often show up with granule loss, bruising, and hairline fractures that aren't obvious from ground level, which means timing your claim participation is critical. When you hear heavy hail or thunder roll through along the I-14 corridor, prepare to document what you can and plan for a rapid response window once the storm passes. In this climate, quick action reduces the risk of further interior damage and minimizes the likelihood of a disputed claim later on.
In this part of Texas, carriers commonly require photo sets, roof age verification, and adjuster inspections before approving storm-related roof work. Photos taken from multiple angles, close-ups of visible impact areas, and a dated record of the roof's condition help establish the storm's impact. You should have a recent roof age and material type documented so the adjuster can verify depreciation and replacement needs accurately. After a storm, expect the insurer to want a detailed history of prior damage, virtually every year as applicable, and a clear path for the adjuster to access the attic or interior for signs of latent leaks. The fastest path to an approval often depends on providing a clean, organized package of images, measurements, and material identification that aligns with what the adjuster will see on-site. If your photos are scattered or timestamped inconsistently, your timeline can stretch and complicate the claim.
Because Harker Heights sits in a hail-prone Central Texas insurance environment, replacement timing is often influenced by claim deadlines, adjuster availability, and post-storm contractor demand surges. After a major hail event, restoration teams can be overwhelmed, and slots for inspections or material orders fill quickly. Delaying action to "wait for a better weather window" can backfire if your claim sits outside the insurer's preferred reporting window or if the adjuster's availability stretches across weeks. If a storm has left you with visible damage, you should initiate contact with your carrier promptly, then line up a local, reputable roofing firm that can respond with an evidence-based inspection, a clear scope, and a realistic schedule for materials and staging. The most effective approach is to start the claim while the storm's official impact is still fresh in the adjuster's queue, then proceed with the contractor's inspection within the insurer's recommended timeline to avoid gaps or denial risk.
First, photograph everything immediately after the weather settles, focusing on impact marks, cupped or lifted shingles, and any interior signs of leaks. Second, gather proof of roof age and warranty terms for the insurer to verify depreciation and replacement eligibility. Third, request an on-site adjuster inspection window and be ready to accompany the adjuster with your documentation. Fourth, engage a local roofer promptly to provide a detailed scope and a replacement plan that reflects the condition documented during the adjuster's visit. Finally, keep a running log of all communications with the insurer and the contractor-dates, times, and the names of representatives-so nothing slips through the cracks if deadlines or adjuster availability shift. Acting decisively now helps secure a smoother path through the storm-damage claims process and reduces the risk of delays when the most critical damage is at stake.
In Harker Heights, the climate and storm pattern shape how a roof replacement goes from start to finish. Scheduling in spring or fall is often optimal to dodge the peak summer heat and the frequent weather disruptions that march through the I-14 corridor. Heat accelerates wear on materials and can complicate installation conditions for crews and materials, especially when high afternoon temperatures return day after day. By targeting mild shoulder seasons, you give crews a more predictable window to complete tear-off, install, and inspection steps without heat-related delays.
You want a window that avoids the hottest weeks but still leaves enough dry days for a proper dry-in. In practice, that means aiming for a spring slot after the late-wreeze storms have passed and a fall slot before winter fronts ramp up. Call ahead to confirm that the crew's schedule has a buffer for weather pivots, since early-season storms can shift lean-to timelines quickly. If you're coordinating with an insurer, lock in dates that give time for any claim documentation while still keeping the project away from the heart of summer.
Summer heat in this market accelerates wear on materials and can help some components age faster if exposed during long periods of high temperature. If a replacement falls toward late spring or early fall, you still may encounter warm afternoons. Plan for crew hours that minimize heat exposure-early starts, strategic shade breaks, and secure material staging to prevent heat-related tightening or warping of underlayment. Ensure the site has clear access for crews and material deliveries, since heat and dehydration risk translate into slower progress if spaces get cluttered or blocked.
Autumn and winter fronts can bring wind and rain that delay tear-off and dry-in if projects are not tightly scheduled. In practice, you want a window with a few consecutive dry days following tear-off to complete underlayment, flashing, and shingle installation without back-to-back weather interruptions. Have a plan for rapid protection from sudden gusts and for extra fastener checks after windy systems pass. If a storm wallops the area, expect the timeline to shift by a few days or a week and discuss contingency options with the contractor so you're not caught mid-work.
Hail activity and thunderstorm bouts common along the I-14 corridor can trigger insurance workflows and the need for documentation. Align your replacement timing with a period when documentation can be assembled and reviewed without pressuring a quick turn that risks skipping essential steps. A spring or fall start gives you the opportunity to verify all components, confirm warranty applicability, and secure any required proofs of damage while the meteorological pattern is more predictable.
Before committing, walk the scope with the contractor during a moderate-weather day, not in the heat of afternoon or during a forecasted storm window. Verify access routes, material storage areas, and the sequencing of tear-off, underlayment, and final shingle installation. Confirm that the plan includes weather-based milestones and a clear plan for hit-by-weather adjustments so a season that starts well does not devolve into a rushed, poorly staged job.
Get a clear picture of your project costs upfront - no commitment required.

K2T Roofing
(254) 312-2258 www.k2troofingkilleentx.com
1607 Pontotoc Trce A, Harker Heights, Texas
5.0 from 2 reviews
Reese Roofing & Construction
(254) 718-2196 www.reeseroofingcentraltexas.com
Serving
5.0 from 8 reviews
Top Notch Roofing
(254) 393-1248 topnotchroofingkilleentx.com
1300 Farm to Market 2410 Suite A, Harker Heights, Texas
4.9 from 146 reviews
Top Notch Roofing your #1 roofing company serving Killeen, and the surrounding areas. With a strong reputation as a trusted Killeen roofer, we take pride in delivering top notch roofing solutions that meet and exceed your expectations. Our team of skilled professionals specializes in roofing, ensuring your property is safeguarded from the elements. We're one of the leading roofing companies in the Killeen area, and we're here to handle all your roofing needs. Whether you need a roof repair in Killeen or a complete roofing replacement, our expert roofers in Killeen are at your service. As a local roofing company near you, we understand the unique challenges that Texas weather can present.
Texas Local Roofing
(254) 220-8478 texaslocalroofing.info
Harker Heights, Texas
5.0 from 29 reviews
Texas Local Roofing is a trusted Texas-based roofing company serving all of Central Texas. Specializing in roof repair, maintenance, installation, and inspection, we provide reliable and professional roofing services to homes and businesses across the region. Our skilled team is dedicated to ensuring your roof remains secure and durable, whether you're in need of a quick fix or a full replacement. With local expertise and a commitment to excellence, Texas Local Roofing is your go-to choice for all roofing needs in Central Texas. Get a free quote now! Se habla español
American Accu-Roof Systems
(855) 744-7775 accu-roofsystems.com
103 Cattail Cir, Harker Heights, Texas
4.3 from 21 reviews
I'm Danny Sheppard, proud owner of American Accu-Roof Systems, LLC located right here in Harker Heights. We proudly serve a 100 - mile radius, offering our expertise and exceptional service to our valued customers. From start to finish, we're there for you throughout the entire process of completing your job from Exterior to Interior work. At Accu-Roof we are dedicated to making sure the entire project goes smoothly. We also help you get the most from your Insurance Company to insure all your work has been found and file all supplements to complete the work. Give us a call for a free inspection at: (855) 744-7775 / (254) 432-6471 / (979) 218-4106

K2T Roofing
(254) 312-2258 www.k2troofingkilleentx.com
1607 Pontotoc Trce A, Harker Heights, Texas
5.0 from 2 reviews
Roofing Contractor in Killeen, Texas — The most reliable roofing Killeen tx has to offer! K2T Roofing is committed to providing you with the finest residential roofing services in the area, so if you need residential roof repair or roof installation services, we've got you covered! As one of the top Killeen roofers, our main focus is on value, durability, and superior customer satisfaction. We provide just what our clients need through durable and stylish roofing. We work with our clients to understand their unique needs and provide them with the most suitable options for their roofs. We also offer free roof inspections, free estimates, and a warranty! If you want to hire a roofer in Killeen TX who you can trust, give us a call!
Whitish Roofing / Construction
(254) 300-8242 whitishroofing.com
Serving
5.0 from 263 reviews
We are a Bell County based roofing company offering roofing and general construction services. Serving Central Texas and surrounding areas with 18+ years of experience Whitish Roofing is a team composed of professionals with over 18 years of combined experience who have installed hundreds of quality, durable roofs in Temple, Belton and surrounding areas. What sets us apart? We take pride in doing what it takes to complete the job in a professional manner while maintaining healthy relationships with our clients. Our experts always strive to provide top-notch customer service. Roof Repair Residential Roofing Commercial Roofing General Construction
Reese Roofing & Construction
(254) 718-2196 www.reeseroofingcentraltexas.com
Serving
5.0 from 8 reviews
Replace Or Repair Your Roof Right Away SCHEDULE COMMERCIAL OR RESIDENTIAL ROOFING SERVICES IN FLORENCE & KILLEEN, TX Whether you need your roof repaired after a storm or a roof installed at your office, Reese Roofing & Construction is the roofing contractor in Florence, TX for you. We provide commercial and residential roofing services to clients in Florence, Belton, Killeen, Harker Heights and Copperas Cove, TX. Reach out to us today for a free estimate.
Heritage Roofs & Gutters
(254) 369-0990 heritageroofsandgutters.com
Serving
5.0 from 178 reviews
At Heritage Roofs & Gutters, LLC, we prioritize customer satisfaction and ensure top-notch workmanship in everything we do. We understand the challenges of entrusting your home to a contractor and the associated stress it can bring. That's why we take pride in proving that we stand out among the rest. Our motto, "Protecting your HERITAGE starts with your home!", reflects our unwavering commitment to deliver exceptional service from beginning to end. Your satisfaction is our utmost priority, and we go the extra mile to exceed your expectations.

R & R Roofing
(254) 206-1649 www.randrroofingtx.com
Serving
4.9 from 918 reviews
R & R Roofing provides metal, corrugated, TPO and shingle roofing services to residential and commercial customers in the Belton, TX area.
Denali Roofing
(254) 317-8025 denaliroofingllc.net
Serving
5.0 from 450 reviews
At Denali Roofing, we are proud to be your local roofer in Killeen, TX, and nearby areas. Our team of skilled roof inspectors is here to help you with everything from routine checks to handling insurance claims for hail damage. We make sure you get any compensation you deserve, guiding you step-by-step through the process. Whether you need a roof repair or a full roof replacement, we pay close attention to every detail to ensure top-notch service. Give us a call today, and let’s get started on keeping your home safe and secure!
Pioneer United Roofing
(254) 458-4225 www.pioneerutdroofing.com
Serving
5.0 from 101 reviews
We are a family-owned & operated storm restoration roofing company, serving central TX. We specialize in insurance claims & anything related to the beautification of your home. Please visit our website for more info.
Fsr
(254) 332-1311 www.fsrtexas.com
Serving
5.0 from 193 reviews
FSR in Salado, TX provides professional roof replacements designed to protect homes from Central Texas heat, storms, and heavy rainfall. Our skilled team specializes in removing damaged or aging roofs and installing durable new systems that handle the region’s high winds and hail. We work with homeowners to ensure every project is completed with precision, from inspection to final installation. With a commitment to quality materials and expert workmanship, FSR is the trusted roofing contractor Salado residents count on for reliable, long-lasting protection and experienced service.
The Peoples Roofing Group
(254) 394-2061 thepeoplesroofinggroup.com
Serving
5.0 from 20 reviews
Locally owned in Central Texas, our service are roof repairs, roof installation, & metal roofing !
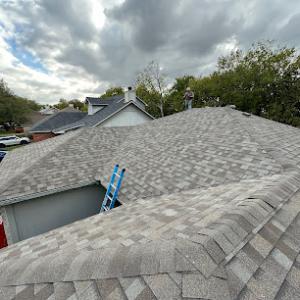
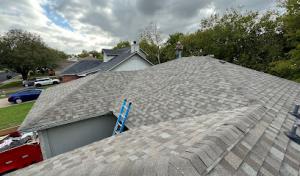
In Harker Heights, storm-driven demand spikes after hail events push crews, materials, and inspection slots to the limit. That pressure shows up in the price tags, especially for common residential systems like asphalt shingles and metal roofing. When a hail season hits, you'll often see bid ranges widen and job start times push back by a few weeks. Local crews may prioritize storm-damaged homes, which can create temporary price premium even for standard replacements. The heat of Central Texas summers also accelerates material aging, so you'll notice a faster move toward replacement on houses with long-term hail exposure. If you're budgeting for a next-step project, plan for potential premium windows in the wake of a hail event and set expectations for scheduling rather than just the sticker price.
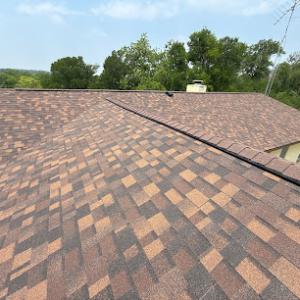
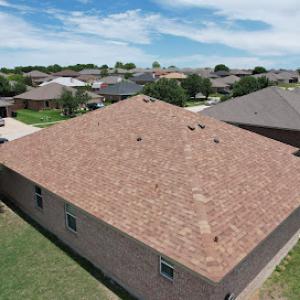
Asphalt shingles remain the most common choice in this market, and their price points reflect the local demand. A typical full replacement for asphalt shingles runs from about 350 to 800 dollars per square, depending on shingle class, complexity, and the finish you select. This range tightens somewhat when demand is normal, but during storm surges you might see the higher end favored by crews who are racing to keep up with demand. Metal roofing sits in a higher price tier, with common full replacements from roughly 650 to 1100 dollars per square. Metal offers durability that can align well with hail exposure, but the upfront cost tends to ride higher, especially if you opt for coatings or specialized profiles. If you're weighing long-term performance, metal can be a strong match for hail-prone conditions while still requiring attention to flashing and ventilation details that affect overall cost. For homeowners eyeing more distinctive looks, clay or concrete tile scales upward quickly: clay tiles typically range from 900 to 2300 dollars per square, and concrete tiles run from about 800 to 1600 dollars per square. These options trade upfront cost for a perception of longevity and weather resistance, which can influence resale value and cooling efficiency in heat-heavy months. Wood shingles or shakes sit around 550 to 1000 dollars per square, offering a traditional aesthetic but with maintenance considerations-especially in hot, stormy seasons. Synthetic or composite shingles span roughly 450 to 900 dollars per square, providing a middle ground between cost and performance with better resistance to cracking under hail compared to some natural products.
In daily practice, you'll notice that cost is only part of the calculation. The most cost-effective choice in a given home often hinges on the roof's pitch, access, and the overall shingle or panel weight that the structure can safely support. A steeper pitch or tight clearance around the eaves can raise labor time and lead to higher invoices, even if the material price remains stable. During the busy season, crews may consolidate multiple insurance-centered projects in the same area, which can reduce travel time but may push up per-project pricing if labor availability tightens. When evaluating bids, ask for a line-item breakdown that includes materials, waste disposal, underlayment quality, and ventilation components, so you can compare apples to apples across options. The goal is to balance upfront cost with expected performance, especially in a climate where hail, heat, and quick weather changes stress aging roofs.
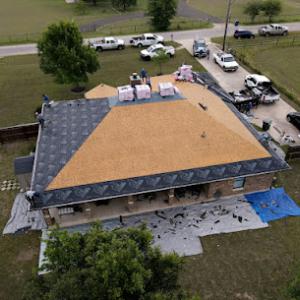
When a full roof replacement is on the schedule, a building permit is typically required. This isn't just a formality; it ensures the project aligns with local wind and load requirements, especially important in this area's storm-prone climate. Before the first shingle is removed, confirm with the contractor that the permit has been issued and that the job site address is properly listed. Retain the permit card or digital record on site, as it may be requested during inspections or by the insurance adjuster if a claim is involved. If a permit is delayed or missing, you risk a stop-work order or penalties, which can complicate hail-damage timelines.
The building department reviews roofing projects for code compliance on underlayment, ventilation, and fire code requirements. In practice, this means your roof system should meet the department's standards for attic ventilation balance, proper underlayment type and installation, and fire-rated decking where required. Common pitfall areas include undersized soffit or ridge vents, gaps in underlayment at roof penetrations, and mismatched flashing around chimneys or skylights. Ask your contractor to provide product data and installation details that clearly show compliance with the current code cycle. If your plan includes upgrades to ventilation or attic insulation, that should be coordinated with the permit plan to avoid a re-inspection loop.
Inspections are generally scheduled by the contractor, with a final inspection upon completion of the roof replacement. The process typically follows a sequence: permit issuance, rough inspection (if decking or structural work is involved), underlayment and ventilation inspection, and final roof inspection after all materials, flashing, and penetrations are complete. On the day of an inspection, ensure access to the attic and roof, with clear pathways and material staging areas. If an issue arises-such as a noncompliant underlayment seam or an exposed vent boot-the contractor should address it promptly to avoid delaying the final approval. The final inspection confirms that work adheres to the permit and applicable codes, which also helps when processing insurance claims tied to storm damage.
Because hail and storm damage often trigger insurance reviews, align your permit timing with the adjuster's expectations. Some adjusters require documentation of the permit and final inspections as part of the claim package. Work with a contractor who understands this workflow and can provide copies of permit applications, inspection approvals, and manufacturers' installation instructions. If rain or heat waves threaten scheduling, communicate early with the building department and your contractor to set realistic inspection windows to prevent weather-related delays. Keeping everyone informed helps maintain a steady path from permit approval to a compliant, inspected, finished roof.
Asphalt shingles are a dominant local choice, and in this market they need to stand up to Central Texas heat and hail. Choose impact-resistant options labeled Class 3 or Class 4 when possible, and look for الخر coating that reduces heat absorption. When evaluating a shingle, test for granule adhesion and check that the fiberglass or asphalt core can tolerate the heat cycles typical here. A roof installed with proper underlayment and ventilation helps slow heat aging and reduces the risk of premature granule loss after hail strikes.
Metal roofing has a meaningful presence on many homes, reflecting homeowner interest in durability during strong storms and under intense summer sun. If selecting metal, prioritize a coating system designed for hail resistance and a panel profile that resists denting. Standing-seam systems often perform well when installed with adequate attic ventilation and a solid attachment method. Consider roof slopes and当地 drainage to avoid pooling, which can amplify wind-driven impacts and heat exposure on exposed edges.
Clay tile and concrete tile are present locally, but both materials bring notable weight and vulnerability to hail-driven impact. Clay tends to be more brittle in hail, while concrete can handle impacts better but still carries a heavier load. Structural assessment is essential before choosing these options. If opting for tile, ensure proper interlocking or nail-strap systems, and verify that the roof deck and framing can support the additional weight. Heat aging remains a factor, so pairing tiles with a reflective underlayment and adequate ventilation helps extend service life.
Wood shingles and shakes deliver a distinct look but carry more maintenance considerations under hail exposure and heat stress. Look for fasteners and sealants that resist shrinking, and ensure the roof has a solid ventilation strategy to minimize curling and splitting after swift temperature swings. Inspect for previous hail dents that could indicate compromised integrity in the fastener pattern. Replacement options should match density and feel of the surrounding roofing to maintain a cohesive appearance and performance.
Synthetic and composite shingles are present locally as a versatile substitute to traditional materials. They often balance impact resistance with lighter weight and better heat aging control. When evaluating these, confirm a proven impact rating and long-term color stability under high sun exposure. Check warranty coverage for hail-related concerns and confirm compatibility with existing underlayment and ventilation details to preserve performance over time.
Explore specialists in steel, aluminum, and standing seam metal roofs built to last 50 years or more.

The claim environment you encounter as a homeowner here is shaped by Texas hail and thunderstorm activity along the I-14 corridor. Losses happen, and roof damage often shows up after the loudest spring storms. That means claim activity in a given season can be steadier than in milder markets, and your file will be reviewed with a careful eye for documentation. In practice, that means your contractor's photos, the date of the storm, and the roof's visible condition on the first inspection become part of the negotiating table-more important than you might expect in a single-season repair world.
Some insurance markets in hail-prone Texas areas have tightened coverage, which can affect deductible exposure, material selection, and whether homeowners replace sooner rather than later. You may see stricter rules about brand-new or code-compliant underlayment, the type of shingles allowed, and how upgrades are valued in the claim. If you are weighing options after a storm, know that the adjuster may push for durable, hail-resistant materials after assessing the roof's age and remaining service life. That can influence both design choices and timing.
For Harker Heights claims, homeowners should expect insurers to focus on dated photos, roof age records, and adjuster-confirmed storm damage before approving full replacement. This means you should keep careful records from the moment a hail event hits: timestamped photos from different angles, notes on any interior leaks, and maintenance history. Even with a clear storm report, the final decision rests on the adjuster's on-site confirmation and the insurer's guidelines. Being prepared with well-organized evidence helps a full replacement move forward without unnecessary delay. Keep copies of every communication handy.
Connect with contractors who help homeowners navigate the claims process from damage assessment to final approval.
Top Notch Roofing
(254) 393-1248 topnotchroofingkilleentx.com
1300 Farm to Market 2410 Suite A, Harker Heights, Texas
4.9 from 146 reviews
American Accu-Roof Systems
(855) 744-7775 accu-roofsystems.com
103 Cattail Cir, Harker Heights, Texas
4.3 from 21 reviews
K2T Roofing
(254) 312-2258 www.k2troofingkilleentx.com
1607 Pontotoc Trce A, Harker Heights, Texas
5.0 from 2 reviews
After severe thunderstorms in Harker Heights, a roof that has sustained damage can fail quickly under renewed rain or wind gusts. Leaks aren't just ceiling stains; they threaten insulation, electrical systems, and interior finishes. The risk climbs when storm clusters overwhelm local crews and adjusters, leaving a window where a fresh leak can grow before a full assessment is completed. Acting with urgency can limit interior damage and streamline the path to a proper repair.
As soon as water intrusion is suspected, a temporary tarping and leak-control plan should be in place. A sturdy tarp secured over the affected area minimizes active water entry and buys time for a safer, more thorough inspection. Photograph the affected roof and interior damage from multiple angles, including attic and ceiling spots where moisture is evident. Keep a dated log of each rain event and any temporary fixes performed. Quick-response service matters in this market because storm clusters create backlogs for both contractors and insurance adjusters, so stopping additional damage now matters as soon as possible.
Emergency work in this market is often a bridge step between first damage documentation and a later permitted full replacement. The goal is to stabilize the home, preserve what remains, and preserve the option to pursue a complete, properly inspected repair or replacement when the situation allows. Know that crews may schedule around weather windows and adjuster availability, so precision in timing and communication becomes critical. Keep contact names and timelines for both the contractor and the insurer handy, and maintain clear notes on what temporary measures are in place, what was observed during the initial inspection, and what the next milestone will be.
When you can't wait, these contractors offer fast response times to stop leaks and prevent further damage.
Top Notch Roofing
(254) 393-1248 topnotchroofingkilleentx.com
1300 Farm to Market 2410 Suite A, Harker Heights, Texas
4.9 from 146 reviews
A growing segment of the local market involves solar-integrated roofing, which matters when coordinating roof replacement with panel work. When planning a replacement, you'll want a contractor who can confirm the compatibility of the roof system with your existing or planned solar array. Look for installers who can evaluate flashing details where panels meet shingles or metal, and who can coordinate with the solar installer to minimize penetrations and ensure watertight transitions. In this market, panel-ready underlayment and properly spaced fasteners help prevent heat-induced failures around the warranted panel areas. Expect discussions about panel mounting, roof-age considerations, and potential need to adjust vents or exhausts to maintain roof integrity and energy performance over time.
Skylight-related work is a relevant capability in the local contractor pool, making it practical to address storm damage that affects roof penetrations. If a hail event or wind-driven debris impacts a skylight, a quick assessment should verify flashing integrity, curb sealing, and the surrounding shingle or roofing membrane. Replacements may involve adjusting the skylight opening to fit a new unit or upgrading flashing to a more robust configuration. For a homeowner, this means planning for potential simultaneous repair of the skylight and the main roof to avoid mismatched seals and leaks. A trusted contractor will inspect interior condensation pathways and ensure the interior finish around the skylight remains structurally sound after any replacement.
Low-slope and flat-roof expertise exists here, but it remains a niche within a primarily steep-slope market. When tackling a replacement or repair on a low-slope section, prioritize contractors who specialize in membrane systems and proper drainage solutions to prevent ponding. Verify that the contractor can integrate edge detailing, penetration sealing, and flashing transitions with adjacent steep-slope sections so that the overall roof assembly remains seamless. In practice, this means asking for recent flat- or low-slope projects, especially those that involved storm-related repairs, to gauge the team's capability to deliver long-lasting waterproofing in Central Texas weather.
Find contractors who integrate solar panels or solar shingles into your roof for long-term energy savings.