Last updated: Apr 19, 2026
The roofing reality in this area is driven by inland Lake Country weather: spring hail, summer wind storms, and winter freeze-thaw cycles. This isn't the coastal or desert climate with different stressors. In Hartland, heavy snow loads and repeated thaw-refreeze conditions in southeastern Wisconsin constantly stress flashing, loosen shingle tabs, and expose vulnerable roof transitions. The pattern is predictable enough to demand proactive inspection after each big event and a clear plan for any needed repairs or replacement. Treat every hail or wind event as a potential trigger for roof damage that can quietly worsen during the next thaw.
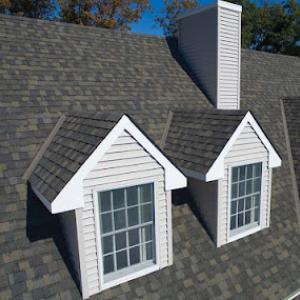
After a hailstorm or strong wind, look for dented gutters, bruised shingles, and granule loss at the edge of the roof. In the steep suburban builds common here, pay special attention to flashing around chimneys, skylights, vent stacks, and at roof-to-wall transitions. Winter cycles emphasize the risk: ice dams and thaw-refreeze cycles can buckle metal flashing, loosen tabs on shingles, and force water into seams you didn't know existed. On mansard or multi-angled roofs typical in this market, check valley joints and low-slope transitions-these spots bear extra risk when snow piles up and then slides away with thawing temperatures. If you notice curling edges, lifted tabs, or visible dark streaks that look damp or saturated, mark the location precisely.
Because local claim activity rises after hail and wind events, prompt, thorough documentation is essential before any temporary repairs or replacement decisions are made. Start by photographing each affected area from multiple angles, including close-ups of any lifted tabs, exposed flashing, and any signs of interior water intrusion on ceilings or walls beneath the attic. Create a simple map of the roof, noting approximate locations and square footage affected. Save weather reports corresponding to the storm, and collect any prior maintenance records that show the roof's baseline condition. This evidence helps when talking with an insurer and choosing a contractor who understands how winter cycles interact with flashing and transitions.
First, document, then reduce further damage with temporary measures only as needed to prevent water intrusion. If you have access, place a durable tarp over small openings or exposed areas until a professional can assess. Avoid delaying permanent repairs if there is active leakage into living spaces; water intrusion can accelerate ice dam formation and damage insulation and ceilings. When arranging a temporary fix, insist on materials and methods that protect the most vulnerable seams and transitions, especially around flashing.
Start with local roofers who have verifiable experience handling storm damage in Hartland's climate. Ask for previous projects involving hail or wind damage with winter exposure, and request detailed assessments that address flashing, transitions, and attic ventilation as part of the plan. A reputable contractor will provide a transparent inspection report, a staged repair plan, and a clear timeline that considers the ongoing risks of freeze-thaw cycles. Your choice should prioritize partnerships that emphasize thorough documentation, careful handling of flashing, and a solid method for restoring integrity to roof-to-wall connections.
Storm-driven damage often requires rapid decisions, but timing matters in this climate. Freeze-thaw wear continues to strain roof systems through the winter and into spring. A comprehensive assessment after the initial storm is essential to determine whether the roof can be repaired securely or if a full replacement is warranted to restore long-term protection. Because the seasonality drives wear patterns, establish a plan that sequences temporary fixes, permanent repairs, or replacement in a way that minimizes ongoing vulnerabilities while aligning with insurance timelines and anticipated winter load considerations.
In Hartland, full replacements are typically best scheduled from late spring through early fall because Wisconsin winter conditions can interfere with sealing, staging, and inspection timing. The window season aligns with milder temperatures that help sealants cure properly and let roof edges dry out after spring thaw. When planning, you should map a target installation period that avoids the heart of winter and stretches through early fall when days are long and crews can work reliably. If a project stretches into shoulder seasons, be prepared for tighter scheduling and potential weather-related delays.
Fall temperature swings in this region can affect asphalt shingle sealant performance and make end-of-season scheduling riskier for aging roofs. That same principle translates to window work in this climate: temperature and moisture swings alter caulking, flashing, and sealant behavior around openings. If a replacement window project must occur during late fall, choose materials and products proven to perform under cold-wet conditions, and plan for additional curing time after installation. Clear, dry days are ideal for interior work to minimize condensation and ensure accurate fit. In summer, heat can influence trimming and flashing; ensure installers account for expansion and contraction as temperatures rise and drop during the day.
Storm-driven demand spikes after spring and summer weather events can tighten contractor availability in Hartland during the same months that installation conditions are best. If a severe weather cycle hits, you may see crews push other jobs, extend wait times, or schedule work around forecasted rain. The practical implication is to book a window replacement with a buffer: confirm a provisional schedule and keep contingency dates, especially if your project hinges on precise flashing and interior finishes. When a storm is fresh in memory, local crews may be in high demand, so planning ahead by a few weeks can help secure a reliable team without sacrificing timing on the work itself.
Before any crews arrive, confirm access to the work area, including clear walkways and safe staging zones for ladders and materials.Storm debris and overhanging branches can complicate exterior work; trim branches that overhang the opening and remove loose debris from the vicinity to reduce cleanup time. Verify that interior spaces near the work are protected against dust and potential water intrusion, and set up a clear path for waste removal so crews can keep on schedule. During the job, keep an eye on flashing transitions around openings and ensure interior finishes are protected from unexpected moisture during caulking and sealing.
At project close, perform a quick inspection with the crew leader focusing on tightness of seams, flashing alignment, and the absence of gaps around openings. If a winter storm is forecast soon after completion, ask for a follow-up check or a short-term warranty review to catch any post-install settling issues, especially in areas where temperature swings are pronounced. Clear communication with the contractor about preferred timing, potential weather windows, and the impact of autumn frost will help keep the project moving toward a solid, long-lasting replacement.
Get a clear picture of your project costs upfront - no commitment required.
Community Roofing & Restoration
(414) 786-8978 www.communityroofingandrestoration.com
Hartland, Wisconsin
5.0 from 33 reviews


Community Roofing & Restoration
(414) 786-8978 www.communityroofingandrestoration.com
Hartland, Wisconsin
5.0 from 33 reviews
At Community Roofing & Restoration, we approach every project with the same level of ambition and determination as we did when we got our start in 1975. Now, more than 45 years later, we’ve become a trusted roofing contractor in Lake Country and the surrounding areas throughout Wisconsin by never compromising on quality and always providing the highest level of workmanship. We’ve been honored and recognized as one of Milwaukee’s best roofing companies for our exceptional track record. In addition to roofing services, we also install and repair gutters, windows, doors, and siding for residential and commercial properties. Contact us today for a fast, free, and friendly quote on your next home improvement project.
Benchmark Exteriors
(833) 708-7663 www.benchmarkexteriors.com
103 North Ave, Hartland, Wisconsin
4.9 from 39 reviews
Benchmark Exteriors is a veteran-owned company specializing in insurance restoration. We are your premier choice for top-notch exterior remodeling, serving Hartland, WI & nearby areas. As a full-service exterior contracting company, we specialize in roofing, siding, gutters, solar energy & 24/7 emergency services. Our dedication to quality is supported by acknowledgment from Owens Corning and the Vinyl Siding Institute. Our team is dedicated to providing modern solutions and top-rated products for your home improvement needs. We believe in transparent pricing and customer satisfaction. Take advantage of our 0% interest and zero payments for a limited-time 12-month financing program. Explore our gallery, let us bring your vision to life.

Hucke Exteriors
(262) 955-0245 huckeexteriors.com
590c Progress Dr, Hartland, Wisconsin
4.5 from 22 reviews
Hucke Exteriors serves homeowners in southeastern Wisconsin in restoring and replacing storm damaged exteriors. Our team is devoted to meeting your home improvement goals on time and within your budget. Our team helps clients with roof repairs, roof replacement and brand new roof installations. We work all around including in Hartland, Oconomowoc, Pewaukee, Nashotah and Brookfield. We do siding installation and even minor siding repairs. If you happen to need gutter replacement also, our team can bring you a new system to help remove water correctly from your roof. The exterior of your home takes abuse all year here in Waukesha county, so hire a top rated (and award-winning) roofing company to fix it for you!
Roof Maxx of Oconomowoc, WI
Hartland, Wisconsin
5.0 from 6 reviews
Roof Maxx® is a scientifically formulated, and 100% safe, plant-based roof rejuvenating spray treatment that was developed by the world’s largest private research and development company.
Hans Roofing & Siding
(262) 267-7128 www.hansroofingandsiding.com
Serving
5.0 from 28 reviews
Hans Roofing & Siding provides roofing, siding, gutters, windows, doors, and trims to the Southeastern, WI area.
LeFever Roofing
(262) 256-3445 www.lefeverroofing.com
Serving
4.8 from 66 reviews
LeFever Roofing is Wisconsin's No. 1 professional installer of quality roofs, serving Waukesha, Brookfield, Mequon, River Hills, Ozaukee, and neighboring counties. Our team is highly trained and certified by our select manufacturers to ensure that the jobs we do match the highest industry standards. We specialize in cedar shake roofing and offer a variety of composite cedar shakes as well as a whole host of other products and services. We provide multiple luxury roofing styles that come in a variety of materials such as copper, DaVinci Synthetic Roofscapes, and CertainTeed Presidential Shake TL products.
TMC Exteriors
(262) 563-1055 www.tmcexteriors.com
602 W N Shore Dr, Hartland, Wisconsin
5.0 from 1 review
TMC Exteriors, LLC delivers 20 years of exterior contracting experience to our customers in SE Wisconsin. We provide skilled project management paired with a dependable, experienced and versatile workforce on every project - large or small. We do the right and best thing for our clients. Every project, no matter the scope, is a reflection on our company. Integrity means something to our team. We work in a relationship business and know that we will be judged based on the last experience you've had with out company. We stand behind our work, as do the two largest shingle manufacturers in the country do as well. We are Master Elite Certified w/GAF and Preferred Contractors w/Owens Corning. Our clients trust us. We'd like to earn yours!
Tip Top Roofing & Gutters
(262) 269-9400 tiptoproofwi.com
Serving
5.0 from 85 reviews
Tip Top Roofing & Construction is a leading roofing and gutter contractor based in Okauchee, WI. We are a team of professionals who can tackle everything from difficult, large projects to smaller scale jobs. Fueled by our commitment to excellence, we’ve taken a comprehensive approach to project management while providing our clients with a wide range of services to cover their needs.
Modern Exterior Roofing
(262) 525-4113 modern-exterior.com
Serving
5.0 from 18 reviews
From the start, Modern Exterior committed itself to offer the best roofing service for Southeast Wisconsin Residents. We are always researching and developing processes that allow us to bring even greater return to each of our customers. Through experience and time we have come to the conclusion that one of those ways to better serve our customers was to start installing seamless gutters and Siding to deliver more value on each remodeling project.
Erie Home
Serving
4.6 from 288 reviews
Since 1976, Erie Home has manufactured, supplied, and installed the best-performing roofing on the market. By providing ironclad warranties and convenient financing, we ensure that every homeowner we work with receives top quality service and value for their homes and properties. Erie Home professionals are the roofing company of choice in the greater Milwaukee, WI area. Whether you need roof inspections or roof damage repair services, Erie Home has been the go-to roofing contractor for nearly 50 years because of our attention to detail and dedication to making sure our customers are satisfied with their results. Contact us today for a quote and see why we're the trusted roofing company Milwaukee counts on.

Briggs Family Home Development
(866) 301-0155 briggsfamilyhd.com
Serving
4.7 from 116 reviews
WE’RE A FAMILY BUSINESS WE MAKE HOME REMODELING IN OREGON, WI EASY Home remodeling is stressful. You feel pressure to make all sorts of decisions. Possibly the most important choice you make is who you trust to become your remodeling contractors. Based in Oregon & Kenosha, WI, Briggs Family Home Development, LLC has been in the home remodeling business for over 10 years. We’re experienced remodeling contractors who are passionate about making your dreams come true. Our clients come back time and time again because we take the hassle out of renovations. The Oregon, WI community appreciates our: Customer service Cleanliness Value for the money Organization Timeliness Call now for a free estimate on your home remodeling project.
Larson & Keeney Home Services
(262) 303-4008 www.larsonkeeneyhomeservices.com
Serving
4.9 from 160 reviews
Larson & Keeney Home Services is a trusted local expert in roof replacement, roof repairs, gutter installation, and insulation needs. We offer various types of insulation including spray foam, blow-in, and rigid foam insulation. Founded in 2009 by Andrew Larson and Josh Keeney, our company is dedicated to the principle of always putting the customer’s needs first. When it comes to comprehensive home services in Milwaukee and Southeastern Wisconsin, Larson & Keeney Home Services has you covered. Our highest priorities are top-quality work and providing a stress-free experience. It’s because of our dedication to these ideas that we are considered one of the top home improvement service companies in the area.
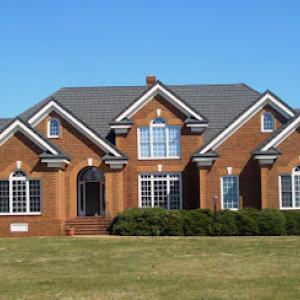
In this area, the dominant replacement mix includes asphalt shingles, metal roofing, slate, fiber cement shingles, and cedar shakes. That means cost comparisons should reflect both standard suburban roofs and the premium architectural homes common in Lake Country communities. A plain three- or four-tab asphalt replacement on a typical ranch or split-level will sit near the lower end of the spectrum, while premium architectural asphalt, metal with decorative edges, or slate on a two-story with dormers shifts the math upward. When you're weighing options, compare not just the per-square price but the expected labor for roof features: steeper pitches, complex intersections, and multiple skylights add real dollars to the job.
Asphalt shingles are the most common in Hartland, delivering broad value for standard roofs. Expect roughly 350 to 650 per square (1 square = 100 square feet) in typical conditions, with steeper pitches or triple-hip designs nudging closer to the higher end. Metal roofing runs higher, commonly 700 to 1200 per square, and pays off on longevity in harsh winters and heavy snows, though the color and profile choice can tilt pricing further if a premium panel or concealed-fastener system is used. Slate presents a premium path, often 1500 to 3000 per square, reflecting both material cost and careful installation required for interlocking pieces and attic vapor management. Fiber cement shingles sit between asphalt and metal, at roughly 450 to 900 per square, offering a good balance of durability and install ease. Cedar shakes, chosen for curb appeal on higher-end homes, typically range from 700 to 1300 per square and demand careful pressure-treated sheathing and precision in staggering and sealing joints.
Storm surges in demand after hail and wind events can push scheduling pressure and labor pricing higher in this market. In Hartland, a busy spring season often translates to shorter notice windows and higher crew availability costs, especially when multiple homes share contractors after a big hail event. Factor in potential price spikes if a roof is scheduled during peak demand or when emergency responders or insurers re-prioritize projects. If a premium material is chosen (slate, metal with complex profiles, or cedar shakes on a larger home), the premium on timing is amplified because skilled labor is thinner and fabricating or hand-fitting pieces takes longer.
Steeper rooflines, chimney intersections, and accessory features such as skylights found on upper-end Waukesha County homes can increase labor complexity beyond base per-square pricing. A straightforward, single-story rectangle will stay closer to base estimates, while a two-story with a right-angle corner, multiple peaks, or a large chimney can push labor hours up and push total cost higher than the square-footage math alone would suggest. In practical terms, when planning, look for a contractor who can itemize the extra costs associated with these features, rather than presenting a single lump sum.
Asphalt shingles remain the most practical fit for many homes in this area, balancing cost, ease of repair, and available color options. In Wisconsin's freeze-thaw cycling, shingles can take a toll when ventilation is inadequate, flashing around chimneys and vents isn't properly sealed, or sealants around roof penetrations fail to accommodate repeated expansion and contraction. If you notice granular loss on exposed areas, curled edges, or recurring ice dam activity, a close look at attic ventilation and soffit intake can reveal the root cause. A well-vented attic paired with correctly installed drip edge and shingle sealant at exposed seams helps prevent moisture intrusion during rapid thaws and late-season freezes.
Metal roofing stands out for snow shedding and overall durability, which is valuable on steep Hartland roofs exposed to heavy snow loads. The real strength is in the edges and penetration details: where the panels meet walls, at skylights, vents, and chimneys, and along the ridge lines where thermal movement can create gaps. In this climate, ice can form at eave edges and lap joints if flashing isn't continuous or if fasteners loosen over time. When considering metal, focus on panel clips that allow a modest amount of movement, integrated foam closures at rake edges, and a robust sealant strategy at penetrations. Regular inspection after winter storms helps catch loose fasteners or compromised seals before they grow into leaks.
Cedar shakes, slate, and fiber cement appear in homes with higher-end stock, where the roof structure and original framing may have been designed with heavier materials in mind. These choices demand specialized repair skill, particularly when dealing with older framing or mismatched retrofit details. Cedar provides a distinctive look but can be more sensitive to freeze-thaw cycles if ventilation isn't balanced with moisture management. Slate and fiber cement offer longevity, yet slate requires careful matching of replacement slates and professional cutting near ridges and hips. When contemplating a full replacement, ensure that the roof's framing, underlayment, and flashing plans are compatible with the chosen material's weight and installation nuances. In all cases, a clearly staged plan for addressing edge conditions, snow loading, and potential ice dam formation will help extend the roof's life through Hartland winters.
In Hartland, the building department generally treats a full re-roof as a permit-needed project rather than informal maintenance. If a complete tear-off and new roof are planned, assume that a permit will be required. This isn't optional paperwork to skip; it's part of the process to ensure safety and code compliance on a flood-influenced inland lake climate where freeze-thaw cycles and snow loads test every roof.
The permit application process usually requires a clear project scope and roofing material details. This information can be submitted by the contractor or, in some cases, the homeowner. Have a precise plan on what will be torn off, what decking or underlayment will be replaced, and what roofing material is being installed. If any attic ventilation changes or new drip edge details are involved, include those as well. Submitting complete documentation helps avoid delays and keeps the project moving through the calendar, especially during the spring and fall windows when storms tend to appear.
Hartland inspections are typically scheduled after decking and underlayment are in place and again after final completion. That means your tear-off and installation plan should line up with these checkpoints. Plan to have the roof deck exposed and underlayment installed so the interim inspection can verify decking condition, rafters, and ventilation placement. Then stage the final installation so the inspector can verify the new roof finish, flashing, and any penetrations are properly sealed. Coordinate material delivery and crew access to ensure there are no gaps between decking, underlayment, and the final roof-for instance, avoiding delays that push the final inspection beyond a weather window.
Begin the permit and plan early, especially if spring hail or heavy snow loading is in play. Have the contractor's scope and material selections ready to accompany the application, and confirm which party submits the permit. Keep the staging area tidy and protect nearby landscaping, since storm-driven debris is a real concern in this climate. Confirm reminders for the initial inspection date and ensure the crew adheres to the sequence: deck and underlayment first, then final roof finish.
Wisconsin's seasonal hail and wind events create recurring claim activity that directly affects how homeowners approach inspections, temporary repairs, and full roof replacements. In Hartland, inspections after a hailstorm or strong wind should be scheduled promptly, but not impulsively-storm windows can be narrow, and the insurer may scrutinize whether damage aligns with the latest event. If a wind-driven shingle lift or hail dents appear after a specific storm, document the exact date and weather conditions, then plan a professional evaluation within days rather than weeks. This helps avoid disputes about whether damage was caused by a prior event or the most recent one.
Insurers commonly expect photo documentation, contractor estimates, and evidence tying visible damage to a specific storm window before approving larger roof claims. Take clear, wide-angle photos of all affected areas from ground level and from the attic where safe. Include close-ups of damaged shingles, metal flashings, and any interior signs like attic staining. Keep a written record noting the storm's date, wind speeds if available, hail size, and how the damage is situated on the roof. When you bring in a contractor's estimate, ensure it references the same storm window and locations shown in your photos to avoid back-and-forth delays.
Post-installation workmanship verification can matter in this market, so having a reliable archive matters. After a replacement, save final invoices, product specifications, and installation notes, and keep a concise summary of what was replaced and why. Maintaining these records helps if another storm hits in the coming seasons or if the insurer requests additional proof that the new roof was installed to manufacturer standards. In practice, think of the file as a personal timeline: damaged, inspected, repaired, replaced, and verified. It minimizes surprises when the next hail or wind event occurs.
Connect with contractors who help homeowners navigate the claims process from damage assessment to final approval.
Benchmark Exteriors
(833) 708-7663 www.benchmarkexteriors.com
103 North Ave, Hartland, Wisconsin
4.9 from 39 reviews
Hucke Exteriors
(262) 955-0245 huckeexteriors.com
590c Progress Dr, Hartland, Wisconsin
4.5 from 22 reviews
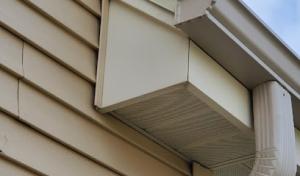
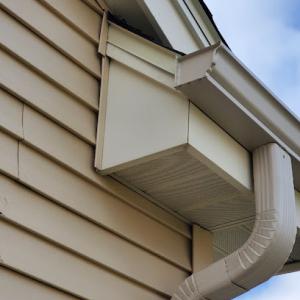
In Hartland's winter climate, flashing at chimneys, valleys, and roof-wall transitions often shows stress before the main field of the roof does. Freeze-thaw cycles push and pull seams, loosening sealants and corroding metal putty over time. If you notice hairline gaps where metal meets masonry or where two planes meet, address them promptly. The first sign is usually damp spots or dark staining along these edges, not across the center of a shingle field. Prioritize these areas when preparing for inspection after a heavy snow or a thaw cycle, because failures here can propagate under shingles and behind siding.
Skylight perimeters and other penetrations are common leak points after freeze-thaw movement and wind-driven rain events in southeastern Wisconsin. In deserts of moisture this would be less likely, but here those edges endure more stress as water migrates around fasteners and flashing. Pay attention to caulking joints, tear-off membranes, and the alignment of flashing around skylights, vents, and plumbing stacks. A small drip or soft frost line at a corner can mean water is finding a way under the roof deck, especially where the sealant has aged or where fasteners have loosened. Treat these as urgent fixes rather than cosmetic repairs.
Low-slope sections over additions, porches, or transitions can age differently from the main steep-slope roof and may need separate material and drainage planning. Those areas collect water, ice, and debris more readily, leading to faster wear on membranes and flashing. If a low-slope patch shows pooling, unusual softness, or new staining near end walls, consider a targeted evaluation that accounts for drainage paths and potential stage-by-stage replacement rather than a single, broad re-roof. In tight suburban lots, effective flashing and precise transitions matter more than bulk material choices alone.
Find contractors experienced in skylight installation, flashing, and leak repairs to bring natural light into your home.
Community Roofing & Restoration
(414) 786-8978 www.communityroofingandrestoration.com
Hartland, Wisconsin
5.0 from 33 reviews