Last updated: Apr 19, 2026
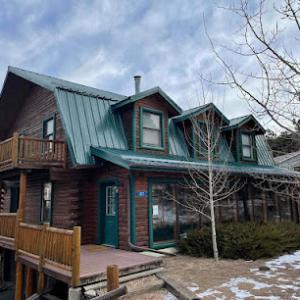
Laramie sits at high elevation in southeast Wyoming, which intensifies UV exposure and sharp day-night temperature swings that age exposed roofing surfaces faster than lower-elevation markets. That means shingles, underlayment, and flashing endure more cycles of sun heat and midnight frost than most homeowners anticipate. Your roof isn't just battling snow; it's fighting a relentless sun that bakes material during the day and freezes it at night. The result is accelerated aging, more microcracks, and a reduced life span if every detail isn't chosen with that climate in mind.
The city's open terrain and wind-prone setting mean roof edges, ridges, flashing, and mechanically fastened components face more uplift stress than in more sheltered urban areas. When dry cold fronts sweep across the plains, gusts can peel at vulnerable seams and loosen fasteners. A roof that looks solid from the curb can hide creeping uplift problems along the rake edges and at penetrations where flashing meets vent pipes, chimneys, or skylights. If your home has a shallower roof pitch or a roof style with long ridge lines, that uplift risk multiplies. The takeaway: you must prioritize robust edge detailing, continuous flashing, and fasteners rated for wind zones and cold cycles. Substandard sealant or marginal flashing won't survive repeated gusts and freeze-thaw stress.
Long winters with significant snowfall followed by freeze-thaw cycling make ice-related moisture entry, brittle shingle damage, and repeated expansion at penetrations a central local roofing concern. Snow load isn't just about how much snow sits on the roof; it's about the melt-and-refreeze that creates ice dams, sump leaks, and slow water intrusion around vents, valleys, and joints. In a high-elevation climate, attic insulation and ventilation aren't afterthoughts-they determine where ice dams form and how quickly heat loss translates into roof damage. If ice begins to back up at hips or along eaves, you'll see increased shingle edge lift, granule loss, and potential water intrusion around gutters and downspouts. The practical implication is to choose a roof system with components tested for freeze-thaw durability, ensure proper attic ventilation to break the warm-air pocket, and maintain a consistent snow-removal habit on smaller or flat-roof sections where meltwater can pool.
Prioritize a roofing system that excels in wind resistance and lift resistance, with sturdy edge details and mechanically fastened seams designed for cold climates. Inspect exposed fasteners and sealants after major storms-the first sign of trouble is often a loose edge or flashing that has begun to lift. Use venting and insulation upgrades to reduce attic heat loss and ice dam risk; ensure soffits and vents are unblocked and balanced to promote continuous airflow. Schedule proactive maintenance after each heavy snowfall and after major wind events. When replacing, lean toward materials with proven freeze-thaw durability and wind-rated fastening systems, and confirm that ridge and hip lines are fully protected with continuous, corrosion-resistant flashing. In this climate, your roof isn't a "set-it-and-forget-it" feature-it's a high-stakes shield that must be maintained proactively to prevent water intrusion and structural concerns.
Spring hail and thunderstorm activity are a recurring local risk, so you must act fast after a storm to protect your claim. Gather clear, time-stamped photo documentation of all roof areas, gutters, siding, and chimney flashing within 48 hours of the event. Document hail size from multiple angles, noting dents, bruising, and granule loss on asphalt shingles or scoring on metal panels. If access is safe, climb a ladder with a helper to photograph sections of the roof edge, hips, and valleys. Keep a dated log of observed damage and any immediate leaks or water intrusion inside the attic or ceilings. A roof condition report from a qualified roofer shortly after the storm provides a credible baseline for insurer review and helps prevent denial due to perceived pre-existing wear.
Wyoming insurers commonly scrutinize wind and hail claims closely, and replacement decisions in Laramie are often shaped by whether the owner can document pre-loss condition and storm-date damage. A robust file starts with a dated pre-storm photo set if available, plus the post-storm images and the roofer's assessment. Be prepared to explain any gaps between the last professional roof inspection and the storm, including how long the roof has shown wear and where prior repairs were made. Insurance decisions can hinge on whether damage is discrete hail impact versus general wear; thus, clearly labeled photos that show isolated bruising, broken tabs, or punctures in hail-affected areas strengthen the claim. If a portion of the roof looks damaged but the rest appears intact, request a guided assessment that separates hail-caused issues from routine aging.
Because autumn winds are strong and persistent, insurers may look for evidence separating hail bruising from wind-lifted tabs, exposed fasteners, or older weathering. Capture close-ups of any lifted or missing shingles, displaced tabs, or fastener corrosion, and compare with the surrounding roof surface. Document any granule loss concentrated along hail impact zones and note the presence of any sealing or flashing failures around chimneys and vent pipes. If wind events pushed debris against the roof, photograph the specific zones where damage aligns with storm-driven debris paths. A detailed roofer's note that differentiates hail-induced damage from wind-related wear can be decisive in the claim review.
Secure the home with a temporary, safe roof protection plan if you suspect active leaks. Immediately contact a local, licensed roofer to perform a quick, independent roof condition report focused on hail impact and wind-lift indicators. Ensure the report notes the roof's age, the presence of any pre-existing issues, and the storm date. Align the insurer's expectations by providing both the inspection report and the storm photo log. If you can, arrange a same-day or next-day inspection during favorable weather to prevent further deterioration from wind-driven rain or shifting snowmelt. In every communication with the insurer, present a concise narrative: the storm date, observed hail impact patterns, wind-related damage indicators, and the expert assessment that sets a clear boundary between hail damage and aging wear. This clarity can accelerate a fair settlement and reduce back-and-forth ambiguity.
Stonescape Steel Roofing & Exteriors
(307) 757-0657 stonescapesteelroofing.com
209 S 1st St, Laramie, Wyoming
4.9 from 29 reviews
Stonescape Steel Roofing and Exteriors is Laramie's premier metal roofing company. Though we are specialized roofers of all residential and commercial systems, we can take care of your siding and window needs as well. From roof repairs, roof installation, roof replacement, and storm damage assessment to window installation and replacement and siding replacement, Stonescape is your one-stop shop for all your exterior needs. Offering free property inspections, we can handle asphalt shingles, stone coated steel, traditional metal, PVC, EPDM, TPO, roof restoration, and roof coatings. We aim to provide roofing services based on honesty, integrity, and quality. Contact Stonescape today for your next roofing, window, or siding project!
Highroad Roofing
(307) 399-4730 highroadroofing.com
203 S 2nd St #3610, Laramie, Wyoming
4.7 from 29 reviews
Highroad Roofing has been serving our customers in Northern Colorado and Southern Wyoming since 2005. As a family-owned and operated business, we make sure every customer has peace of mind when choosing us as their contractor. We will take the Highroad in every business dealing! We provide expertise and top-notch service to both residential and commercial customers. We have years of experience in all types of jobs ranging from asphalt, metal roofs, flat-roofs, commercial roofs, and everything in between. We are committed to keeping you and your family out of harm's way by providing you the very best roof!
Pete's Builders
(307) 514-5489 petesbuilders.com
528 S Adams St, Laramie, Wyoming
5.0 from 2 reviews
Pete’s Builders, LLC is your local leader in roofing replacements, roof repair, storm damage repair, and fire restoration in the Laramie, WY, area. We are a full-service licensed general contractor and help you restore your home or business quickly and efficiently, better than it was before. With over 25 years of experience, we proudly serve residential and commercial property owners. Committed to industry knowledge and safety, we hold the OSHA 30 Certification. We are a proud member of the National Roofing Contractors Association (NRCA), and we hold an A+ rating with the Better Business Bureau (BBB). We provide free property inspections for all residents and property owners in the Laramie, WY, area. Give us a call today!
American Roofing & Restorations - Laramie, WY
(970) 460-8720 americanroofingandrestorations.com
605 S 30th St bldg 5 unit 204, Laramie, Wyoming
American Roofing and Restorations, a veteran, family-owned business located in Laramie, Wyoming, has proudly served the community since 2012. As a trusted roofing contractor Southeast Wyoming residents rely on, we specialize in residential roofing services, including repairs, replacements, metal roofing, tile roofing, and asphalt shingles. Our services include storm damage repairs, insurance claims, custom roof design, gutter installation, cleaning, and exterior improvements like windows, siding, and painting. We deliver high-quality assessments of homes using advanced Eagleview Assess Drone AI technology. Serving Southeast Wyoming and Northern Colorado, we are committed to protecting your home with reliable roofing solutions.
Replacement work in this high-elevation, wind-swept setting tends to run from late spring through early fall. The goal is to capture a solid stretch of dry, snow-free days without pushing into the first hard freeze or a late storm that can halt tear-off and installation. You'll notice crews commonly plan around stubborn shoulder-season days, aiming to finish before harsh cold sets in again. If your project starts in late spring, expect a few warm spells that can speed up handling, but remember that wind and sudden inclement days can still rearrange the daily pace. In Laramie, the schedule is a climate-driven dance between available daylight, melt-water runoff, and the practical need to keep decks and underlayment dry.
Summer heat in the afternoon can complicate material handling, even when crews are working in a dry spell. Temperature-sensitive components-underlayment, sealants, and certain fasteners-benefit from cooler morning sessions and shaded work zones. Plan for early-start days when possible, and ensure crews have a shaded staging area on the roof or adjacent ground to reduce heat buildup. When asphalt or synthetic shingles are being installed, consider how peak daytime temperatures might soften certain adhesives or impact granule setting; crews will adjust by scheduling critical steps for cooler hours or overcast days. In practice, this means you may see tighter sequencing during the peak of summer, with more frequent visibility checks to catch any material misalignment caused by heat.
Autumn brings reliable wind that can complicate staging and expose bare roof edges at vulnerable moments. The key is tight sequencing: pre-stage everything that can be moved ahead of the forecasted windy days, and keep gaps between roof sections as small as possible to prevent gust-driven drips and loose debris. If autumn weather looks unsettled, aim for completing critical phases-like underlayment and early shingle rows-before stronger winds become routine. A practical approach is to coordinate a compact workfront: finish each major roof face in a single, continuous push, then move to the next, rather than letting exposed sections linger as the temperature drops.
With long snowy winters looming, crews in this region prioritize leaving the roof in a wind-tight, snow-ready state whenever possible. That means finishing with secure ridge lines, clean edge detailing, and proper drip edge installation to minimize water ingress during freeze-thaw cycles. If a project must pause as fall storms approach, expect tight handoffs: lingering open areas should be minimized, and temporary protections may be used to guard exposed decks against wind-driven dust and small debris until permanent closures are completed. Inquiries about staging areas, material storage, and crew rotation ahead of the expected weather shifts help keep the project on track and reduce the risk of weather-induced delays.
Asphalt shingles are common on many homes, but in this climate they face hail impact, wind exposure, and significant thermal cycling that can shorten their service life relative to milder environments. When choosing this material, prioritize thicker granules, advanced wind-resistance ratings, and underlayment designed for freeze-thaw cycles. Expect greater attention to hail impact zones and regular inspections after storms. A well-sealed ridge line and secure edge detailing help minimize wind-driven leaks in exposed locations.
Metal roofing is especially relevant due to its strong snow-shedding behavior and wind performance when installed with careful detailing. The key in exposed conditions is attaching panels to resist uplift and managing trim integrity at joints, valleys, and transitions. Choose systems with corrosion-resistant finishes and proper sealants that tolerate wide temperature swings. Field-verified fasteners and continuous venting at eaves reduce ice dam risk and preserve seal integrity after heavy snow events.
Clay tile, concrete tile, slate, and synthetic products must be evaluated for freeze-thaw resilience and snow-load implications before installation. Lighter roof structures often struggle with heavy, dense tiles or composites, so structural assessment is essential. Some tiles excel in low-heat bids but crack under rapid temperature changes and snow load. When in doubt, pair with a proven underlayment and ensure accessory components (fittings, clips, and battens) are rated for high wind and freeze-thaw cycles.
Regular inspections after winter transitions and hail events help catch early failures caused by thermal cycling and wind exposure. Look for loose fasteners, lifted edges, compromised underlayment, and signs of freeze-thaw damage on any material. In the right conditions, a well-chosen system that accounts for wind loads, snow shedding, and edge detailing will maintain performance through long winters and rapid thaw periods.
In this high-elevation, wind-exposed setting, you'll see price sketches for each roofing option that reflect both material durability and the local climate. Average material pricing in Laramie runs about $350 to $700 per square for asphalt shingles, $600 to $1200 for metal, $900 to $2100 for clay tile, $800 to $1500 for concrete tile, $400 to $800 for synthetic/composite shingles, and $1400 to $3500 for slate. Those ranges give you a practical sense of the spread you'll encounter when you're weighing options after your next hail event or after a long cold season. If you're evaluating bid sheets, use these as guardrails to separate material choices from labor and accessory costs.
Costs in Laramie can rise when short seasonal scheduling compresses contractor availability into late spring through early fall, especially after hail events that create a local surge in demand. If the window to replace a roof is tight, you may see bid timing push suppliers and crews toward higher short-term availability, which shows up as a higher overall job cost. This isn't about improper bidding; it's about the reality that the weather and the work pace in a small mountain market don't always align with your preferred calendar. Plan for a few weeks of flexibility around peak demand, and consider pre-scheduling a fall or late-summer window if your roof is near the end of its life and hail history is fresh in memory in your neighborhood.
High-wind detailing, snow-oriented accessory work, and the need to protect projects from sudden weather changes can add labor complexity beyond base material pricing. In practice, this means components like upgraded underlayment, stronger fasteners, and wind-rated edge details may push the installed cost beyond the bare material price. When you're comparing bids, ask how crews address blow-off risk, ice dam prevention, and temporary protection during sudden storms. Local crews often include extra whip-fastening, ridge vent considerations, and snow guards as standard add-ons for Laramie's winter pattern, which affects the bottom line.
If you're prioritizing snow load and freeze-thaw durability, synthetic/composite shingles offer a balanced option with a more manageable price than slate or true clay tiles, while still delivering decent performance in freeze-thaw cycles. Metal roofing can excel in wind resistance and hail durability, but check local warranties and the panel geometry to ensure there's adequate overhang and secure fastening. Clay and concrete tiles provide excellent longevity but carry heavier weight and higher installation costs, which should be weighed against structural readiness and climate exposure. For the region's typical housing stock, pairing a durable underlayment with an appropriate venting strategy often yields the most reliable performance across multiple winters.
Residential reroofs are typically handled through the local City/County building department rather than treated as simple no-permit maintenance. In this climate, where long snowy winters, frequent freeze-thaw cycles, and high winds shape every roof choice, the permit process helps ensure that the replacement system meets structural and moisture management standards. A reroof project is reviewed for deck condition, underlayment suitability for cold snaps, and fastener integrity to withstand wind exposure. Keeping the permit in place helps avoid latent defects that could complicate future snow loads or hail resistance.
Contractors usually submit project details and plans for review, and the department commonly uses an online portal to manage approvals. The timing of this review matters, because the short roofing season in this high-elevation setting can compress scheduling. If approval slips or conditions are needed, crews may wait for a clear weather window or for a re-inspection item to be cleared. Plan around potential delays by aligning start dates with a confirmed permit status and a realistic window that accounts for weather and material lead times.
Inspections are typically conducted during the work and again at final. The interim inspection helps verify that fasteners, underlayment, venting, and flashing meet code requirements as they're installed, which is especially important when dealing with gusty winds and freeze-thaw movement. The final inspection is used to verify code compliance before the project is considered closed out. Having the permit and any supplemental documentation ready will streamline this step and reduce the risk of a hold-up that could affect the season's schedule.
After a major weather event, insurers commonly request date-stamped photos, close-ups of hail or wind damage, and a contractor roof report. This is especially true for the high-elevation, wind-exposed roofs found around the area. Because Wyoming policies may carry stricter wind and hail replacement prerequisites, claim success in Laramie often depends on documenting both storm-related damage and the roof's prior condition. The adjuster will scrutinize whether preexisting issues could have contributed to any failure, so clear, organized records matter.
The local pattern of spring hail and fall wind makes prompt documentation essential. Delays can blur causation, inviting questions about whether later events caused or worsened damage. Take clear date-stamped photos from multiple angles, including attic and interior scenes if water intrusion is involved. Preserve damaged shingles, granules, or flashing as physical evidence. If you can, have a contractor perform an independent roof report soon after the storm to corroborate the assessment, aligning it with your photographs.
Wyoming policies often hinge on whether the roof's condition before the storm was a factor in the damage. Gather any prior roof records: last replacement date, prior repairs, and notes from maintenance visits. A documented baseline helps distinguish what was already wearing out from new impact or wind effects. Sharing this context with the adjuster and your contractor roof report can improve the odds of a fair evaluation.
The sequence of events matters. If a hailstorm happens in spring and a wind event comes later, insurers may question which event caused the latest damage. You can strengthen your position by presenting a tight timeline, the storm-specific damage, and a professional report that connects the dots with your prior condition notes.
Create a simple, dated file after each major storm: photos, any contractor notes, and a copy of the report. Keep this organized for easy handoff to the insurer and your roofing expert. When in doubt, contact a trusted local contractor early to prepare the roof report and ensure your documentation aligns with wind and hail risk realities in this high, exposed setting.
In Laramie, repeated freeze-thaw tends to expose weaknesses first at flashing transitions, roof penetrations, and any area where meltwater can refreeze near colder edges. Those micro-motions push against sealants, caulks, and joints, turning tiny gaps into avenues for leaks after a heavy thaw or a sudden cold snap. If a skylight curb or vent booting isn't properly integrated with the surrounding surface, you'll notice hairline leaks that feel stubborn and hard to track down. Pay close attention to valleys and fastener patterns where ice can back up against a seam. When a roof looks good from the ground but shows stains or damp spots after a warm-up, that's often the telltale sign of a flashing weakness waiting to fail when temperatures swing again.
Wind exposure makes ridge caps, rake edges, and perimeter shingle attachment more vulnerable than in calmer markets. In gusty days, the strongest vulnerabilities show up as lifted edges or shingle tears near the eave and along the ridge line. You may see granular loss on asphalt shingles concentrated where wind streams across the roof plane, leaving asphalt film exposed to sun and meltwater cycles. Metal settings-screw patterns, seam tapes, and fasteners-may begin to patina with loose panels or unsealed seams before you notice widely. Those edge details matter most when the air is running hot and cold, then cold again, which is common through rapid weather shifts.
After hail, granular loss on asphalt and cosmetic or functional denting on metal can become the local trigger for both leak investigation and insurance disputes. A dented panel or a missing granule patch can mask underlying corrosion or seam wear, so the first rain after a hailstorm is not the time to assume the roof survived intact. Look for soft or wrinkled spots along ridges and around vents, and don't rely on surface appearance alone. If a hail event leaves any irregularities, treat them as potential gateways for moisture that will complicate claim review and future repairs.