Last updated: Apr 19, 2026
Thunderstorm-driven wind and hail events can turn a simple repair decision into an insurance-backed replacement overnight. In the Cherokee County market, a shingle lift, lifted granules, or dented metal can escalate quickly from cosmetic fix to structural concern. When hail hits, the clock starts ticking on hidden damage-felt as compromised underlayment, blistering, or compromised sealant that may not show up until a heavy rain. If you notice curling shingles, granule loss, or dented vents after a storm, treat it as urgency: waiting even a few days can allow moisture intrusion to spread and complicate repairs or trigger a full roof replacement later under an insurance claim.
Georgia roof claims in this area rely on solid photo documentation of prior condition, clear adjuster review, and a precise scope tied to code compliance and material type. Start with comprehensive photos from multiple angles, including close-ups of damaged shingles, gutters, vents, and any interior signs of leak-ceiling stains, attic condensation, or warped decking. Keep a dated record of each storm event and any changes you notice over time. When you file, the adjuster will compare pre- and post-storm conditions, so the more evidence you have of the roof's state before the hit, the smoother the claim process. If a contractor notes mismatches in material type or a mismatch with code-compliant components during a walk-through, that can set expectations for a replacement rather than a repair. This requires timely, precise communication with your insurer and your chosen roofing team.
Spring and fall are the installation sweet spots in Cherokee County because summer heat and humidity can throw a wrench in scheduling and performance. Storm season can extend into early summer and late fall, but the weather pressure is most favorable when humidity is moderate and rain showers are predictable rather than prolonged. If your roof has sustained hail impact or wind damage, plan for immediate assessment but align installation with the windows-your local crew will be attuned to the seasonal delivery of materials and optimal ventilation during those months. Delays in installing during peak storm windows can push a claim into a larger scope, especially if interior moisture has a chance to progress, or if you end up with secondary damage that complicates the scope.
First, arrange a storm damage assessment with an experienced contractor who understands Cherokee County's expectations. They should document existing conditions, provide a transparent scope, and help prepare the documentation the insurer will require. Next, coordinate with your adjuster to schedule a field review and ensure the scope aligns with your chosen materials. If the claim is approved for replacement, insist on a project timeline that respects the spring or fall installation windows, and confirm that the chosen materials meet local performance needs against hail and wind exposure. Finally, maintain a steady line of communication with your contractor and insurer: timely updates, updated photos after each stage, and clear acknowledgments of changes prevent miscommunications from slowing the process and jeopardizing the replacement delivery.
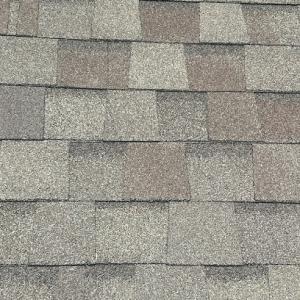
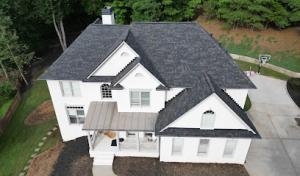
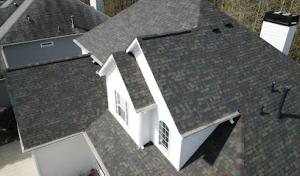
Asphalt shingles are the workhorse among Woodstock replacements, because they fit the typical residential rooflines found around Cherokee County and are responsive to insurance-driven replacements after storm events. In summer, the North Georgia heat and humid air can accelerate granule loss, curling, and aging on older roofs. That means a roof that looks fine in spring can show wear quickly after a string of high-temperature days and frequent afternoon thunderstorms. When choosing this material, plan for a shingle with good UV resistance and a higher wind rating, and be prepared for more frequent inspections after severe storms to catch flagging granules and lifted edges before moisture infiltrates the deck.
Metal is a strong local fit for homes facing recurring storm exposure. It handles hail better than many traditional shingles, and its installation can help shed wind-driven rain more effectively once the system is in place. If a home already has framing and decking able to support non-conventional loads, metal can be a practical upgrade that minimizes the chance of storm-related leaks after a hail event. In this climate, metal's coolness during the heat of summer can help reduce heat absorption, but note that some metal profiles can amplify noise during heavy storms unless properly insulated and sealed. Accuracy in flashing details around chimneys, vents, and transitions remains crucial, especially on older Woodstock homes with varied roof lines.
Clay tile and concrete tile deliver long service life and a distinctive look, but they demand careful structural consideration. Many homes in this market were not originally framed for heavy coverings, so a retrofit may require reinforcement of rafters or decking to prevent sagging and ensure proper fastener performance in windstorms. Tile can resist impact well, yet cracked tiles can create hidden leaks if not addressed promptly after hail or heavy rains. If choosing tile, work with a contractor who can verify whether the existing structure can support the weight, and plan for potential reinforcement to avoid future concern after a major storm season.
Wood shingles and shakes are available in this market, but humidity plays a bigger role here. In prolonged damp spells, moisture retention can shorten service life relative to drier climates, and high humidity can accelerate mold and mildew issues around fasteners and seams. If wood is selected, opt for treated or cedar varieties with proven resistance to rot and insect pressure, and ensure proper ventilation and underlayment to minimize moisture entrapment. Regular maintenance becomes essential in Woodstock's humid stretches: rapid cleaning of debris, prompt repair of any water intrusion, and periodic re-sealing to slow dimensional changes that can lead to gaps.
Consider how each option aligns with your home's existing structure, attic ventilation, and overall aesthetic. In a storm-prone area, a well-sealed roof with robust flashing around penetrations is worth prioritizing, regardless of material. If a property has multiple roof lines or complex geometry, ensure that the chosen system can accommodate those details without creating vulnerable seams. For older homes with unique framing, a cautious approach-balancing weight, wind resistance, and patchability after hail-tays practical. The goal is a roof that holds up through North Georgia's fast-moving thunderstorms while maintaining a dependable seal and a manageable maintenance schedule.
In Woodstock, storm-driven demand after North Georgia hail and wind events can tighten labor availability and extend lead times. When a significant hail season hits, local crews pivot to storm work, and you may see longer scheduling windows even for a straightforward replacement. If your roof is near the edge of a one- or two-day job, expect adjustments in project logistics, material deliveries, and crew turnover. Planning around peak after-storm windows helps minimize delays, but you should build a cushion into your timeline for weather-driven holds and temporary access needs.
Costs in Woodstock rise when steep suburban rooflines, multiple penetrations, chimneys, and skylights increase tear-off complexity and flashing labor. Steep pitches require extra safety measures and equipment, which can push labor time higher than a flatter roof. Each chimney or skylight adds flashing seams that must be carefully integrated with the chosen roofing material to prevent leaks. If your home has a lot of venting, weep holes, or attic access points, anticipate incremental increases in both material waste and labor hours compared to a standard, low-slope replacement.
Typical cost ranges in Woodstock reflect the local market during storm seasons and the variety of materials homeowners choose. Asphalt shingles run roughly from 350 to 700 USD per square, providing a balance of cost and reliability that fits many suburban homes. Metal roofing sits higher, about 600 to 1100 USD per square, offering durability against hail but with a steeper upfront price. Clay tile and concrete tile projects commonly fall in the 900 to 1700 USD and 800 to 1400 USD per square ranges, respectively, and wood shingles/shakes are usually 650 to 1100 USD per square. Slate options can push well above 1200 up to 2300 USD per square. If your home has a mix of aged decking or higher tear-off waste, the final bill can lean toward the upper end for any given material.
Insurance-driven replacement timing is a common driver in this market. After a claim is approved, the start date can hinge on material availability, contractor scheduling, and the pace of temporary protections as storm debris are cleared. You'll want to verify that the chosen material aligns with your insurance scope and that the installation window accounts for potential back-and-forth with adjusters. A practical approach is to lock in a preferred start date with your contractor, establish clear milestones for tear-off, decking checks, and underlayment, and keep a contingency plan for weather days that may push the schedule beyond the initial window.
Precision Roofing
(404) 480-2751 www.precision-roofer.com
3205 S Cherokee Ln Suite 130, Woodstock, Georgia
5.0 from 135 reviews
Precision Roofing is an Owens Corning Preferred Contractor with a dedicated team of roofing professionals committed to providing exceptional workmanship and top-quality roofing solutions for homes and businesses across the region. Our staff combined has over 20 years of experience. Our skilled technicians are experts in all aspects of roofing, from new roof installations and repairs to storm damage restoration. We take pride in our attention to detail, ensuring that every project is completed to the highest standards. When you choose Precision Roofing, you can rest assured that your roof is in the hands of experienced and reliable professionals.
MTak Roofing Systems
(404) 615-6436 www.mtakroofingsystems.com
233 Arnold Mill Rd Suit 300, Woodstock, Georgia
5.0 from 86 reviews
We are focused on workmanship, quality, and efficiency. Our attention to detail ensures your satisfaction is above the rest. Call or email us today to request a free inspection or estimate!
Terminus Roofing & Restoration
(866) 837-6168 www.trustterminus.com
1445 Londonderry Dr, Woodstock, Georgia
4.9 from 309 reviews
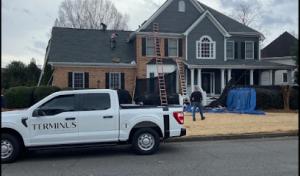
Terminus Roofing and Restoration is a trusted roofing company serving North Georgia and the greater Atlanta metro area. We specialize in roof repair, roof replacement, storm damage roofing, and emergency roofing services for residential and commercial properties. With over 20 years of experience, our team delivers dependable workmanship, clear communication, and high-quality materials built for Georgia’s climate. We also provide storm-related restoration services to support properties affected by wind, hail, fire, or water damage. Contact Terminus Roofing and Restoration today to schedule a professional roof inspection or request a commercial roofing estimate.
Preserve Roofing & Renovations
(678) 444-9459 www.preserveroofing.com
1010 Churchill Ct, Woodstock, Georgia
5.0 from 104 reviews
Preserve Roofing is a full-service exterior renovation company based in Woodstock, GA. We believe that the best way to Preserve your home is through conscientious craftsmanship and long-lasting, durable products. We are certified contractors for GAF, Owens Corning, and Andersen Windows. Our services include Roofing, Windows & Doors, Siding, and Gutters. Let us help you Preserve what's yours!

Thor Roofing
(678) 790-0566 thor-roofing.com
236 Ashland Dr, Woodstock, Georgia
5.0 from 64 reviews
THOR Roofing delivers high-quality roof replacement, roof repair, metal roofing, gutter cleaning, gutter replacement, chimney caps, siding repair, and FREE drone inspections in the Greater Atlanta area. Our licensed team provides durable workmanship, honest assessments, and reliable service for storm damage, leaks, and full roofing projects. Trusted for fast response, fair pricing, and superior craftsmanship—THOR Roofing protects your home with strength and integrity.
Contour Roofing
(678) 880-4414 www.contourroofing.com
Woodstock, Georgia
5.0 from 59 reviews
Contour Roofing is proud to provide quality roof installations and roof repairs throughout metro Atlanta. From the moment you call Contour Roofing, you will find our staff to be courteous and respectful, and we will go the extra mile to make you a very satisfied customer.
RoofSmart
(678) 954-8593 www.roofsmart.com
10214 Hickory Flat Hwy #102, Woodstock, Georgia
4.9 from 89 reviews
At RoofSmart we are committed to providing our clients with a dependable and trustworthy experience, utilizing the expertise of our experienced and knowledgeable Woodstock roofing contractors who are licensed and insured. This ensures that all work completed is done in accordance with safety regulations and produces results of the highest quality Our team takes pride in providing efficient and innovative solutions tailored to each customer's needs. We guarantee that when you choose us for your roofing needs, you will receive nothing less than the best quality service, reliable expertise, and customer satisfaction.
ComfortEagle Roofing
(770) 628-0675 www.comforteagleroofing.com
225 Creekstone Ridge Suite 415, Woodstock, Georgia
4.9 from 86 reviews
Welcome to ComfortEagle Roofing! We are a woman-owned roofing company in the Woodstock, GA and Surrounding Areas of North Metro Atlanta Area and are committed to providing top-quality roofing services. We have over two decades of experience in the roofing industry. During this time, we’ve completed hundreds of projects and have acquired skills and knowledge to handle everything related to roofing systems.
ARAC Roof It Forward
(470) 289-2212 roofitforward.com
296 Bell Park Dr, Woodstock, Georgia
4.8 from 1694 reviews
ARAC Roof It Forward is a residential and commercial contractor specializing in retail and insurance restoration projects. Our expertise includes all types of roofing, gutters, insulation, woodwork, and more. We pride ourselves on uncompromising character, ethics, and workmanship. At the core of our mission statement, we feel a tremendous sense of gratitude and fulfillment in the fact that we've made a commitment to give back to the communities that we are blessed to serve through our Roof It Forward initiative. This involves volunteering our time and giving a portion of every dollar we earn to fund Camp Sunshine. The purpose of this beneficiary is to help kids battling cancer get back to being kids again. "Together we can Roof It Forward"
Complete Roofing
(678) 885-9213 www.completeroofing.com
220 Heritage Walk Suite 202, Woodstock, Georgia
4.8 from 493 reviews
We focus on helping homeowners who have storm or hail damage get a new roof through their insurance. We walk along side our customers by answering their questions, meeting with their insurance adjuster, and providing the highest level of documentation of damage through high res photos from our drone inspections. Yes, you can get a new roof through insurance!
Amplify Roofing
(770) 376-8072 www.amplifyroofing.com
6478 Putnam Ford Dr #222, Woodstock, Georgia
5.0 from 52 reviews
Specializing in roof replacement in North Georgia using weather forensic storm technology, on-staff insurance specialists, comprehensive roof condition reporting, and software-based insurance estimation.
Ridgepoint Roofing
(678) 916-7112 ridgepointroofing.com
6478 Putnam Ford Dr Suite 108, Woodstock, Georgia
4.9 from 101 reviews
Ridgepoint Roofing founded by the Georgia-native father and son team of Tommy and Les White, embodies over 20 years of roofing expertise and a strong commitment to personal excellence, honesty, and dependability. Serving Atlanta for since 2008, they have earned the trust and respect of numerous national insurance companies, making Ridgepoint the premier choice among roofing companies in Atlanta, ensuring top-notch workmanship and dedicated customer service for each roof and every customer.
When a full roof replacement is on the horizon, treating it as informal maintenance can lead to delayed approvals and potential code issues. Cherokee County expects a formal permit process for meaningful roof work, particularly after severe weather calls or insurance-driven replacements common in this area. Getting the permit right up front helps ensure the project proceeds smoothly through the storm season and the underwriting path remains straightforward. The county's emphasis on proper documentation reflects how local crews handle Cherokee County's stricter inspections and how insurers view fully disclosed scopes of work.
Before submitting anything, gather the basics: a clear scope of work that aligns with the actual roof replacement, the chosen contractor's license information, and proof of contractor insurance. In Woodstock, where storm damage can drive rapid decisions, it helps to have a written description of the materials, venting changes, and any auxiliary repairs tied to the project (drainage, soffits, fascia, or deck attachment). A detailed scope reduces back-and-forth with the county and speeds up the review. Keep your contractor's contact details and project address ready, as those items appear repeatedly in the application. If there are any altered plans due to storm-related damage or insurance requirements, document those changes clearly so the permit review can proceed without delays.
The Cherokee County process generally involves submitting project details, contractor information, and a clear scope of work before work begins. Once the permit is issued, inspections are scheduled at pivotal stages: the initial framing or shingle deck processing, a mid-build inspection to verify proper installation and ventilation, and a final inspection to close the permit and confirm compliance with local code and the approved scope. In Woodstock, these inspections align with the county's expectations for engineered fixes, weatherproofing, and any modifications tied to upgrades or shingle choices. Licensed contractors with experience navigating the county system typically have the right documentation ready, which helps keep inspections on track and minimizes the chance of rework.
Coordinate closely with the contractor to ensure the permit application mirrors the actual work. Any deviations discovered during inspections should be reported promptly and amended in writing to avoid delays. Maintain a file of all inspections and correspondence with the county; keeping complete documentation helps prevent miscommunications that stall the project. If a storm-related claim triggers changes to the scope, provide a concise, updated description and ensure the permit reflects the final installed materials and ventilation plan. A well-documented, licensed crew with a clear scope is the best defense against weather-driven timing hurdles and insurance processing snags.
Storms whip through Cherokee County with enough speed to leave misgivings in their wake, and Woodstock roofs bear the brunt of wind, hail, and quick-moving thunderstorm debris. If a claim seems likely, you need a clear before-and-after record: shingle condition, interior leaks, and exterior elevations all matter once the adjuster arrives. Before that visit, inventory what is visibly damaged or displaced and note any recent storms that could have prompted changes. A well-kept record helps separate sudden storm loss from long-term wear, a distinction insurers scrutinize carefully in this market. The more precise your notes, the less room there is for guesswork about what occurred.
Take time to gather and organize evidence so the adjuster can see the full picture without guesswork. Start with exterior photos that show roof surface, flashing, vents, and any hail pitting or missing granules. Ground-level and low-angle shots help document the extent of wind damage to ridges and edges, while interior photos should capture leaks around ceilings, walls, and attic insulation staining. Keep a dated log of observed changes, including elevations and the condition of nearby trees or debris. Prior-condition evidence-if available from a recent inspection or home maintenance records-can influence the scope of the claim, so preserve it carefully. Simple notes about weather conditions during the damage event can also matter when reviews are underway.
Claim outcomes in this region can hinge on code-related line items and manufacturer warranty considerations when matching materials after a storm loss. If the roof is replaced, the insurer may check whether the chosen materials align with current code expectations and with the manufacturer's warranty requirements. This is not a theoretical concern: the sequence of replacement, the exact shingle or panel type, and the way color and texture are matched can affect warranty eligibility and coverage decisions. By documenting the roof's original materials and any visible wear before the storm, you help the adjuster interpret whether the loss qualifies as a sudden event or a cost of upgrading to newer standards. In Woodstock, staying organized and proactive can prevent surprises once the claim moves from inspection to settlement.
Connect with contractors who help homeowners navigate the claims process from damage assessment to final approval.
Precision Roofing
(404) 480-2751 www.precision-roofer.com
3205 S Cherokee Ln Suite 130, Woodstock, Georgia
5.0 from 135 reviews
MTak Roofing Systems
(404) 615-6436 www.mtakroofingsystems.com
233 Arnold Mill Rd Suit 300, Woodstock, Georgia
5.0 from 86 reviews
Terminus Roofing & Restoration
(866) 837-6168 www.trustterminus.com
1445 Londonderry Dr, Woodstock, Georgia
4.9 from 309 reviews
Strong storm winds in Woodstock can create immediate tarp-management problems, especially when afternoon thunderstorms interrupt active jobs or expose decking. Some rooftops will shed tarps or shingles mid-storm, leaving underlayment vulnerable to soaking. You should inspect the roof from a safe distance after a gusty event and secure any loose tarp edges with roofing nails and 2x4 wind blocks. If you notice shingles peeled back or granules blown into gutters, treat it as a warning sign that the roof needs attention before the next wave of moisture.
Emergency response matters locally because summer storm sequences can bring repeated rain before a permanent repair crew can return. Plan for rapid containment: have tarps, plastic sheeting, and quick-seal caulk readily accessible, and designate a nearby entry point for workers to minimize foot traffic across wet decking. When crews must pause due to lightning or generator outages, you want a ready plan to cover exposed decks and penetrations. Communicate weather windows to the contractor so their return aligns with dry spells rather than chasing storms.
Quick temporary dry-in is especially important when hail or wind damage occurs just ahead of another North Georgia storm cycle. Prioritize covering valleys, penetrations, and chimneys, then focus on any compromised decking or underlayment. Use temporary patches over damaged vents or skylights to limit interior intrusion. After a rain, walk the interior ceilings for fresh staining and address it immediately; delaying can turn a small leak into costly interior damage. In Woodstock, timely decisions during a storm sequence preserve structure and interior comfort until a permanent repair can complete.
When you can't wait, these contractors offer fast response times to stop leaks and prevent further damage.
MTak Roofing Systems
(404) 615-6436 www.mtakroofingsystems.com
233 Arnold Mill Rd Suit 300, Woodstock, Georgia
5.0 from 86 reviews
Terminus Roofing & Restoration
(866) 837-6168 www.trustterminus.com
1445 Londonderry Dr, Woodstock, Georgia
4.9 from 309 reviews

Complete Roofing
(678) 885-9213 www.completeroofing.com
220 Heritage Walk Suite 202, Woodstock, Georgia
4.8 from 493 reviews
In this market, crews move fast after a storm, and response speed often determines how smoothly a roof replacement goes. Look for a crew that can be on-site within 24 to 72 hours after reports of hail or high winds, not just when the weather is calm. Practical cleanup matters matter more than flashy promises: ask about daily debris removal, tarping during weather gaps, and how they handle nails and fragments around driveways and landscaping. A Woodstock-based crew familiar with tough springtime storms will anticipate mud, drainage issues, and leaf-filled gutters, and will outline a concrete plan for keeping your yard and driveway clear during the project.
Free inspections are common locally, and drone reviews are widely used. You should receive visual documentation-photos and video-showing roof damage, hail impact patterns, and a step-by-step progression of the replacement. If a crew leans on vague verbal assurances, move on. A solid contractor will provide before-and-after imagery, a written scope, and a realistic timeline that accounts for typical North Georgia thunderstorms and afternoon downpours.
Cherokee County expects licensed contractors and clear scope documentation, so you need clarity on who is actually pulling the permit and who is responsible for inspections. Ask for the project lead's name, a direct contact number, and a plan for addressing any issues that arise during the process. The best crews assign a dedicated supervisor who will be onsite daily, handle material deliveries, coordinate with the insurance adjuster if needed, and ensure inspection milestones are recorded and communicated in real time. This level of hands-on management helps prevent delays and miscommunication when weather shifts suddenly.
Get a clear picture of your project costs upfront - no commitment required.
MTak Roofing Systems
(404) 615-6436 www.mtakroofingsystems.com
233 Arnold Mill Rd Suit 300, Woodstock, Georgia
5.0 from 86 reviews
Weather Tight Roofing Solutions
220 Heritage Walk Suite 214, Woodstock, Georgia
4.7 from 39 reviews
Aldridge Roofing & Restoration
(864) 909-1016 www.aldridgeroofing.com
Woodstock, Georgia
4.8 from 21 reviews