Last updated: Apr 19, 2026
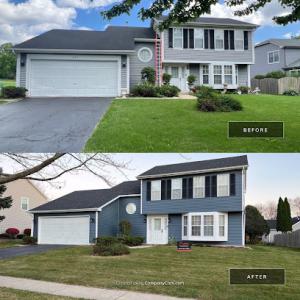
Storm season in this market follows a predictable pattern: spring and summer storms bring wind and hail that trigger claim activity, then winter snow and the freeze-thaw cycle reveals hidden damage. If a roof survives a hail event but experiences wind-driven debris or hail impact, the damage may not be fully visible until after the thaw. In this climate, decisions about replacing a roof are often driven by when the storm is fresh in the adjuster's and contractor's minds and when the ice and thaw expose vulnerabilities. That means if a storm hits your neighborhood, you should map out a rapid plan to document, report, and act before damage deteriorates or temporary fixes lapse.
The first 24 to 72 hours after a storm are critical for capturing photos of any irregularities. Focus on missing shingles, creased decking, granule loss, dented flashings, and damaged vents or skylights. Keep date-stamped images and compare to the roof's past condition if you have it. Collect receipts for any temporary repairs and note the date of the storm and its severity in a simple log. If you've done previous inspections, highlight issues that have worsened since then. Insurance carriers in Illinois commonly ask for photos, invoices, and a contractor scope of work before approving replacement costs, and adjusters may compare the roof condition against code-related items. Present a concise scope that distinguishes cosmetic wear from structural damage.
Spring and summer storms drive the insurance conversations, but winter snow can mask problems until thaw reveals them. If a storm occurs, file promptly to lock in the claim window and to avoid disputes over timing or causation. Plan a rapid but careful inspection by a qualified roofer within a week or two of an event, especially if there is wind-driven debris, large hail, or visible shingle displacement. In the months after thaw and the first warm spell, recheck suspicious areas. The lag between storm exposure and visible failure means that patience can be costly; proactive documentation and timely action reduce the risk of the insurer disputing preexisting conditions or deferred damage.
Adjusters will likely measure the roof against current code-related items and compare your condition to what a typical replacement would entail. Prepare a contractor's scope of work that mirrors the loss assessment: confirm the number of squares affected, the materials proposed, and the required replacements for underlayment, flashing, and venting if applicable. Ensure the scope explicitly notes any wind damage, hail impact, and seasonally affected components such as ice barriers or roof edge metal. Ask the roofer to accompany you when meeting the adjuster to walk through each damaged area and to reference clear photographic evidence. Documentation should be organized, with a photo log tied to the corresponding areas of the roof and a line-by-line matching scope of work.
Delay is the enemy. Waiting for spring inspections to "settle" or assuming wear is purely cosmetic can open gaps for denial or underpayment. Do not rely on old estimates or generic repair notes; insurers want a current, itemized, contractor-backed plan. Do not skip the structural components when hail or wind is involved; if decking, underlayment, or flashing show signs of wear, those are often the differentiators between a repair and a full replacement. Finally, avoid signing a preliminary agreement without a complete scope and a clear timeline that aligns with both your insurer's expectations and the weather-driven realities of South Elgin's climate.
Apex Exteriors
1655 Shanahan Dr, South Elgin, Illinois
4.8 from 240 reviews
At Apex Exteriors, we specialize in transforming the exterior of your home with a wide array of services including roofing, siding, windows, doors, and gutters. With over 40 years of experience, our team of experts have been delivering top-notch exterior home finishing solutions across Northern Illinois, Southern Wisconsin, and Northwest Indiana. Whether you require a service repair for your roofing, siding, gutters, or a complete home improvement renovation, you can rely on us to get the job done right, the first time. Our professionals possess the knowledge and expertise needed to handle any project efficiently and effectively. Contact us today to benefit from our professional know-how and make your home exterior vision a reality.
4All Roofing Contractors
(224) 242-8228 southelginroofers.com
35W059 State Rte 31, South Elgin, Illinois
5.0 from 34 reviews
4All Roofing Contractors is the roofing company in South Elgin that has your back when it comes to your roofing needs. We provide services for both your commercial roofing and residential roofing. Our services include roof repair and roof replacement that are done by professional roofing contractors. We offer a free and accurate estimate at the initial meeting so that there wouldn't be any surprises along the way. Our team of roofers ensures to keep smooth communication during the process so that you will be updated on the progress of your roof. We are equipped with roofing contractors that can determine the problem of your roof and can turn into something once again. Call one of the best roofing companies in the South Elgin area today!
Purple Cow Roofing
(765) 478-7753 purplecowroofing.com
460 Briargate Dr STE 900, South Elgin, Illinois
4.8 from 37 reviews
With over forty years of combined experience, Purple Cow Roofing is a premier roofing, gutter, and siding contractor dedicated to serving customers across Illinois, Indiana, and Wisconsin. We operate on a foundation of safety, meticulous procedures, and an unwavering commitment to both our customers and employees. Our passionate team delivers world-class quality and exceptional service, ensuring a positive and professional experience from start to finish. We take immense pride in our work, making every project a testament to our dedication to excellence.
Halo Exteriors
(630) 441-5745 www.haloexteriors.com
Serving
5.0 from 28 reviews
Halo Exteriors is a Family owned and operated business with years of experience in the local area repairing homes. We are BBB accredited and our goal is to make a positive impact on any property or community we have the pleasure to work with. We offer a full service which handles every step along the way so you can focus on your priorities knowing your property is in good hands.
MidWest Elite Restoration
(630) 780-4091 www.midwesteliterestoration.com
Serving
4.9 from 46 reviews
Midwest Elite Restoration provides roof replacement services to commercial and residential customers in South Elgin, IL and the surrounding area. With years of experience helping customers improve the comfort and functionality of their homes, we have the skills and extensive knowledge to install your roof correctly the first time. We are a locally owned and operated business, licensed and insured for your protection. Our services include roof replacement, leak investigations and restoration. We share our knowledge with customers so they can make informed choices for their roofing projects. Our friendly technicians cater to our customers' needs with on-time, superior service and quality work.
Halmer
Serving
5.0 from 19 reviews
At HALMER, we specialize in public adjusting, roofing, gutters, soffit, siding, and more. Our comprehensive services cover a wide range of exterior home needs, ensuring that your property remains protected, functional, and aesthetically pleasing. With our expertise in public adjusting, we navigate insurance processes seamlessly to maximize your coverage. From roofing installations to gutter repairs, we handle every aspect of your project with professionalism and attention to detail. Trust us to deliver top-quality solutions for all your exterior home improvement needs.

DFC Roofing, Dyna-Flow Corporation
Serving
5.0 from 29 reviews
DFC is a family owned and operated roofing contractor serving Elgin and the surrounding area for over 40 years. Give us a call for a free estimate on your roofing needs!
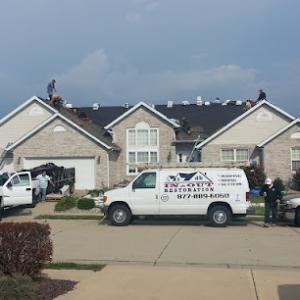
In & Out Restoration
(708) 510-9861 www.iaorestoration.com
Serving
4.9 from 72 reviews
In & Out Restoration is a family owned and operated, specializing in residential remodeling. Our services include roofing, windows, doors, siding, gutters & storm damage repair. We offer full service insurance inspections and repair consultations for wind, hail or tornado damage. At In & Out Restoration, we only use the best materials available all backed by the skilled craftsmanship. We pride ourselves on our commitment to our customers, craftsmanship, and most importantly our five year warranty. We always guarantee your 100% satisfaction. In & Out Restoration is a company that is big enough to have received such recognition, as being members of The National Roofing Contractors Association, as well as being “A+” rated in the BBB
Abel Roofing & Construction
(847) 800-7700 abelroofingandco.com
Serving
4.6 from 34 reviews
Abel Roofing & Construction is a family-owned company proudly serving the Chicagoland area with expert residential and commercial roofing solutions. We specialize in all roofing systems—shingle, metal, cedar shake, all low slope roofing systems—as well as complete exterior services including gutters, siding, windows, soffit, fascia, and doors. Call for a free estimate!
NV Roofing
(847) 429-2669 nvroofinginc.com
Serving
5.0 from 22 reviews
We are a licensed roofing contractor in the state of Illinois with experience in all types of roofs. We do interior and exterior work including roofing, siding, soffit, fascia, gutters, windows, drywall and painting.
Vista Restorations
(847) 766-1654 www.vistarestorations.com
Serving
4.9 from 16 reviews
Committed to quality jobs and working locally with years of experience transforming homes, whether remodeling or repairing them. We offer quality services in residential and commercial industry
Durable Roofing & Coating Systems
(847) 504-7679 durableroofingandcoatingsystems.com
Serving
4.5 from 16 reviews
Durable Roofing and Coating Systems is dedicated to delivering professional roofing, siding, and gutter services with a commitment to honesty and integrity. Serving Cook, DuPage, and McHenry counties, we pride ourselves on ensuring every project meets the highest standards of quality and customer satisfaction. Our skilled team is always ready to assist with any questions or concerns about your home or business installations. We invite you to experience our exceptional service and get in touch with us today for all your roofing needs.
South Elgin's cold winters create repeated freeze-thaw cycling that can open shingle seals, stress flashing, and worsen minor leaks over a single season. When nights drop below freezing and days rise above, water seeping into tiny gaps can refreeze and push apart sealants. That pressure isn't dramatic at first, but it compounds across dozens of shaded roofs and dormers around town. Older homes with aging flashing or cracked vent boots are the ones most likely to show a quick shift from a small drip to a noticeable stain after a few cycles. Understanding this pattern helps you spot trouble early rather than chasing a leak after a storm.
Snow load and ice-related stress matter more here than in milder Illinois markets, especially on older roofs that already have ventilation or flashing weaknesses. Snow acts like a pool of weight that sits on top of a roof as it compacts and refreezes, pulling against fasteners and edge materials. In windy pockets along the Fox River valley, wind-driven snow can create uneven load distribution, aggravating ridge lines and eaves. Ice damming can form as heat escaping from the attic melts bottom layers of snow, while upper layers remain frozen, forcing meltwater to back up behind ice at soffits and gutters. If a roof is near the end of its service life or has any preexisting gaps, those conditions will show up as faster leak development during thaw cycles or after a heavy storm.
Replacement timing in South Elgin is often planned around getting work completed outside the harshest winter conditions but before spring storm season exposes existing weak points. The window between late fall and early winter can be ideal because it avoids the freezing core of mid-winter while giving a roof time to recover from the season's wear before spring rain, hail, and temperature swings ramp up. If a roof shows consistent signs of wind-driven ingress, repeated ice damming, or multiple frost-related leaks across a season, consider scheduling work so that critical components-such as flashing, underlayment transitions, and ridge vents-are upgraded before the next freeze-thaw cycle returns. Coordination with a contractor who can seal vulnerable edges and reinforce ventilation helps prevent new weak points from forming with the next storm pattern.
Walk the attic during dry days to check for any attic vent blockages or insulation gaps that could be driving heat into the roof deck. Inspect eaves and near-peak flashing for lifting or corrosion after dynamic storms, especially near dormers or skylights. After a freeze-thaw cycle, look for new damp patches or staining along rakes and valleys; these are early indicators of seal stress and potential ice dam risk. Keep gutters free of debris so meltwater can move away from the roof properly, reducing the chance of ice buildup at the eave line. If a leak appears consistent with freeze-thaw timing or ice dam formation, treat the area as a warning sign rather than a one-off leak-address flashing integrity and ventilation to blunt the next cycle's impact.
In this area, the roof market moves around the Fox River valley's weather swings. The seasonal freeze-thaw cycle and off-hurricane-hail patterns mean a roof is as much about resilience as curb appeal. Asphalt shingles dominate replacements because they fit the area's re-roofing-heavy residential market and are widely used on suburban pitched roofs. This combination of familiarity, cost-effectiveness, and broad contractor availability makes asphalt a reliable default choice when time and practicality drive the decision.
For many homeowners, asphalt shingles deliver predictable performance across a broad range of houses in the region. Modern asphalt products balance wind resistance, impact durability, and ease of installation, which matters when a hail event or a rapid temperature shift prompts quick replacement. Look for shingles with good granule adhesion and a warranty that covers reflective or granule loss scenarios common after winter storms. In homes with multiple roof planes, color and profile choices should consider the long-term appearance as shingles age through sun exposure and seasonal moisture. Regular inspection after heavy storms helps catch edge wear or wind damage before it leads to leaks.
Metal roofing is a meaningful but smaller specialty locally, typically considered by homeowners looking for longer-term performance against snow shedding and storm exposure. If snow load, ice dams, or frequent wind-driven hail is a concern, metal can shed snow more predictably and resist denting better than some shingle systems. The trade-off is a higher upfront cost and potential flashing considerations around eaves, valleys, and skylights. When metal is chosen, ensure the system is matched to the roof's pitch and existing framing to avoid thermal movement issues. A metal roof also calls for a contractor experienced with panel seams, proper sealing at penetrations, and careful integration with gutters and drainage.
Tile and cedar shake appear in the market but are specialty installations in this area, so homeowners considering them need contractors familiar with their weight, flashing, and repair details. Clay or concrete tiles bring a distinctive look and high durability, but require structural assessment to handle the weight and accurate installation to prevent cracking in freeze-thaw cycles. Cedar shakes offer natural aesthetics and good insulation but demand attention to moisture, potential warping, and meticulous flashing around chimneys and valley intersections. Inquire about install methods, underlayment choices, and long-term maintenance plans, since improper flashing or overdrainage can complicate repairs after a hail event.
Across all materials, the key is how well a roof withstands wind, hail, and repeated freeze-thaw cycles while maintaining a tight, weather-resistant barrier. Consider a system that aligns with current roofing practices in the area, has a track record with nearby builders, and offers clear repair pathways if damage occurs. In any material choice, establish a plan for inspections after major storms, and prioritize components-underlayment, flashing, and ridge lines-that commonly fail first during harsh winters and hail seasons.
Provided local pricing ranges run from 350 to 700 USD per square for asphalt shingles, 650 to 1100 for metal, 900 to 1500 for clay tile, 900 to 1400 for concrete tile, 700 to 1400 for wood shingles or shakes, and 450 to 900 for synthetic or composite shingles. In practice, that means your project cost starts with the material choice and then climbs with roof complexity, attic venting, and the number of penetrations you have to work around. In this market, you'll see asphalt as the most common, with metal and tiles pulling the higher end, especially on homes with steeper pitches or more complex rooflines.
South Elgin experiences winter freeze-thaw cycles and spring hail that can spike demand for re-roofs. After a major hail or wind event, costs can rise as crews, materials, and emergency response time tighten up across the western Chicago suburbs. If storm damage is suspected, expect the replacement to be driven by insurance timelines and available labor, which can compress scheduling and push up short-term pricing. Your decision window often hinges on when a contractor can secure the right materials and crew for your roof's specific layout.
Labor differences between standard asphalt re-roofs and specialty systems (metal, clay or concrete tile, cedar, or low-slope sections) show up in the per-square price and in how long the job takes. Complex hipped roofs, large valleys, or multiple roof planes raise both material waste and labor time, nudging the final bill upward. Costs here are also affected by permit requirements for full replacement, the need to coordinate inspections, and the higher handling and installation precision that tile and metal systems demand. If you're weighing options after a hail event, consider how each material ages in our winter-to-spring freeze-thaw cycle and how that will perform during the next storm season.
Get a clear picture of your project costs upfront - no commitment required.
4All Roofing Contractors
(224) 242-8228 southelginroofers.com
35W059 State Rte 31, South Elgin, Illinois
5.0 from 34 reviews

The Village of South Elgin typically requires a building permit for a full roof replacement. This isn't just red tape; it's a formal check against code requirements that protect your home and your neighbors. In this city, the contractor is generally responsible for pulling the permit and coordinating the required inspections. That means you'll be counting on your roofer to handle the paperwork, schedule the visits, and make sure the project stays on track with the town's deadlines. If the contractor stalls or misses a step, you can quickly find yourself facing delays that hold up the replacement and extend the time your home is exposed to weather during a fragile work phase.
Inspections usually include a rough-in stage and a final inspection focused on flashing, ventilation, and whether the installation meets local code expectations. The rough-in inspection is your early warning system: it verifies that the roof deck is sound, underlayment is properly installed, and roof penetrations (vent pipes, chimneys, skylights) are correctly prepared for the finish roofing. The final inspection centers on the finished product-flashing around dormers, chimneys, and valleys; attic ventilation compliance; and overall adherence to local code. In this climate, where freeze-thaw cycles and wind-driven hail stress can reveal weaknesses quickly, those final checks are essential to prevent moisture intrusion and heat buildup that could shorten the roof's life.
Coordinate with your contractor to align the project timeline with the inspection schedule. Have any required documentation ready, including permit numbers and product specifications for the chosen roofing system. Clear access to the attic and roof lines for ventilation and flashing checks is practical; if attic spaces are cluttered, inspectors may need extra time, which can slow the process. Weather windows matter here too: after a hail event or during thaw cycles, inspectors may be more vigilant about ensuring water barriers and ventilation paths are intact before the final seal is approved.
Because seasonal swings push rapid changes in moisture and wind exposure, insist on a detailed plan for flashing and ventilation upgrades when needed. The right combination of properly installed underlayment, accurate flashing details, and a compliant ventilation strategy isn't just about passing an inspection-it's about preventing recurring issues that could lead to leaks or ice damming in winters. Your contractor should walk you through how the permit process will unfold and provide a realistic schedule, so there are fewer surprises once work begins.
In South Elgin, Illinois is an active wind and hail claim environment, so insurers will scrutinize storm dates, photos, and itemized repair scopes. Keep a clear, storm-specific narrative ready, tying damage to the event window and avoiding gaps between the storm and report. This matters when the winter freeze-thaw cycle compounds preexisting wear, and when hail hits can mimic multiple damage patterns across a roof line.
Document timing and sequence: when the storm occurred, when the claim was first filed, and when the roofer's scope was created. Collect dated photos showing the extent of visible damage from multiple angles, including gutters, fascia, and decking if accessible. Retain a copy of any prior roof reports or maintenance notes that predate the storm. Make sure the itemized repair scope aligns with the actual observed conditions, so adjusters can verify what is necessary beyond the first glance at shingles.
Adjusters in this market may review whether replacement items are tied to code-related requirements, which can affect what gets approved beyond visible shingle damage. Be prepared to explain why certain materials or details are chosen, and how they meet current code-adjacent expectations. An organized package that connects storm impact, required replacements, and the proposed scope reduces back-and-forth and speeds resolution.
Depreciation and roof age can materially change payouts in Illinois claims, making pre-loss maintenance records and post-storm documentation especially important in South Elgin. Maintain a file of routine maintenance, ice dam prevention steps, and any recent repairs. When you file, present a concise history that links age and wear to the indicated damage, so depreciation adjustments are transparent and defensible.
In this market, how fast a crew shows up after a storm and how cleanly they leave matters nearly as much as the actual repair. Homeowners here expect crews that can identify wind and hail damage quickly, set clear timelines, and minimize further leaks while working. A dependable crew will tarp exposed areas, contain debris, and leave the yard and gutters tidied at day's end. Because freeze-thaw cycles amplify hidden damage, you'll notice neighbors prioritizing firms that communicate promptly about assessment findings and next steps, so you're not left waiting through another cold snap.
The local mix leans toward re-roofing rather than niche new-construction work, which aligns with South Elgin homeowners' needs for replacement and storm-restoration projects. You'll find many specialists who focus on asphalt shingles first, with experienced teams ready to upgrade underlayment, vents, and flashing in one coordinated effort. If a project touches attic ventilation or roof-to-wall connection points, expect contractors who treat those details as non-negotiables. When you're comparing bids, look for a firm that can walk you through shingle upgrades, underlayment choices, and documentation for insurance restoration without steering you toward oversized, nonessential upgrades.
Residential roofing dominates the local demand, but there is meaningful commercial and low-slope presence as well. Homeowners with porches, additions, or attached flat sections often need a contractor who can handle mixed scopes. Expect better outcomes when the firm can coordinate a single crew or closely partnered teams to match materials and flashing details across different roof geometries. You'll benefit from a contractor who anticipates transitions between slope and low-slope areas, ensuring watertight connections and consistent performance across the entire structure.
Past storm-season experiences in this area reward contractors who document damage, provide transparent inspection notes, and follow up with clear repair plans. Look for crews who outline who handles insurance communications, who replaces fasteners and vent systems, and who confirms the project will restore the roof's resilience against the upcoming freeze-thaw and potential hail cycles.