Last updated: Apr 19, 2026
In the western Chicago suburban hail and wind corridor, Batavia faces storms that arrive with little warning and leave quick damage trails. The Fox River valley channels strong gusts and hail across roofs that line the historic core and newer in-town homes alike. This isn't theoretical risk-spring and summer storms routinely trigger insurance claims for dozens of homes on a single block. When a hail pulse rips across shingles or flakes out vent edges, the fast-paced visibility of damage makes immediate action critical to prevent further leaks and ice-dam risk.
The city endures a harsh two-part stress cycle. First comes hail and wind during storm season, which can puncture, crack, or dislodge shingles, expose underlayment, and loosen flashing. Then, as winter sets in, freeze-thaw cycles push water into any weak seams, creating ice dams that back up under shingles and into attic spaces. This sequence means a roof that looks fine after a summer storm can deteriorate quickly once temperatures drop. Actionable next steps are needed before the first deep freeze: verify venting, seal flashing, and address any rough spots while your roof is still accessible after a storm.
Local contractors report a strong skew toward storm-damage response and insurance-related work. After a heavy storm, you'll see quick offers for tarp or temporary covers, plus rapid assessments by adjusters. The practical consequence is that roof issues are often time-sensitive: a minor surface dent can hide a larger problem beneath. If a storm hits, prioritize a same-day assessment for visible leaks, damaged flashing, or lifted shingles. Document damage with photos, keep records of any temporary fixes, and coordinate promptly with your insurer to avoid claim delays or coverage gaps.
Older in-town housing stock shares common vulnerabilities with retrofits that may not fully align with modern weather demands. Shingles that have shrunk or curled, cracked flashing around chimneys or skylights, and compromised edge metal are typical flashpoints after a harsh season. In newer builds, wind uplift can reveal misaligned panels or poorly sealed ridge caps. The Batavia climate's shift between hot summers and cold winters accelerates material fatigue, so even a seemingly minor surface irregularity can become a leak under ice dam pressure.
After a major storm, schedule a dedicated roof check within days, not weeks. Focus checks on shingle integrity, flashing around edges and vents, chimney and skylight transitions, and gutters that overflow and back up water toward the soffits. If a quick inspection reveals lifted tabs or damaged sealant lines, arrange professional repair before winter. For homes with flat or low-slope sections, pay extra attention to drainage and ice-guard behavior along eaves and ridges. Remember: in Batavia, the storm season sets the stage, but winter's freeze-thaw cycle finishes the work unless preemptive care is taken.
In Batavia, the cost picture centers on the six materials homeowners most commonly choose: asphalt shingles, metal, clay tile, concrete tile, wood shakes, and synthetic/composite shingles. Asphalt shingles remain the baseline in many older in-town homes and on practical midrange remodels, with a typical cost around 350 to 650 USD per square installed. Metal roofing commands higher headroom, generally 650 to 1100 USD per square, reflecting its longer lifespan and faster installation in certain weather windows. For historic-influenced or high-end appearances, clay tile runs 1000 to 1800 USD per square, while concrete tile sits in the 900 to 1600 USD per square range. Wood shakes and shingles come in around 500 to 900 USD per square, offering a textured look but with maintenance considerations. Synthetic or composite shingles span roughly 700 to 1200 USD per square, delivering a blend of durability and design flexibility. For any replacement plan, expect the local market to refine these ranges based on roof complexity, existing decking, and accessibility.
Storms are a real driver here: hail and strong winds sweep through the Chicago area with enough frequency to tighten scheduling and labor availability shortly after events. When a major storm hits, Batavia projects can experience price bumps and longer lead times as crews swing into high demand. The practical takeaway is to build a contingency in both budget and timeline for a storm season window. If a hail event hits, anticipate a few extra days to weeks before a full crew can dedicate steady days to your project, and prepare for possible material delays if the supplier pipeline is disrupted. Planning with a trusted local contractor who maintains a steady inventory can help mitigate surprise spikes, but expect some fluctuation tied to regional weather patterns.
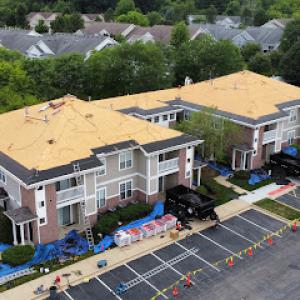
Batavia's established neighborhoods bring unique cost drivers beyond the material choice. Decking repairs are common when older shingles are removed, and some structures show softened or damaged plywood, which requires replacement before a new roof goes on. Ventilation upgrades-such as reconfiguring soffits, baffles, or attic fans-often surface during replacement to improve long-term performance in tight attics. Chimney flashing work is another frequent line item, as older masonry joints and metal flashing may have degraded, needing careful sealing and integration with the new roofing material. Tear-off complexity matters too: a full tear-off on a multi-layer, oblong, or steep roof can extend labor time and disposal costs, compared with a straightforward re-roof. In short, expect a Batavia project to carry modestly higher overhead than a simple suburban re-roof when decking needs attention, ventilation is updated, or flashing around chimneys and intersections requires careful resealing.
Rogoz Roofing Company
(630) 326-6352 bataviaroofers.com
162 W Wilson St, Batavia, Illinois
5.0 from 39 reviews
At our roofing company, we are a leader in the roofing industry, renowned for our commitment to quality, durability, and customer satisfaction. Our roofing contractors serve as a testament of dedication to excellence and innovation in roofing solutions. With a team of certified roofers, we specialize in residential roofing, offering a wide range of services including roof installation, roof repair, and roof replacement. Our use of cutting-edge technology and high-quality materials ensures that each project is completed to the highest standards. Our roofing company Batavia, IL based prides itself on its impeccable service record, integrity, and the lasting relationships built with clients, making us the top choice for all roofing needs.
Marty Shingle Roofing Contractor
(630) 937-3492 shingleroofingbatavia.com
801 S River St, Batavia, Illinois
5.0 from 25 reviews
If you're in need of a specialist in shingle roofing that is reliable and skilled, Marty Shingle Roofing Contractor Batavia is the company to call. We specialize in shingle roofing Batavia services, including roof repair Batavia and gutter repair Batavia. Our roofing contractors are highly trained and have extensive experience working on shingle roofs and performing gutter services. Whatever shingle roofing Batavia problem you may have; we have the skills and experience to solve it. It is important that your roof is maintained for the safety of you and your family. Our competitive prices mean that our services are affordable and we can look after your roof without you worrying about emptying your wallet. Contact us today!
Expert Roofing
(630) 864-6840 expertroofinginc.com
Serving
5.0 from 149 reviews
Expert Roofing in Geneva, IL specializes in roof replacements and professional roofing services for homes and businesses across the Fox Valley area. Our skilled roofers handle complete tear-offs, re-roofs, and new installations designed to protect against Northern Illinois weather challenges, including heavy snow, ice, high winds, and seasonal storms. We also address issues like leaks, storm damage, and aging shingles to restore both protection and curb appeal. Known for quality craftsmanship and responsive service, we are committed to delivering lasting results for our community. Expert Roofing is licensed, insured, and trusted in Geneva as experienced roofing contractors.
Legend Exteriors & Construction
(630) 296-5885 legendexteriors.com
Serving
4.9 from 296 reviews
Legend Exteriors & Construction: Your A+ BBB rated, licensed roofing & siding contractor in West Chicago. We specialize in full replacement & repairs of all roofing systems & offer premium siding options like vinyl, Hardie Board & stone veneer. As gutter installation experts, we provide complete gutter systems & leaf guards. Our window replacement services help you find the best options for your home & budget. We are highly experienced in claims assistance and storm damage restorations, offering Free comprehensive inspections & damage assessments. Uniting unmatched quality, expert claims assistance & a commitment to delivering a LEGENDARY experience to every customer, Legend's the #1 choice for your roofing, siding, gutter, & window needs!

Gravico Commercial Roofing Company
(331) 265-5120 genevaroofingcompany.com
Serving
5.0 from 19 reviews
Established in 1994, our company stands as a premier provider of commercial and flat roofing services in the Chicagoland area. We specialize in complex tasks such as flat roof construction and insulation, and have consistently excelled due to our high technical skill level. Our team of seasoned specialists with over 30 years of experience and our use of top-tier materials define our approach. Customer satisfaction is our guiding principle and a top priority in everything we do. Trust in our reliability, professionalism, and commitment to quality for all your roofing needs.
A & J Roofing Corporation
Serving
4.9 from 33 reviews
Roofing contractor Siding Contractor Gutter Contractor

Randall & Son
Serving
5.0 from 739 reviews
With over 43 years of dedicated local service, Randall and Son Roofing & Exterior has become a trusted name in the industry. We pride ourselves on providing high-quality products, an industry-leading warranty, and unmatched customer service. Our commitment to excellence ensures that every exterior project meets the highest standards of quality and customer satisfaction.

Jeremy's Roofers
(773) 654-4637 roofingcontractorstcharles.com
Serving
5.0 from 60 reviews
We are a leading roofing company specializing in professional roofing services for residential and commercial properties. Our team of expert roofers take care of your roof, offering installation, repair and replacement of all types of roofs. We install asphalt shingles, metal, flat roofs and much more. We use only highest-quality materials and the latest techniques to ensure that your roof is durable, long-lasting and energy-efficient. We're committed to customer satisfaction and strive to exceed expectations with every project we undertake. Whether you need a new roof installed or a repair job done, our team of skilled professionals is ready to provide you with the highest quality roofing services at competitive prices.
Leo Exterior Restoration
(630) 790-1279 www.leoexteriors.com
Serving
4.8 from 19 reviews
Leo Exteriors serves as a leading contractor in the Naperville area. We're a team of fully-certified professionals who tackle everything from large, complex projects to smaller-scale jobs. Fueled by our commitment to excellence, we go the extra mile to make sure clients are completely satisfied with our work. Call us today to schedule a consultation.

ACE Roofing Services
(630) 444-7575 www.ace-roofs.com
Serving
4.9 from 64 reviews
ACE Roofing Services, Inc. is the residential roofing contractor you can rely on for dependable & affordable service. No matter if it’s your roof, siding, or windows, we have the experience to repair or replace any part of your home’s exterior. We also provide roof and exterior inspection to find the source of the problem and ensure that your repairs are necessary. Although we’re based in St Charles, IL, we are proud to serve all of Kane County and much of the western Chicagoland suburbs. We look forward to providing first class roof repair, installation, and home exterior services for our valued customers. If your home has experienced storm damage, we’ll even help guide you through insurance claims!

Atlas Roof Roofing Companies & Roof Repair
(331) 212-8509 roofreplacementaurora.com
Serving
4.9 from 59 reviews
We are number one among roofing companies in Aurora. We offer a comprehensive array of roofing services, including commercial and residential roofing, re-roofing, roofing installation, and roofing repair. No matter what type of roofing you’re working with, our experienced roofing contractors can handle it all. We offer the widest selection of premium materials, as well, like shingle, metal, rubber, and flat roofing. There’s no need to hire multiple specialist roofing companies anymore. Our highly-trained and friendly roofing contractors will provide expert craftmanship as well as top-quality customer service. To top it all off, we offer the lowest rates you’ll find among any roofing companies in Aurora.
Roberts Restorations
(630) 340-8026 robertsrestorations.com
Serving
5.0 from 37 reviews
The leader in home exterior improvement and restoration in Kane and DuPage Counties, the team at Roberts Restorations has been providing exceptional service to clients for more than 15 years. We offer both residential and commercial roofing, gutter and siding installation, and free roof inspections. We offer free estimates and convenient financing is available. We pride ourselves on client communication, making things as easy as possible during the insurance claim process, and providing premier services from design to installation.
A full roof replacement in Batavia typically requires a building permit through the City of Batavia Building Department. Before any shingle lift starts, confirm the permit scope matches the planned project-materials, ventilation changes, underlayment type, and waste-disposal plans all influence the permit review. The permit packet should include the contractor's license details, project addresses, and a concise description of work. Timely submission helps avoid hold-ups when weather windows align with the replacement schedule.
Replacements in this area are not a paperwork-only exercise. Inspections occur at key milestones to verify that building codes and local standards are being met. In practice, look for an early rough-in or structure inspection that checks roof framing, attic ventilation, and proper vent pathways. A final inspection assesses the completed installation, flashing details, and overall workmanship. Scheduling both inspections in advance with the contractor helps keep the project moving, especially given Batavia's regulatory cadence and typical weather interruptions.
Local review commonly checks ventilation adequacy, underlayment installation, and waste-disposal compliance. Ventilation ensures attic air moves correctly to prevent ice-dam formation and heat buildup in hot months. Underlayment quality and overlap are evaluated for effective moisture barriers, which matters in hail-season transitions. Waste-disposal compliance covers how old materials are removed and where debris is staged or hauled, preventing residential debris from accumulating on streets or alleys. Because these checks happen during inspections rather than after completion, planning for access, containment, and cleanup must be part of the project scope from day one.
Coordinate with the contractor to align the permit timeline with supplier deliveries and weather windows. Keep a running checklist that ties every major milestone to inspection timing, so nothing stalls the process. Ensure the scope clearly documents ventilation upgrades or changes, underlayment specifications, and any temporary protective measures for landscaping and driveways. Because inspections scrutinize cleanup, establish a defined waste-disposal plan, including how and where discarded materials are stacked and removed daily. Local expectations favor tidy, well-sealed work sites, especially during winter or early spring when moisture and wind can complicate both installation and inspection readiness.
Before the crew arrives, clear easy access to the roof and eaves, and confirm that exterior finishings near the roofline won't obstruct scaffold or ladder setup. Have a weather contingency plan in place for shifting wind or sudden hail threats that can affect inspection timing. Request a pre-inspection walkthrough with the contractor to confirm that ventilation and underlayment placements meet the anticipated inspection criteria. On the day of final inspection, ensure all penetrations through decks, hips, and valleys are properly flashed and sealed, and that any temporary tarping or protection installed during the project is removed or secured as part of the final cleanup.
Asphalt shingles dominate replacements in Batavia because they fit the area's mainstream housing stock and the local contractor base has the strongest material-specific presence in asphalt work. For many homeowners, a modern architectural or conventional three-tab asphalt shingle delivers dependable protection against the Fox River valley's variable weather. The wide availability of local installers means quicker scheduling, more predictable workmanship, and a smoother warranty experience if hail or wind damage occurs. When choosing asphalt, look for a shingle with a hefty impact rating and good nail-hold strength to stand up to repeated storm exposure and ice-dam cycles. Consider a reflective or algae-resistant option to cut heat buildup on attic spaces and extend roof life in springtime sun storms.
Metal roofing is a meaningful but smaller niche in Batavia, often chosen by homeowners prioritizing snow shedding, longevity, and resistance to repeated storm exposure. If you expect heavy wind events or want a roof that can carry a longer service life with fewer roof penetrations for utilities, metal can be a strong fit. The panel profiles and coatings matter: a factory-applied anti-condensation layer helps with ice-dam scenarios, and standing-seam designs reduce seam exposure to wind-driven rain. Metal is particularly appealing on newer homes or secondary structures where fire resistance and minimal maintenance are valued. It's worth noting that metal installations require a skilled crew familiar with battening, flashing transitions, and proper attic ventilation to prevent condensation problems.
Tile and cedar shake exist in the Batavia market but require more specialized crews, which is reflected by much lower local contractor signal counts than for asphalt or storm-response work. Clay and concrete tiles can resist wind damage well when the substrate and installation details are correct, but they demand a precise roof slope, strong substrate, and careful flashing around chimneys and skylights to avoid ice-dam formation at eaves and valley intersections. Cedar shake offers a distinctive look and good insulation value but is vulnerable to moisture-related cracking and hail impact if not properly treated or installed. If choosing these materials, seek contractors with documented experience in climate-specific installation, underlayment choices, and proven weatherization practices for the region.
In this climate, the roof must handle hail, wind-driven rain, and winter ice dams. Asphalt remains the most accessible and flexible option for quick repairs and local service coverage, while metal offers resilience against repeated storm exposure and snow shedding. Tile and cedar shake can deliver aesthetic appeal and long-term performance but demand more specialized workmanship and ongoing maintenance. Regardless of material, prioritize compatible underlayment, robust flashing at penetrations, and an attic ventilation plan that minimizes condensation and ice-dam risk. When evaluating options, consider the local contractor network, the typical response times after hailstorms, and the ease of obtaining color and warranty support through familiar local suppliers.
Batavia's Chicago-area winters bring snow loads and freeze-thaw cycling that can back water up at eaves and stress shingles, flashing, and gutters. When ice forms along the roof edge, it can trap meltwater behind it, forcing water under shingles and into the attic. That subtle seepage can show up as stained ceilings, warped decking, or attic condensation long after a storm. If you've got older shingles or compromised flashing, the risk rises quickly when temperatures swing from freezing to above freezing.
Spring through fall is the preferred replacement window locally because winter conditions limit safe access and can interfere with installation quality. Cold days slow shingle application and can cause ridge caps to crack, while frozen gutters make cleanup and flashing work hazardous. Shoulder seasons also provide steadier temperatures for sealants and underlayment to perform as intended. Planning during these months helps ensure crews can complete the work with proper ventilation, adequate daylight, and reliable asphalt or synthetic materials.
Summer heat in Batavia can also affect asphalt shingle handling and installation conditions, so timing is not only about avoiding winter. Extreme heat can soften shingles, increase waste, and challenge fastener performance, especially on steep pitches or in attic spaces that heat up quickly. A heat-avoidant plan helps protect shingles from micro-damage during transport and placement. In all seasons, consider the cumulative effect of hail and wind events common to this area; a well-timed replacement reduces the chance of repeated repairs and minimizes the window of exposure to weather during the job.
Coordinate with a contractor who can provide a phased plan that respects access during shoulder seasons and avoids peak heat days. Ensure gutters and downspouts are prepared for re-routing during tear-off and reinstallation. Have attic ventilation checked beforehand to help manage condensation and ice dam risk after the new roof is complete. A cautious approach to timing pays off in long-term performance and reduces the chance of knock-on damage to interior finishes after a storm.
In Batavia, the Illinois insurance environment treats hail and wind as common claim drivers, and roof condition documentation has outsized value before and after storms. When a storm rolls through the Fox River valley, you are wise to keep a well-organized record of your roof's state. Insurers in this market may ask for prior roof photos, post-loss inspections, and contractor estimates when evaluating claims. Expect a process that leans on documentation to establish baselines and confirm damage patterns, especially on older in-town homes and structures that faced multiple seasons of weather exposure.
Begin with clear, dated photos of the entire roof from ground level and from a safe vantage point using a wide-angle shot. Capture any hail impact marks, lifted shingles, flashing, and any signs of ice dam activity in winter. Photograph gutters, downspouts, and ventilation intakes that can influence leakage. If you have prior photos from a few years back, compare to highlight changes. Store all images with timestamps and a simple description file to accompany them when you file a claim or request an estimate.
After a storm, arrange for a licensed contractor to provide a written inspection and scope of work. A professional assessment helps align your insurer's expectations with real-world roof condition, especially on roofs with mixed materials or aged components. Ask the contractor to mark suspect areas with a diagram and to note whether damage appears hail-driven, wind-driven, or related to existing wear. This documentation supports faster, more accurate claim handling.
Coverage availability varies by carrier in Illinois, but there is no uniform statewide insurer pullback, so you should compare policy terms rather than assume broad market withdrawal. Read the homeowners policy for exclusions, deductibles, and storm-related language. If you have questions, contact your agent with the set of photos, the post-loss report, and the contractor's estimate to map out next steps.
Connect with contractors who help homeowners navigate the claims process from damage assessment to final approval.
Rogoz Roofing Company
(630) 326-6352 bataviaroofers.com
162 W Wilson St, Batavia, Illinois
5.0 from 39 reviews
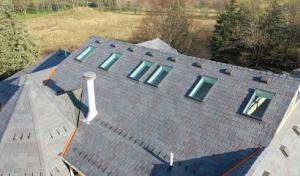
In Batavia's mix of older in-town homes and newer additions, skylights often become a homeowner's first line of leak trouble after hail or ice dam events. Local contractor signals show meaningful demand for skylight work, which points to a pattern: penetrations that sit on the roof surface and around flashed edges are the most vulnerable. When storms arrive, flashing can loosen, seals can degrade, and ice dams can push water toward the joint. If a skylight has been in place for a decade or more, treat it as a potential weak spot even on days that stay dry. Regular inspection after extreme weather is wise: look for moisture staining along the frame, condensation on the glass, or peeling sealant around the curb. Addressing small flaws early can prevent larger interior damage in the attic and upper rooms. Prioritize skylights on any roof with exposed valleys or dense tree cover that sends leaves and debris into the flashing, since debris can trap moisture and accelerate leaks.
Chimneys sit at a natural moisture junction, and chimney-related roofing work remains common in Batavia's older neighborhoods. The chimney chase, flashing along the masonry, and crown integrity are the frequent failure points after winter winds. Where a chimney meets the roof, feathered flashing must seal against shifting mortar and temperature swings. Ice buildup along the crown or at the flashing can lift or crack sealant, inviting water intrusion. If chimney activity is visible-staining on interior ceilings near the chimney shaft or dampness around the base-investigate promptly. For older homes with brickwork, repointing and proper counterflashing can make a decisive difference. Even when you don't see active leaks, schedule periodic checks after heavy snows or hail events, as a slow drip can grow into a costly interior repair if left unaddressed.
Flat and low-slope sections appear mainly in additions, porches, garages, or mixed-use structures and should be treated with targeted attention. These areas can trap snow and ice longer, making leaks more likely at penetrations like skylights or vents. Ensure those flashing details are compatible with the roof type and that any low-slope patches maintain proper drainage to mitigate winter water intrusion.
Find contractors experienced in skylight installation, flashing, and leak repairs to bring natural light into your home.