Last updated: Apr 19, 2026
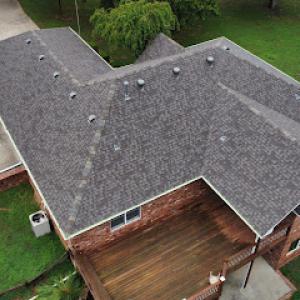
Prairie Village sits in the Kansas City metro hail belt, where spring hail and wind events regularly drive roof claim activity and replacement demand spikes. That pattern isn't random: a sudden pop of hail can leave a roof looking fine from the street while delivering hidden damage to underlayment, flashing, and valleys. When a storm season hits hard, you'll see crews and adjusters moving through neighborhoods in waves, and timing becomes a backbone of a smooth claim and replacement process.
Local replacement planning has to account for the risk of fresh hail damage arriving during the same spring season when many homeowners first schedule work. If you push a project forward to beat potential storms, you risk opening a second wave of damage that can complicate the claim and extend the timeline. The most efficient path often means staging work to avoid overlapping storms, while still protecting the interior from weather exposure. Keep a realistic window for finalizing materials and scheduling crews that doesn't collide with anticipated hail activity.
Because insurers in this metro often require photo sets, date-stamped documentation, and an adjuster inspection, you must document damage before temporary repairs or full replacement begins. Start with clear, timestamped photos from multiple angles-up close to shingles, edges, vents, and any visible granule loss. Photograph the interior attic after a wind event if you notice any condensation, staining, or light leaking. Maintain a running record of dates tied to each storm, and collect any relevant weather reports or hail trajectory notes. If there are trees or landscaping that obscure roof eaves or gutters, document those conditions too, then plan temporary protections (board up or tarps) only after you've captured the initial damage evidence.
When the adjuster shows up, expect a thorough inspection that may reproduce or reveal damage not visible from the ground. Have your documentation organized by storm date, with notes on any prior temporary fixes or pre-existing issues. If a contractor suggests replacing portions rather than the whole roof, insist on a clear rationale tied to detected damage and the roof's remaining service life. In the midst of spring's hail cadence, timing is a tight rope: you want to secure coverage for legitimate damage promptly, but avoid rushing into a replacement that might be unnecessary or prematurely triggered by a later, more severe storm.
Plan your inspection and documentation now, knowing that a second hail event could hit before you're finished with the first replacement. Coordinate with a trusted local contractor who understands the typical storm patterns, and who can guide you through the staged inspection process required by insurers. Keep your files organized by storm date, with both exterior and interior evidence, so the adjuster can validate the claim efficiently and minimize back-and-forth. In this pricing-and-time-sensitive climate, clarity and preparedness are your strongest shields against delay and regret.
Garcia Roofing Kansas City
(816) 286-7387 www.garciaroofing.biz
Serving
5.0 from 196 reviews
Garcia Roofing Kansas City provides professional high quality roofing, siding & gutter replacement and repairs. We also help homeowners with storm damage claims. We will handle all paperwork and communication with your insurance company. This way you can avoid the frustration and confusion that many homeowners experience during the claims process. We provide roofing services for the Kansas City metro area within a 50 mile radius. We never ask for money upfront or a deposit! Only after the work is completed to your satisfaction, will we accept payment for our roofing services rendered. If you're looking for an honest, high quality and reliable company, call Garcia Roofing your Kansas City Roofing Contractor at 816-286-7387
Bumble Roofing of Greater Kansas City
(913) 675-9187 bumbleroofing.com
Serving
4.9 from 54 reviews
At Bumble Roofing of Greater Kansas City, we're more than just roofers; we're builders of trust, craftsmanship, and “un-bee-lievable” quality! We believe in clear and upfront communication with customers. We offer transparency in pricing and provide financing options with no down payment. There will be no haggling, no gimmicks, no pressure- EVER. Experience Roofing, The Easy Way with Bumble Roofing!
Roof Repair Techs
Serving
5.0 from 42 reviews
Problems with a leaky roof? *Same or Next day service (weather permitting & call volume), we are open all Weekend also at No additional cost. *Wood Shake, Asphalt Composition, Low Slope (Flat), Metal Roof, Skylight & Chimney Specialist. *We ONLY do Roof Leak, Roof Repairs & Maintenance, We will NOT sell you a NEW Roof. *Others will try to imitate but can't replicate! *Roof Repair is a Craft and a Art, "The Art of Roofing" with Roof Repair Techs! *Pre-Set Pricing per item on most common roof problems. *We provide Before & After Photos of all Work after the completion of the Repair. *We only fix what's needed to solve the problem. *Repairs Starting at $300 and up.
Osage Ridge Roofing
Serving
5.0 from 70 reviews
Osage Ridge Roofing, a trusted and reliable service provider in the roofing industry, is committed to delivering unparalleled quality, personalized service, and eco-friendly solutions. With a focus on exceptional craftsmanship and transparent communication, our company has earned a reputation for surpassing customer expectations. Our team of skilled professionals, using the latest methods and premium roofing materials, ensures the longevity and durability of your roof. Our strong community-centric approach and sustainable practices demonstrate a genuine dedication to making a positive impact. By choosing Osage Ridge Roofing, you are not just getting a quality roof, but also contributing to a greater cause, which should make you feel proud.
Crown Town Restoration
(913) 214-9028 crowntownrestoration.com
Serving
5.0 from 80 reviews
Does your house need an upgrade? Turn to Crown Town Restoration, Inc. We're a local roofing company in Overland Park, Kansas. Whether your roof just took a hard hit from a storm, or you simply need a few repairs, our roofing company can help. We also offer exterior and interior painting, cabinet refinishing, build decks and fences, and can replace your siding or gutters! We thrive on providing the best service and offering exceptional roofing and painting products in Overland Park and Johnson County. We are fully licensed and insured, and always offer free inspections and estimates.

Manning Roofing
Serving
4.9 from 183 reviews
Manning Roofing is a full-service roofing and exterior company providing residential and commercial roofing, siding, gutter, and window services throughout Lees Summit, MO and surrounding areas. There is no compromise to the quality of products we install or the people we hire. Our licensed and insured team handles anything from small roof repairs to large condominium projects. If you are looking for someone who can add value to your property, Manning Roofing has you covered!
RoyCo Roofing
Serving
4.9 from 155 reviews
RoyCo Roofing is your roofing company in Kansas City. We specialize in all types of roofs and services. We install new shingle, tile and metal roofs, we do re-roofing and repairs from storm damage or normal wear and tear due to old age of the roof. We stock discontinued concrete tile, slate and clay roofing materials. We provide many services to meet your roofing needs and strive to provide our customers with fast, fair priced, quality services. We offer: -Metal Roofing -Cedar Shake Roofing -Tile Roofing -Slate Roofing -TPO Roofing -Commercial Roofing -Residential Roofing -Roof repairs -Roof replacements -Roof maintenance -Roof inspections -Emergency roof repair -Roof tarping Now offering balcony waterproofing.
Shamrock Roofing & Construction
(913) 850-6556 shamrockroofer.com
Serving
4.9 from 1042 reviews
For over four decades, Shamrock Roofing and Construction has been recognized as the premier roofing company in the Kansas City area, dedicated to delivering outstanding customer care and satisfaction with every project they undertake. Their team of skilled professionals is committed to quality craftsmanship and exceptional service, ensuring that every roof is expertly installed and maintained to provide peace of mind and long-lasting protection for their valued customers.

Easton Roofing
(913) 257-5426 eastonroofing.com
Serving
4.8 from 383 reviews
Your roofing problems stop here so you can get back to business, faster. Whether we perform a free inspection of your roof to help guide you to the best decision that fits in your budget and your timeline or you choose us to do the work, you can be certain our team will treat you with dignity, respect, and compassion. If you find that you are in need of a roof, be it from storm damage, a real estate transaction, or just worn out, we can help.
Robinson Roofing KC
(913) 489-7531 robinsonroofingkc.com
Serving
4.9 from 62 reviews
Robinson Roofing KC, based in Kansas City, Kansas, brings over 75 years of expert roofing experience to your doorstep. With a dedication to fairness, community, and satisfaction, we aim not just to fix roofs but to forge lasting relationships within our community. Our unique approach combines a team-oriented atmosphere with generous worker wages, ensuring that every project receives the care and dedication it deserves. Trust us to protect your home with a commitment as solid as our roofs. Contact us today for your free roof inspection and become part of the Robinson Roofing KC family.

Interstate Roofing
(913) 393-5997 www.interstateroof.com
Serving
5.0 from 47 reviews
Interstate Roofing Kansas City is a family-owned roofing company proudly serving the Kansas City metro area. We specialize in residential, commercial, and multi-family roofing, with expertise in storm damage restoration and insurance claim support. Our certified team is recognized as a GAF Master Elite, and we work with all types of roofing materials, including asphalt shingles, metal, cedar shake, slate, and more. Whether you need a full roof replacement, emergency repair, or help navigating insurance after storm damage, we’re your trusted partner. We provide free inspections, detailed estimates, and fast, transparent service backed by 30+ years of experience. Contact us today to schedule your free roof inspection!
Fidler on The Roof KC
(816) 298-5648 www.fidlerontheroofkc.com
Serving
4.9 from 101 reviews
Fidler on the Roof KC is the name you can trust for residential, commercial and institutional roofing in the Kansas City area. We're a locally-owned, family-run business with deep roots in the Kansas City area. In a world of fly-by-night contractors, we’re here to stay. Fidler is committed to treating your home or business like it’s our own. Our reputation – and more importantly – your roof, is on the line. If it’s over your head, we can handle it. Our services include: •Commercial roofing installation and repairs •Emergency roof service and repairs •Residential roof installation and repair •Roof storm damage repair We're lean, responsive and professional. Let us know how we can serve you today.
The hot summers, cold winters, and spring hail risk create a narrow window for reliable window installs. When weather cooperates, mild springs and falls are ideal for work, giving crews a steadier pace and better material handling on the roof and around edges. In Prairie Village, the goal is to avoid peak sun for long durations, which can cause sealants and caulks to cure too quickly and create gaps. Plan installations for late spring or early fall when overnight temperatures stay above freezing and daytime highs stay moderate. If a storm rolls in, be ready to pause and cover openings to protect the interior from sudden rain and wind-driven debris.
Summer heat in northeast Kansas adds a layer of caution. Dark asphalt roofs exposed to full afternoon sun can push temperatures inside the attic high, which speeds up drying times for sealants but also stresses helpers and materials. Coordinate crew breaks, intake of new materials, and sequencing so that roof work isn't left exposed during the hottest part of the day. For longer projects, stagger tasks-install windows when the roof isn't in the peak sun zone, then finish trims and interior details during cooler hours. In winter, freezes and wet transitional-season rain events can delay tear-off schedules and increase the need for temporary dry-in protection. Have a plan for rapid tarping, temporary insulation, and quick drainage solutions so interior spaces stay dry if a front moves through or a stray freeze hits during a critical stage.
Window installs on a re-roofed home require careful sequencing to preserve shingle edge integrity and to avoid wind uplift on open openings. Protect new shingles and underlayment by keeping the work area tarp-free from wind-blown debris whenever possible, and use temporary edge protection during teardown to prevent hail damage to exposed sheathing. On warm days, keep sealants and polyurethane foams shaded or cooled to maintain proper cure rates; store moisture-sensitive components in a shaded, dry area and bring them to the job only as needed. In cold snaps, keep fasteners and hardware organized to prevent binding from condensation, and use controlled heat sources to avoid over-drying sealants. When a storm threat exists, maintain a plan for quick dry-in or temporary plastic barriers to secure the interior, especially around newly installed window rough openings.
Prepare a clear work sequence that minimizes open flaps and exposed sheathing during wind-prone times of year. Ensure ladders, scaffolding, and fall-arrest gear are anchored to stable structures, not temporary racking, and verify fastener access points so repairs don't require backtracking. Document all phases of the window install with photos showing rough openings, flashing, and sealing progress for any hail-related insurance documentation that may come later, and keep a running log of weather impacts to defend scheduling choices during inspections. This approach helps maintain steady progress through Prairie Village's characteristic claim cycles without sacrificing interior comfort or exterior performance.
Get a clear picture of your project costs upfront - no commitment required.

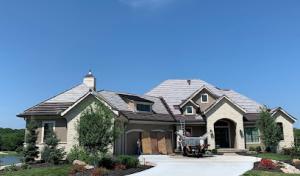
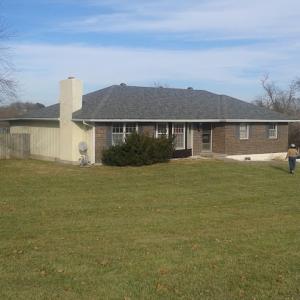
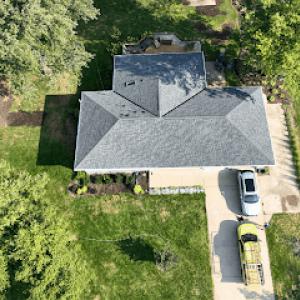
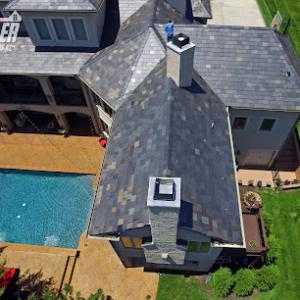
Asphalt shingles dominate replacements in this market because they align with the city's large stock of conventional residential roofs and are easier to source during post-storm demand surges. The practical advantage is simple: supply chains recover faster, crews are readily available, and the selection of colors and profiles fits the familiar Prairie Village rooflines. For homeowners facing hail or wind activity, asphalt shingles offer reliable performance with established warranties and straightforward repairs. When choosing an asphalt system, focus on impact-resistant editions if available and verify that the underlayment and flashing details match the chosen shingle line to guard against wind-driven leaks. In many neighborhoods, a traditional three-tab or laminated shingle can blend seamlessly with existing roofs, preserving curb appeal while delivering dependable protection in Kansas City's spring storm pattern.
Metal roofing presents a practical upgrade for durability against recurring Kansas City metro hail and wind exposure, but it remains a secondary choice in this market. Homeowners weighing metal often aim for longer service life, better resistance to impact, and a cleaner slope line that can modernize a home's appearance. In Prairie Village, the decision to go with metal hinges on roof slope, attic ventilation, and the ability to manage temperature fluctuations that accompany metal installations. Metal's upfront heft is balanced by a long-term payoff in reduced maintenance, but installation specifics matter: deck compatibility, flashing transitions at dormers, and careful nailing patterns to address wind uplift. When selecting metal, consider standing-seam systems for a tight, weather-tight fit on mid- to steep-sloped roofs and ensure the color and profile harmonize with neighboring homes to maintain the neighborhood's cohesive look.
Tile, slate, and fiber cement appear in the Prairie Village material mix, but they require closer attention to structural load, specialized installation, and repair matching than standard shingle jobs. Clay and concrete tiles bring a distinctive curb appeal paired with excellent longevity, yet their weight demands a strong roof deck and appropriate structural reinforcement if the existing framing is marginal. Slate offers unmatched durability and elegance, but its brittle nature means precise handling and a carefully chosen fastener pattern to resist hail-driven impacts and wind uplift. Fiber cement shingles provide a practical compromise: they mimic the look of traditional materials while offering improved impact resistance and a lighter footprint on the structure. For all three options, professional assessment of roof framing, attic access for installation, and compatibility with existing ventilation ducts is essential. Repair work becomes more specialized, requiring matched profiles and trained crews to maintain water-tight transitions around chimneys, skylights, and dormers.
In this market, roof material choice is not only about appearance but about how well the system tolerates frequent hail and wind events and how easily repairs can be coordinated with the local contractor network. Full replacements staged to align with the city's inspection cadence require careful planning around material availability and crew scheduling after storms. Additionally, consider how each material handles debris, attic heat, and snow load in the winter months, as Prairie Village winters can place different demands on each option. For most homeowners, asphalt shingles remain the default due to compatibility with the existing housing stock and the reliability of supply during surge periods, while metal, tile, slate, and fiber cement serve as careful, well-structured alternatives when the property's condition and design intent justify the extra considerations.
When hail rings across the Kansas City metro, Prairie Village experiences a knee-jerk tightening of contractor schedules. Local crews surge to handle the wave of inspections, assessments, and replacements, which pushes labor availability and scheduling into tighter windows. That means both the timeline and the finish quality can hinge on how many crews are actively taking on Prairie Village jobs after a hail event. In practical terms, expect longer lead times for materials and crew arrival after a major storm, and plan accordingly so your project doesn't get stalled mid-shingle swap.
Asphalt shingles remain the most common and cost-effective option for many homes in Prairie Village, with pricing that fits tight budgets when storm demand spikes. But for homeowners exploring alternatives, slate, clay tile, concrete tile, and fiber cement shingles carry higher local costs because fewer crews in this market specialize in those systems. If choosing one of these premium materials, expect not only higher per-square costs but also potential scheduling premiums and longer lead times for specialty crews to line up.
Typical replacement costs in Prairie Village reflect the regional contractor dynamics and material availability. Asphalt shingles generally clock in on the lower end, while metal roofing sits higher, and the premium options-clay tile, concrete tile, slate, and fiber cement-tend to require more specialized labor. In practice, the decision often comes down to balancing long-term durability and style with the overall project timeline and the ability to secure qualified crews promptly after a storm event.
Timing a replacement around peak storm seasons matters. If a hail event has recently occurred, expect a cluster of projects to be scheduled in the ensuing weeks, which can compress the start window for a new job. A measured approach helps: secure a trusted contractor early, confirm exact material choices, and line up a realistic sequence of installation days. For homes with unique roof shapes or older construction typical to Prairie Village, anticipate longer durations for material adaptation and site preparation, which can influence the overall cost and completion date.
Don't let upfront costs delay a critical repair - these contractors offer payment plans to fit your budget.

In this city, a building permit is typically required for a full roof replacement, rather than treated as routine maintenance. The local Building Department takes the lead on permit applications and scheduling. That means your project won't move forward without the official permit, and skipping this step can trigger delays, fines, and the need to uncover work already completed. The process is designed to ensure the work meets current code, interfaces correctly with attic ventilation, and aligns with adjacent homes that share similar storm exposure.
Inspections happen in stages, and understanding the sequence helps prevent surprises. Most projects include a tear-off or underlayment stage, followed by a final completion inspection. The tear-off stage confirms the old materials are removed and the roof deck is sound, while underlayment verification ensures a proper moisture barrier beneath the new roofing. The final inspection confirms everything is finished to code and that flashing, penetrations, and field details are correct. Because inspections are staged, delays in one step can stall the next, even if the local weather cooperates.
During inspection, verification of attic ventilation and moisture-barrier details is common. Prairie Village homes often rely on specific venting configurations to handle hot Kansas summers and storm-driven humidity. Having installation documentation, vent calculations, and moisture-barrier details ready can smooth the process. If the inspector requests measurements or product data, having them organized helps you avoid rework. In tight neighborhoods with older homes, proper ventilation details also support long-term roof performance and energy efficiency.
Storm season timing matters: the city's inspection cadence and weather windows can influence when a replacement is scheduled and completed. A well-coordinated plan aligns permit approval, material delivery, and staged inspections to minimize exposure of newly decked areas to moisture. If exterior finishes or soffit work tie into the roof replacement, coordinate those trades to avoid conflicts and ensure the sequencing remains compliant. Remember that a closed-in roof without the required ventilation or moisture-barrier verification can trigger rework or additional inspections, so your contractor should build in lead time for these steps.
In Prairie Village, homeowners are operating in a high-claim Kansas City metro insurance environment sharpened by repeated hail and wind losses. That pattern means adjusters come with expectations about weather damage timing, documentation, and how quickly a roof shows its true age after a storm. When a hail event hits, the immediate impulse to patch and move on can blur the long-term picture of whether a roof is truly past its useful life. Tread carefully: a quick repair now can influence how a carrier views the overall claim later, and in turn affect what the policy will cover moving forward.
Older roofs in this market often face tougher depreciation treatment or stricter carrier guidelines, which can change whether a homeowner repairs, patches, or replaces. A roof that has sustained repeated hits or widespread aging may be evaluated more harshly than a newer installation, even if the current damage seems isolated. The consequence can be a narrower recovery from the claim or a decision leaning toward replacement rather than a simple fix. Understanding how depreciation can apply in your situation helps you set realistic expectations for the outcome after an adjuster reviews the case.
Claim success locally depends on keeping thorough inspection notes, wide and close damage photos, and records of any emergency tarping or leak mitigation before adjuster review. Photographs should capture both the extent of visible damage and the surrounding condition of neighboring homes for context. Detailed timelines of when storms occurred and when mitigation actions were taken can matter when the file moves from field adjuster to desk review. If you have temporary measures, keep receipts and note the dates they were put in place. A clear, well-organized record often helps the adjuster see the full scope, reducing back-and-forth and supporting a fair evaluation when the claim lands on the desk.
Connect with contractors who help homeowners navigate the claims process from damage assessment to final approval.
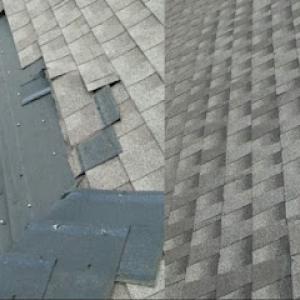
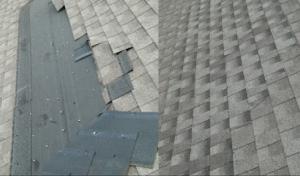
In Prairie Village, repeated hail and wind exposure commonly turns minor granule loss, lifted shingle edges, and flashing damage into full replacement discussions. Shingles often fail first at edges and around vents, gutters, and chimneys where wind shear concentrates. Your eyes and hands should check for exposed fasteners, soft spots in the roof deck, and any consistent granule residue in gutters after storms. Don't wait for visible leaks when hail history suggests rapid deterioration; plan for a coordinated replacement with a reliable crew before the next storm cycle.
Heavy rain events during Kansas transitional seasons make underlayment integrity and dry-in sequencing especially important once tear-off begins. Ensure the contractor staggers tear-off and installation so no portion remains exposed longer than necessary. A tight dry-in should cover all penetrations as soon as the deck is prepped, with flashings and resulting transitions sealed promptly. If a rain front looms, delay nonessential work and protect the interior with temporary barriers. Prairie Village homes often have older roof decks; verify that the underlayment choice matches climate risk and deck condition.
Projects involving skylights or roof penetrations need extra scrutiny because leak complaints often surface after storm seasons rather than during routine dry weather. Check the skylight flashings, curb seals, and surrounding shingles for lift, caking, or misalignment. Seams near dormers and vent stacks deserve close inspection because heat cycling can loosen fasteners and widen gaps. A proactive inspection plan reduces post-storm call-backs and preserves interior dryness.
Staged roof inspections on full replacements are common in this market. Plan interim checks after major hail events and again after wind-driven damage rallies. Document damage with dated photos and keep a running log of contractor notes, shingle granule loss, and flashing condition to align expectations when the work resumes after weather breaks. This local pattern helps avoid surprises and supports a smoother replacement timeline. In Prairie Village, careful sequencing and meticulous detailing near penetrations keep dry-in resilient through the next season.
Find contractors experienced in skylight installation, flashing, and leak repairs to bring natural light into your home.