Last updated: Apr 19, 2026
Raymore sits in the Kansas City metro insurance zone, where frequent hail and severe thunderstorm activity create elevated roof claim volume compared with calmer markets. When a storm stacks up multiple events in a short window, insurers shift to rapid assessments and batch reviews, and your roof age becomes a bigger piece of the puzzle. That means the window from first damage to replacement can feel both urgent and uncertain, especially if your home carries any prior wind or hail marks. In this neighborhood, demand spikes after metro-wide events, and the cadence of inspections shifts with the weather calendar.
Spring storm season is the main trigger for inspections and replacements in Raymore, but autumn wind events can also lift shingles after earlier storm damage. A sudden gust or hail hammering on a clear day can reveal new moisture pockets or laminate failure that wasn't visible last season. If you've had a hailstorm or strong winds recently, don't wait for a follow-up storm to reveal hidden failings. The timing of your claim matters, because insurers often scrutinize roof age and the progression of damage when determining replacement eligibility.
Because replacement demand spikes after metro-wide storms, homeowners can face scheduling delays, tighter material availability, and more insurer scrutiny on documentation and roof age. That means you should prepare as soon as damage is suspected, not after you receive a formal notice. Have clear photos from multiple angles, dated records of any leaks or attic staining, and a simple log of when and how the damage appeared. Insurance-focused crews will look for consistent, verifiable evidence that the roof has reached a point where repairs become a nonviable option, so organized records matter.
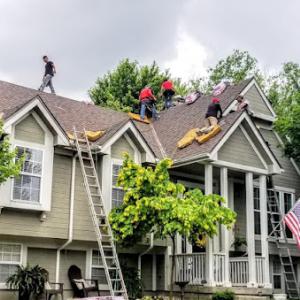
Act quickly if you notice curling, missing granules, or darkened patches on the ceiling after a storm. Contact a local roofer who understands Raymore's typical housing stock and the nuance of storm-driven claims, and request a rapid roof assessment that documents condition year by year. If an adjuster visits, have a concise hold of your records ready and be prepared to demonstrate pre- and post-storm conditions. In a town where spring storms drive the pace, keeping a consistent file and a proactive stance helps you avoid being pushed to the back of the queue when the next round of storms hits.
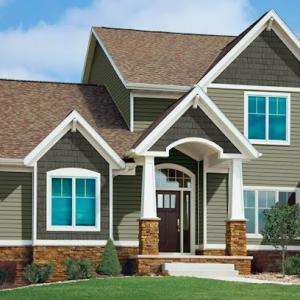
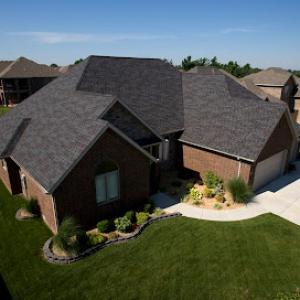
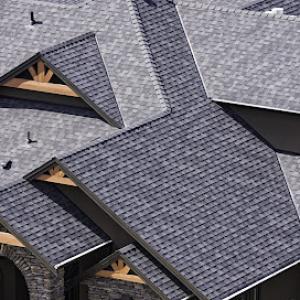
Asphalt shingles dominate replacements here because they fit the suburban housing stock and are easier to replace after hail than heavier premium systems. For homeowners facing repeated hail events, asphalt offers straightforward repairs, simpler color matching, and a faster return to a weather-tight roof. In a typical Raymore reroof timeline, standard asphalt shingles handle Missouri heat and summer storms without the complexity of heavier materials. If your goal is a reliable, relatively economical upgrade that this market already understands, asphalt shingles are often the most practical choice.
Metal roofing is a meaningful upgrade path for homeowners prioritizing wind resistance and longer service life through Missouri's heat, storms, and winter temperature swings. Metal systems in this area tend to shed hail impact with less immediate cosmetic damage and can carry advantages in high-wine wind events common to the region. If your roof faces frequent storms or you want a surface that handles temperature swings with consistent performance, metal offers a steady, predictable option. While installation and weight considerations matter, modern metal roofs can be a strong fit for Raymore's typical home profiles when the goal is resilience and extended life between major overhauls.
Tile, slate, and wood systems exist in the market but are less common in Raymore and can be harder to justify where repeated hail exposure raises repair and replacement risk. Clay or concrete tile brings a distinctive curb appeal, but individual tiles can crack under hail, and widespread damage can complicate repairs. Slate and wood offer unique aesthetics but demand careful assessment of hail history, roof pitch, and maintenance capacity. For homeowners considering these options, a conservative approach is prudent: weigh the potential for increased repair costs and the typical replacement cycles against the visual goals and long-term expectations for the home.
Wood materials provide a classic look but bring their own maintenance rhythm in this climate. Wood shingle or shake systems can be more susceptible to hail impact and weather-induced wear, which may translate into more frequent maintenance or replacements in a storm-prone cycle. If the decision points toward wood for appearance or environmental reasons, ensure the roof framing and ventilation support a longer service life, and factor in ongoing maintenance needs to keep the roof performing well through heat and moisture swings.
In Raymore, the practical path often starts with asphalt for its balance of performance, ease of repair after hail, and compatibility with existing home envelopes. For those prioritizing wind resilience and extended life in heat and cold swings, metal is a compelling upgrade when budget and installation considerations align. If a homeowner's taste or home design pushes toward tile, slate, or wood, a candid appraisal of hail history, expected repair costs, and maintenance plans helps determine whether the aesthetic payoff outweighs the practical risks.
When a hailstorm or damaging wind sweeps through the Kansas City metro south side, you'll feel the impact in Raymore pricing and scheduling. Local labor and supply channels tighten quickly, and storm-season demand pushes both timing and bids higher. This isn't just about material choice; it's about how fast crews can line up, how many crews are in the queue, and how suppliers price common components during peak weeks. If your roof has already been flagged by insurance after a hail event, expect the cycle to move faster, with lead times stretching and pricing reflecting urgency rather than a standard off-season schedule.
Material choice matters sharply in this market. Asphalt shingles run about $350 to $700 per square, a broad spread driven by batch availability and local labor costs. Metal roofing sits higher at roughly $700 to $1200 per square, reflecting faster installs in some home layouts and the long-term durability many homeowners pursue after hail damage. Clay tile, a popular pick for certain Raymore homes with its distinctive curb appeal, ranges from $1200 to $2200 per square. Concrete tile clocks in around $900 to $1700 per square, offering a balance between weight and performance. Wood shingles or shakes are typically $500 to $1100 per square, favored by those seeking a warm, traditional look but aware of maintenance and fire ratings. Slate sits at the top end, from $1800 to $3200 per square, chosen for longevity and premium appearance on specific home styles.
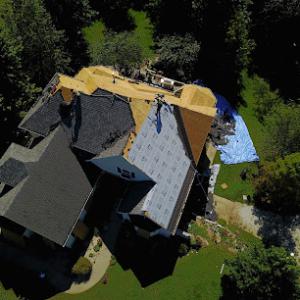
Storm-season demand surges can push reroof scheduling upward. In Raymore, where homes span a mix of older ranches and newer subdivs, crews can quickly reach capacity after a big hail event. This means even if the damage seems straightforward, the earliest start date might slip by a few weeks to a couple of months, depending on weather windows and crew availability. If your insurer is involved, expect the process to compress the timeline for decision-making, which can affect the pace of material sourcing and door-to-door assessments. Being prepared with a clear project scope and preferred material can help minimize delays when the phone rings and a crew is ready to roll.
Budget planning for a full reroof in this market should include allowance for material preferences and potential price bumps during peak weeks. Asphalt remains the most cost-effective baseline option, but many homeowners consider metal or tile for hail resistance and longevity-factors that justify higher upfront costs. Given the variability in local labor and supplier conditions, it's prudent to obtain multiple, detailed bids that itemize shingles, underlayment, fasteners, flashing, and any tear-off or disposal charges. In Raymore, the difference between a timely, clean install and a delayed one often comes down to securing a reliable crew and a predictable supply chain for the chosen material type.

Marquee Roofing
(816) 808-6400 www.marqueekc.com
106 Evans Ave Ste D, Raymore, Missouri
4.9 from 89 reviews
When you hire Marquee Roofing, you get more than just work done on your home, you get a commitment to excellence and a customer service experience that is second to none. With more than 20+ years of roofing experience, our dynamic team of roofing technicians have been trained and challenged to provide the best possible services in Kansas City and surrounding areas. As a certified roofing contractor in Kansas City, we offer the highest quality roofing materials and the best warranties to our customers. Our commitment is to our customers and their complete satisfaction. We work hard to ensure you get the best roof possible and stand behind every roof.

IBEX Roofing
906 Florence Ave, Raymore, Missouri
4.9 from 57 reviews
Professional Roofing company for customers who want the best products! Joining the IBEX Family gets you an annual inspection, minor repairs and maintenance, and a 24/7 emergency line all for free! We’ll transform your roof to boost your home’s curb appeal, decrease your homeowner’s insurance, improve your HVAC efficiency, and increase your peace-of-mind by protecting you and your loved ones from the elements! We are Veteran-owned and operated local Roofing company in Kansas City and surrounding cities.
Great Quality Roofing
Raymore, Missouri
5.0 from 8 reviews
Great Quality Roofing is the local trusted roofer in the Beldon, MO and Prairie Village, KS areas. We offer roof repair, roof replacements, and storm damage repair for businesses and homeowners in the Leawood, KS and Peculiar, MO communities. The last thing you want to worry about is a leaky, cracked or sagging roof threatening the safety of your home and family. When your roof starts to show signs of age or damage, turn to Great Quality Roofing. You'll work closely with our local roofers to assess the integrity of your roof and get the quality asphalt roofing your home needs.
M&M Exterior Services
(816) 401-0062 mmexteriorservices.com
Serving
4.8 from 24 reviews
M&M Exteriors is a licensed general contractor specializing in roofing, siding, gutters, windows, and painting.
Brewster Roofing
(816) 750-5423 brewsterroofing.com
Serving
4.7 from 90 reviews
Brewster Roofing is a roofing contractor in Overland Park, KS & Lee's Summit, MO serving Gardner, Lawrence, Belton, Blue Springs and nearby areas. Our roofing company offers residential roofing, commercial roofing, roof repair, asphalt shingle roofing, and more. We also specialize in gutters, siding, doors and more. Customers love us because of our comprehensive roof warranties and our affordable roof financing options. We also have industry affiliations and certifications such as TAMKO Master Pro Dealer, Beacon Pro Plus Dealer, & GAF Certified. If you want to experience how your most trusted Overland Park, KS & Lee's Summit, MO roofing company embraces our motto "60 years, 15,000 roofs replaced", call us now for a free estimate!
Brown Roofing
(816) 322-2600 www.brown-roofing.com
Serving
4.5 from 33 reviews
Family owned, Brown Roofing has been helping residents and business owners of Missouri and Kansas since 1995. As a general contractor, we provide an experienced team for every phase of your project. Our roof/restoration projects are handled in a courteous, timely, and professional manner. We specialize in residential and commercial roofing including: architectural shingles; all types of metal & tile roofing; cedar shakes; TPO, PVC and EPDM flat roofs; and roof repairs. No money down - satisfaction guaranteed. So there is no stress on you, we work with all insurance companies for the inspection/settlement of storm and hail damage claims, whole house restoration (roof, siding, windows & gutters) and offer free inspections/estimates.
Driggs Roofing
(816) 542-2937 driggsroofing.com
1704 Johnston Dr, Raymore, Missouri
5.0 from 1 review
Driggs Roofing is the official Roofing Contractor for Raymore, Belton, Peculiar, Harrisonville and the surrounding areas. We do it all from Residential Roofing, Metal Roofing, Commercial Roofing, Roof Inspections, Roof Repairs and more. So call Driggs Roofing Today and let us serve you and your family!
Hometown Roofing
(816) 269-2528 hometownroofingkc.com
Serving
4.8 from 68 reviews
Roofing Contractor
All American Roof Coatings
(816) 726-3493 allamericanroofcoating.com
Serving
5.0 from 19 reviews
All American Roof Coatings is one of Kansas City’s leaders in liquid-applied roofing systems. Unlike most contractors who treat coatings as a side hustle or outsource the work, roof coatings are our primary focus. We have the specialized equipment, the in-house expertise, and a clean-cut, uniformed crew to ensure every job meets or exceeds manufacturer warranty inspections. Whether your project is commercial, industrial, or agricultural, we install the right coating system for your specific roof. With renewable Labor & Material warranties available in 10, 15, and 20-year terms, we offer long-term protection that fits nearly any budget. If you need a roof coating in Kansas City, All American Roof Coatings is your sure bet.

Pyramid Roofing Company
(816) 966-1101 www.pyramidroofingkc.com
Serving
4.5 from 338 reviews
Looking for reliable roofing contractors in Kansas City? Your search ends with Pyramid Roofing, Inc. As a certified residential and commercial roofing company, we’ve proudly served Kansas City homeowners and businesses since 1992. With over 35,000 roofing installations, we deliver high-quality, affordable roofing solutions—always on time and within budget. Pyramid Roofing Company is a trusted roofing contractor serving the Kansas City Metro and Springfield areas. Specializing in residential roofing, we offer expert roof repairs, installations, and inspections to protect your home.
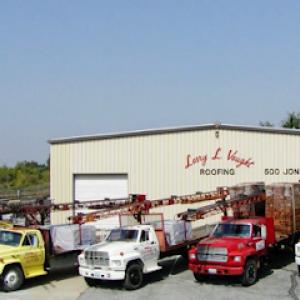
Larry L. Vaught Roofing
(816) 761-9859 www.vaughtroofing.com
Serving
4.9 from 214 reviews
Larry L. Vaught Roofing has been serving the Kansas City area since 1967. Vaught Roofing is a GAF Certified Master Elite Roofing Contractor in Kansas City. Because of GAF’s stringent standards, only 3% of all roofing contractors have qualified as Master Elite® contractors! Because of our unique factory-certified GAF Master Elite® contractor status, the GAF roofs we install are eligible for special warranties. Every certified contractor offers professional installation, superior protection and warranty options.
Andersen Contracting
(816) 400-9596 myandersenhomes.com
Serving
4.8 from 53 reviews
Andersen Contracting specializes in residential and commercial roofing. We are also you one stop shop for almost all of your general contracting needs. If we cannot take care of your project needs in house, we will connect you with one of our trusted contacts, for a fair and honest quote. Andersen Contracting takes pride in going above and beyond to provide exceptional customer service from initial estimate to completion of work. No job is finished until you are completely satisfied! Give us a call today!
When a full reroof is planned in this area, a building permit is typically required through the City of Raymore Building Department. The application can be filed by the contractor chosen for the project or, if you prefer, by you as the homeowner. Understanding who takes the lead on the permit helps prevent delays at the job start. The permit ensures that the project aligns with local safety codes, wind and drainage standards, and the city's inspection sequence. Keep in mind that leaving the permit to the last minute can push back the start of work, especially in a busy spring storm season.
Raymore inspections are commonly scheduled during and after the project rather than relying on a single closeout visit. Expect the inspections to address several key milestones: confirming proper underlayment placement and condition, verifying adequate roof ventilation, and checking final completion details. The inspector may review attic ventilation balance, soffit vents, ridge ventilation, and attic access to ensure moisture and heat are managed correctly. If the roof is being replaced due to hail or wind damage, the inspector will also verify that the workmanship and materials comply with the approved plans and city amendments. Planning for multiple touchpoints helps keep the project moving and reduces the chance of a retrofit or re-inspection snag.
In this climate and housing stock, the permit turnaround can vary because it depends on department workload and weather. Spring and summer commonly bring higher reroof volumes due to storm-driven damage, which can extend processing times and scheduling windows. If a storm event has produced multiple claims in your neighborhood, anticipate a possible backlog for both permit approval and inspection scheduling. Staying in close communication with the contractor and the City of Raymore Building Department helps set realistic timelines and minimizes downtime between permit issuance, roof delivery, and start of installation.
Before the first inspection, ensure that the attic space is accessible and that all ventilation components are installed per code guidelines. Have documentation ready for the inspector, including the permit number, the contractor's license, and any storm-related damage assessments. Clear access to the roof and attic spaces, and ensure debris is managed so the inspector can evaluate underlayment, nailing patterns, and vent placement without delay. After work is completed, anticipate a final completion review to confirm that all permit conditions are satisfied, including flashing details around chimneys, skylights, and vent pipes. A smooth inspection sequence depends on proactive preparation and timely responses to any corrective notes from the inspector.
Raymore homeowners operate in a Kansas City metro climate where hail and wind events recur with enough frequency to drive insurance-driven roof replacements. Insurers often expect detailed photo sets that show roof condition before any work begins, followed by a thorough written scope of work that clearly documents hail impact zones, wind damage, and any preexisting deficiencies. In practice, that means you should gather a wide-angle and close-up photo record from multiple elevations, plus notes on attic signs of leaks or moisture intrusion. A licensed roof consultant report is sometimes requested, especially when the damage is not uniform or when the roof is older. Understanding this mindset now can save you frustration later, because those documents become the language that the adjuster uses to assess your claim.
Coverage handling in this market can vary by roof age and material. Older roofs often face closer review after hail and wind events, with insurers scrutinizing whether replacement is truly warranted or whether patching could suffice. The material type matters too: a metal or asphalt roof may prompt different expectations for prep, scope, and evidence than tile or slate. If your roof has mixed areas-some wind-driven lift, some granule loss from hail-the writing of the scope needs to reflect those nuances. Being precise about the extent of damage, the suspected cause, and any preexisting blistering or curling helps the adjuster see a coherent narrative rather than a patchwork claim.
During peak storm periods around Raymore, claim processing can slow and adjuster standards may tighten, making pre-work documentation especially important before tear-off. If you anticipate a storm window or a rapid sequence of hail events, start assembling your documentation early. A well-organized packet with dated photos, a clear scope, and any independent assessment can reduce back-and-forth when the adjuster visits. It also helps you avoid missing items the adjuster might flag later, such as attic ventilation concerns or decking conditions beneath the affected areas. In practice, the more you can show in black and white-where the damage sits, how it aligns with wind zones, and what the replacement plan covers-the smoother the review tends to go. Keep copies of emails, photos, and the consultant's findings in a single, accessible folder you can share with your contractor and insurer.
Connect with contractors who help homeowners navigate the claims process from damage assessment to final approval.
Marquee Roofing
(816) 808-6400 www.marqueekc.com
106 Evans Ave Ste D, Raymore, Missouri
4.9 from 89 reviews
Xtreme Xteriors
(816) 556-6831 www.xtreme-xteriors.com
1250 W Foxwood Dr, Raymore, Missouri
5.0 from 11 reviews
During hot summers, Raymore roofs absorb heat, especially dark asphalt surfaces, which can push underlayment and shingles to the limit in afternoon heat. When shingles sit on a roof deck that's already warm, adhesive seals cure differently and faster, which can affect alignment and wind resistance. Schedule high-temperature work with the crew to minimize heat exposure, favor early morning or late afternoon windows, and ensure the crew keeps heat-sensitive products properly stored and tested for readiness on site. Proper ventilation in attic spaces matters more in Raymore's sun-drenched days to prevent decking warping and rapid moisture buildup behind the scenes.
Missouri winters bring freeze-thaw cycles that stress materials after moisture intrusion from earlier storm damage. In Raymore, a roof repeatedly exposed to moisture from hail or leaks contracts and expands with temperature swings, stressing shingles, decking, and sealants. If an edge flash or ridge vent has shown signs of aging, those weak points can become pathways for ice damming or deeper moisture infiltration after a cold snap. A quick, proactive inspection after a storm-before cold spells set in-helps catch hairline leaks that could worsen with freezing temperatures.
Hail and wind events drive insurance-driven replacement timing in Raymore, which means planning around tight schedules is key. If a roof replacement is anticipated due to storm damage, coordinate with the contractor to stagger work when heat or cold could compromise materials or ventilation. For summers, emphasize alignment of underlayment performance with the local sun exposure, and ensure crews adjust their workflow to protect vulnerable edge details on the steep, sunlit sections.
After a major storm, perform a careful, daylight inspection of visible shingles and flashing. Note any curling, missing granules, or interior signs of moisture on ceilings or attic insulation. When scheduling work, confirm that the crew has a plan to protect against peak heat and to manage moisture during thaw cycles. Keep an eye on attic ventilation openings, and consider pre-fall checkups to catch any hidden wear from a long hot season followed by a cold snap.
Hail bruising and wind-lifted shingles are the most common repair triggers in Raymore. After a severe hail event, you should inspect the ridge lines, corners, and vent pipes for obvious dents, cracked shingles, or lifting tabs. If you notice granule loss or dark, bruised patches on the asphalt, metal, or tile surfaces, treat it as a red flag. Don't wait for a leak to learn the roof has damage-act fast to prevent further interior exposure.
Leaks that appear after severe spring thunderstorms are a telltale sign of compromised roofing systems. Even when the surface looks mostly intact, water can find weak points around flashing, skylights, and chimney zones. If water marks appear on ceilings or walls, or if you hear dripping from the attic, prioritize a professional inspection. Storm-driven pressure can push water into small weaknesses, turning a minor issue into a major repair.
Emergency tarping is a practical, local response because additional storms can hit before a full replacement is approved, permitted, and scheduled. A temporary tarp buys protection and buys time to coordinate inspections and repairs. If storm advisories are out, secure tarping on damaged sections and monitor wind-driven debris that could compromise the cover.
Skylights and flashing leak checks matter in this market because repeated storm exposure can turn minor weak points into interior water damage during the next weather event. Inspect seals and joints after any hail or heavy rain. If you notice moisture around skylights, vents, or roof-to-wall transitions, schedule a targeted inspection promptly to pinpoint the source and prevent cascading damage.
When you can't wait, these contractors offer fast response times to stop leaks and prevent further damage.
Marquee Roofing
(816) 808-6400 www.marqueekc.com
106 Evans Ave Ste D, Raymore, Missouri
4.9 from 89 reviews
The local contractor scene is shaped by repeated hail and wind, so you'll see many crews hustling to replace roofs quickly and handle insurance paperwork. Expect pitches that stress fast response and quick insurance coordination more than specialty craftsmanship. This isn't inherently bad, but it means you should keep your eye on the long game: a solid repair or replacement that lasts year after year rather than a rush job that shows wear after two seasons.
Cleanup is a top hiring criterion in residential neighborhoods after a tear-off. Homeowners compare contractors by how well debris is contained, how neatly the yard is protected during work, and how thoroughly debris is removed at the end of each day. A reputable crew will set up drop cloths or containment, manage nails and shingle scraps, and finish with a thorough sweep. If a crew can't commit to tidy teardown and complete debris removal, consider other options-even if their schedule looks appealing.
Long-established, family-owned firms remain visible in the market and often matter when warranty follow-through is on the line after a storm season. In Raymore, you'll want to align with a company that stands by its work beyond the initial install, especially when hail storms cluster and warranties get activated. Ask for concrete examples of past storm-related warranty service, timelines for visits, and how they handle service calls if a problem crops up years later.
Ask for referrals from neighbors who faced similar storm repairs, and verify local reputation for reliable cleanup and ongoing service. Request a written timeline and a clear communication plan for weather delays, insurance coordination, and post-install follow-up. If a contractor's emphasis is mainly on speed and insurance forms, add a second candidate that highlights proven cleanup standards and durable, long-term results. After a storm, you deserve a roof that holds up, not a quick fix that's gone in a season.