Last updated: Apr 19, 2026
Mission sits in the Kansas City metro insurance environment, where hail and wind events generate heavy claim volume and adjusters often review roof condition closely after regional storms. In this compact inner-ring suburb, homes sit close enough that a single hail event can leave a ripple effect of damaged shingles, dented metal, and flashing wear across several properties on the same block. After a big spring storm, the clock matters: the quicker you start documenting, the stronger your position becomes when the adjuster arrives.
Because Mission is a tight-knit grid of near-identical homes, neighborhood-wide storm patterns matter. After a hail event, you will hear about others' findings, and that comparison can shape the adjuster's expectations. If your neighbors report bruising or missing granules while your roof looks "okay," you should still investigate thoroughly. Storms in this area create concentrated damage footprints, and the first-to-file advantage often hinges on early, detailed reporting that reflects the real extent of damage across comparable structures nearby.
Local claim success depends heavily on thorough documentation such as date-stamped photos, elevation-by-elevation notes, and records separating hail bruising, wind creasing, flashing damage, and pre-existing wear. Take high-resolution photos from ground level and from at least two angles per elevation, using a standard timestamp on every shot. Note the exact date and time of each storm, and correlate that with hail size, wind speed estimates, and any accompanying rain or debris that could influence damage claims. Create a simple sketch showing where each type of damage appears on the roof, gullies, and flashing. Elevation-by-elevation notes help the adjuster see a comprehensive pattern rather than a piecemeal snapshot. If you have attic or ceiling leaks, capture interior photos labeled by room and floor, linked to roof-to-structure pathways. This methodical approach often separates hail bruising from wind-related creasing and distinguishes pre-existing wear from new storm impact.
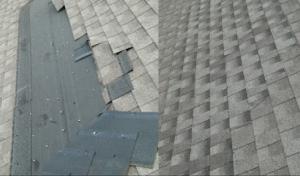
After spring storms, hail bruising typically shows as rounded indentations with color distortion on asphalt shingles or metal panels, while wind damage surfaces as rips, missing granules, or tabs lifted at the edges. Flashing damage can appear as corrosion, lifting, or gaps around chimneys and vent pipes. In Mission's climate, repeated wind gusts can aggravate edge damage that seems minor in isolation but becomes material when multiple elevations are combined. Document all instances, even if they seem small, because the adjuster will assess cumulative impact across the roof and surrounding components.
Storm windows and subsequent weeks can blur damage visibility, so initiate contact promptly after a storm and request a licensed roof inspection if needed. Do not wait for a single telltale sign to guide your claim; the pattern across elevations, the presence of granule loss on multiple shingles, and flashing wear near penetrations all feed into a credible, well-supported file. In this market, timely, precise documentation reduces back-and-forth with adjusters and strengthens your position when negotiating repairs or replacements.
Expect the adjuster to compare your roof against neighboring properties affected by the same storm. They will scrutinize both visible surface damage and signs of deeper wear that could influence the repair approach. A well-documented file helps the adjuster distinguish hail-related damage from long-term wear and ensures the scope of work reflects actual need rather than assumptions. Be prepared to guide the adjuster to the most affected elevations and to provide your elevation-by-elevation notes as a road map for what to inspect first.
Connect with contractors who help homeowners navigate the claims process from damage assessment to final approval.
Roof Repair Techs
Serving
5.0 from 42 reviews
Problems with a leaky roof? *Same or Next day service (weather permitting & call volume), we are open all Weekend also at No additional cost. *Wood Shake, Asphalt Composition, Low Slope (Flat), Metal Roof, Skylight & Chimney Specialist. *We ONLY do Roof Leak, Roof Repairs & Maintenance, We will NOT sell you a NEW Roof. *Others will try to imitate but can't replicate! *Roof Repair is a Craft and a Art, "The Art of Roofing" with Roof Repair Techs! *Pre-Set Pricing per item on most common roof problems. *We provide Before & After Photos of all Work after the completion of the Repair. *We only fix what's needed to solve the problem. *Repairs Starting at $300 and up.
RoyCo Roofing
Serving
4.9 from 155 reviews
RoyCo Roofing is your roofing company in Kansas City. We specialize in all types of roofs and services. We install new shingle, tile and metal roofs, we do re-roofing and repairs from storm damage or normal wear and tear due to old age of the roof. We stock discontinued concrete tile, slate and clay roofing materials. We provide many services to meet your roofing needs and strive to provide our customers with fast, fair priced, quality services. We offer: -Metal Roofing -Cedar Shake Roofing -Tile Roofing -Slate Roofing -TPO Roofing -Commercial Roofing -Residential Roofing -Roof repairs -Roof replacements -Roof maintenance -Roof inspections -Emergency roof repair -Roof tarping Now offering balcony waterproofing.

Interstate Roofing
(913) 393-5997 www.interstateroof.com
Serving
5.0 from 47 reviews
Interstate Roofing Kansas City is a family-owned roofing company proudly serving the Kansas City metro area. We specialize in residential, commercial, and multi-family roofing, with expertise in storm damage restoration and insurance claim support. Our certified team is recognized as a GAF Master Elite, and we work with all types of roofing materials, including asphalt shingles, metal, cedar shake, slate, and more. Whether you need a full roof replacement, emergency repair, or help navigating insurance after storm damage, we’re your trusted partner. We provide free inspections, detailed estimates, and fast, transparent service backed by 30+ years of experience. Contact us today to schedule your free roof inspection!
Robinson Roofing KC
(913) 489-7531 robinsonroofingkc.com
Serving
4.9 from 62 reviews
Robinson Roofing KC, based in Kansas City, Kansas, brings over 75 years of expert roofing experience to your doorstep. With a dedication to fairness, community, and satisfaction, we aim not just to fix roofs but to forge lasting relationships within our community. Our unique approach combines a team-oriented atmosphere with generous worker wages, ensuring that every project receives the care and dedication it deserves. Trust us to protect your home with a commitment as solid as our roofs. Contact us today for your free roof inspection and become part of the Robinson Roofing KC family.

Easton Roofing
(913) 257-5426 eastonroofing.com
Serving
4.8 from 383 reviews
Your roofing problems stop here so you can get back to business, faster. Whether we perform a free inspection of your roof to help guide you to the best decision that fits in your budget and your timeline or you choose us to do the work, you can be certain our team will treat you with dignity, respect, and compassion. If you find that you are in need of a roof, be it from storm damage, a real estate transaction, or just worn out, we can help.

SRA Roofing & Gutters
(913) 648-9441 www.sraroofs.com
Serving
4.4 from 166 reviews
A Veteran owned roofing company, SRA Roofing & Gutters is a full service roofer in the greater-Kansas City area. We give our customers the highest quality work, top of the line customer service and the best products on the market. We care about our neighbors and we care about their families. This results in an unrivaled level of service, commitment and excellence.

Braden
(913) 341-0200 bradenroofing.com
Serving
4.6 from 41 reviews
I started my company in 1995 to offer high quality work and service at a reasonable price. Our commitment to customer satisfaction sets us apart from our competitors. Because of my commitment I have been rewarded with customer loyalty and made many good friends. I have had the opportunity to watch my company grow from infancy into the widely respected company the Kansas City Metropolitan area knows as "the ONE with the GREAT Reputation!". Braden Castaner, Owner
Buck Roofing & Construction
(913) 384-2680 rbuckroofing.com
Serving
4.5 from 139 reviews
Buck Roofing is a Kansas City roofing contractor who values customer service, workmanship, and follow-through. With years in both the commercial and residential roofing industry, there is no job that is beyond our expertise. Each job has a plan tailored to the specific roof. We install all major brands of residential and commercial shingles. The Buck Roofing team works diligently with customers in Kansas City to ensure the best finished quality product. Only high quality products are used to repair or re-roof your house or business. Our expertly trained technicians and project managers are equipped to handle anything from the smallest repair to the largest commercial project.
Ratliff Enterprises
(913) 831-3822 www.ratliffenterpriseskc.com
Serving
4.4 from 39 reviews
At Ratliff Enterprises, we provide professional gutter contractor services in Olathe, KS as part of our full-service home improvement solutions. Our family-owned company specializes in roofing installation, siding, gutter installation, and windows, delivering maintenance, repair, and installation services that enhance curb appeal and protect structural integrity. We use top-quality materials and proven craftsmanship with integrity, ensuring 100% customer satisfaction on every project. Proud to be an Angie's List Super Service Winner for 8 years straight. Call today to schedule your consultation.
Garcia Roofing Kansas City
(816) 286-7387 www.garciaroofing.biz
Serving
5.0 from 196 reviews
Garcia Roofing Kansas City provides professional high quality roofing, siding & gutter replacement and repairs. We also help homeowners with storm damage claims. We will handle all paperwork and communication with your insurance company. This way you can avoid the frustration and confusion that many homeowners experience during the claims process. We provide roofing services for the Kansas City metro area within a 50 mile radius. We never ask for money upfront or a deposit! Only after the work is completed to your satisfaction, will we accept payment for our roofing services rendered. If you're looking for an honest, high quality and reliable company, call Garcia Roofing your Kansas City Roofing Contractor at 816-286-7387
Mr Telhas Roofing
(816) 814-6269 www.mrtelhasroofing.com
Serving
5.0 from 42 reviews
Mr. Telhas Roofing specializes in providing high-quality roofing solutions and expert insurance claims assistance. With extensive experience in the industry, we offer expert installation services for a wide range of roofing materials, including Clay Tiles, Concrete Tiles, Natural Slate, DaVinci Polymer System, Asphalt Shingles, and Metal Roofing. Our team is committed to ensuring your roof is durable, efficient, and aesthetically pleasing. We also specialize in navigating insurance claims, making sure our clients get the full coverage they deserve. Trust Mr. Telhas Roofing for reliable, professional, and affordable roofing services.

Shamrock Roofing & Construction
(913) 850-6556 shamrockroofer.com
Serving
4.9 from 1042 reviews
For over four decades, Shamrock Roofing and Construction has been recognized as the premier roofing company in the Kansas City area, dedicated to delivering outstanding customer care and satisfaction with every project they undertake. Their team of skilled professionals is committed to quality craftsmanship and exceptional service, ensuring that every roof is expertly installed and maintained to provide peace of mind and long-lasting protection for their valued customers.
In this area, window selection should align with the seasonal tempo of storms and temperature swings. For storm-prone springs, choose styles with tight seals and reinforced frames to resist wind-driven rain and hail impacts. Impact-resistant glass or laminated glazing helps limit interior damage from hail and reduces air leakage during gusts. Durable frame materials-aluminum-clad wood or vinyl with reinforced corners-hold up better under freeze-thaw cycles and high summer heat. If you anticipate long windows of hot sun, consider solar control coatings or Low-E glass to curb heat gain without sacrificing visible light.
Spring in this corridor can bring abrupt interruptions to tear-off or window replacement work. Scheduling during a window of mild, drier days helps crews complete installations before the next round of storms. If the weather turns windy or wet, brace for temporary delays and plan a flexible timeline with your contractor. Choose windows with quick-but-reliable installation methods and confirm that the crew has weather-ready protocols to protect exposed openings and interior finishes during a sudden rain cell.
Autumn weather can still deliver wind and heavy rain, which affects scheduling and contractor availability before winter. Aim to lock in a start date early in the season, and build a small contingency into the plan for potential weather gaps. Material stock and crew pacing can become tight as temperatures drop, so confirming lead times for glass and hardware sooner rather than later helps keep the project on track. Consider fall-ready installation sequences that minimize exposure of open openings during storms.
Hot months accelerate material expansion and contraction, potentially impacting seal longevity and operation. If a replacement aligns with a hot-season pattern, select windows with thermally broken frames and robust gaskets designed for high UV exposure. Consider test-fitting hardware and ensuring that operable sashes are balanced to operate smoothly after prolonged sun and heat cycles. A well-insulated unit reduces interior heat gain and can improve comfort during the hottest weeks.
Ask for impact-rated options where local storms are most severe, even if a standard window seems adequate. Confirm that the installation plan includes proper flashing, moisture barriers, and interior trim to resist wind-driven moisture. Window replacements that are staged with siding or roofing work should coordinate with existing weather breaks to avoid repeated interior exposures. Finally, ensure the contractor provides a clear sequence: weather provisioning, seal verification, and functional checks for each operable unit before completion. In this market, purposeful planning around spring and autumn windows helps protect the home from both hail impact and wind-driven leaks.
When you can't wait, these contractors offer fast response times to stop leaks and prevent further damage.
In this area, asphalt shingles dominate replacements because they fit the region's common residential housing stock and remain the most economical option in a hail-prone market. For Mission homeowners, this alignment with typical roof pitches, steepness, and existing underlayment patterns makes installation more predictable and serviceable after spring storms. When choosing shingles, consider selecting a product with a robust impact resistance rating and a strong wind warranty to better withstand the local wind-driven events. A proper installation matters just as much as the product itself; look for a crew that uses correct nailing patterns, adequate attic ventilation, and a secure hip-and-ridge finish to reduce wind uplift risks. After hail or high-wind episodes, a prompt inspection focuses on the condition of most vulnerable areas-edges, valleys, and any previously repaired spots. Asphalt shingles also offer straightforward repair options if a localized area is damaged, which can help keep the rest of the roof intact during winter freeze cycles. For value-driven homeowners, this material ties closely to the surrounding home styles and the typical roof geometry found across Johnson County's older postwar neighborhoods.
Metal is a growing upgrade choice for homeowners prioritizing durability against wind and long-term heat exposure. In Mission, metal can significantly improve resistance to hail impact and thermal expansion, but the installation quality around flashing and penetrations is critical in freeze-thaw conditions. Panels with concealed fasteners tend to perform well, yet proper sealing at all penetrations-vent pipes, chimneys, skylights, and edge details-must be meticulous. If a metal roof is chosen, confirm that the underlayment system is compatible with metal and that the flashing transitions into walls and chimneys are designed to handle the local freeze-thaw cycle without leaking. A well-executed metal install can keep a home cooler on hot days and withstand the Kansas City spring storm sequence, but the long-term performance hinges on careful detailing of joints, vent boots, and chimney head details. For new or replacement projects, metal becomes a durable option that complements the region's evolving home updates while still aligning with typical roof footprints in many Mission neighborhoods.
Tile, cedar, and synthetic options appear in the broader Mission market but require closer review of structural load, repairability after storm impacts, and compatibility with older homes common in this part of Johnson County. Clay tile and concrete tiles bring distinctive aesthetics and solid hail resistance, but their weight can demand structural recalculation or reinforcing. Cedar brings natural insulation and a classic look, but cedar roofs demand more maintenance and can be sensitive to moisture and hail damage, affecting repair options after storms. Synthetic systems offer versatile design choices and often lighter weight than traditional tile, with a potential blend of durability and ease of repair; however, the long-term performance in freeze-thaw cycles depends on the specific synthetic composition and system details. When considering these materials, a careful assessment of attic structure, reroofing retrofit needs, and the ability to repair after a hail event becomes essential to avoid early, expensive iterations.
When Kansas City metro spring storms roll through, Mission feels the impact in a tight labor market that tightens scheduling for full re-roofs and repairs. Hail events can create sudden demand spikes that push contractor calendars and material lead times forward, so planning windows shrink and prices reflect the rush. If your roof is near a threshold for a full replacement rather than a spot repair, expect a tighter window for crew availability and a higher likelihood of price variability between bidding days.
Shingle choices still drive the per-square cost most homeowners notice. Asphalt shingles run roughly $300 to $600 per square; metal roofing can range from $600 to $1,500 per square; clay tile typically lands between $900 and $2,600 per square; concrete tile between $800 and $1,800; wood shingles or shakes from $500 to $1,500; synthetic or composite shingles from about $450 to $900 per square. In Mission, the final price often knots around the chosen roof type, the complexity of the job, and the labor window created by spring storm demand.
Older residences in Mission often require more than a straight tear-off and re-nail. Decking repairs may be needed if the surface shows rot or sag under the old structure. Ventilation upgrades to meet newer airflow standards can add material and labor hours. Flashing replacement at chimneys and along wall intersections is common after hail damage, and correcting code-related items discovered during tear-off can influence both timing and price. These additions tend to push the project toward the higher end of the installed-cost range, especially when labor schedules are tight after a big hail event.
Tight suburban lot lines, limited driveway access, and the need to coordinate cleanup in mature neighborhoods can affect dumpster placement and tear-off efficiency. If the crew must shuttle debris across a narrow drive or navigate a constrained yard, expect incremental increases in disposal costs and duration. In practice, scheduling with neighboring properties in mind can reduce delays; however, that consideration may also mean a slightly higher bid from a contractor who accounts for maneuvering challenges and property access.
Start by getting multiple bids that clearly break out decking repairs, vent work, flashing, and any code-related corrections. Ask for a realistic timeline that accounts for potential storm-demand surges in spring and a contingency for limited access on tight lots. For a full-coverage re-roof, compare the overall per-square price across asphalt, metal, and tile options, but weigh the long-term value of ventilation and flashing upgrades against initial material cost. In Mission, the right choice balances storm resilience, neighborhood access, and the ability to secure timely installation without sacrificing quality.
Get a clear picture of your project costs upfront - no commitment required.

For this city, a full re-roof typically requires a permit through the City Building Department rather than being handled informally. That means your project will sit in a queue with other nearby homes, and the timing of your replacement can hinge on how quickly the permit moves through the system. Treat the permit as an actionable part of the project, not an afterthought, because a missing or late permit can stall work and complicate any storm-related claim processes later on.
Inspections in this area don't happen all at once. City staff will look at underlayment and ventilation during the build, then return for a final inspection when the roof is complete. Contractors need to sequence work to align with these sign-offs instead of treating replacement as a single-visit job. A hiccup in one stage can trigger a re-inspection, which adds delay and potential friction with your insurer if storm damage is involved. Plan staging carefully with your contractor so each phase is ready for review when the inspector arrives.
The city may ask for material specifications and contractor licensing documentation as part of the review. Copies of shingle type, underlayment, venting details, and proof of licensing help keep the project moving. If any item falls short during the review, a failed item can require another inspection before the roof can be closed out. Having these documents prepared in advance reduces the risk of hold-ups and ensures a smoother closeout.
Coordinate with a licensed contractor who understands the local permit timetable and the expected inspection windows. Always keep a copy of the permit card, plan set, and any amendments on site. After storms, especially, verify your contractor's readiness to present required specifications and licenses when the city flags a submission. If plans change, obtain updates in writing and resubmit promptly to avoid delaying the final clearance.
In Mission, repeated hail and wind exposure commonly shows up as shingle granule loss, bruising, lifted tabs, and flashing damage that may not leak immediately but can shorten roof life. You may notice granules in gutters after a spring storm, or small dents on the shingle face. This kind of wear often starts as cosmetic, but over time it undermines the protection layer, invites accelerated aging, and increases the chance of leaks after the next round of storms. Regular inspections after hail events help catch these issues before they cascade into costly repairs.
Winter freeze-thaw cycles in northeast Kansas put extra stress on flashing, sealants, and roof penetrations, especially where prior repairs were rushed after storms. In the attic, you might see dips in insulation or attic condensation that points to compromised seals. Frozen and thawed joints can loosen, allowing water to travel along flashing and under shingles even when the roof looks dry from the outside. If flashing around vents, chimneys, or skylights shows any wrinkling, lifting, or corrosion, damage can quietly progress until a leak finally appears.
Summer heat and UV exposure are especially hard on aging asphalt systems, making brittle shingles and ventilation-related attic heat buildup recurring local concerns. When shingles lose flexibility, edges crack, and tabs lift more easily in the sun, wind can amplify the damage. Attic heat buildup without adequate ventilation also speeds shingle deterioration and can compromise roof deck and underlayment life. Periodic vent checks and a quick interior heat check during hot days help identify problems before they turn into leaks.
Look for unusual attic heat, sudden shifts in interior humidity after warm weeks, or new soft spots along the roof line. Recurrent small leaks or damp patches near penetrations warrant a closer look, as they often signal a slow-but-steady pathway to bigger failures if left unaddressed. Prioritize professional assessments after severe weather to map out targeted repairs before more damage accumulates.
When you can't wait, these contractors offer fast response times to stop leaks and prevent further damage.
When a spring storm hits, insurers in the Mission and wider Kansas City metro market expect a clear storm-loss narrative tied to a specific event. Documentation should show what existed before, what the storm altered, and how the damage aligns with known wind or hail patterns from that date. The goal is to establish a direct cause-and-effect trail for the claim.
In addition to field shingles, capture soft-metal impacts, gutters, downspouts, vents, and collateral exterior damage that supports the storm sequence. Keep a dated file of notable observations: dented vents, lifted shingles, granule loss, and any interior signs of moisture. If you have measurements or notes from neighbors about shared damage, include those as corroborating evidence. Clear evidence linking a storm event to the observed condition strengthens the claim.
Take high-resolution photos from multiple angles, both close-up and wide, within a few days of the event. Photograph attic and crawlspace indicators if accessible (stains, moisture, or condensation). Include the approximate date and weather tag in each file name, and maintain a simple written condition note that references the affected area, material type, and any temporary weatherproofing applied. When possible, time-stamp photos with a recognizable local landmark to confirm the date.
Policy renewals and lapses can matter more in this high-claim region, where some carriers scrutinize replacement requests after repeated hail seasons. Be proactive: call your insurer promptly after detection, and avoid delaying documentation or repairs. If a contractor's assessment differs from the adjuster, present your dated photos and notes to support the narrative.
Connect with contractors who help homeowners navigate the claims process from damage assessment to final approval.
Mission's older housing stock often includes porch roofs, additions, garages, and transitions that create low-slope sections needing different detailing than the main roof plane. Those pockets are common in postwar layouts where a primary steep plane is joined by flatter appendages. In heavy Kansas City rain events, those low-slope patches are the first to show trouble when drainage isn't moving water away quickly or when membrane transitions and wall flashing were not properly addressed during prior remodels. Treat these zones as separate roofing problems rather than an afterthought to the main roof.
When inspecting a roof in this area, start by evaluating the transition seams where low-slope sections meet the main plane. Look for standing water after a storm, edge pooling along drip lines, and any edge or corner that feels soft underfoot. Pay special attention to from-scratch or reworked wall flashings that connect a porch roof or garage roof to the vertical wall. Creases, blisters, or exposed fasteners on the membrane in these zones often signal the need for targeted resealing or a dedicated underlayment strategy. In Mission, these areas can hide leaks until a season of heavy rains reveals the pattern, so plan two visits: a close-up inspection and a broader, weather-driven check after a storm cycle.
Replacement planning should separate the main steep-slope roof from attached low-slope sections because lifespan, leak patterns, and material choices differ. Consider how the chosen materials will interact at the junctions, ensuring continuous water barriers where the porch or add-on meets the primary roof. In practice, this means selecting compatible underlayment, properly integrated flashing, and a drainage plan that guards against water backup in the flatter profiles. Address transitions with attention to edge metal and kick-out flashing to reduce the risk of water migration into wall assemblies. A thoughtful, compartmentalized approach helps extend overall performance and minimizes surprise leaks during Kansas City's spring deluges.
Find specialists in TPO, EPDM, and built-up flat roofing systems for residential and commercial properties.

In this storm-chasing metro market, you want a roofer who can handle more than a quick patch. Look for crews that demonstrate they can navigate city inspections, keep claim documentation organized, and coordinate with your insurer. A contractor with a proven track record of handling repairs alongside the filing and tracking of storm-related paperwork will save you headaches when the city or the carrier requests details or corrections after a storm.
Local hiring patterns show strong demand for crews that can start promptly, manage debris, and complete work with minimal disruption to established neighborhoods. When evaluating bids, ask about typical response times after a hail event, how they stage a cleanup before and after, and how they protect landscaping and driveways during a tear-off. A contractor who can demonstrate a clean, orderly worksite and respectful site practices is well-suited to older postwar neighborhoods common to Mission.
The city's short permit review cycle and potential re-inspections mean you benefit from crews that communicate scheduling clearly and can return quickly if corrections are flagged. Request a documented schedule with milestone indicators: arrival, tear-off, installation, and expected inspection windows. Confirm who will be your primary point of contact and how changes will be communicated. A reliable team will provide updates, hold to the plan, and promptly address any city-flagged issues without leaving you in limbo.
Storm-damage work involves documentation beyond the install. The right roofer keeps detailed records of material provenance, workmanship, wind and hail assessments, and warranty terms. Ask for a written scope of work, a materials log, and a plan for post-install inspections if the city requires re-checks. A neighborhood-conscious crew will treat your property with care, protect adjacent homes, and leave a clear path for future maintenance or quick fixes if needed.
Get a clear picture of your project costs upfront - no commitment required.
A concise audio briefing helps homeowners in this area prepare for the after-storm process. After a regional weather event, the immediate focus is to document damage, understand how quickly to begin assessments, and align replacement timelines with the typical spring peak in the Kansas City metro. The goal is to keep decisions practical: what to inspect, what evidence to gather, and when to engage contractors who can navigate the seasonal surge in demand without delaying critical work.
In this climate, hail and wind are the dominant drivers of roof damage. Look for bruised or dented shingles, lifted edges, granule loss, and cracked sealants around vents and plumbing stacks. Extended wind gusts can peel back flashing and loosen ridge cap material. Photograph areas affected by hail impact, especially on southern-facing slopes where exposure is greatest. Keep a running record of the time, date, and weather conditions when the damage was first noticed, as this helps establish a clear timeline for claims and scheduling with contractors.
Understand that permit timing can influence when replacement work begins. While the long-form guidance sits in the permits section, this overview notes that first-contact materials discussions should acknowledge potential timing constraints, especially after a large storm. Scheduling conversations with contractors may hinge on permit processing windows, inspection requirements, and the availability of crews in a busy spring window.
Seasonal shifts drive contractor availability and material lead times. Spring storms often trigger a surge in claims that can push timelines from assessment to installation. Weather windows matter: dry periods with mild temps help roofers complete underlayment and shingle installation without moisture exposure. Planning for a staged approach-from initial assessment through order placement to final installation-can minimize delays during peak demand.
Before evaluating materials or contractor bids, focus on three Mission-specific factors: whether hail exposure is the primary cause of damage, the likely sequencing of permit steps and inspections, and how spring weather patterns may affect scheduling. With these anchors, you can align expectations on timelines, quality of workmanship, and contract terms when material choices come into play.