Last updated: Apr 19, 2026
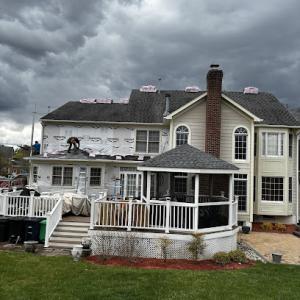
Spring brings quick-moving storm systems and frequent rainfall swings that force you to face leaks sooner rather than later. In this market, active leak response and temporary dry-in timing are practical first concerns for homeowners. The clock starts the moment you notice water tracking under shingles, staining on ceilings, or damp insulation in attic spaces. Waiting for a "better time" can turn a manageable repair into a larger, more costly issue as moisture penetrates deeper and interior finishes suffer.
The local contractor signal mix shows unusually strong demand for emergency repair, storm damage, and insurance-claims help. That pattern isn't random: Lanham projects often begin after a weather event rather than as purely elective replacements. When a storm hits, contractors shift into rapid-response mode, and insurers align with it by requiring timely documentation and assessment. Your roof condition this week can influence how an adjuster views the severity of the claim next month, so acting decisively after a storm improves both peace of mind and the likelihood of a smoother settlement.
Because Maryland carriers commonly require documentation and adjuster review, you need concrete proof before any repairs erase claim evidence. Start capturing date-stamped photos the moment you identify a leak or storm-related damage. Take interior evidence: stained ceilings, wet insulation in the attic,, or the presence of dripping through vents or skylights. If you have prior roof-condition records-photos, service reports, or previous repair notes-pull them together as a baseline. This documentation becomes your leverage when talking to adjusters and your contractor, helping ensure that the scope of work aligns with what the claim can cover.
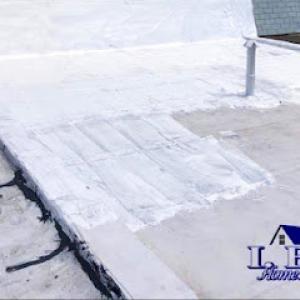
Temporary dry-in is not a cosmetic courtesy-it buys you time to schedule proper repairs or a full replacement without letting interior damage compound. In Lanham's climate, a quick tarp or vented cover over exposed areas can prevent further moisture intrusion during rain-heavy spells. But these measures are stopgaps, not substitutes for professional assessment. Schedule an on-site inspection soon after the storm so the contractor can identify hidden entry points where water travels, such as under shingles around chimneys, skylights, or low-slope transitions.
Storm-driven replacements in Prince George's County hinge on how the claim unfolds. If the damage is widespread, insurers may approve a larger scope, making it possible to pursue a full replacement rather than piecemeal repairs. In that scenario, your readiness-photos, dates, and interior evidence-helps you move from emergency fixes to a coordinated project timeline. A prepared homeowner who can show the progression from storm impact to documented leakage and then to a defined repair plan reduces the risk of coverage disputes and project delays.
Lock in a rapid-response inspection after the next storm, focusing on visible leaks and potential entry points around skylights and low-slope sections. Gather date-stamped photos, interior leak evidence, and any prior roof-condition records you can find. When talking to contractors, ask about their experience handling insurance-adjuster coordination and what documentation they will provide to support your claim. If moisture is actively dripping, prioritize temporary dry-in measures that protect living spaces while you work toward a long-term replacement plan, aligning with the insurer's expectations and the local market's urgency.
Late spring and early fall are the window sweet spots for roof replacements in this area, because you can avoid the worst summer attic heat and humidity while still leaving enough time to complete before winter. In practical terms, plan around the shoulder seasons when temperatures are moderate, humidity is lower, and crews can move through underlayment and shingle installation without rushing. In Lanham, those windows align with more dependable attic ventilation conditions and clearer access to soffits and ridge vents, which helps crews finish with proper airflow and dry-in quality.
Lanham's hot, humid summers can affect underlayment handling, attic working conditions, and shingle installation quality if crews are rushing during peak heat. When temperatures climb, adhesive and asphalt products behave differently, and exposure time increases the chance of moisture intrusion on vulnerable edges. Scheduling tasks to avoid peak heat days reduces the risk of warp, lap damage, or incomplete seals. In shoulder-season work, crews can take longer, methodical breaks, keep materials at stable temperatures, and maintain a cooler, safer attic work zone. If an unexpected heat spike appears, you may need to pause exterior work and complete interior tasks first to preserve overall roof integrity.
Storms in this area can push homeowners toward urgent replacements, but insurance-ready timing benefits from a measured approach. If water has penetrated into decking or rafters, delaying repair can compound deck moisture issues and increase the likelihood of edge damage during winter freeze-thaw cycles. When weather systems threaten, focus on securing a temporary, watertight seal first, then align the full replacement with a controlled window in the mild season. For insurance readiness, document visible damage promptly, gather all necessary photos, and coordinate with your contractor to ensure the replacement plan preserves proper eave and fascia protection, ridge vent integrity, and attic ventilation. In winter, the risk of ice dam-related edge problems rises, so delaying repairs to a milder period is often riskier than pushing for a carefully staged plan that avoids the harshest cold snaps.
Ask your contractor to schedule work during early morning or late afternoon in the milder seasons to minimize attic heat buildup. Ensure the crew has a clear plan for moisture control under decks and roof gaps, including a dry-in procedure that protects plywood and underlayment from unexpected rain. Confirm that attic access is prepared with sufficient ventilation and temporary cooling measures if interior spaces must be worked on during warmer days. Finally, keep a realistic storm-response plan: address leaks promptly, board and tarp if necessary, and coordinate with your insurer to document pre- and post-repair conditions for a smooth claim process.
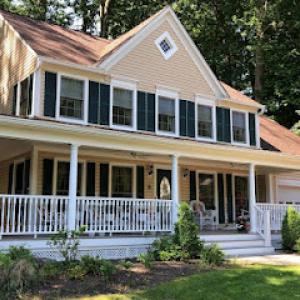
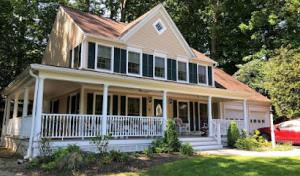
Asphalt shingles are the dominant practical choice for most homes in this area, including typical Lanham roofs. Yet the local mix includes metal, slate, clay tile, concrete tile, and synthetic/composite products, so replacing a roof often becomes a conversation about matching an existing upscale look found on nearby Prince George's County houses. When you're weighing options after storm damage or during a routine replacement, you'll want a plan that preserves curb appeal while standing up to the humidity and seasonal rain that define this climate. The right choice balances familiarity with the roof's architectural character, especially on older homes where a historic appearance matters.
Lanham's humidity and regular precipitation place a premium on how a roof is finished, not just what covers it. Underlayment quality becomes a first-order concern, because a damp spring or a humid summer can exploit even small gaps. Flashing around chimneys, dormers, skylights, and transitions to vents needs meticulous sealing, because those joints are the most vulnerable during heavy rain events. Attic ventilation also plays a critical role: a well-vented attic keeps underside surfaces drier, which protects the decking and helps any roof covering perform as designed. Regardless of whether you choose shingles, metal, tile, composite, or slate, you'll want a ventilation strategy that supports long-term dryness behind the visible roof.
In neighborhoods where older, upscale homes sit side by side with newer builds, the appearance of the roof matters as much as the performance. Slate-look and concrete or clay tile can be attractive options for matching existing lines and textures, particularly when homes already feature a certain weight or color palette. If your project involves replacing an older, character-rich roof, consider how the new material reads from the street and how it layers into neighboring houses. Heavier systems can alter the silhouette of a residence, so attention to detailing at eaves, rake lines, and flashing becomes part of the replacement conversation rather than an afterthought.
Slate, clay tile, and concrete tile bring a distinct look and durability, but they also introduce structural and detailing considerations, especially on older homes with specific roof framing. If you're preserving an architectural look rather than switching to a lighter system, expect to discuss deck-to-structure compatibility, potential reinforcement needs, and the way these materials interact with existing parapets and overhangs. The goal is to maintain the home's character while ensuring a durable, resilient envelope that performs under Lanham's climate and storm patterns.
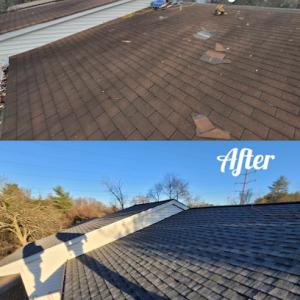
In practical terms, storm-driven leaks require fast, thorough assessment and a plan that aligns with insurance timelines. The strategy centers on sealing active leaks promptly, documenting damage, and coordinating temporary measures with a quality replacement plan. When possible, a repair-focused approach can buy time for a well- orchestrated, insurance-ready replacement that respects the home's architectural language. Your contractor should prepare a written scope that details flashing remediation, underlayment upgrades, and ventilation improvements, so the ensuing claim can move smoothly and the finished roof meets both performance needs and aesthetic expectations.
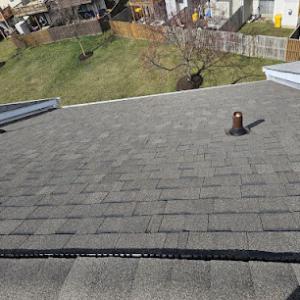
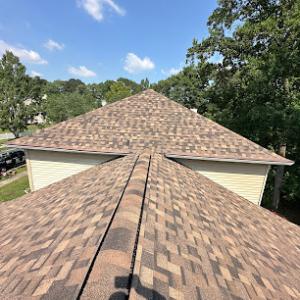
In Lanham, the contractor market shows meaningful demand for both flat-roof and skylight work, signaling that leak-prone transitions beyond the main shingle field show up regularly. The most failure-prone areas on local homes are often low-slope rear additions, porch roofs, and skylight perimeters where heavy rain exposes flashing and drainage weaknesses before the main roof covering fails. The combination of humid summers and repeated wet-dry cycles puts extra stress on edge details, curb connections, and transitions, so minor flaws can become visible leaks long before the shingles themselves give out. Recognizing where water tends to pool or back up helps you catch problems early rather than chasing drips after a storm.
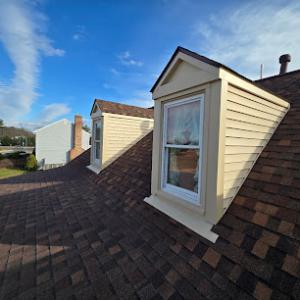
On a standard steep-shingle roof, the real trouble often hides where a low-slope roof meets the house or where a skylight sits atop a protruding curb. Pay particular attention to flashing where a flat or low-slope section ties into a vertical wall, and to drainage around parapets and gutters at the rear additions. In Lanham's climate, heavy rain followed by sun and heat can drive moisture into seams that seemed sealed a season before. Trapped moisture around curbs, wall intersections, and low-slope membranes is a recurring issue if ventilation and drainage details are weak. If you notice condensation, damp staining along the edge of a low-slope surface, or peeling sealant around skylight flashing, treat these as warning signs rather than cosmetic blemishes.
During routine care, run a careful eye along the perimeter of skylights and any rear or porch roof sections after a storm. Look for loose or cracked sealant, lifted flashing, or staining at the transition between horizontal membranes and vertical surfaces. Check attic or crawlspace ventilation near these areas; poor airflow can compound moisture buildup and shorten the life of low-slope components. If you find areas where water sits on a flat plane or where interior walls show signs of dampness near skylights or transitions, plan a professional inspection focused on these trouble spots rather than replacing the main roofing surface first.
Schedule targeted maintenance for low-slope transitions before the next storm season. Ensure flashing is correctly integrated with wall intersections, and that skylight perimeters have continuous, properly sealed flashing with adequate drainage slope away from the curb. Ventilation improvements, such as adding or upgrading soffit and ridge vents in the adjacent attic spaces, help keep moisture moving rather than lingering around curb walls. For porch roofs and rear additions, verify that the flashing is integrated with proper drip edges and that any slope changes direct water toward functional gutters or scuppers. In this market, addressing these details now saves bigger leaks and more invasive repairs later.
Neighborhood Restoration
(240) 502-0996 www.myrooflawyers.com
4200 Parliament Pl, Lanham, Maryland
5.0 from 49 reviews
Neighborhood Restoration is a 5-star Roofing, Siding, and Gutter Contractor serving the DC, Maryland, and Virginia areas. We specialize in Home Roof Inspections and are a trusted local Roofing Contractor. Your trusted partner in preserving and enhancing your home. ⭐️Discover if you qualify for a no out-of-pocket cost roof replacement! 🏡 Call or Text anytime!
MARS Roofing
(240) 820-2483 mars-roofing.com
4301-A Forbes Blvd, Lanham, Maryland
4.8 from 720 reviews
MARS Roofing, previously known as MARS Restoration, is a locally owned and operated Roofing and Siding Company specializing in weather-related damages, with a staff of trustworthy, experienced professionals with years of experience in the industry. We are located in Clinton, MD, taking pride in improving our neighborhoods and communities. We would love to make you a member of our rapidly growing family. Contact your leading Maryland roofing contractor today for a free estimate!

Roofworks
(301) 352-7222 www.roofworksinc.com
9336 Annapolis Rd, Lanham, Maryland
4.8 from 283 reviews
ROOFWORKS is a locally owned and operated roofing contractor. Whether your roof is in need of repair or replacement, you can rest assured you are in good hands with ROOFWORKS. ROOFWORKS, a Maryland roofing company servicing both Maryland and Washington, D.C., is a locally owned and operated company based in Lanham, MD. Whether you are in need of residential roof repair, total roof replacement, residential gutter service, siding repair or installation, or if you need a new roof or almost any exterior home repair, you can rest assured you are in good hands with ROOFWORKS and our roofing services. That's why we're one of the most trusted Maryland roofing companies out there!

Roof First
(301) 536-7240 rooffirstllc.com
Lanham, Maryland
5.0 from 15 reviews
ROOF FIRST: Your trusted partner for top-quality roofing solutions. As one of the state's leading roofing companies, we handle projects of all sizes with unwavering dedication. We deliver exceptional workmanship and professional service, ensuring your roofing needs are met with expertise and care. At ROOF FIRST, we stand behind our name and take pride in every project we undertake, providing you with reliable and durable roofing for years to come.

Home Genius Exteriors
(301) 381-1768 homegeniusexteriors.com
Serving
4.8 from 1887 reviews
Elevate your home with Home Genius Exteriors, setting the standard in Maryland and Washington DC by offering full-service solutions for roofing, siding, windows, doors, gutters and insulation. We support our veterans and communities by supporting local and national charitable organizations through our Home Genius Cares initiative. With an Owens Corning® Platinum Preferred designation, we also offer flexible payment options, industry leading warranties and a wide range of premium products tailored for your home. It’s time for a different experience, entrust your next home project to a genius and schedule your free inspection today!

Construction Pro HQ
(301) 535-0201 constructionprohq.com
Serving
5.0 from 20 reviews
Construction Pro HQ, LLC is a premier construction company specializing in roofing, storm damage, and restoration services in Maryland and Washington, DC. With a dedicated team of professionals, we strive to be the go-to solution for individuals facing challenges finding a Licensed & Bonded Contractor.
Capitol Improvements - Roofing Company & Siding Contractor
(301) 690-8187 www.improveitmd.com
Serving
5.0 from 222 reviews
The family owned and family run team of roofing and siding experts that are consistently rated as the best in our class for replacement roofing, siding, windows, gutters, trim, decks, and door replacements. We provide quality products, expert installation, and lifetime manufacturer backed warranties. All for a fair price.

Exteriormax
(301) 750-3899 www.exteriormax.com
Serving
4.9 from 324 reviews
Specializing in exterior remodeling/storm restoration. Installation of roofing shingles, windows, doors, gutters and siding. No money down. Free detailed inspections. Payment options are available.
FM Home Company
(301) 720-2567 www.fmhomecompanyllc.com
Serving
4.9 from 59 reviews
We are a family business with more than 15 years of experience in the roofing, chimney, and siding industries. Our priority is with our customers, and the quality of our work is our commitment. We treat our customers home like our own with all the responsibility and quality they deserve.
D&V Roofing
(240) 887-7054 www.dvroofingllc.com
Serving
4.7 from 51 reviews
D&V Roofing is a licensed and insured residential and commercial roofing contractor near me serving Maryland, Virginia, and Washington DC. We specialize in GAF roof replacements, storm damage inspections, roof leak repair, and full insurance claim support. Our team provides expert commercial roofing services, including flat roof systems such as TPO, EPDM, and Modified Bitumen, along with large building maintenance, waterproofing, and emergency roof service. If you need a trusted roof specialist for repair, replacement, or commercial flat roofing, call today for a fast and professional inspection. Roofing specialist, comercial roof, Remodelation, siding installation, and gutter replacement.
I. Boyd Home Improvements
(202) 805-6114 iboydhomeimprovement.com
Serving
5.0 from 14 reviews
I. Boyd Home Improvements is a locally owned Home Improvement company specializing in Roofing, Gutters, Masonry Work, Painting, Deck Restoration and much more! We are Experienced, Professional, and know how to get the Job done right!
Mancia Roofing
(240) 665-0050 jmanciaroofing.com
Serving
5.0 from 81 reviews
Mancia Roofing specializes in top-notch roofing in Bowie MD. As a premier contractor, we are dedicated to providing residents and businesses in Bowie with high-quality roofing solutions. With years of expertise, our team ensures durability, aesthetics, and peace of mind for every project. Whether you need a simple repair or a complete roof overhaul, Mancia Roofing is your trusted partner. We use the best materials, innovative techniques, and offer unparalleled customer service. Proudly serving Bowie, our commitment to excellence has made us a household name. Choose Mancia Roofing – where your roof's integrity and your satisfaction are our top priorities.
In Lanham, which is in Prince George's County, a building permit is typically required for a full roof replacement rather than being treated as a no-paperwork job. That distinction matters when a storm-rushed teardown and replacement begins after a leak or wind event, because the permit process adds a formal timeline and accountability to the project. Knowing that helps you plan around weather swings and avoid delays that can stretch into the fall or winter.
The permit application generally includes the project scope and licensed contractor information, so homeowners should confirm before work starts who is actually pulling the permit. It is common for the roofing contractor to handle the submission, but verification is essential. If a different tradesperson or the homeowner themselves is listed as the permit holder, you should expect follow-up requests for documentation, plan clarifications, or additional qualifications. In practice, you will want a clear, written understanding of who is responsible for submitting the permit, who is supervising the work on site, and who will be the point of contact if the county inspector shows up with questions.
A final inspection is required after completion in Prince George's County to verify code compliance, making closeout paperwork and inspection scheduling part of the real project timeline. The inspector will check components such as roof decking, underlayment, flashing, venting, attic insulation, and proper installation details for the chosen roofing system. If your home includes low-slope sections, skylights, or storm-response repairs, expect a closer look at transitions, penetrations, and drainage details. It helps to have the final materials list, warranty information, and any documentation about repairs or previous leaks ready for the inspector.
Scheduling the final inspection should be done proactively as part of the project plan. A typical sequence is: permit is approved, work begins, mid-project inspections may occur if required, and the final inspection is scheduled soon after the contractor believes the roof is complete. If any deficiencies are found during the final inspection, the contractor must address them promptly to avoid hold-ups in closeout. Expect to receive or request a certificate of occupancy-style closeout or other county paperwork once the inspector signs off. Keeping a labeled file with the permit number, inspector notes, and contractor contact information can simplify follow-up questions or future insurance interactions.
Typical Lanham pricing runs about $350-$650 per square for asphalt shingles, $600-$1400 for metal, $1000-$2500 for clay tile, $900-$1800 for concrete tile, $450-$900 for synthetic/composite shingles, and $1800-$3500 for slate. These ranges reflect the mix of steep-slope shingles common to most Lanham homes and the occasional low-slope section, skylight, or heavier material replacement that can push a project toward the higher end. When you're reviewing bids, expect thinner asphalt to land near the bottom and premium metals or tiles to approach the top.
Costs in Lanham can rise when storm-driven demand compresses scheduling across Prince George's County and nearby parts of the Washington metro labor market. If a hail or wind event hits, crews can be scarce and overtime rates may appear on invoices. That pressure tends to elevate lead times and pricing, especially for larger or multi-structure replacements. Plan for potential queue time after a storm, which can shift start dates and logistics in ways that affect overall project value.
Heavier materials like clay or slate bring higher per-square costs, but they also demand specialized installation skills that are more prevalent locally during peak storm seasons. The presence of skylights or low-slope sections adds complexity, which tends to push bids toward or beyond the upper end of Lanham's price bands. If a contractor is recommending a heavier upgrade, weigh long-term durability and wind resistance against short-term budget-storm-resistance often pays off in Prince George's County weather.
Get a clear picture of your project costs upfront - no commitment required.
MARS Roofing
(240) 820-2483 mars-roofing.com
4301-A Forbes Blvd, Lanham, Maryland
4.8 from 720 reviews

Most Maryland carriers will cover valid roof damage claims in Lanham, but adjuster review and documentation are common enough that a proof-heavy process should be expected. When a storm hits, you typically need to document what happened, when it happened, and how the damage developed over time. A careful, organized file helps the conversation with the adjuster and can shorten delays that leave a roof vulnerable during the later, rainier months. The goal is to establish a clear chain of evidence: photos taken soon after the event, a written damage narrative, and any receipts for temporary repairs that demonstrate you attempted to protect the home.
Carriers may ask Lanham homeowners for recent roof-condition documentation and may limit coverage when a roof is near end of life or not updated to current code expectations after repeated storm exposure. If the roof shows widespread aging or prior leaks that were not addressed, the claim may be scrutinized more closely, especially after back-to-back storms. In practice, that means your insurer may focus on the incremental causes of new leaks rather than treating every storm as a fresh start. To avoid surprises, maintain a running record of repairs, replacements, and any inspections that were performed between major weather events. Honest, detailed reports can help align expectations and prevent coverage gaps that occur due to aging materials or non-updated components.
Because Prince George's County requires a final inspection on full replacements, keeping permit and closeout records can help support future underwriting and claim conversations. If a full replacement becomes necessary, ensure your project file includes the final inspection report, contractor notes, and material specifications. These documents can be valuable when a future claim is reviewed or when underwriting questions arise years later. In Lanham, a disciplined approach to record-keeping-photos from multiple angles, dated professional assessments, and a tidy log of repairs-will reduce friction and make the path from storm event to claim resolution more predictable.
After a storm, you're looking for a contractor who can respond fast, protect your property, and clean up thoroughly. In Lanham, the market favors re-roofing with quick turnarounds and debris-included cleanup. When you call, ask how they secure the site during tarping and shingle replacement, how they handle plywood or skylight debris, and whether daily cleanup is part of the contract. Confirm a firm projected completion window and how weather holds affect the schedule.
The local mix of long-established family-owned operators and affordable bidders means price isn't the sole warning signal. Require proof of licensing and current insurance, and verify they will obtain any required permits for the job. Ask for references from recent storm-related work and follow up on those projects' timeliness and thoroughness. A contractor who communicates delays promptly is particularly valuable when storm response timelines tighten.
Manufacturer-certified and warranty-offering contractors are present, but not universal. Before signing, clarify who provides the warranty, what it covers, and for how long. Obtain the exact model and type of roofing material in writing, plus the terms for workmanship. If there are subcontractors, confirm the primary contractor remains responsible for the warranty and for addressing post-install leaks or workmanship issues.
Insurance-driven replacements demand documentation readiness. Ensure the contractor can provide detailed, itemized work plans and a recognized process for documenting storm damage with your insurer. Ask how they coordinate with adjusters, how many crew members will be on site, and how they minimize weather-related interruptions to keep the project on track.