Last updated: Apr 19, 2026
District Heights sits in Prince George's County's inland Washington metro weather pattern, where nor'easters and tropical remnants can bring wind-driven rain without coastal exposure. That means your roof faces sudden, hard rain from storms that whip through the area, followed by rapid temperature swings. There is little shield from those gusts, and a misaligned vent, compromised flashing, or a loose shingle edge can become a moisture entry point fast. In practice, this translates to a higher likelihood of edge leaks after every storm, even when skies look clear just a day before. You should treat any sign of wet attic scent, damp ceiling spots, or stained sheathing as a potential indicator of accelerated moisture intrusion from a recent wind event.
The local climate combines hot, humid summers with cold, wet winters, creating a yearly cycle of algae staining, accelerated asphalt aging, and freeze-thaw stress on older roof coverings. Algae and moss thrive in the humidity, leaving unsightly streaks that mask underlying damage and trap moisture at the roof surface. Asphalt shingles in particular can show accelerated granule loss and edge curl from repeated sun exposure and moisture absorption. In winter, freezing and thawing cycles stress the roof assembly, pushing water into vulnerable areas around flashing, underlayment seams, and valley intersections. When spring temperatures swing dramatically, those micro-fissures can widen, and small leaks can become noticeable inside the home after a heavy rain.
Spring rain anomalies in central Maryland can delay tear-off schedules and make moisture control during replacement more difficult than in drier climates. Wet springs hinder contractor access, extend tarping times, and increase the risk of rain-driven moisture seeping into insulation and decking during removal. This is not a seasonal quirk to ignore; it directly affects how you plan a roof replacement window. If a tear-off overlaps with a period of heavy spring rainfall, expect more careful temporary moisture management-more robust tarps, better sequencing of shingle removal and underlayment installation, and stricter protection of interior spaces.
As a homeowner in this pattern, you should prioritize identifying compromised flashing, loose fasteners, and signs of wear at drip edges and ridge lines after any storm. Regular inspection after the late-winter thaws and the first major spring rain can catch deterioration before it escalates. If algae staining appears consistently, address it promptly to prevent moisture retention that can accelerate underlayment degradation. During replacement windows, arrange staging that minimizes rain exposure, and coordinate with a contractor who understands the region's wind-driven rain dynamics and how freeze-thaw cycles will affect the chosen materials. Your goal is to maintain a tight roof envelope that withstands damp winters and storm-driven gusts, while staying vigilant for moisture that travels from the deck to the attic during unpredictable spring weeks.
Replacement timing matters because winter moisture and freeze-thaw conditions can turn minor shingle defects into active leaks before spring. In this area, late winter and early spring are notorious for damp spells that expose gaps around old windows and let wind-driven rain seek interior paths. The practical takeaway is to plan on replacing windows after the cold snap has passed but before the humidity spikes in late spring. This helps prevent moisture from migrating behind rotted siding or under sheathing during the wet months that follow. For homes with upstairs bedrooms and common living spaces, targeting a window project in the shoulder seasons reduces the risk of chilly drafts while crews are on-site.
Late spring through fall is often the practical target window locally because crews are trying to avoid both winter wet conditions and the heaviest spring moisture disruptions. In District Heights, projects timed for May through September typically allow crews to dry-fit frame, sashes, and flashing with clear weather windows. If a leak is already present after a storm, scheduling sooner is warranted to minimize interior damage, but the best long-term results come from dry, warm days that facilitate accurate flashing and sealant work. Consider aligning interior renovations (paint, trim, and insulation) with the window install so you can complete a weather-tight envelope in one trip, reducing the chance of recurrent moisture intrusion during the fall transition.
After regional storm events affecting the Washington-Prince George's County area, contractor availability and inspection scheduling can tighten quickly. When a recent wind-driven rain or hail event hits, the first priority is a professional assessment to confirm whether window frames, sills, or surrounding siding have suffered structural compromise. If an urgent repair is needed to stop ongoing leaks, address that promptly, then plan the full replacement to coincide with the next dry window. In the weeks following a storm, weather-related delays are common, so it helps to have a flexible plan and a preferred contractor ready to respond as soon as a window of dry weather opens.
Look for a local crew that understands the climate's freeze-thaw cycles and the impact on exterior openings. They should pay close attention to flashing details around corners, heads, and jambs, and have a clear process for sealing against wind-driven moisture typical of heavy rains in late winter and early spring. Ask for a short, transparent sequence: assessment, measurement, product selection, storm protection plan for interior spaces, and a go/no-go date aligned with a dry spell. In this neighborhood, a project timeline that minimizes exposure to late-wall dampness and avoids peak storm periods often yields the most durable results for windows facing the common wind corridors and rain bands.
Get a clear picture of your project costs upfront - no commitment required.

Rapid Roofing & Remodeling
(301) 266-1393 www.rapidroofingandremodeling.com
Serving
4.9 from 161 reviews
Shaw's 1st Choice Roofing & Contracting
(202) 826-2912 shaws1stchoice.com
Serving
4.9 from 31 reviews
JCS Construction
(301) 648-0151 jcsconstructions.com
Serving
5.0 from 13 reviews
Welcome to JCS Construction, LLC, we are a top-rated roofing company in Maryland, proudly serving Laurel and surrounding. Our expert roofing contractors have over 15 years of experience, so you can be assured that everything is done right.
CS1 Remodeling
(301) 873-6514 www.cs1remodeling.com
Serving
4.8 from 190 reviews
CS1 Remodeling is a full-service construction company specializing Roofing, Gutters, Windows, and Home Remodeling/Renovations in the DMV area. Our mission is to satisfy our client’s home renovation needs through excellent service and quality work.

Custom Home Exteriors
(240) 565-8908 customhomeexteriorsllc.us
Serving
5.0 from 22 reviews
Custom Home Exteriors offers residential and comercial roofing, siding, and gutter installation and repairs, with same-day emergency services throughout the DMV area.
Remodeling Solutions
(301) 604-6600 remodelingsolutionsmd.com
Serving
5.0 from 18 reviews
We help homeowners get a new roof through there insurance. If you have wind/hail damage your insurance has to replace your roof. For more information please visit our website or feel free to call us thanks for your time.

Rapid Roofing & Remodeling
(301) 266-1393 www.rapidroofingandremodeling.com
Serving
4.9 from 161 reviews
Rapid Roofing & Remodeling is a family owned business specializing in Roofing, Gutters, Windows & Siding in the DMV area. We offer flexible financing and affordable pricing. Call Today for a FREE Roof Estimate. If you are looking for a roofing contractor you have come to the right place.
TC Dryer Vent & Air Duct Cleaning
Serving
4.9 from 47 reviews
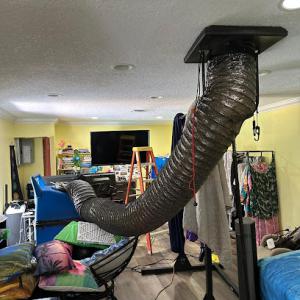
TC Dryer Vent & Air Duct Cleaning And Repair is a trusted and professional company offering comprehensive chimney sweep and repair services in the Clinton area. With a commitment to exceptional customer service and quality workmanship, we are the go-to experts for all your chimney needs. Our highly skilled team specializes in chimney sweep cleaning for residential and commercial properties. In addition to chimney sweep cleaning, we offer a wide range of chimney repair services. Our expertise covers chimney cap installation.
Shaw's 1st Choice Roofing & Contracting
(202) 826-2912 shaws1stchoice.com
Serving
4.9 from 31 reviews
Shaw's 1st Choice Roofing and Contracting is a full-service roofing and contracting company with over 30 years of experience serving the entire DMV area. We offer a wide range of services, from roof, gutter and siding repair and replacement to home remodeling. While we may not be the cheapest nor the fastest, we are the absolute best at completing the job perfectly without any lingering questions or issues. Here at Shaw's 1st Choice, we stand tall in confidence with a A+ rating by the Better Business Bureau. We are dedicated to providing our clients with first-class quality workmanship and superior customer service.

Home Genius Exteriors
(301) 381-1768 homegeniusexteriors.com
Serving
4.8 from 1887 reviews
Elevate your home with Home Genius Exteriors, setting the standard in Maryland and Washington DC by offering full-service solutions for roofing, siding, windows, doors, gutters and insulation. We support our veterans and communities by supporting local and national charitable organizations through our Home Genius Cares initiative. With an Owens Corning® Platinum Preferred designation, we also offer flexible payment options, industry leading warranties and a wide range of premium products tailored for your home. It’s time for a different experience, entrust your next home project to a genius and schedule your free inspection today!
Jet Renovation
(301) 312-0661 www.jetrenovation.com
Serving
5.0 from 233 reviews
Our company, Jet Renovation, is locally owned and operated, proudly serving Maryland, Virginia, and Washington, DC. Since our founding in 2010, we’ve been committed to providing high-quality, reliable, and reasonably priced services. Our dedication to excellence has earned us a strong reputation within the community, thanks to our focus on top-notch materials and skilled workmanship that ensure outstanding results for our customers.
RX. Renovation Xperts
(202) 860-3272 www.renovationsxpert.com
Serving
4.7 from 34 reviews
RX. Renovation Xperts is a local, Washington, DC, home improvement company and general contractor. We believe that our customers should never be taken advantage of – no matter if you’re a business or homeowner.
Neighborhood Restoration
(240) 502-0996 www.myrooflawyers.com
Serving
5.0 from 49 reviews
Neighborhood Restoration is a 5-star Roofing, Siding, and Gutter Contractor serving the DC, Maryland, and Virginia areas. We specialize in Home Roof Inspections and are a trusted local Roofing Contractor. Your trusted partner in preserving and enhancing your home. ⭐️Discover if you qualify for a no out-of-pocket cost roof replacement! 🏡 Call or Text anytime!
Home Matters Exterior Remodel
(301) 850-1572 www.homemattersremodel.com
Serving
5.0 from 15 reviews
Family Owned and Operated We believe in the people we work with and work for. We measure our own teams with not only the pride they take in their work and results, but the measure of respect and integrity they have for each other, our clients, and the project at hand.
Asphalt shingles remain the dominant choice in this neighborhood, and for good reason: they're familiar, affordable, and straightforward to install over a wide range of roof pitches. In District Heights, the humid Mid-Atlantic climate means algae streaking and heat-related aging show up more quickly than in cooler inland markets. That makes it important to pick a shingle with strong algae resistance and good heat tolerance. Look for products with a high solar reflectance or a cool-roof coating option to slow aging during hot summers. A well-installed asphalt roof can also handle the typical wind events that brush through Prince George's County, especially when a roof add-on like upgraded underlayment or improved edge vents is included. If a re-roof is on the horizon after winter moisture and spring winds, asphalt is often the most reliable balance of performance, refresh rate, and repairability for a home that's been lived in for years.
Metal roofing is present locally and appeals to buyers who want a roof that stands up to storms and damp seasons. In practice, however, the material choice has to be weighed against the home's curb appeal and the reroof budget expectations common in this county. Metal can offer excellent wind resistance and long life, but color, profile, and edge detailing matter in neighborhoods where house styles range from mid-century splits to more modern brick facades. When considering metal, plan for proper ventilation and an integrated drainage plan to avoid standing water in heavy rain, plus careful matching with existing trim and roofing planes to avoid a piecemeal look if the house has irregular valleys or dormers. If the roof is aging or previously damaged by wind-driven moisture, metal may be a logical upgrade-provided the budget and aesthetic alignment are clear.
Tile, wood, and synthetic systems exist, but suitability here depends heavily on structure, moisture exposure, and whether the home is an older re-roof rather than a custom build. Clay and concrete tiles bring longevity and a distinctive profile, yet heavy weight and vulnerable underlayment needs can complicate retrofit on aging structures. Wood shingles or shakes offer a classic look but demand meticulous maintenance in humid summers to prevent moisture-related rot and insect pressure. Synthetic or composite shingles can deliver good durability at a lighter weight and lower maintenance than natural materials, making them appealing for homes with limited attic ventilation or tighter budgets for structural upgrades. Before choosing any of these, assess the roof framing, attic moisture dynamics, and the potential need for additional ventilation or drainage upgrades to prevent moisture retention and ensure a long service life.
In this market, pricing reflects the Washington metro labor dynamics more than small-town expectations. Labor availability and regional demand push per-square costs higher than a purely local pace might suggest. When a crew is in demand, you'll see tighter scheduling windows and higher upfront quotes, especially for roof systems that require skilled teardown and careful installation. The reality in District Heights is that you feel the cost pressure not just in materials, but in the time it takes to line up reliable crews who can handle storm-driven wear and mid-winter weather delays.
Because the local market leans heavily toward reroof projects, the job often includes tear-off and disposal, decking repairs, and weather-related scheduling delays. Those elements can account for a larger share of the total than a straightforward new-construction roof. Expect crews to quote for full tear-off in many cases, even when a partial refresh seems feasible, because damaged decking and underlayment issues are common after repeated wind-driven rain and freeze-thaw cycles. Budget contingencies for decking repairs, nail-hematite replacement, and flashing work are prudent.
Storm surges affecting Prince George's County can temporarily raise pricing pressure and extend lead times as quick-response crews get booked across nearby communities. When a significant storm hits, you may see shorter notice windows, higher mobilization fees, and tighter scheduling. If a storm line coincides with your project, you could face a few extra days of weather-related delays and price bumps on rush orders for materials and disposal. Plan for potential weather-induced resets in both timing and contractor availability.
Costs align with the material choice, but the District Heights context adds a premium on top of base ranges. Asphalt shingles commonly run from about 450 to 800 USD per square, with metal roofing at roughly 800 to 1,300, and clay or concrete tiles pushing well above that in the mid-to-high range. Wood shingles and synthetic options sit in between. With tear-off, disposal, and decking repairs, you'll often see the final figure higher than the simple material cost alone, especially when wind and moisture demand rapid response.
Start with a buffer for decking repairs and disposal so you're not surprised by hidden subdeck needs. Schedule reroofs in late summer or early fall when weather tends to be more predictable, avoiding peak storm windows. Get multiple bids and ask each contractor to itemize tear-off, disposal, deck repairs, and disposal fees separately. If a supplier offers bundled pricing, compare it against a staged plan that includes inspection of flashing and underlayment, since those elements commonly drive extra cost after a heavy season.
Don't let upfront costs delay a critical repair - these contractors offer payment plans to fit your budget.
Rapid Roofing & Remodeling
(301) 266-1393 www.rapidroofingandremodeling.com
Serving
4.9 from 161 reviews


In this jurisdiction, a full re-roof typically requires a building permit rather than a stand-alone city roofing permit. District Heights homeowners should anticipate that Prince George's County handles the permit process, not a separate city department. The permit paperwork centers on documenting the scope of work and the materials being installed, so accuracy in describing the planned roof replacement matters. If you skip a permit or mischaracterize the project, you risk delays, fines, or a stop-work order that can stall your project midway through the season.
The county's review focuses on what is being replaced and how the system is described. That means the permit application should clearly specify the roofing type, the number of layers to be removed, underlayment choices, ventilation plans, and any attic or interior work tied to the roof upgrade. Emphasize how much of the existing structure is being retained and how the new system will address the wet winters and humid summers that drive wear here. If you plan to use a material with distinct installation requirements, outline installation steps and fastener patterns so inspectors can verify compliance. A precise description reduces back-and-forth during review and helps ensure the project aligns with county codes and wind-resistance expectations common to our area.
Final inspection is typically scheduled after completion. Timing can vary with county workload and whether the installed work matches the approved scope. To avoid surprises, keep a copy of the approved plan on-site during the job and be ready to show how the actual installation mirrors the permit. A common snag is minor deviations in material type or venting that aren't immediately obvious in the initial submission. If changes become necessary-such as switching to a different underlayment or altering ventilation-update the permit and notify the inspector before covering work. Scheduling early, coordinating with a licensed contractor familiar with Prince George's County expectations, and documenting every step helps prevent delays during the peak replacement window after wind-driven rain or freeze-thaw cycles.
Maryland's insurance environment tends to stay stable, but in this area claim activity tends to spike around regional storm events rather than chronic catastrophe patterns. After a heavy wet winter or a windy spell, homeowners often see a surge in activity that can slow responses if documentation isn't ready. Those winds and rain put stress on roofs that already show wear from previous seasons, so the conversation with insurers tilts toward what actually failed rather than what looks worn. In District Heights, the pattern is clear: the storms drive the need to prove damage, not just to confirm age or appearance.
Insurers serving this area may ask for roof age, photos, and documentation of visible wind or water damage, which matters in a market where many losses follow heavy rain and wind rather than dramatic hail events. When a claim is opened after a regional event, expect requests for dated photos that show the transition from pre-storm to post-storm conditions, plus notes on any interior water intrusion. If the roof already shows loose shingles, lifted edges, or granule loss, have those details ready. Documentation helps anchors the claim in real conditions rather than assumptions about condition prior to the storm.
After severe storms in the Prince George's County area, adjuster workflows can become more centralized, making contractor notes and photo documentation especially important for homeowners. Take time-stamped photos of roof edges, flashing, and penetrations from multiple angles, including attic insulation or ceiling stains that indicate water ingress. Keep a simple log of dates and who inspected the roof, plus copies of any prior repairs. Clear, organized records reduce back-and-forth and help the process move toward a fair assessment more quickly.
With centralized workflows, it helps to provide concise, damage-focused notes that align with your photos. If an adjuster requests access or additional documentation after a storm, respond promptly and assemble references from your roof's recent history-any wind-related impacts, prior repairs, or seasonal wear. A neighborly approach-calm, organized, and factual-often smooths conversations and helps ensure the claim reflects the true impact of the event on your roof.
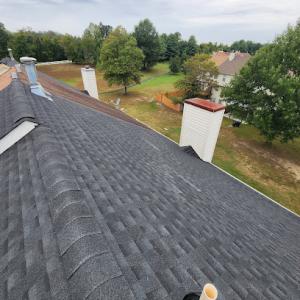
In District Heights, repeated wet-winter exposure makes flashing transitions and roof penetrations especially vulnerable. Seasonal humidity fuels corrosion and swelling at step and chimney flashing, while valley and skylight joints are pressured by both rain-driven runoff and long, damp spells. If flashing around chimneys, vents, and skylights shows lift or corrosion, address it promptly because those gaps invite slow leaks that travel with the ceiling finish before a homeowner notices. Create a quick inspection habit after heavy rains: run a hand along metal flashing for looseness, check sealants for cracking, and watch for dark stains around penetrations that signal moisture intrusion.
Shingle wear is a common District Heights concern due to aging tabs and the region's humid summers. Look for lifted tabs, granular loss, and curling that gathers moisture in the bend of a roof line. Algae and mildew can form dark, slick bands on shaded or north-facing slopes, especially along ridgelines and overhangs where airflow is sluggish. When you spot loose tabs or dark streaking, plan targeted replacement or resealing in the affected bays rather than a full roof refresh. Timely resealing helps extend the life of the remaining shingles and reduces interior staining from slow leaks.
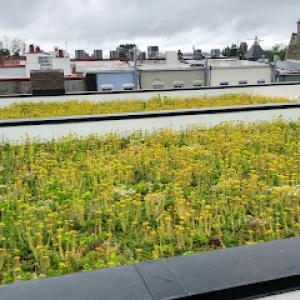
Low-slope sections and add-on areas deserve extra attention locally because standing moisture risk rises when spring rains interrupt drying cycles. Check transition points where old shingles meet newer roof planes, including dormers and porch coverings. Standing moisture tends to linger in these zones, promoting mold growth and underlayment deterioration. Regularly clear debris from low-slope valleys and ensure proper drainage toward established drip edges. If you notice staining on ceilings beneath these sections after a soaking rain, treat as an early warning sign to reflash or reseal.
The local contractor signal mix shows meaningful demand for skylight work, suggesting leak-prone penetrations are a real homeowner concern in this market. Skylight flashing, curb seals, and curb-to-roof transitions are common failure points. Inspect around skylights after heavy rainfall for any dampness along the interior drywall near the light, and check exterior seals for hardening or cracking. When leaks appear at skylights, prioritize resealing at the curb and consider upgrading to higher-quality flashing materials to better resist the wet-winter and humid-summer cycle.
Find contractors experienced in skylight installation, flashing, and leak repairs to bring natural light into your home.

Rapid Roofing & Remodeling
(301) 266-1393 www.rapidroofingandremodeling.com
Serving
4.9 from 161 reviews

In this market, response time after wind-driven rain and freeze-thaw wear can define a project's outcome. The District Heights market favors quick-response reroofing contractors, so homeowners should distinguish between crews optimized for emergency turnaround and those better suited for full-scope replacement planning. A fast crew can stop leaks and secure the structure, but a longer lead crew may deliver a more complete, durable long-term reroof. Knowing which you need helps you avoid delays and misaligned expectations when time is tight.
When a storm hits, look for crews that clearly label emergency response vs. planned replacement. Emergency responders should provide temporary measures, tarp application, and a rapid assessment, with a transparent path to the final roof system. For a full-scope replacement, expect thorough roof removal, deck inspection, and a coordinated timeline. In close-set Prince George's County neighborhoods, debris control is a major factor; ensure the chosen crew has a plan to manage shingle granules, nails, and discarded underlayment without leaving driveways or yards littered.
Cleanup is a major local hiring priority. Ask how daily cleanup is handled, what equipment is used to protect landscaping and neighboring driveways, and who will be responsible for any incidental damage to adjacent properties. A reputable District Heights roofer walks the site with you, documents the work area before starting, and returns to reseal sandwich gaps, gutters, and downspouts during the final walkthrough. Clear expectations on how debris will be contained during windy days can prevent property damage and neighbor complaints.
Long-established, family-owned, and manufacturer-certified firms all have visible presence in this market, giving homeowners a real choice between price-driven operators and credential-focused contractors. Look for firms with factory certifications for the chosen system, a local office or shop, and a track record of projects completed in similar houses and weather patterns. Request referrals from neighbors, and verify licensing and insurance before any signed agreement. This practical vetting helps ensure that the crew you pick meets District Heights' specific storm-resilience needs.