Last updated: Apr 19, 2026
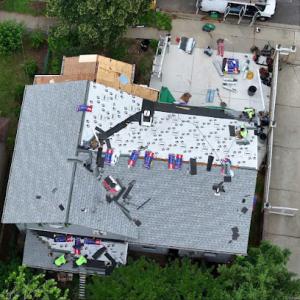
Little Neck sits on the northeastern edge of Queens near Little Neck Bay and the Long Island Sound corridor, where coastal storm tracks and winter nor'easters can push wind-driven rain into vulnerable roof transitions. That wind-driven rain finds gaps around flashing, ridges, and edging where older shingles have curled or aged out. When high winds ride the gusts off the Sound, you can suddenly notice moisture staining along eaves and attic fans. The risk isn't only a leak-it's the structural creep that follows a long season of attic dampness, compromised underlayment, and soaked sheathing. In practical terms, every edge detail, corner seam, and transition into a chimney or vent deserves proactive inspection after the fiercest Nor'easter passes.
The area's cold winters and repeated freeze-thaw cycles make spring and fall the most practical reroofing windows, while winter snow and summer humidity can disrupt installation quality and scheduling. Freeze-thaw cycles stress shingles and underlayment, especially where old layers have thinning granules or soft spots. Spring rain after a harsh winter can reveal uplift failures that quietly developed under snow cover, turning into sudden leaks once temperatures stabilize. Fall reroofing aligns with milder temperatures and manageable humidity, allowing crews to seal flashing, vents, and dormers before the next round of winter weather. If a roof shows granular loss or curling tabs after a harsh season, plan the swap promptly within that window to dodge back-to-back moisture exposure.
Detached homes in Little Neck are commonly exposed on multiple sides rather than shielded by rowhouse conditions, increasing concern about wind uplift at edges, flashing points, and older shingle systems. That exposure means the roof line sees more direct, gusty pressure from passing coastal storms. Edges and valleys require extra attention: ensure step flashing at transitions from deck to wall, verify counter-flashing around chimneys, and confirm dry-to-the-touch underlayment behind any shingles that may have seen heat or moisture stress. When a leak shows up around a chimney or vent boot, anticipate a broader vulnerability across the roof deck rather than a single pinpoint failure. Proactive edge reinforcement and proper sealant compatibility with the existing venting are essential to ride out the next Nor'easter without a repeat failure.
Timing matters because delayed work can collide with the next round of coastal weather. Since winter storms feed on prolonged cold and wind, a rushed mid-winter installation is risky: frozen nails and poor shingle seating reduce life expectancy and invite early failure. Initiate reroofing during the milder shoulder seasons, ensuring protective materials are on site for a reliable seal against overnight lows and sudden gusts. Coastal air carries higher salinity and humidity, which can affect fasteners and sealants. Choose crews experienced with edge details, flashing integration, and wind-barrier compatibility to minimize callbacks after the first Nor'easter or spring squall. If a leak already exists, prioritize temporary measures that keep interior spaces dry while a full replacement is scheduled within the recommended window.
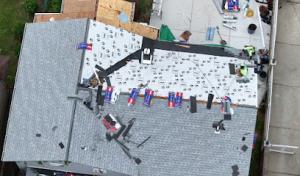
Little Neck features a landscape of detached single-family homes, many with steep-slope roofs designed to shed wind-driven rain and snow off the Long Island Sound. Asphalt shingles, metal, clay or concrete tile, wood shakes, and synthetic shingles are all common choices here. The mix matters because each material has different failure modes when faced with Nor'easter winds, driving rain, and freeze-thaw cycles along the bay. While attached buildings can often share a common drainage strategy, the neighborhood's detached designs mean each roof edge, hip, and ridge often has its own small drainage contour that influences how leaks develop and how replacement projects should be staged.
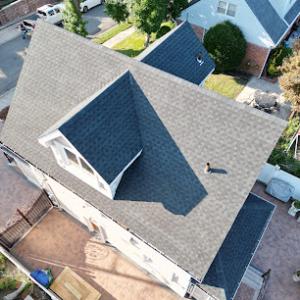
In this market, the junctions where pitched roofs meet flat sections tend to become the most leak-prone zones. Low-slope roof sections over porches, extensions, garages, and dormers create critical transitions that are easy to overlook during routine maintenance. If flashing around a dormer or where a porch roof ties into the main house roof hasn't been sealed properly, wind-driven rain from a nor'easter can exploit micro-gaps and surface rust, then travel into the attic or interior walls. Chimney and skylight interfaces also sit at high risk, because the combination of moisture exposure and daily temperature swings tends to degrade sealants faster than non-skimmed areas. In this neighborhood, chimney crown cracks, crown flashing lift, and skylight curb movement are common trouble spots after a harsh winter or storm season.
Asphalt shingles are ubiquitous and generally durable, but improper nailing near the edges and valley intersections can allow wind uplift and water intrusion, especially where a roof slopes meet a dormer or a parapet. Metal roofing, while resilient to wind, can suffer panel seam failures where fasteners back out or oxide forms at exposed edges, creating slow leaks that migrate to eaves or into attic spaces. Tile roofs-clay or concrete-offer durability in dry climates but can be brittle in cold snaps; freeze-thaw cycles can cause cracked tiles and loosened battens, which then channel water under the tiles during a Nor'easter. Wood shakes are beautiful but require careful sealing around attic vents and along dormer flashings; splitting and cupping concentrate water ingress at the undersides of the shakes. Synthetic shingles can handle harsh weather well, yet improper installation around flashing transitions-especially near dormers and porch overhangs-can still produce leak paths.
Because Little Neck homes frequently combine pitched roofs with flat or low-slope sections, pay special attention to the step flashing along side walls and the boot flashing where roof penetrations occur. The intersection around skylights, chimneys, and dormers deserves a dedicated inspection plan after each major storm. Look for loose nails, puncture marks, or tar streaks that signal compromised sealants. The ridge and hip areas also deserve periodic checks, since windborne debris and abrasive grit can wear through protective coatings on aging materials. When a leak is suspected, tracing it backward to a likely transition point-rather than chasing the water's surface path-saves time and reduces the chance of missing an underlying fail point.
Seasonal checks matter more here because of the coastal exposure. After harsh storms or Nor'easters, clear the edges of the roof quickly for any displaced flashing or loosened fasteners near dormers and skylights. In spring, inspect for tile cracks and for any shingles that have moved out of alignment from winter settling. Prioritize a coordinated inspection of all transition points where pitched roofs meet flat surfaces, and ensure chimneys and skylights have properly sealed flashings and watertight sealants. Maintenance should target preventing minor leaks from expanding into attic moisture issues, which is crucial in the detached-home layout where an attic path often leads directly to living spaces.
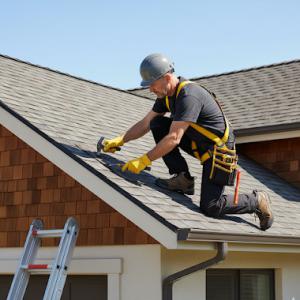
Asphalt shingles remain the most practical and widely used choice for the typical detached roof forms found across Little Neck. The neighborhood's climates-northeasterly winds, winter freeze-thaw cycles, and moisture from the bay side-are well handled by conventional asphalt laminated shingles when installed with proper underlayment and good ventilation. They align with the standard attic and rafter configurations common in these houses, allowing for straightforward flashing transitions around chimneys, vents, and skylights. For many homeowners, asphalt shingles offer a balance of reliable performance, manageable weight, and a straightforward repair path if a leak develops after a nor'easter. The key to longevity here is ensuring roof deck integrity before reroofing, selecting architectural or dimensional shingles for improved wind resistance, and maintaining a solid drip edge and channeling that directs water away from fascia and siding.
In pockets of the northeastern Queens corridor where larger, more custom homes sit on the landscape, clay and concrete tile can create a distinctive, long-lasting roof. Weight and detailing requirements become central considerations in these projects. The structural framing must be assessed to support tile loads, and flashing details around parapets, dormers, and transitions to lower-slope sections demand extra care. Tile roofs can shed wind-driven rain effectively when installed with appropriate base sheets, standoff heights, and compatible underlayment. However, their performance hinges on a well-planned drainage plane and precise integration with gutters and downspouts. If your home fits the profile for a tile installation, anticipate a thoughtful design phase that addresses wind exposure, seismic considerations, and potential maintenance quirks such as cracked tiles after heavy storms. In such cases, long-term durability can justify the effort, but it is not a one-size-fits-all solution for every detached residence.
Wood shingles or shakes carry a classic, authentic appearance that can suit older detached homes and a few hillside or waterfront properties with character. In this area, moisture exposure, freeze-thaw cycles, and local code compliance considerations influence whether wood makes sense as a reroofing option. If moisture control is not achieved through a robust ventilation strategy and a high-quality underlayment, wood can experience faster deterioration in the face of salt spray or humidity common along the Sound. Synthetic or composite shingles offer a more uniform, low-maintenance aesthetic with improved resistance to staining and decay, but still require careful evaluation of compatibility with existing sheathing, ventilation, and warranty expectations. Before selecting wood or synthetic options, assess the roof's ability to shed water efficiently, confirm that flashing details are compatible with wood's movement, and ensure the chosen product meets performance standards for wind and freeze conditions typical of this climate.
Across these material paths, the common thread is detailing for drainage, flashing, and fastener corrosion resistance. Nor'easters bring heavy rain and gusty winds that can stress transitions around vent pipes, chimneys, and skylights. Prioritize roofs with solid underlayment, properly sealed penetrations, and continuous drip edges. For any choice, a thorough inspection of the existing deck structure and a plan for timely replacement-before banner storms hit-supports long-term reliability in this coastal corridor.
The most popular roofing material in the US. Find pros who install, repair, and replace asphalt shingles.
HK Builders: Best Roofing Company in Flushing
(718) 479-8888 hkbuilderscorp.com
Serving
4.8 from 119 reviews
Alb Best Way Construction
(516) 244-0547 roofingalbbestway.com
Serving
5.0 from 75 reviews
ALB BEST WAY HOME IMPROVEMENT is fully licensed, insured, and bonded home improvement and roofing contractor. Specializing in roofing, chimneys, gutters repair, gutters install, gutter cleaning, siding, steps, masonry, skylight, sheetrock and more.
Power Roofing Queens NY
(929) 599-2001 powerroofingnyc.com
Serving
5.0 from 110 reviews
Power Roofing Queens NY is your licensed & insured, family-owned team for roof repair Queens, flat roof, TPO roof, shingle roof upgrades, and same-day emergency roof leak repair. From smart wood-siding installs to seamless rain gutters replacement, we combine top-grade GAF/CertainTeed materials with rapid turn-around and crystal-clear communication. Homeowners and property managers count on our free on-site roof estimates, clean work, and financing guidance to keep projects on budget. Every job is photo-documented, so you get workmanship that lasts through Nor’easters and NYC heat waves. Call today and protect your roof and property with Power that performs.
Supreme Island Roof Repair
(631) 973-6194 supremeislandcorp.com
Serving
4.9 from 36 reviews
With over 25 years of experience serving all of Long Island, we are your local experts when it comes to Roof Repair & Replacement or Installation. Roofing is not our only service we offer to our customers you can count on us for Chimneys, Siding, Gutters and Masonry services too. Get started with your totally Free Estimate by either calling us now or by visiting our website.

Foley & Sons Roofing
(332) 895-1121 foleyroofnewyork.com
Serving
5.0 from 52 reviews
Foley & Sons Roofing has built a reputation for dependable work and genuine care for every home and business we serve. Our family-run team understands how important a solid roof is to your peace of mind, which is why we pay close attention to every detail, from the first inspection to the final cleanup. We handle everything from small repairs to full replacements, always explaining your options and making sure you feel comfortable with each decision. When you choose Foley & Sons Roofing, you get friendly service, skilled workmanship, and a team that treats your property like their own.

HK Builders: Best Roofing Company in Flushing
(718) 479-8888 hkbuilderscorp.com
Serving
4.8 from 119 reviews
HK Builders corporation is well known name in queens for their guaranteed work. We are a top rated in roofing & siding work. From the first nail to the final creative touches our crew will turn your home into a modern, unique, and comfortable place to live. We proudly offer roofing services and siding installation. Give us a call to Schedule appointment. we provide free estimate.

Skyward
(718) 878-6748 www.skywardroofing.com
Serving
5.0 from 82 reviews
Skyward Roofing - Queens is a professional and trusted roofing company catering to the roofing needs of commercial and residential clients. With vast experience, our team of skilled experts offers quality roofing services customized to meet the special needs of every client. From new installations and repairs to inspections and maintenance, we deliver excellent artistry using quality materials and modern techniques. Dedicated to client satisfaction, we ensure timely project completion, moderate pricing, and a commitment to surpassing client expectations. Reliable, trustworthy, and efficient, we are the most sought-after company for roofing needs. Call us or visit our site for more information.
Preferred Exterior
(516) 354-7252 www.preferredexterior.com
Serving
5.0 from 50 reviews
We are a family owned and operated establishment specializing in commercial, industrial and residential roofing and siding. We are certified installers of all major manufacturers. We are fully licensed and insured. Our reputation is built on knowledge, craftsmanship and integrity.


Paragon Chimney & Roofing of Queens
(347) 544-9554 paragonchimneyandroofing.com
Serving
5.0 from 482 reviews
Paragon Chimney & Roofing is dedicated to providing top-quality chimney and roofing services. Our team ensures safety, reliability, and customer satisfaction. Serving New York, we pride ourselves on expert craftsmanship and prompt service. Trust Paragon for all your chimney and roofing needs.
Lucky Stars Roofing
(646) 767-6531 www.callluckystars.com
Serving
4.9 from 56 reviews
"Excellence is written in the stars! For over 30 years, Bonardi Construction has been servicing Queens, NY, and the surrounding areas with reliable masonry, asphalt and more. Now, we have this incredible new division to dedicate completely to roofing! Lucky Stars Roofing offers the same longstanding quality, craftsmanship and top-level service. From replacement and repair to installation, you can count on us to leave you starstruck. Our services include: ● Roof replacement & repair ● Waterproofing & leak repair ● Shingle replacement ● Storm-damage repair ● Gutter cleaning, repair & installation ● Skylight repair & sealing ● And more!"

Reliable Seamless Gutters
(347) 416-0771 reliableguttersroofers.com
Serving
4.9 from 94 reviews
Reliable Seamless Gutters is your trusted partner for professional roofing and gutter services that not only enhance the overall aesthetics of your home but also provide essential protection against the most challenging weather elements. Our team consists of highly trained contractors who take pride in their workmanship and go the extra mile to ensure your satisfaction. We specialize in installing quality gutters and roofing systems tailored to your needs. When you choose us, you can expect a thorough consultation to assess your home and discuss the best options. Our meticulous installation ensures every component fits perfectly for optimal effectiveness and durability. Trust us to provide a reliable roofing and gutter system for years.
Horse GC
Serving
4.7 from 60 reviews
Horse GC General Construction is fully licensed, insured, and bonded contractor. We’re passionate about delivering exceptional construction work. When you hire us, you’re hiring a team of professionals who are trained and skilled to deliver lasting value to your home.
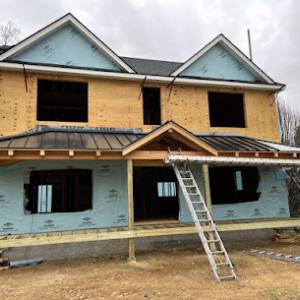
Little Neck sits under New York City's jurisdiction, so a full reroof requires a permit through the NYC Department of Buildings rather than a separate suburban town or village office. The permit process is handled online, and project timing can hinge on DOB review, detailed documentation on underlayment and ventilation, and the sequencing of inspections before final sign-off. That means the moment a contract is signed, work cannot automatically begin; the permit must be issued first, and inspectors will need to check critical steps along the way. Reroof timing often stretches beyond a straightforward start date, especially when the project involves winter storms, coastal winds, or a tight neighborhood schedule.
Plans submitted to the DOB must demonstrate compliance with local fuel and ventilation standards, including underlayment type, nailing patterns, and attic venting. In Queens, the DOB scrutinizes roof assemblies to ensure wind resistance and water management align with city code. Expect to provide drawings or a concise description of scuppering, drip edges, and roof-to-wall transitions, as well as attic ventilation calculations. Documentation gaps are a common cause of delays, so assemble a complete package before submitting online. If the permit reviewer raises questions, resubmission can push the timeline days or weeks. The sequence of required inspections-pre-roof, mid-roof, and final-also adds layers to coordination with crews and any neighbor or homeowner association considerations that sometimes appear in this waterfront corridor.
Because borough-level scheduling realities apply, a contractor cannot assume immediate authorization to commence after signing. Plan around the possibility of staged inspections and weather-related pauses, especially during late fall nor'easters or early spring storms that can stall indoor-outdoor work. The online portal will notify you of each step: permit issuance, inspection approvals, and any additional documentation requests. In this environment, timing hinges as much on City review as on the ability to align weather windows with ladder access and material deliveries. Communication with the contractor should include explicit milestones tied to DOB approvals, so there is a clear road map for progress and potential delays.
Failing to secure timely approvals can leave an aging roof vulnerable to leaks during coastal weather, which in turn risks interior damage and complicated insurance claims. Before work begins, verify the sequence of required inspections and confirm the expected dates with both the contractor and the DOB portal updates. Once the final sign-off is posted, the permit is closed, and the project can be closed out with the city-crucial for any later resale or neighborhood compliance checks.
Costs in Little Neck are influenced not just by material choice but by NYC labor conditions, permit handling, debris removal logistics, and the complexity of detached homes with dormers, chimneys, and multiple roof planes. When a crew has to navigate dormers and skylights, flashing detail around peaked sections, and intersections where two or more slopes meet, labor time and waste disposal can push up the price. In practice, that means a straightforward shed roof will land closer to the low end of the spectrum, while a multi-plane, dormered home with roof penetrations tends to creep toward the higher end. Scheduling around dense city blocks and tight access can also nudge both costs and project duration upward, so timing and logistics matter as much as the shingles themselves.
Asphalt shingles run about 350 to 650 USD per square, metal 700 to 1100, clay tile 1100 to 1900, concrete tile 900 to 1500, wood shingles or shakes 600 to 1100, and synthetic or composite shingles 500 to 900. In Little Neck, the choice often reflects exposure to Long Island Sound, which can heighten underlayment and flashing requirements to resist moisture intrusion. For a typical detached home with two or more roof planes, expect the installed price to reflect both material cost and the extra flashing, trim, and edge work that keep water out at joints and around dormers. The presence of chimneys or skylights frequently adds iterative flashing detail and measures that extend labor time and material usage.
Pricing can rise after regional storm events because demand spikes across the NYC metro area, and Little Neck homeowners often face added cost for detailed flashing work around skylights, chimneys, and mixed-slope sections. In practice, plan for a buffer in both material and labor costs after a major Nor'easter or coastal storm, especially if the job includes replacing or resealing critical flashings and structurally delicate eave lines. Budgeting with this in mind helps avoid last-minute price shocks and aligns timing with the project's moisture-sensitive phases.
Get a clear picture of your project costs upfront - no commitment required.

In this shoreline corridor, wind, hail, and winter storms are a recurring reality when a Nor'easter moves through the bay. Carriers in the broader NYC metro environment expect thorough photo documentation and itemized contractor estimates. For detached homes with more exposure than attached city housing, the adjuster will scrutinize wind-related shingle loss, flashing damage, and leak pathways at roof penetrations. Solid records can tilt the outcome in a homeowner's favor, and poor documentation increases the risk of partial or denied claims.
Before a claim is filed, take clear, dated photos of all roof surfaces, flashing joints, and any visible leak signs inside the attic or ceilings. Capture close-ups of loose shingles, worn sealant, and rusted or displaced flashings around chimneys, vents, and skylights. Keep a dated log of each leak event, noting rainfall amounts if possible and the first day water appeared inside. Because Little Neck homes sit on exposed lots, emphasize conditions after storms and wind-driven debris to demonstrate the exact failure points the claim seeks to address.
Document every step taken to mitigate further damage. Use tarps, boards, or roof cement as a temporary shield and photograph the setup from multiple angles. Save receipts or written confirmations for materials and labor used to cover exposed areas. These records help show responsible stewardship of the home while the claim is being processed, a factor adjusters consider when evaluating potential additional living expenses or interim repairs.
Adjusters will look for clear links between the storm event and the observed damage, plus evidence that the loss is covered under the policy's wind and water provisions. In this high-exposure area, shingle loss, flashing damage, and leak pathways at penetrations often drive the decision. Comprehensive before-and-after documentation, backed by dated leak records and protection measures, strengthens the case when the claim is reviewed.
Connect with contractors who help homeowners navigate the claims process from damage assessment to final approval.
Even where the main house has a pitched roof, many homes in this area have low-slope sections over rear additions, garages, bays, and porch structures. These areas age differently from the primary roof surfaces, so their performance under Long Island Sound weather and northeast winters is not the same. Low-slope sections collect and hold water longer, and seams are more exposed to sun, freeze-thaw, and drifting snow. In practical terms, drainage and seam integrity matter more here than on the steeper main roof.
When you're evaluating whether to restore or replace, start by inspecting only the low-slope portion. Look for softened seam caulk, lifted flashing, and any signs of water staining or dampness at the edges where the addition meets the main roof. If the addition area shows more than cosmetic wear, you may be looking at a localized issue rather than a full-roof replacement. Ensure the evaluation distinguishes between the addition's flat or near-flat surface and the surrounding pitched roof.
Snow tends to linger on flat or low-slope sections, increasing the risk of ice damming at the drainage transitions. Freeze-thaw cycles can push seam materials apart and widen micro-cracks. A practical approach is to confirm that drainage paths from the addition are clear and that any valley or seam transitions are protected with properly aligned flashing. If you notice recurring ice buildup at the edge lines, plan for targeted intervention rather than a broad roof overhaul.
Coating or restoration on the addition area can be viable when the main roof remains sound and the low-slope section shows limited wear. However, the decision hinges on whether the coating addresses only the addition or the entire roof system. If the addition's drainage, seams, and flashing are the weak link, a targeted low-slope repair or a weatherproof coating specifically for that area may suffice. In contrast, widespread deterioration across the attachment argues for a more comprehensive plan that aligns with the overall roof strategy.
Find specialists in TPO, EPDM, and built-up flat roofing systems for residential and commercial properties.
In Little Neck, homeowners are choosing among many contractors advertising quick response and cleanup, so scope clarity and documentation matter as much as speed when comparing bids. When a contractor promises to "take care of everything," require a written scope that itemizes materials, labor, cleanup, and any subcontractors. A clear scope helps prevent unexpected field changes that bite you at the end of a project, especially after a Nor'easter season.
The local market includes many long-established and family-owned operators, which makes proof of licensing, insurance, and written warranty terms especially important when narrowing options. Ask for current copies of business, workers' compensation, and general liability policies, and verify coverage with the issuing agent. Demand a warranty that covers both materials and workmanship, with explicit timelines and conditions. Prefer contractors who can provide references from familiar Little Neck neighborhoods and who stand behind recent repairs similar in climate and roof type.
Because NYC permit and inspection compliance can affect project closeout, homeowners should confirm who handles DOB filings, inspection coordination, and final sign-off paperwork before work begins. Identify the person responsible for submitting required drawings, scheduling inspections, and obtaining the final roof sign-off. A single point of contact reduces miscommunication and helps ensure a smooth closeout, which is especially important when a project spans seasonal weather windows or after a storm event.
Finally, set up a written change-order process. In a coastal climate with exposure to Long Island Sound winds, change orders should require written approval, a revised scope, and a revised timeline. This keeps expectations aligned and protects both sides from scope creep or timing disputes as the project progresses.